General
- P6: Physical Education and Sports File Uploaded 31/07/22, 11:52
- P6: Physical Education and Sports TG File Uploaded 1/08/22, 09:37
UNIT 1: PHYSICAL CONDITIONING AND HEALTHY BODY
1.1. Key unit competence
After completion of this unit, learners will be able to perform muscular exercises and gymnastics movements with flexibility and agility. Learners will be able to demonstrate skills for prevention from infectious.1.2. Prerequisites knowledge and skills
Students will learn better this unit if they are able to perform exercises and games which develop the body and strengthen the muscles of the body: jumping, walking slowly taking short steps
Learners should also be able to perform exercises of rotating and sitting while hands are set forward or back and demonstrate the safe use of different gymnastics equipment.1.3. Cross-cutting issues to be addressed
1. Gender: In teaching-learning process the teacher must provide physical exercises that engage both girls and boys and help them to exploit their full potentials. Teachers should ensure equal participation of both girls and boys during physical activities and equal participation in open discussion.
2. Inclusive Education: In teaching-learning process the teacher must identify the students with special education needs and plan adapted exercises accordingly. Involve all learners in all activities without bias.
Allow a learner with physical disability (using wheelchair) to be a referee, a coach, an assistant, a judge.1.4. List of lessons
Lesson 1 : Motor control
a. Prerequisites
Learners will learn better this lesson if they are able to perform aerobic and muscular exercises with increasing independence and to perform exercises of rotation of different parts of the body: neck, shoulders, knees, vertebral column.
b. Teaching resources
Playground, mat, whistle, rope, lanes, balls, bench, stopwatch, double- decametre/ tape measure, cards etc.
c. IntroductionOpening discussions (in the playground in a semicircle formation)
In this part of the lesson you need to check the readiness of learners, check the sport uniform and give instructions and rules of the game.
• Ask learners examples of previous learnt physical activities which develop aerobic capacities.
• Tell learners to make teams/groups
• Ask learners to choose assistants and determine the limits of the game playing area and to enforce respect of the rules.
• Choose a learner to lead warm-up activities and stretchingWarm-up activities
Learners start by running slowly and steadily around the playground and then they increase the acceleration and speed in a progressive way until they are warmed-up.
Variation of Running:
• Running with high knees
• Butts kicks running
• Running with legs extended• Sideways running
• Backward running
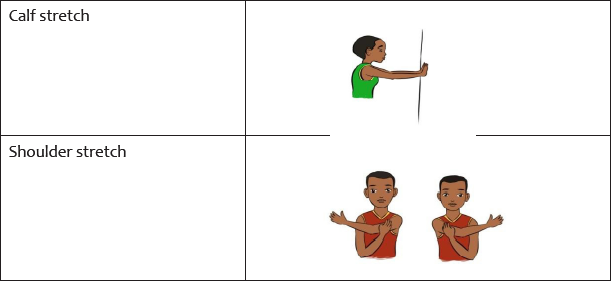
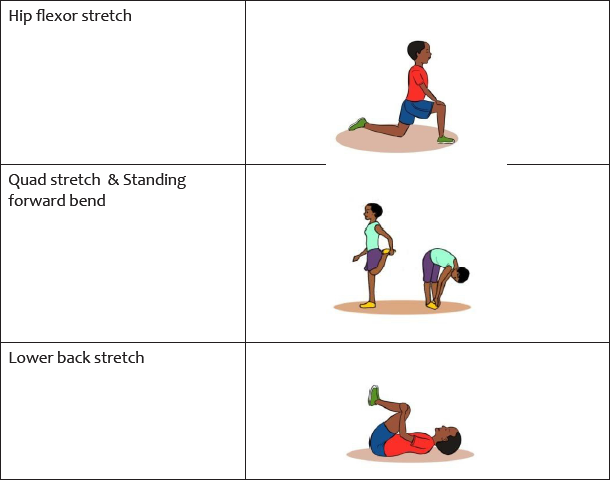
Exercises of stretching (In columns formation not exceeding 6 columns)

The activity of stretching helps learners to well Stretch shoulders, stretch triceps and biceps, stretch wrists, stretch quadriceps, stretch calves, stretch hamstrings, stretch hips, stretch groin, stretch the upper back, stretch the neck, and stretch the jaw.
NB: Never stretch before you warm up.Some stretching exercises to use are given below:

d.Lesson development
In this lesson learners will perform these 4 exercises:
• Running exercises : Help learners increase their physical condition and aerobic capacity,
• Jumping exercises: Help learners increase their coordination ability and muscles strength,
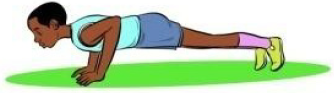
• Push-ups and sit-ups : Increase also muscle strength.
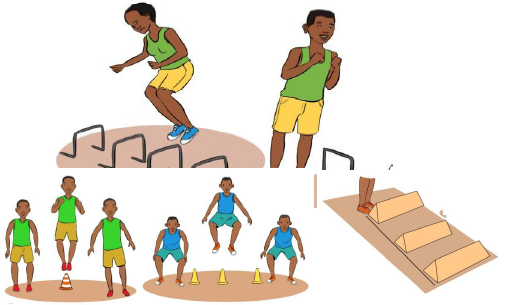
Teams in running exercise are composed by 10 learners. You need to put short (40cm Height) hurdles in lanes for each team. Learners must start by running exercises, jumping exercises, push-ups and sit-ups.
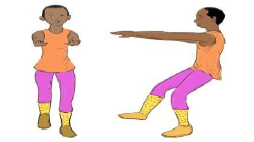
Let learners perform and intervene where necessary especially make corrections for bad body posture in push-ups and sit-ups. Correct body postures and samples are given below.
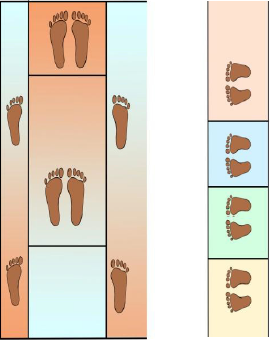
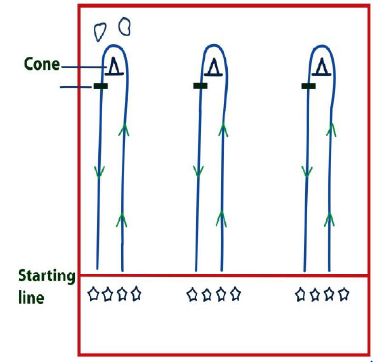
For push-ups and sit-ups, encourage learners to maximise their full potentials.Exercise number 1: Running exercises (150 meters of distance running).

Process
Each team has to run around a course of 150 m (in 8 minutes) (see figure above) from a given starting point.
Each team member tries to run around the course as often as possible in 8 minutes.
The start command is set for all teams at the same time by blowing a whistle.Each member of the team starts with one card (ball, piece of paper, cork or similar) which he/she has to take back to his/her team after each completion of a round trip course, and before starting again, he/she takes a new card or similar and so on.
After 7 minutes, the last minute is announced by another blow of a whistle.
After 8 minutes the completion of the run is indicated by a final signal.Scoring
After having finished the course, all participants hand the collected cards to the assistant who counts them for scoring. Only completed rounds are counted; those which are not completed are ignored
The role of assistants
For efficient organization of the event, at least two assistants per team are required. They are responsible for designating the starting line, as well as for dealing, collecting and counting the cards. They also must record the scores on the event card.
In addition, a starter is required for time keeping and giving the other signals (last minute and final signal).
• Two lanes are necessary for each team: one lane with and the other lane without hurdles.
• The first distance is the hurdle distance and then the team members run the sprint distance as a regular Relay.
• The event is completed once each team member has run both sprint and hurdle distances. The relay is conducted so that the changeover is made with the left hand.Ranking
The ranking is evaluated according to the time;the winning team being the one with the best time. The next teams are ranked according to their finishing time.
Exercise number 2: Jumping exercises
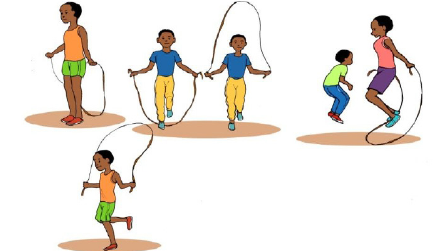
Help learners to perform different types of jumping exercises over an adapted obstacle considering their ability and progression. For variations of jumping exercises, they will jump over a rope, do consecutive tuck jumps... Always check coordination ability and encourage for improvement.
Jumping over the rope techniques
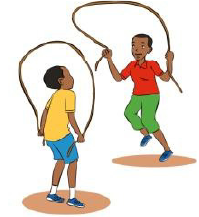
• Feet (together)
• Standing nice and tall
• Elbows in
• Thumbs out
• The rope is on the ground
As learners progress in the jumping over the rope exercise, tell them to increase speed of spinning. Tell learners these variations: side jumps right and left, forward and backward jumps over the rope.Jumping over the bench

Variations: lateral jumps (left, right) forward jumps. The bench or any other obstacle must be adapted to the age and potentials of learners. Doing many repetitions according to learners’ ability.
Successive tuck jumps: doing many repetitions
Exercise number 3: Push-ups

Exercise number 4: Sit-ups

Cooling down exercises
Why cooling down after a Physical Activity ?
Cooling down has several benefits such as: Bringing heart rate and breathing back to normal, prevents fainting or dizziness, prepares your muscles for the next exercise session, remove waste products (such a lactic acid), which can build up during vigorous activity, reduces the immediate post-exercise tendency for muscle spasm or cramping, reduces muscle soreness and stiffness.
In cooling down learners perform the exercises given below. The teacher must ensure that learners take the correct posture and demonstrate the correct body position.Exercise number 1: Low-to moderate-intensity aerobic exercises: walking slowly
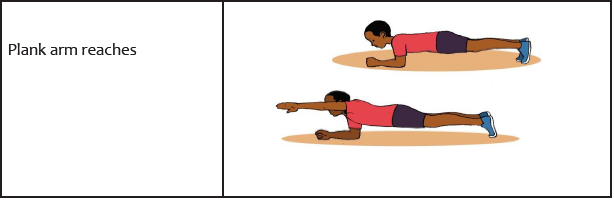
Exercise number 2: Low-to moderate-intensity aerobic exercises: balancing legs and arms in slow movements
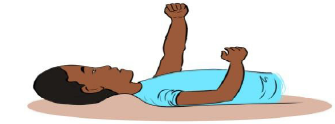
Exercise number 3: Supine shoulder flexion to stretch the muscles of the shoulders and back
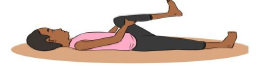
Exercise number 4: Supine hamstring stretch to stretch the muscles of the back of the thighs

Exercise number 5: Side-lying quadriceps stretch to stretch the muscles of the front of the thighs

Exercise number 6: Supine hip flexor stretch to stretch the muscles that flex the hips
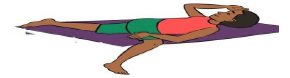
Exercise number 7: Supine spinal twist to stretch the muscles of the trunk and relieve tension in spine
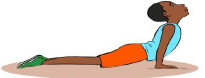
Exercise number 8: Upward-facing dog to stretch the muscles of trunk, pelvis, and hips
Exercise number 9: Downward-facing dog to stretch the entire body, with specific focus on the calves, hamstrings,

Exercise number 10: Stretching your back

Exercise number 11: Stretching shoulders and elbows
Reflection
• How did you feel before, during and after exercises?
• What can you say about the heart rate before, during and after exercises?
• What are muscles were engaged in activities? During push-ups? During sit-ups?
• What were the challenges?
• What are the areas to improve for you?Connection
How do you relate today’s work to your previously learnt physical activities?
Application
• What will you do in your daily life to stay physically fit?
Lesson 2: Body balance and coordination
a. Prerequisites
This lesson will be successful if learners are able to perform different aerobic exercises with increasing coordination, flexibility and balance.
b. Teaching resources
Playgrounds, radio, drums, drum stick, piano, rope, CD player, balls, ladder, stairs.
c. Introduction
Opening discussions (in a semicircle formation)
After checking learners’ readiness to work out, you ask them to give examples of previously learnt physical exercises similar to coordination exercises and exercises of balance.Warm-up activities
Jogging around the playground with rhythmic exercises until they are warmed-up
Exercises of stretching (Use the same as in previous lesson)
Stretch shoulders, stretch triceps and biceps, stretch wrists, stretch quadriceps, stretch calves, stretch hamstrings, stretch hips, stretch groin, stretch the upper back, stretch the neck, and stretch the jaw.d. Lesson development
Below you have examples of coordination and balance exercises and instructions to give to the learners. Learners must perform each exercise by the help of the teacher. Encourage learners to dare performing every exercise. Ladder and stairs exercises can be performed on a rhythmic music if it is available.
Exercises of coordination
Coordination is the ability to choose the right muscle at the right time with proper intensity to achieve proper action.
Exercise number 1: Jumping rope: running in place while spinning the rope, hope on one foot, alternate kicking one foot and cross the rope in front of you.Experiment with different footwork to challenge coordination (e.g.: jumping over the rope after spinning it two, then three times).
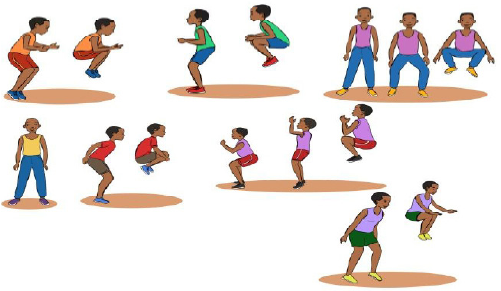
Exercise number 2: Lateral plyometric jumps: Place plyo box 6 inches in front of you. Get into a squat position with your feet about shoulder-width apart. Squat and explode up using your entire body, including your arms.
Exercise number 3. Speed ladder agility drills:
Ladder drills help developing a number of different footwork and movements such as: stride length, speed and agility on the running track.
Variations on this exercises: - Ladder linear run (forward or backward),
• Ladder running with high knees/jumping strides,
• Ladder running with lateral quick steps,
• Backward jumps,
• Lateral single leg hops.Exercise number 4: Plyometrics jump box drills:
Variations: Lateral jumps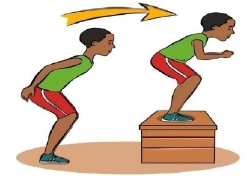
Exercise number 5: - Forward, backward drills
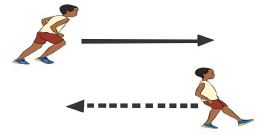
• Tuck jumps

Exercise number 6: Stairs running:
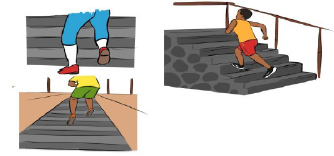
Stairs running help develop a wide range of coordination, agility and speed.
Variations:• Increase of acceleration and speed,
• Linear run (forward or backward)
• Running with high knees/jumping strides,
• Running with lateral quick steps,
• Lateral single leg hops. …Exercises of keeping balance
1. Standing one leg up to 30 seconds. (Repeat with the other foot.)
When you can easily keep your balance for 30 seconds without support, consider adding modifications like these for more of a challenge:
Close your eyes while lifting your foot.
Stand erect and swing the raised foot slowly from front to back.
2. Touching down
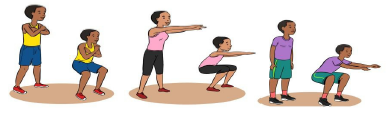
With feet hip width apart, reach out one leg and go down as you are going to tap the floor in front of you, arms straight extend forward. Do not bend your back until you sit on your heel of the back leg.
3.Walk the line (draw a line on the floor)
Place the heel of one foot directly in front of the toes of the other foot so that they touch or nearly touch. Hold your arms out to each side, then begin walking by moving the back foot to the front and placing the heel just in front of the toes again. Try turning your head side to side while you walk for a more advanced version of this exercise.
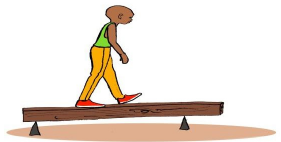
4. Walking on one tree bridge
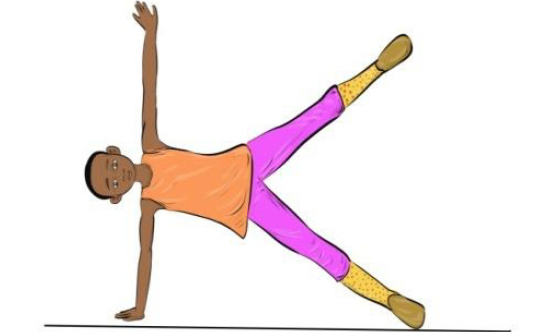
5. Side leg swing
Stand in a side lying position on your right leg and right arm and raise the left leg off the floor. With the left arm extended at your sides, swing your left leg forward, backward and upward. Now, repeat the moves, but don’t allow your foot to touch the ground. Switch the leg and repeat.
Exercises
of cooling down (Same as for the lesson 1)
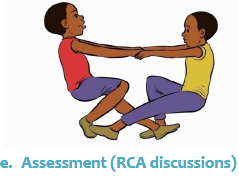
e. Assessment (RCA discussions)Reflection
• What did you noticed as key to a coordinated movement?
• What additional activities to ameliorate balance?• What were challenges?
• What are the areas to improve for you?Connection
Give some examples of previous learned exercises which develop coordination and balance.
Application
How will you use the learnt physical activities in your daily physical exercises and sports?
Lesson 3: Diseases prevention and infectious diseasesa. Prerequisites
This lesson will be successful if learners are able to identify different types of diseases and infectious diseases and their causes
b. Teaching resources
Teaching materials needed are given for each of the three described games.
c. Introduction
Opening discussions (in a semicircle formation)
After checking learners’ readiness to work out, ask them to brainstorm examples of infectious and their methods of prevention.
Warm-up and stretching activities
For warm-up and stretching exercises see lesson 1 of this unit.
Exercises of stretching (Use the same as in previous lesson)d.Lesson development
Game 1: Partners in Hygiene
Objective of the game:
Acquire the knowledge and learn strategies to ensure good hygiene.
A team by team competition that consists in finding out the partner who possesses the same object as that used for hygiene.Materials needed:
A pair of objects used for ensuring hygiene care (for example, 2 bars of soap, 2 tooth brushes, 2 tubes of toothpaste, 2 towels, 2 bottles of drinking water, 2 nail files or 2 clippers, and so on) ,blindfolds: 1 by child, whistle.
Organization and rules of the game:
1. Make groups of 6 to 10 children
2. Make off a small boundary of the playground
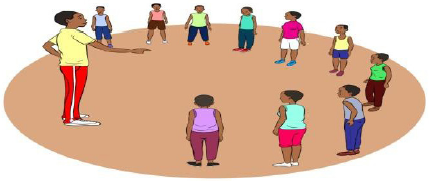
3. Ask 2 or 3 volunteers around the boundaries of the playground in order to ensure that all children are safe (see image).
4. Give every child a blindfold
5. Explain and demonstrate:
• All the children have a blindfold that covers their eyes.
• Every child is given an object that can be used for hygiene (for example a piece of soap, a toothbrush, a tooth-paste, a towel, drinking water, a nail file or a clipper, hard brush or hair brush).
• The objective of the game consists of the children to find out what their object is, and then find the partner who has the same object and stand close to him/her.
• When the children are looking for their partner, they move around the playground saying “I need a partner”.
• When children have found their partners, they move around with him/her saying“I’ve found my partner”
6. The game ends when all the children have found their partners. Children must keep their blindfolds until every child has found his/her partner.
7. Exchange their roles so that other children can play the role of volunteer guards and take other objects used for hygiene.
8. At the end of the game, take time to help children identify what each object is and what it is used for.Points to check
• Do children come to know their object?
• Are children safe while searching for their partners (do they go slowly)?Closing discussion
Reflection
• What is the hygiene routine that you do every day?
• Are any hygiene routines so important than others?
• What can you do to ensure good hygiene for yourself?
• How are those strategies important for good hygiene?
• Why is good hygiene important?Variations
• When all children have found their partners and removed their blindfolds, ask them to explain to the group what their object is used for and why it is important.
• Instead of searching for a partner who has the same object, ask the children to find somebody who has a complementary object (for example, a toothbrush and toothpaste, a bar of soap and water).Game 2: Viruses Protection
Objective of the game:
Acquire knowledge and learn necessary strategies to avoid and treat illnesses and diseases that can be prevented. To make healthy choices all the time.
Summary description of the game
A game in which children form a circle and pass quickly among themselves, sponges and balls which represent the viruses and medicine.
Materials needed:
Water balloons or any ball (you will need to have extra on hand), 10 sponges (or other material that can be easily passed to another player), Prepared questions about viruses, a whistle.
Organization and rules of the game
1. Make groups of 6 to 10 children.
2. Ask each group to sit in circle.
3. Ask children to give examples of viruses
4. Give 2 water balloons and a sponge to each group
5. Tell children “balloons represent viruses, and sponge medicine”.
6. Explain and demonstrate:
• At start of the game, children begin passing balloons and sponge to one another quickly in the circle clockwise.
• When you say “stop”, children who possess the balloons turn around and face the outside of the circle.
• The game continues, with some children sitting facing inside of the circle and others facing outside.
• Children sitting facing outside the circle can turn to face inwards if they get the sponge the next time you say “stop”.
• If children facing outside the circle get the water balloon again, they will be asked a question related to health (see examples of such questions on page J431)
• If a water balloon bursts (or if the balloon drops down), the child holding it must also answer a question related to health.• Children may ask other players to help them answer the question.
• If the children give correct answers, the game continues. If they don’t, the child holding the balloon is given an exercise as a punishment of your choice (for example, hoping, turning around him/herself and touching on his/her toes, and so on). The child may rejoin the group after performance.
• Make sure the children are given feasible punishments and that they do not make them feel ill at ease
7. Ensure that you have extra balloons to replace damaged onesPoints to check
• Do children know answers to the health questions you are asking?
• Do children pass the balloon to one another gently and help one another to answer questions?Closing discussion
Reflection
• When you were holding the balloon (which means that you contracted a virus), what could you do to feel safe once again?
• What could you do in the game in order to answer the question correctly?
• Were some of the questions really easy? Really difficult? Why?
Connection
• Have you ever contracted a virus? How did you feel?Application
• Whom, apart from the group members, can you go to when you have a health problem and you do not know the answer?
• Where do you get medicine in your community when you get sick with a virus?
Variations
• Increase the difficulty of the questions you ask.
• Give more balloons to each group.Game 3: Infection Protection
Objective of the game
Acquire knowledge and learn strategies to avoid illnesses and make regular healthy choices.
A game in which the “virus” chases the “body” and the “immune system” protects the “body”.
Materials needed:
Whistle
Organization and rules of the game
1. Make groups of 5 or 6 children
2. Ask a volunteer from each group to play the role of the virus
3. Ask a volunteer from each group to play the role of the body
4. Tell the remaining members of the groups to play the role of the immune system
5. Explain and demonstrate:
• Children who play the role of the immune system stand around the circle holding one another’s hand.
• The body stands inside the circle
• The virus stands outside the circle
• The virus must try to touch the body; the immune system moves in order to prevent the virus from touching the body.
• When the virus touches the body, the latter falls sick and has to hop on one leg.
• At this time, one member of immune system joins the virus and both try to touch the body
• Whenever the body is touched, a new member from the immune system joins the virus team
• When only one child remains in the team of the body inside the circle, children may restart the game.
• They switch roles, by choosing a new virus and a new body.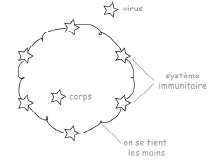
Points to check
• Are the children playing the role of immune system working hard to protect the body?
• Are the children playing the role of the body change their roles when the virus touches them?Closing discussion
Reflection
• How did you feel when you were playing the role of the body?
• What made you worried?
• What made you feel safe?
• Now that you have participated in this game, what do you think is the role of the immune system?Connection
• How does the immune system work to protect our body?
Application
• What can you do in order to make your immune system strong?
Variations
Tell the children that the body has to make an effort to avoid the virus. The immune system must make work hard to protect the body. If the virus touches the body once, the body has to hop on one leg, and a member of immune system team must join the virus. If the body is touched twice, children must change their roles.
Lesson 4: Gymnastics
a. Prerequisites
Learners will learn better this lesson if they are able to perform basic techniques of rolling forward and backward, to perform basic exercises of rotation. They must also be able to perform exercises of stretching the cervical areas, the pelvic guard and scapular guard and of the backbone safely.
b. Teaching resources
Playground or natural grass, carpet, whistles, balance bars, benches, rope etc.
c. Introduction
Opening discussions (in a semicircle formation)
After checking learner’s readiness ask them to show examples of previous learnt exercises of gymnastics movements and discuss on the safety measures in gymnastics. Ask one learner to lead warm-up activities. Intervene where it is necessary to give them a demonstration. Warm-up activities for this lesson are set below.
Warm-up activities
• Jumping rope: Starting slowly, increase speed of spinning as they warm-up
• 10 Jumping jacks: Jumping to a position with the legs spread wide and the hands touching overhead, sometimes in a clap, and then returning to a position with the feet together and the arms at the sides.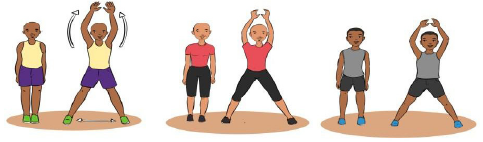
• 10 Body weight squats
• 5 lunges (each leg)

• 10 hip extensions: We are extending our hip anytime we increase the angle between the thigh and the front of the pelvis and that can start from any degree of flexion.
• 5 hip rotations each leg (like you’re stepping over a fence)
• 10 forward leg swings (each leg)
• 10 side (lateral) leg swings (each leg)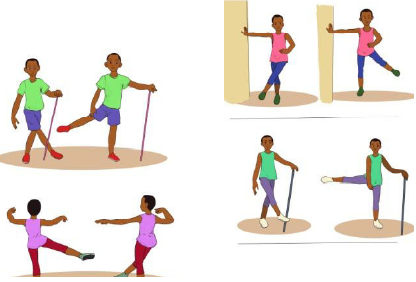
• 10-20 pushups (scale based on level of fitness)
• 10 Spiderman steps (each leg)
Exercises of stretching: in a semicircle formation
The teacher chooses one learner to help classmates to stretch their body after warm-up.
They will use stretching exercises seen in the previous units to: Stretch their shoulders, stretch triceps and biceps, stretch wrists, stretch quadriceps, stretch calves, stretch hamstrings, stretch hips, stretch groin, stretch the upper back, stretch the neck and stretch the jaw.d. Lesson development
Rolling in gymnastics include: backward rolling, forward rolling and wheel round rolling.
For each roll: Tell learners how to execute with explanations for each step and if possible do a demonstration yourself or by the help of a genius learner. Always avoid doing a demonstration if you cannot do better than every single learner. Describe techniques step by step and genius and quick learners will help you to make a demonstration for other learners.Let learners practice based on instructions and provide necessary support
1. Forward Roll

Technical Steps of performing a forward roll
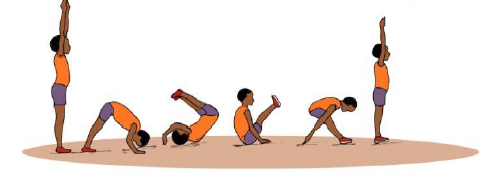
Step 1 Standing on a carpet in a wide open space: A forward roll can be done indoors on a gym mat or outside in the grass. The teacher must look for a flat space where learners will have plenty of free space. Alternatively, learners can do a forward roll on a downward incline and use gravity to help them move into the roll.
Step 2 Getting in starting position: Learners get into a squat position with their feet together. Feet must be placed together and knees bent as they are squatting.
They have to place their hands on the ground in front of them with their elbows bent. Their hands should be evenly spaced at shoulder width.
Alternatively, they can start in an upright standing position with their hands stretched straight over the head.
Step 3. Dropping the head between arms: At this step, tell learners to tuck in their chin. As they move into the roll, they don’t want to place weight on their neck - it should move directly onto the upper back. Tucking in their chin will help ensure that they don’t put pressure on the neck.
Step4. Rolling forward: At this step, tell learners to push over onto their upper back, so that their body rolls forward and the hips are pushed over the head. Tell them to follow the curve of their spine as they roll, keep their back curved and keep their hands in position.
They must not roll from side to side - They must roll straight forward along the spine. Otherwise, they may fall to one side or the other.
Have straight legs and pointed toes. Throughout the roll, legs should stay straight and the toes pointed. Bend the legs only at the end of the roll, when it’s time to stand up. This is the standard positioning for a beginner’s forward roll.
However, some gymnasts prefer to tuck in the legs during a forward roll. If it helps you gain momentum to keep your legs tucked, learners can practice that way, too.Stand without using your hands for support. At the end of the roll, feet are placed flat on the floor and the gymnast move into a standing position without putting his/her hands on the ground. Here you must straighten your legs, then finish upright with your hands over your head.
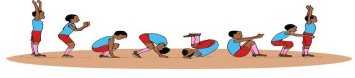
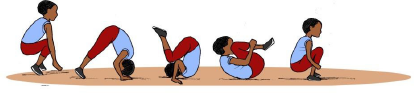
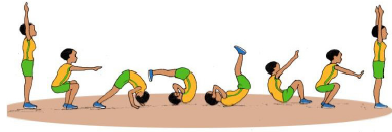
2. Backward Roll
Step 1: Start in a squat position with knees together and back straight, thighs parallel to the floor. Hold your hands out in front of you if you need a help balancing
Step 2: Hold your palms facing the ceiling: Bend your arms close to your body. Place your palms facing towards the ceiling just above the shoulders. Tuck your chin to your chest like you are looking at your bellybutton.
Step 3: Drop your butt: from the squat position, drop your butt down by bending your legs. Push back with your heels. You will start to roll onto your back.
Step 4: Push with your hands and shoulders: As you roll backward, keep your knees tucked to your chest. Roll quickly enough so that you get some momentum. Your weight need to shift from your lower back to your upper back.
Step 5: Straighten your arms: As you straighten your arms, your hips will start to lift up. This will roll your body over your head. Land on your feet.
Develop sequences with others
Two or more learners can start at the same time a forward or a backward roll. They will execute rolling movements simultaneously so as to make beautiful sequences in a team play situation.
Exercises of cooling down
For cooling down, let one learner lead the process. Provide guidance and support where necessary. In cooling down, use the exercises below.
• Tuck up: Lay on your back with your legs and arms flat on the mat. Then, rise up in sit-up position and grabs your legs with your arms. Hold this position for a few second and then let you go, slowly returning to the mat.
• Foot balancing: Hold one foot up in the air behind yourself. Then, focus on one spot in the area and hold the position for several seconds. This not only helps stretch the muscle out, but also helps your mind relax well.
• Touching toes: Stand straight up and the slowly reach down and try to touch your toes with your fingers. You may not be able to reach the toes comfortably, but the goal is to try and reach towards them (Do not force). This helps stretch out the leg muscles.
• Walking: Walking slowly around a track to lower heart rate and help the learners to breath well after work out.e. Assessment (RCA discussions)
Reflection
• What have seen as main skill in doing forward and backward rolls in gymnastics?
• What is more challenging between forward and backward rolling in gymnastics?
• What is common in both rolls?
• What were the challenges in general?
• What are the areas to improve for you?Connection
• Relate this lesson to the previously learned gymnastics exercises.
Application
• Where do you think you can use gymnastics sequences in your daily activity?
1.5. Additional information
In physical conditioning exercises it is better to maximize one’s full potentials. As teacher you need to control passive and slow learners as many of them will show less
Summary description of the game:
A type of game in which learners run around avoiding being caught by a learner who is in the centre. The learner is self-esteemed, self-confident and happy.
Materials needed: A whistle, cone or mark: (1 per team), piece of chalk (something that can be used to draw a starting line).Organization and rules of game:
1. Divide the playground in three zones: a play zone and 2 smaller safe zones (see image).
2. Ask each team to line up inside the safe zone.
3. Tell learners that in this game they are going to play the role of « students ».
4. Ask learners to list different distractions that prevent them from doing their homework. (For example: house hold chores, playing with friends, lack of time, etc.).
5. Ask a volunteer to play the role of « distraction ».
6. Explain and demonstrate:
• The learner who plays the role of distraction positions him/herself inside the play zone.
• He/she tries to catch students as they run across the play zone towards the safe zone.
• Make sure that learners touch one another gently.- When the learner who is playing distraction is ready for learners to run across, he/she shouts out
- « It is time to do homework! ».
- motivation in some activities.
1.6. End unit assessment
• Set exercises for learners of rolling forward and backward to evaluate their level of achievement from different departure positions.
• Set muscular development exercises: push-ups and sit-ups
• Set various running exercises to evaluate aerobic capacity (sprints, resistance and endurance running)
• Prepare a competition and if possible reward for best performers.1.7. Additional activities
• Encourage learners to participate actively in mass sport in their villages
• Encourage learners to organize recreational sports activities in their villages during weekends and holidays with their neighboring learners
Exercises and games of developing patience, pardon and happinessa. Title of the game: Students crossing
Objective of the game:
Develop self-esteem and self-confidence, happiness and pardon
Summary description of the game:
A type of game in which learners run around avoiding being caught by a learner who is in the centre. The learner is self-esteemed, self-confident and happy.
Materials needed: A whistle, cone or mark: (1 per team), piece of chalk (something that can be used to draw a starting line).Organization and rules of game:
1. Divide the playground in three zones: a play zone and 2 smaller safe zones (see image).
2. Ask each team to line up inside the safe zone.
3. Tell learners that in this game they are going to play the role of « students ».
4. Ask learners to list different distractions that prevent them from doing their homework. (For example: house hold chores, playing with friends, lack of time, etc.).5. Ask a volunteer to play the role of « distraction ».
6. Explain and demonstrate:
• The learner who plays the role of distraction positions him/herself inside the play zone.
• He/she tries to catch students as they run across the play zone towards the safe zone.
• Make sure that learners touch one another gently.
• When the learner who is playing distraction is ready for learners to run across, he/she shouts out
• « It is time to do homework! ».
• Students then try to run across the play zone without getting caught.
• Once they have reached the safe zone, they cannot be caught.
• If a child is caught, he/she joins distractions and helps in catching others.
• Continue to play until all students have joined the team for distractions.
7. Restart the game by choosing another volunteer to play the role of distraction.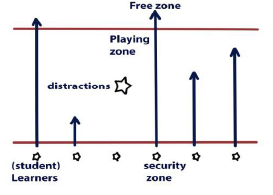
Points to check
• Do children run across the play zone when the child who is playing the role of distraction shouts « It is time to do homework! »?
• Do children who are caught join distractions?Closing discussion
Reflection
• How did you feel when you were playing distraction?
• When did the game become very tough for students? Why?Connection
• Is there a time your friends wanted you to do something that prevented you from doing what you had to do?
• Was it difficult to refuse? Why?Application
• How can you prevent your friends from compelling you to do something you do not like?
Variations
• Ask children to dribble a ball in the play zone without getting caught by the child playing the distraction.
• Children who are caught by the distractions hold one another in hands and try to catch others.b. Title of the game: Say it without words
Objective of the game:
Develop and encourage self-expression and creativity.
Summary description of the game:
A team challenge in which children try to guess the activity that one of their colleague is miming in silence.Materials needed:
Cone or mark: (1 per team), Piece of piece of chalk (something that can be used to draw
a starting line), A whistle.Organization of the game:
1.Draw a clear starting line.
2. Make teams of 3 to 6 children.
3. Ask each team to line up behind the starting line
4. Position a cone or a mark at the distance of 3 meters from each team (see image).
5. Explain and demonstrate:
• It is an activity of relay race.
• The first child of each team (A) must hop to the mark, choose one of his/her preferable activities and mime it in front of his/her teammates (for example: football, the kitchen, reading, dancing, etc.).
• Children must only use gestures miming their activities; they are not allowed to speak.
• Each team must collaborate to guess their teammate’s activity.
• Once team A has guessed the activity, child A can join his/her team. The second child, B, then starts. When B arrives at the mark, he/she must first mime the activity of child A before miming his/her own activity (for example, if A has mimed a match of football, B mimes a match of football first, and then his/her own activity).• The third child, C, mimes activities of A and B, then his/her own activity, and so on.
• That means that the last player of each team must remember all activities of his teammates.1. Decide when to end the game.
Points to check
• Do children manage to guess the activities?
• Do they work in teams?Closing discussion
Reflection
• What activity did you like to mime? Why?
• What are your favourite activities in life?Connection
• In which situation did you have to express yourself without using words?
Application
• When you can’t use words, what else can you do to make yourself understood?