UNIT 2: ATHLETICS
Key unit competence: Develop technical and tactical skills of throwing and
apply rules and regulations of throwing.
2.1 Prerequisite (Knowledge, skills, attitudes and values)
Students of senior six will learn better athletics throws techniques and rules if
they can perform motor control, body control and balance learned in Secondary
School ordinary level.
2.2 Cross-cutting issues to be addressed
Gender: In teaching and learning of athletics throws, the teacher must prepare
and provide physical activities that engage both girls and boys equally to exploit
their full potential and talents without any discrimination or prejudice.
Inclusive education: The teacher as a facilitator he/she must consider
different special education needs and select physical activities to adapt his
teaching approaches to all students. This creates a positive attitude and helps
all learners to participate actively and develop their competence levels.
Financial education: The teacher should integrate Financial Education into
his teaching/learning activities by providing the local and no cost teaching
material where is possible. He/she must encourage students to make their
own materials that can help them to develop competences not only in sport at
school but also in their daily life.
Standardization culture: The teacher must choose and select the standardized
materials to use in his/her teaching/learning process. It is necessary to provide
appropriate materials required to the levels of students and help them to
develop culture of checking and using the quality of sport materials for the
competitions before to use them in order to prevent injuries and other accident.
Environment and sustainability: The teacher should provide materials and
deliver the lesson with encouraging students to protect the environment and
well use of materials. The teacher helps them to develop the spirit of keeping
safe the environment they use in sports activities.
Peace and values education: The teacher helps students to develop fair play
and social values by planning physical activities that Avoid violence and conflict
in the game and by setting clear and relevant instructions. He/she should
provide the activities that help students to develop their competence peacefully.
Comprehensive sexuality education: A teacher provides physical activities
and sets instructions that prevent sexual harassment, any kind of gender based
violence like sexual abuse and physical contacts oriented to the sexuality
intention.
Genocide studies: While conducting athletics throws activities a teacher
should take a time to explain students how sports should be used to fight against
Genocide ideology and how to prevent it. For example, to organize Genocide
memorial tournaments at school and give the message related to the Genocide.
2.3 Guidance on introductory activity
Before introducing the lesson one of this unit, teacher must introduce the whole unit.
The teacher as a guide, facilitator and expert, ask questions or give activity
related to athletics in order to help them to predict what to be learnt in the wholeunit.
2.4. List of lessons/sub-heading
Lesson 1: Shot put techniques and tactics exercises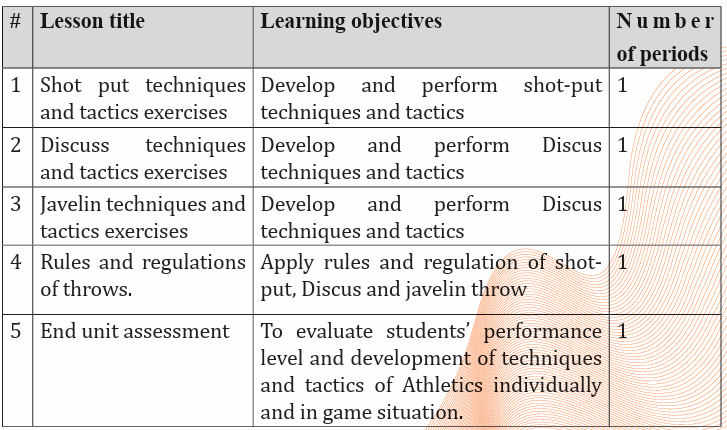
a) Learning objective
Develop and perform shot-put techniques and tactics.
b) Teaching resources
Cones, Whistle, Internet, Laptop, Projector, Field/playground/throwing area,
watch, decameter and shot put (for men and women).
c) Prerequisites/Revision/Introduction
Students of senior six will learn better techniques and tactics of shot putting in athletics
if they have developed basic techniques of shot putting in Ordinary Level and
have performed basic physical exercises.
d) Learning activities
Opening discussions
– Ask questions related to different types of athletics learned in senior four
and five.
– Introduce the lesson of the day by asking questions on techniques of shot
putting learned in ordinary level.
– Invite students to start warm up exercises.
Warm up exercises and stretching exercises
Let students perform general warm up exercises and specific warm up based
on the most body’s parts to be used while performing techniques of shot put
and stretch their muscles properly.
e) Lesson body
Activity 2.1
Explain and demonstrate to the students that during shot put, the following steps
are respected:
1st step: Holding a shot put
– Applying to grip the shot put.– Placing parallel fingers and slightly speed.
2nd step: Neck placement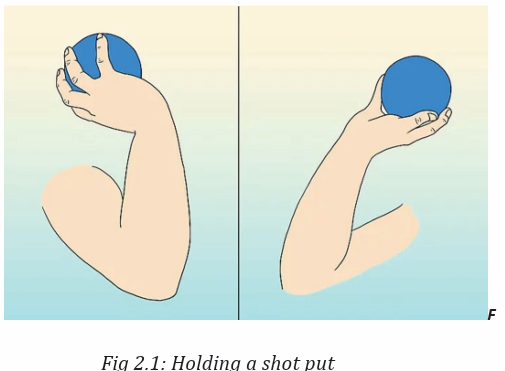
– Raise the shot above their head.
– Push the shot into their neck.
– Holding the shot on the front part of the neck.
– Lift elbow parallel to the floor.
– Check to see that their thumb is pointing down towards their clavicle.
– The palm keeps pointing towards the throwing direction.
3rd step: Preparation
– Carrying out start upright at the rear of the circle.
-Back to the stop board.
– Bend trunk forward parallel to the ground.
– Supporting the leg bent.
-Make free leg drawn towards the back of the circle.
4th step: Gliding
– Gliding off the right/left foot to its heel.
– Placing it in the center.
– Coordinate landing feet simultaneously.
– Land left/right foot on the ball.
– Maintain landing feet on the ground.
5th step: Rotation/deliver/recovery
– Execute preparation with non-support and maintain foot placement.
– Deliver shot put with increasing power position, accelerate and make final
– arm movement.
– Make recovery by changing legs quickly after the release by bending right
– leg, lowering upper body.
– Swing the left/right leg backwards and keep eyes look down.
Shot putting styles
There are two styles, which are currently used in shot put competition:
– The glide.
– The spin (rotational techniques).
Activity 2.2
Let students perform techniques of throwing shot put individually using
glide style by making many trials in order to be familiarized with shot put
throw, try to keep security while throwing by giving enough space to the
thrower in order to avoid accidents.
Activity 2.3
Let students perform techniques of throwing shot put individually using
rotational style by making many trials in order to be familiarized with shot
put throw, try to keep security while throwing by giving enough space to the
thrower in order to avoid accidents.
Application Activity 2.1
Let student teachers perform techniques of shot putting individually
using the style of their choice and record their performance to show and
evaluate their own progress. They can do this activity in a small competition.
Remember to give enough space to the thrower in order to avoid possible
accident, which may occur during throwing.
Cool down exercises
Ask students to make sure that their muscles are stretched after throwing a shot
put. To stretch shoulders, stand straight and lift your arm, holding it straight
Closing discussions (RCA)
and parallel to the floor, and gently stretch it backward, which will extend your
arm behind your shoulder. Hold the position for 30 seconds, then repeat the
exercise on the other side.
Reflect
– What are challenges/benefits did you face while performing exercises of
shot putting?
– How did you proceed in order to perform techniques of that throw?
Connect
– In which conditions do you need throws like shot putting?
Apply
– What is the usefulness of shot putting?
– How will you use skills of shot putting in your daily life?
Lesson 2: Discus techniques and tactics
a) Learning objective
Develop and perform discus techniques and tactics.
b) Teaching resources
Cones, Whistle, Internet, Laptop, Projector, Field/playground/throwing area,
watch, decameter and Discus (for men and women).
c) Prerequisites/Revision/Introduction
Students of senior six will learn better techniques and tactics of discus throw
in athletics if they have developed basic techniques of discus in Ordinary Level
and have performed basic physical exercises.
d) Learning activities
Opening discussions
– Ask questions related to different types of athletics learned in senior four
and five.
– Introduce the lesson of the day by asking questions on techniques of discus
learned in ordinary level.
– Invite students to start warm up exercises.
Warm up exercises and stretching exercises
Let students perform general warm up exercises and specific warm up based on
the most body’s parts to be used while performing techniques of discus throwand stretch their muscles properly.
e) Lesson body
Activity 2.4
Explain to the students that the discus throw is divided into four main phases;
Gripping the implement, Foot placement, the power position, and release and
recovery.
Phase 1: Gripping the implement
Request students to:
– Make preparation by holding the discus.
– Face back to the throwing direction.
– Bend knees slightly.
– Keep the weight on the balls of the feet.– Keep arms nearly to the shoulder height
Phase 2, 3 and 4: Foot placement, power position, release and recovery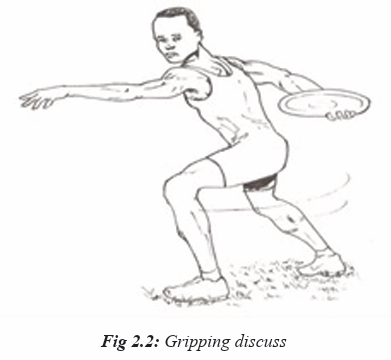
Request students to:
– Make preparations with non-support.
– Provide support and maintain momentum.
– Deliver by the maintenance of power position (the right toe should clear
past the left foot before the athlete starts the sprint to the middle.
– The left leg should stay low and fixed, ready to push off toward the front of
the circle the left arm will remain inside the knee and with the shoulders
level to help keep the body on balance) and acceleration.
– Recover with changing legs quickly after the release.
– Bend right leg and lower upper body.– Swing the left leg backwards and keep eyes look down.
Remind students that the influence on discus distance are the following: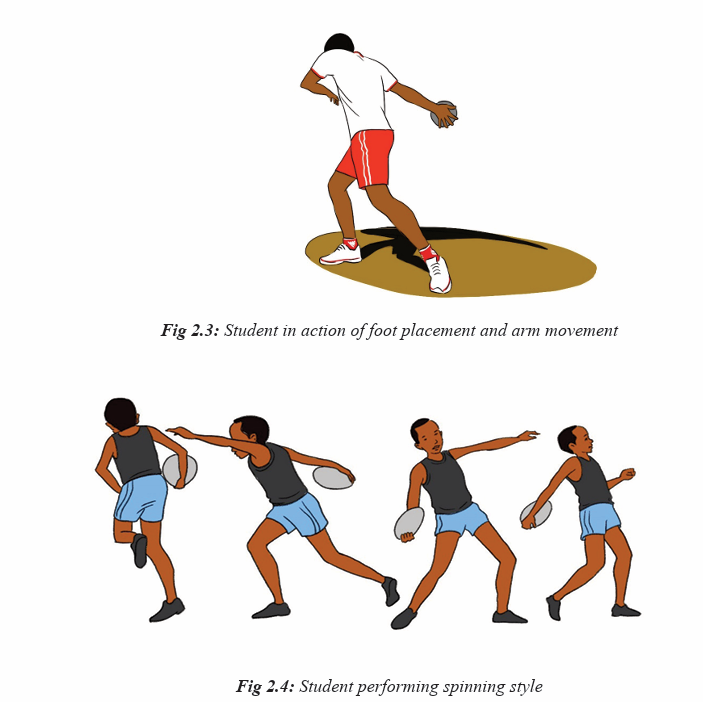
– Velocity of the discuss at release.
– Angle of release.
– Attitude angle or angle of tilt at the release.
– Wind direction and velocity.
Activity 2.5
Let students perform techniques of throwing discus individually by making many
trials in order to be familiarized with discus throw, try to keep security whilethrowing by giving enough space to the thrower in order to avoid accidents.
Application Activity 2.2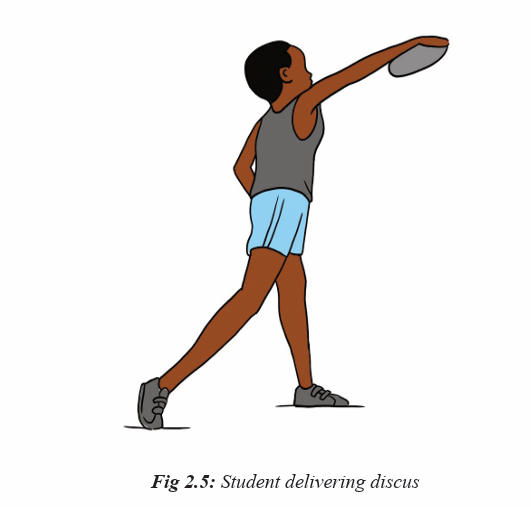
– Let students perform techniques of throwing discus individually and
record their performance with evaluating their own progress.
– They can do this as a small competition. Remember to give enough
space to the thrower in order to avoid possible accident, which mayoccur during throwing.
Cool down exercises
Let students do light exercises and stretch their group of muscles by insisting
on most used parts. Guide them while stretching their muscles systematically.
Help them/demonstrate/correct where is necessary.
Closing discussion
Reflect
– What are challenges/benefits did you face while performing discus throw
exercises?
– How did you proceed to perform those exercises?
Connect
– In which conditions do you need throw like discus?
Apply
– What is the usefulness of discus throw?
– How will you use skills of discus throw in your daily life?
Lesson 3: Techniques of throwing javelin
a) Learning objective
Develop and perform Discus techniques and tactics.
b) Teaching resources
Field/playground/throwing area, Watch, Whistle, Decameter, Javelin (for men
and women).
c) Prerequisites/Revision/Introduction
Students of senior six will learn better techniques and tactics of throwing
javelin in athletics if they have developed basic techniques of javelin throws in
Ordinary Level and have performed basic physical exercises.
d) Learning activities
Opening discussions
– Ask questions related to techniques of throwing javelin learned in ordinary
level.
– Let students answer questions, support them where is necessary and
introduce the new lesson.
– Invite students to start warm up exercises.
Warm up exercises and cool down description
Let students perform general warm up exercises and specific warm up based
on the most used body’s parts to be used while performing techniques of javelin
throwing and stretch their muscles properly.
e) Lesson body
Activity 2.6
Teacher starts the lesson by explaining students that throwing javelin consist of
the 4 phases:
Phase 1: The grip phase
Explain students that there are three types of grips in throwing javelin such as:
i) The American grip:
The thumb and the first two joints of the index finger are behind the cord.
ii) The Finnish grip:
The thumb and the index finger are behind the cord, while the index finger
supports the shaft. The extended finger assists the rotation of the javelin during
delivery.
iii)The V grip:
The javelin is held between the index and middle fingers behind the cord.
The position of the fingers assists the throwing arm in staying at shoulderheight during the approach.\
Individually, let students perform how to grip javelin by using three grip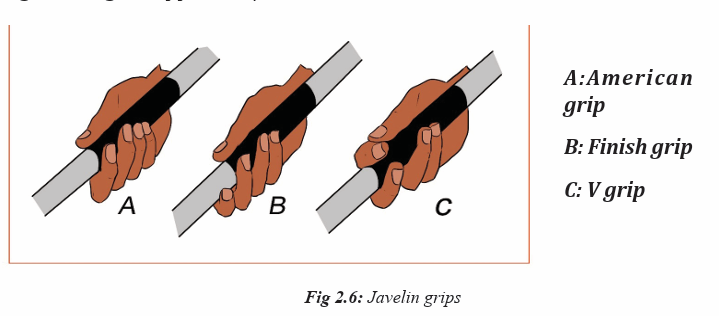
Methods.Phase 2: approach run up and carry
During the approach run up phase, remind students to measure their stridesas follow:
Remind students that:
– They must carry javelin at head height with their arms bent, their elbow
pointing forward.
– Their palm of hand must face upwards to facilitate the wrist and shoulder
to relax, and have an easy running movement.
– Must keep their shoulder parallel to the run up.
– Must keep their hip high with body weight carried on the ball of the foot.
– Must have the javelin lined up approximatively parallel to the ground.
– They have to increase constantly to the maximum controllable speed.
Activity 2.7
Let students perform approach run individually. During practice of run up ap
proach, remind them to:Put a clear marker where five steps rhythm start to indicate student ’s the area.
– Continuing to increase constantly to the maximum controllable speed
by avoiding lengthening the stride.
Tell students to do the following during approach run up and carry:
– Holding the javelin over the shoulder horizontally.
– Maintaining the top of javelin at head height.
– Holding the arm steadily with increasing running speed.– Accelerating until reaching the optimum speed.
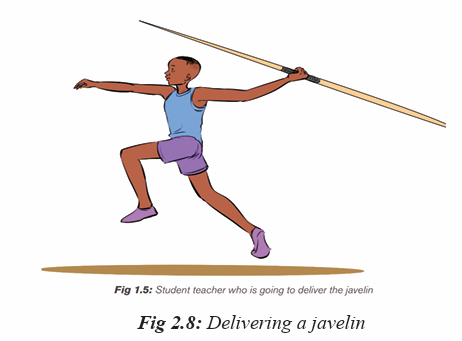
Phase 3 and 4: Stride rhythm and delivery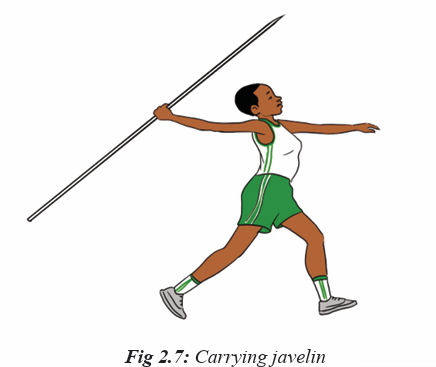
Activity 2.8
Tell students to do the following during stride rhythm and delivery:
– Execute the withdrawal action with impulse stride.
– Carry out delivery, transition, power position and final arm movement.
– Maintain the reserved legs.
– Bend the right legs and lowering the upper body.
– Swing the left leg backwards.– Move the foot of the brace leg to the foul line.
Activity 2.9
Remind students to remember basics throwing principles for javelin throw:
– Involve the whole body.
– Achieve a summation of forces.
– Apply force in the direction of the throw.
– Achieve a long range of motion.– Weight transfer.
Let students perform techniques of throwing javelin individually by making many
trials in order to be familiarized with javelin throw, try to keep security while throwing
by giving enough space to the thrower in order to avoid accidents.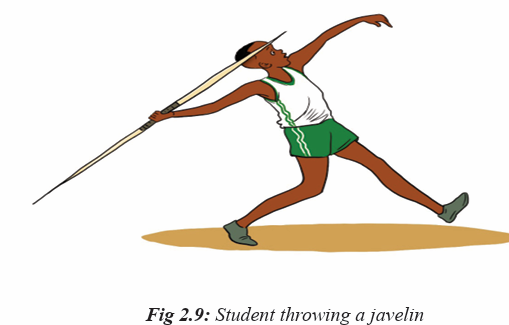
Application Activity 2.3
Let students perform techniques of throwing javelin individually by
respecting different phases and record their performance with evaluating
their own progress. They can do this as a small competition. Remember to
give enough space to the thrower in order to avoid possible accident, which
may occur during throwing.
Cool down exercises
– Let students do light exercises and stretch their group of muscles by
insisting on most used parts. Guide them while stretching their muscles
systematically. Help them/demonstrate/correct where is necessary.
Closing discussion
Reflect
– What are challenges/ advantages did you face while performing exercises
of javelin throw?
– How did you proceed to perform those exercises?
Connect
– What are conditions do you need throws like javelin?
Apply
– What is the usefulness of javelin throw?
– How will you use skills of javelin throw in your daily life?
Lesson 4: Rules and regulations of throws
a) Learning objective
Apply rules and regulation of shot-put, Discus and javelin throw
b) Teaching resources
Books, Internet videos, Pictures on manila paper, Projector and Laptop
c) Prerequisites/Revision/Introduction
d) Learning activities
Opening discussions
Student of senior six will learn better athletic throws rules if they can perform
shot put, discus, and javelin throws learnt in lesson 1,2 and 3 of this unit.
– Teacher as a facilitator and a guider facilitates students in the following
ways:
– Ask questions about types of throws learnt in previous lesson.
– Introduce the lesson of the day by asking question related to athletic
throws rules, like to brainstorm different rules and regulations to followwhen executing shot-put, discus and javelin.
e) Lesson body
Activity 2.10
Divide students into 3 groups, and distribute to them questions in the table
based on group numbers and let them discuss given questions into their
respective groups. Distribute shot put, discus and javelin throwing rules for
each group based on questions given and facilitate students to get resources(if possible, you may use smart classroom, videos showing officiating procedures etc.)
– Pass though groups and help them where is necessary. Request students to
choose a secretary to record their findings and group representative who
will present their findings.
– Request group representative to present their findings and group members
may support where is necessary.
– After presentation of all groups, use a projector to recap presentations,
Application Activity 2.4
Prepare a video which show athletes in competition of shot-putting, discus
and javelin throw, and project it and asks students to watch and analyze the
actions of throwers and write their decision on paper basing on the rules
and regulations of each throw.
Closing discussions (RCA)/ Conclusion
Summarize the lesson on different rules of throwing in athletics (Implements,
throwing area, fouls and penalties) and ask students to write them in their
notebooks.
2.5. Summary of the unit
THE SHOT PUT
The shot has been an Olympic sport since 1896 and involves pushing or putting
a metal ball of 7.26kg for men and 4kg for women. The aim is to put it as far
as possible from a seven-foot diameter (2.135m) circle that has a curved10centimetre high toe-board at the front.
The following rules are adhered to for a legal throw: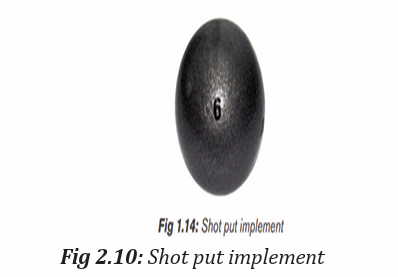
– Competitors take their throw from inside a marked circle 2.135m in
diameter, with a stop board approximately 10cm high at the front of the circle.
– The distance thrown is measured from the inside of the circumference of
the circle to the nearest mark made in the ground by the falling shot, with
distances rounded down to the nearest centimeter. Place the zero end of
the tape at the mark made by the shot closest to the throwing circle, pull
through to the center of the circle (should be a mark or hole, and read off the
measurement where the tape crosses the inside edge of the circumference
of the circle or toe board.
– Upon calling the athlete’s name, they have sixty seconds to commence the
throwing motion.
– The athlete must rest the shot close to the neck, and keep it tight to the
neck throughout the motion.
– The shot must be released above the height of the shoulder, using only
one hand. The ball is to be put (i.e. pushed), not thrown with an overhead
motion. At no time may the shot move behind the plane of the shoulders.
– The athlete may touch the inside surface of the circle or stop board, but
must not touch the top or outside of the circle or stop board, or the ground
beyond the circle. Limbs may however extend over the lines of the circle
in the air.
– The shot must land in the legal sector (34.92°) of the throwing area (Inside
of / not including the line.– The athlete must exit the throwing circle from the back half of the circle.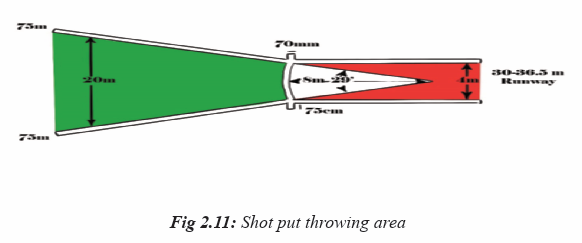
A foul throws occur when an athlete:
– Does not pause within the circle before beginning the throwing motion.
– Does not begin the throwing movement within sixty seconds of having his
or her name called
– Allows the shot to drop below his shoulder or outside the vertical plane of
his shoulder during the put.
– During the throwing motion, touches, with any part of the body (including
shoes): the top or ends of the stop board, the top of the iron ring, anywhere
outside the circle.
– Throws a shot, which either falls outside the throwing sector or touches a
sector line on the initial impact.
– Leaves the circle before the shot has landed.
– Does not exit from the rear half of the circle.
The top eight throwers, once established, will have three more attempts in
order of increasing distance. The final rankings will result from all 6 attempts.
The competitor’s best throw from the allocated number of throws, typically
three to six, is recorded, and the competitor who legally throws the shot the
farthest is declared the winner. Ties are broken by determining which thrower
has the longer second-best throw.
Discuss
The discus throw is an event in track and field athletics competition, in which
an athlete throws a heavy disc called a discus in an attempt to mark a farther
distance than his or her competitors. The men’s discus is a heavy lenticular
disc with a weight of 2 kilograms and diameter of 22 centimeters, the women’sdiscus has a weight of 1 kilogram and diameter of 18 centimeters.
– The discus can be made of any material such as wood but it must have a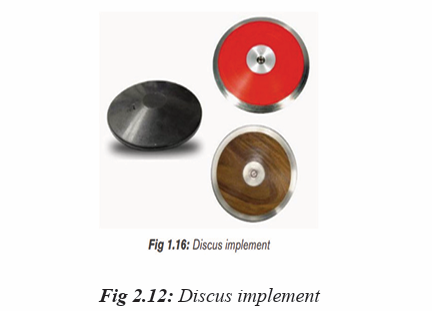
circular edge with a metallic rim.
– Inner construction can be both solid and hollow.
– The cross section of the edge should be made in circular manner and it
should have a radius of 6mm.
– All sides of the discus should be identical. They must be free from any type
of sharp edges or irregularities.
– Finishing of the discus should be smooth.
– An athlete can only throw the discus when he or she will stand inside a
circle, which has a diameter of 2.5m.
– During the course of throw, the athletes are prohibited from touching the
top of the rim. However, they can touch the inner part of the rim.
– An athlete cannot touch the ground beyond the circle.
– If the athlete leaves the circle before the landing of the disc on the ground,
then it will be considered as a foul throw.
– In the Olympic matches, each athlete is given eight chances to display their
talents.
– There is particular boundary of landing of the disc. If the disc lands outside
that zone, then that throw is considered invalid.
Javelin
Javelin throwing was once an integral part of ancient warfare and the farther
a warrior could hurl a javelin, the greater his standing in the army. The first
men’s Olympic javelin event was in 1908 and in 1932 for women. Originally
made of wood, modern javelins are made of metal. Men’s javelins weigh 800 g
and women’s javelins weigh 600 g. Javelins can be thrown huge distances and
have had to be redesigned as athletes were generating throws in excess of the
throwing event that allows a run up.
Implement
The weight and length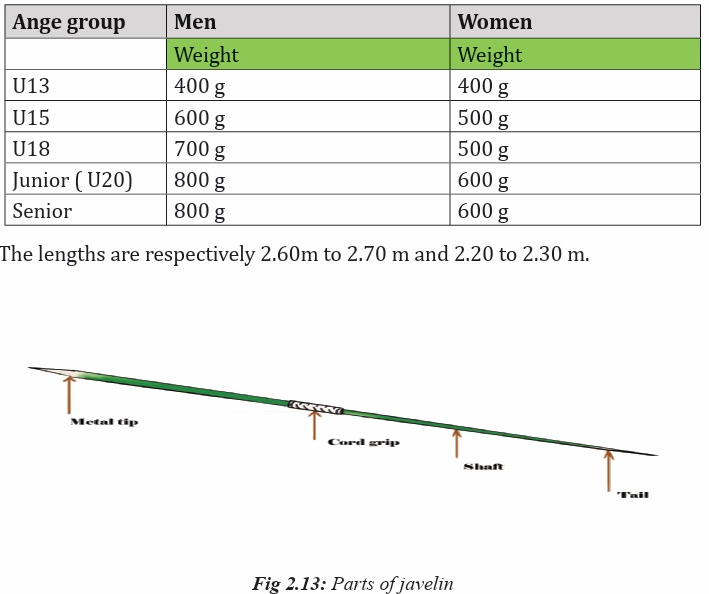
The javelin consists of three parts: a head, a shaft and a cord grip. The shaft
must be constructed of metal and has, fixed to it, a metal head terminating in a
sharp point.
Throwing sector/area
This is bounded by the inner edges of two lines, which are drawn from the
centre of the arc through the points at which the arc joins the lines marking theedge of the runway.
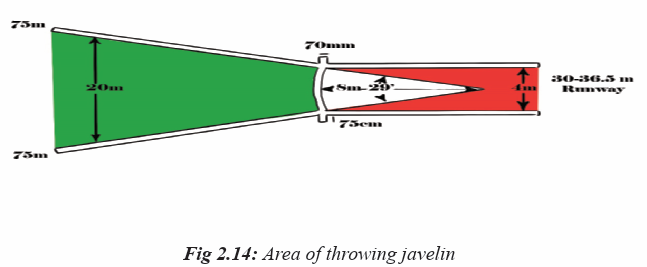
General rules for throwing javelin
– The javelin must be held at the grip and the throw must be made over the
shoulder or upper part of the throwing arm.
– For a throw to be valid, the tip of the metal head must strike the ground
before any other part of the javelin and it must fall completely within the
inner edges of the landing sector.
– The competitor must make his approach and throw within the lines demarcating the runway.
– It is a foul throw if, after starting his throw, he touches the lines or the
ground outside with any part of his body.
– The athlete must not leave the runway until the javelin has landed and then
his first contact with the parallel lines or the ground outside the runway
must be completely behind the lines, at the ends of the arc at the right
angles to the parallel lines.
– Once the athlete has started the throw, the athlete must not turn completely
around so that the back is towards the throwing arc.
– The number of throws allowed is the same as for the shot and discus.
2.6. additional information for tutors
Throwing events are amongst the oldest in track and field athletics. Where
competitors once threw rocks and spears, they now use the shot and javelin.
Throwing events require great strength and throwers are usually the biggest
athletes in any athletic competition. There are four recognized throwing events
in modern track and field athletics: the shot put, the discus, the javelin and thehammer.
Duties of Competition Officials
SHOTPUT
In shot put they are 9 judges:
– The Chief Judge must supervise the whole of the event and check the
measurements.
– A Judge holding the measuring apparatus in such a way that it passes
through the centre of the circle.
– A Judge placing, immediately after the throw, a marker enabling the throw
to be measured.
– A Judge holding the measuring apparatus on the zero mark on the point
where the marker has been placed.
– A Judge in charge of placing the small flags indicating each athlete’s best
throw. The small flag is placed along a strip or line outside the sector in
order to avoid it being hit by an implement.
– A Recorder keeping the results sheet and calling the athletes.
– A Judge in charge of the results score-board.
– A Judge in charge of the clock indicating to the athletes that they have a
certain time to take their trial
– A Judge in charge of the athletes
DISCUSS
In Discuss there can be up to 14 judges
– Near the circle: - Two judges checking that the throw has been made
correctly and measuring the throw. In a large number of national
competitions, the Chief Judge, takes on this duty.
– A Judge placed opposite judge (2) checking from his side that the throw is
correct.
– A Judge (3) holding the tape measure so that it is held taut and passes
through the centre of the circle.
At the landing:
– A Judge (4) responsible for the landing zone and indicating with the help
of flags whether the throw is valid or not.
– Two Judges (5 and 6) who will watch the exact place of landing will have
a marker which he will place in the ground to enable the measuring of the
throw.
– A Judge (7) who will hold the tape measure on the zero mark at the spot
where the marker has been placed.
– A Judge (8) in charge of placing the small flags indicating each athlete’s
best throw along a strip or line outside the sector in order to avoid them
being hit by an implement. In important
– At the landing, one person or two responsible for sending back the discus
that has been thrown (13).
Near the circle:
– A Recorder (9) keeping the results sheet and calling the athletes.
– A Judge (10) in charge of the results scoreboard (trial-number-result).
– A Judge in charge of the clock indicating to the athletes that they have a
certain time to take their trial (11).
– A Judge in charge of the athletes and of the discus near the circle (12).
– Half-way between the circle and the landing zone:
– A Judge will make sure that the tape measure is taut in order to ensure acorrect measurement (14).
JAVELIN
During javelin throws, they are at least 14 officials, controlling that the
event is taking place adhering to rules and regulations.
1. The Chief Judge, must supervise the whole event and check the
measurements.
2. Near the runway:
3. One judge (1) checking that the throw has been made correctly and
measuring the throw. In a large number of national competitions, the
Chief Judge, takes on this duty.
4. A judge (2) holding the tape-measure so that it passes through the centre
of the arc of the circle.
At the landing:
1. A judge (3), responsible for the landing zone, and indicating with the
whether the throw is valid or not.
2. Two Judges (4) and (5) who watch the place where the tip of the metal
head touched the ground. One of these judges holds a marker which he
pushes in the ground.
3. A Judge (6) who will hold the tape-measure and who must place the zero
point on the spot where the marker has been placed.
4. A Judge (7) in charge of placing the small flags indicating each athlete’s
best throw. These flags must be placed along a strip or line outside the
sector in order to avoid them being hit by a javelin.
5. one person (or two) responsible for sending back the javelins that have
been thrown (12). Near the runway zone:
6. A Recorder (8) keeping the results sheet and calling the athletes.
7. A Judge (9) in charge of the results scoreboard (trial-number-result).
8. A Judge in charge of the clock indicating to the athletes that they have a
certain delay to take their trial (10);
9. A Judge in charge of the athletes and of the javelins placed near the
runway (11). Half-way between the runway and the landing zone:
10. A judge will make sure that the tape-measure is taut in order to ensure a
correct measurement (13).
2.7 End of unit assessment
Teacher set series of athletic exercises on javelin, discus and shot put. He/
she provides the appropriates materials to the student teachers and highlight
instructions to follow during performing different throws. Students must perform
individually three trials for
a) Javelin throw
b) Discus throw
c) Shot putting.
– Teacher observe how each student is performing by respecting rules.
– Teacher records the performance of each student to evaluate their
performance.
– Teacher lets students officiate the event and observe/assist them.
2.8 Additional activities
Remedial activities
Individually, the students revise the techniques of javelin, discus and shot
Put during free time and sports time.
Consolidation activities
The teacher organizes a kind of competition where students compete individually
in throwing javelin, discuss and shot putting. Record their performance and rank
them based on each discipline.
Extended activities
Encourages and facilitates students to participate in different athletics competitions
on javelin, discus and shot put organized by the school, Sector, district,
league and National school sports federation.