UNIT 8: ADVANCED LEVEL BRAILLE AND TEACHING APPROACHES FOR LEARNERS WITH VISUAL DIFFICULTIES
Key Unit Competence:
Students should be able to use Braille transcriptions at advanced level, andteaching approaches for learners with visual difficulties
8.1. Advanced Level of Braille and Tactile Transcriptions
a) Vocabulary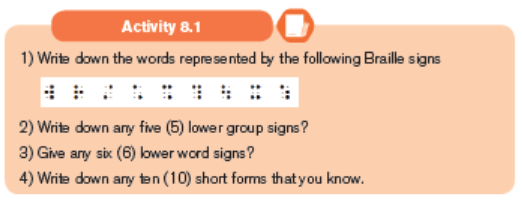
Simple sign – a sign occupying one cell only.
Composite sign – a sign occupying two or more cells.
Upper sign – a sign containing dot 1, or dot 4, or both.
Lower sign – a sign containing neither dot 1 nor dot 4.
Contraction – a sign which represents a word or a group of letters.
Group sign – a contraction which represents a group of letters.
Word sign – a contraction which represents a whole word.
Short form – a contraction consisting of a word specially abbreviated inbraille.
b) Lower group signs
These can be grouped under three headings:– Those that must be written at the beginning of a word or braille line
– Those that must be written in the middle of a word
– Those that may be written in any part of a word

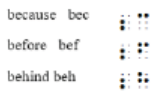
i) Lower group signs at the beginning of a word or Braille line
be dots 2 3 (lower b)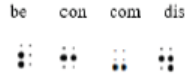
con dots 2 and 5 (middle c)
com dots 3 6 (bottom c)
dis dots 2 and 5 6 (lower d)
These four may only be used when they form the first syllable of a word, or,
in the case of a divided word, the first syllable at the beginning of a braille
line.Examples
• Two of these syllables in sequence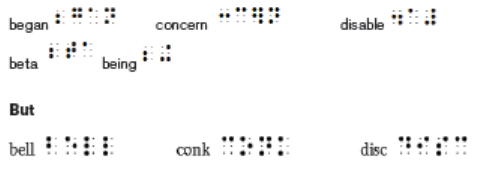
Where any two of these syllables (be, con, com, dis) occur in sequence at the
beginning of a word, the group sign for the first only may be used, because
these group signs may only be used at the very beginning of a word.Example:
• Word Division
Where a word beginning with be, con, com and dis is divided immediately
after one of these syllables at the end of a braille line, the group sign may not
be used at the end of the line.Examples:
But where one of these syllables begins a fresh line after a word-division,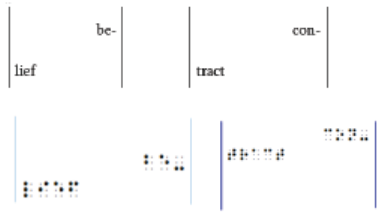
the group sign may be used if another syllable follows and the fragment on
the new line is a dictionary word of related meaning, because on that line it
satisfies the rule.Examples:
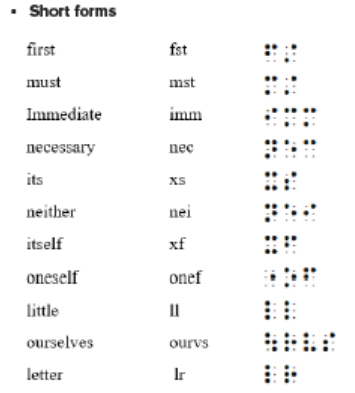
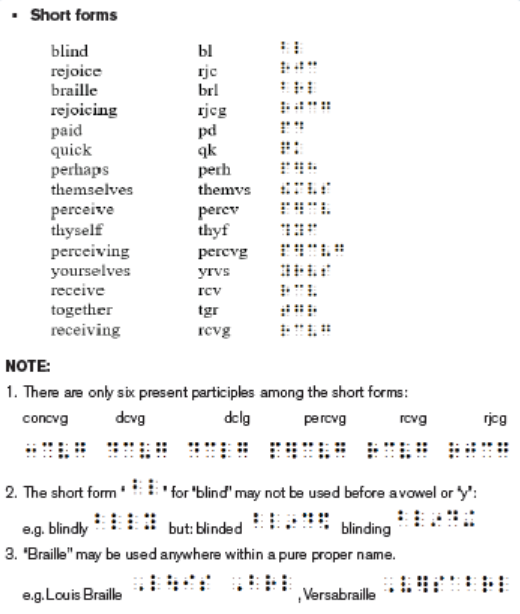
• Short forms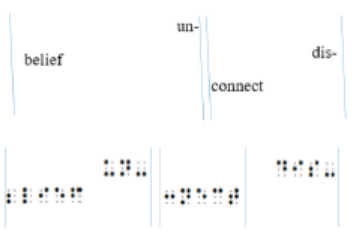
A number of words in general use are specially abbreviated in braille and are
called short forms. The following common words beginning with the syllable“be” are thus abbreviated:
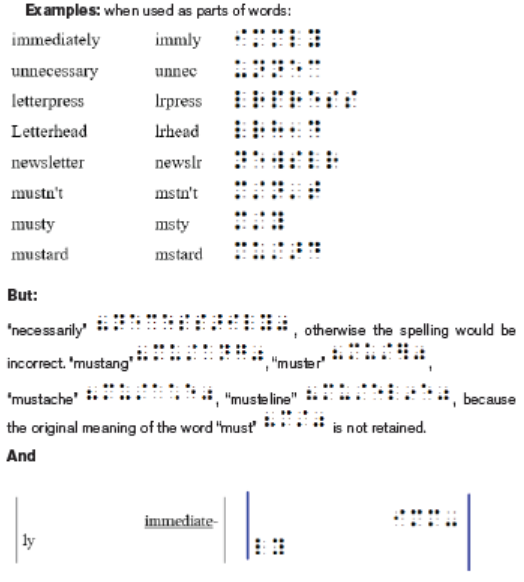
A short form may be used within longer ordinary words (that is words that have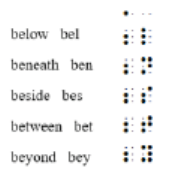
meaning other than use as proper names) standing alone, provided (a) there is
no interference in spelling and (b) an original meaning of the basic short form
word is retained.Examples:
But
The short form beginning with “be” may not be used after the beginning of alonger word.

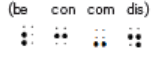
ii) Lower Group signs in the middle of a word
– ea dot 2 (middle a)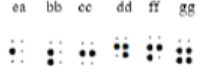
– bb dots 2 3 (lower b)
– cc dots 2 and 5 (middle c)
– dd dots 2 5 and 6 (lower d)
– ff dots 2 3 and 5 (lower f)– gg dots 2 3 and 5 6 (lower g)
Examples:
• Choice of Contractions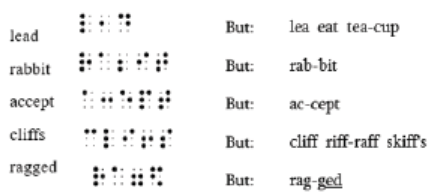
An upper group sign should always be used in preference to a lower group
sign. Thus, in words containing the letters “ear”, the group sign ar is always
to be used in preference to ea. One exception to this rule occurs when the ar
group sign in compound words would cause confusion, for instance: tearoom.
Examples:
cease earn east beast hearts- ease robber babbled wobble abbey caveatMontreal Seattle accredited accurate accustomed

iii) Lower group signs in any part of a word
These two lower group signs may be used in any part of a word; in particular
they are the only lower group signs that may be used at the end of a word.Examples:
• Choice of Contractions
Use the upper group signs the and ing in preference to en and in, in
accordance with the rule.Examples:

NOTE:
• Lower sign rule
Any number of lower signs may follow one another without an intervening
space, provided the sequence is in contact with an upper signExample:
c) Lower Word signs
Some of the lower signs are also used as word signs to represent whole words.
They can be grouped under two heads:
• - Those that must be spaced from all other signs.
• - Those lower word signs should be written unspaced from a word which
follows
• -Those that must be spaced from all other words but may in some cases be
in contact with punctuation signs.i) Lower word signs that must be spaced from all other signs
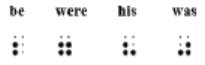
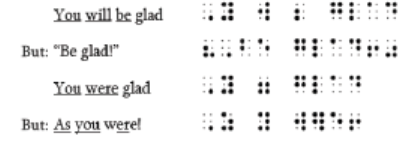
These four words, “be”, “were”, “his” and “was” are expressed by the above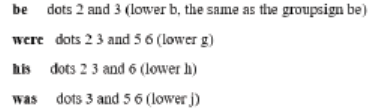
wordsigns, lower b, lower g, lower h, lower j, only where they are separated
by a space from all other signs (except the capital indicator). Therefore, if
the words adjoin lower punctuation in the print copy, they must be spelt
out (for otherwise they would be regarded as punctuation themselves; e.g.
a quote, etc.); and so, too, is the case where a letter is added to them, as:
wasn’t, weren’t.Example:
ii) Lower word signs “to”, “into” and “by”
These lower word signs should be written unspaced from a word which
follows on the same braille line, even when a sense break or natural pause
is present.Examples: By and by he went to school by bus.
These contractions may be sequenced to one another.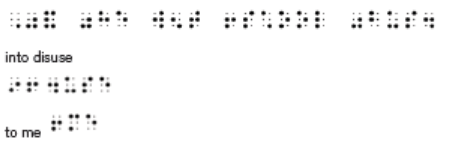
Examples: He was referred to by name.
When one of these words is followed by be, enough, were, his, in, was, the
first word only in the group should be contracted.Examples: He wished to be consulted by his friends.
iii) Lower word signs that must be spaced from all other words but may
in some cases be in contact with punctuation signs
enough dots 2 and 6 (lower e)
in dots 3 and 5 (lower i)
These two signs, when used as word signs, must be spaced from all other
words, but they may be used adjoining punctuation signs provided the wholesequence is in contact with an upper sign.
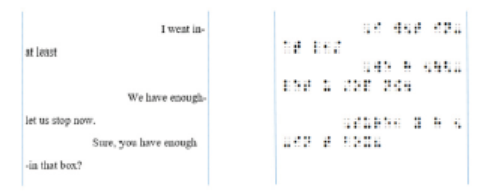
• With Hyphen or Dash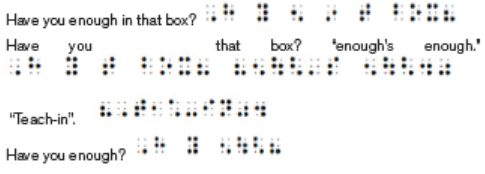
These two word signs differ from the first group in that they may adjoin the
hyphen or dash if the whole sequence is in contact with a letter or uppercontraction.
Examples:
In the last instance, both word signs may not be used, and it saves more space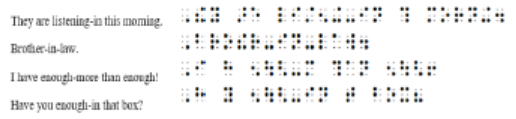
to use the sign for the longer word.
Remember that in is the only lower word sign which can be used between two
hyphens, as long as there is an upper sign in the sequence.But
• Short forms (all those beginning with “a”, plus “said”)
1. Short forms may be used within longer ordinary words (that is, words that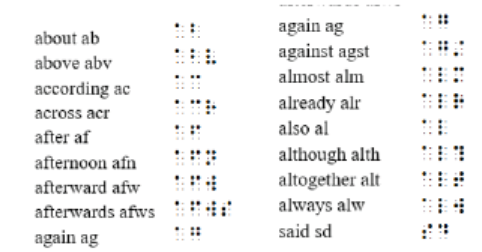
have meaning other than use as proper names), provided
a) there is no interference in spelling andb) an original meaning of the basic short form word is retained.
2. A short form may not be used if the result could be mistaken for another
word
3. A short form may not be used if it would cause confusion in pronunciation
or in recognition of an unusual word.Examples: stirabout, George About (French surname), Port Said.

d) Composite Signs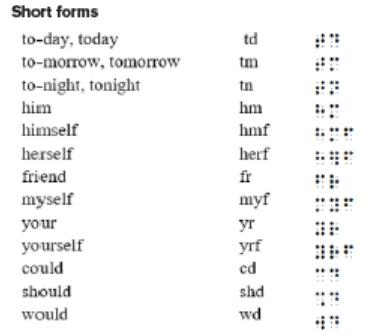
Composite signs are those which occupy two or more consecutive cells. They
will be divided into three classes: Initial Word signs and Final Group signs
Both initial word signs and final group signs consist of a letter (or in one or two
cases a simple upper group sign) immediately preceded by one, two, or three
dots taken from the right side of the first of the two cells–i.e. from dots 4 5 6; in
the case of initial word signs, as the term implies, the letter is the first letter of a
word; in the case of final group signs, the letter is the last letter of a contracted
syllable in a word.Examples:
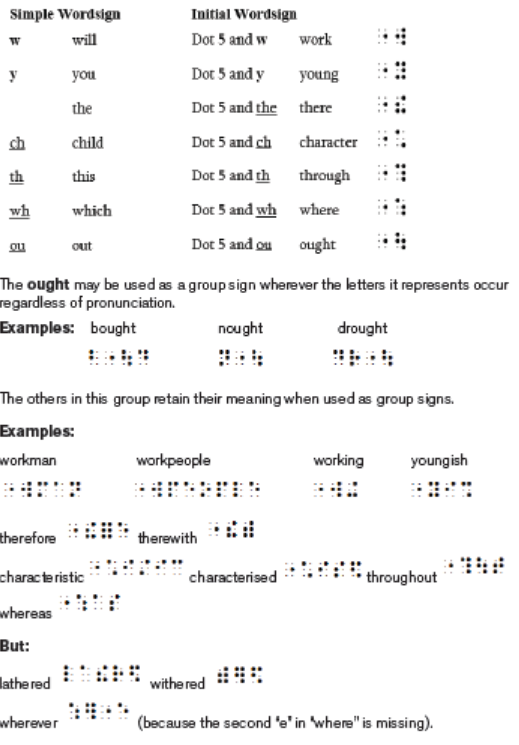
e) Initial Word signs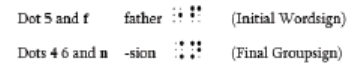
Initial word signs are used to express the whole word shown.Examples:
But they may also be used as group signs to express part of a word: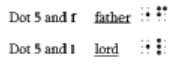
Examples:

i) Initial Word signs with Dot 5
ever may only be used as a group sign when the stress is on the first “e” and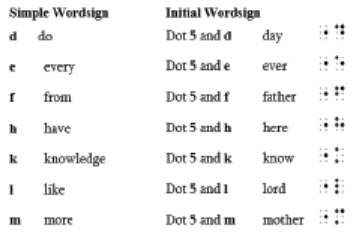
the letter group is not preceded by an “e” or an “i”.

“Everybody” and other words compounded with “every” are written with the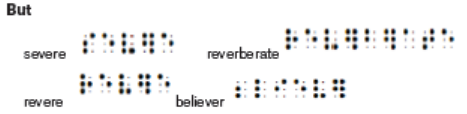
word sign ever and the addition of “y”, i.e. everybody everything. The simple
word sign for “every” may not be used when joined to other letters.
here may only be used as a group sign when all the letters it represents belong
to the same syllable, provided they are not followed by the letters “d”, “n” or “r”,
for then the simple group signs ed, en or er must be used.Examples:
The words: day, father, know, lord and mother may generally be used as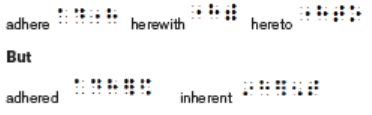
group signs wherever the letters they represent occur, even where they do not
bear their original meaning.Examples:
(“acknowledge” is written: acknowledge; word sign “k” for “knowledge” may not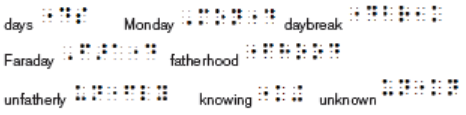
be used when joined to other letters.)

NOTE: The “g” and not ing is used to form the present participle of short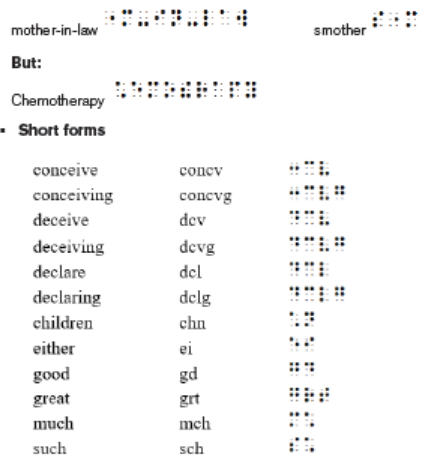
forms.Examples – when used as parts of words:

The one may only be used as a group sign when all the three letters it represents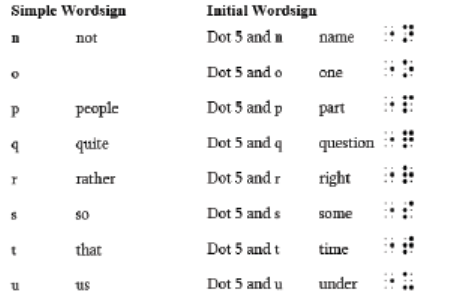
are pronounced as a single syllable, regardless of pronunciation, e.g. done, stones
and gone. One may also be used where a word ends in the letters “oney”.Examples:
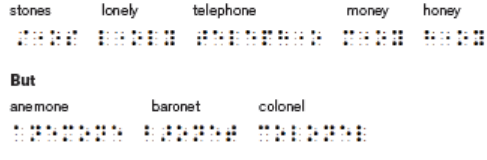
The following exceptional words are used where the sign is nevertheless used:
NOTE: When the letters “one” are followed by “d” “n” or “r”, the simple group signs
ed en er must be used.
The part may be used as a group sign where the letters it represents occur
except when followed by the letter “h” in words in which the letters “th” make a
single sound.Examples:
The question and right may generally be used wherever the letters they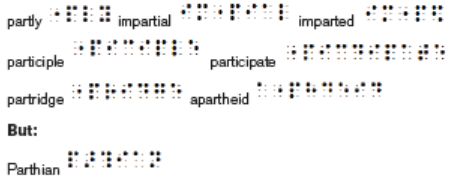
represent occur.Examples:
under may only be used as a group sign where the letters it represents are
pronounced like the word it denotes.
some should be used as a group sign wherever the letters it represents form a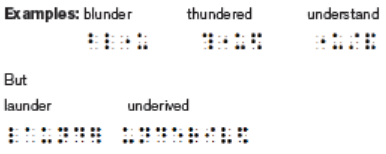
definite syllable of the basic word.

name and time should only be used as group signs when the letters they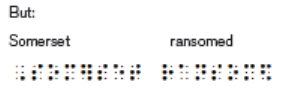
represent are pronounced “name” and “time”.Examples:

ii) Initial Word signs with two dots: 4 5
The group sign word should be used wherever the letters it represents occur,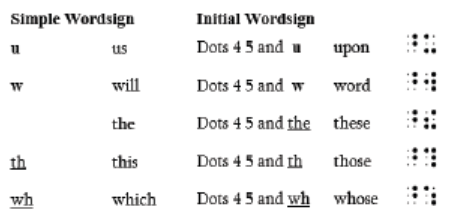
but upon, these, those and whose must retain their meanings as whole
words.Examples:
NOTE: These five can be remembered by the sentence: “upon my word, whose
are these and those?” Therefore, we now have the following:
iii) Initial Word signs with three dots: 4 5 6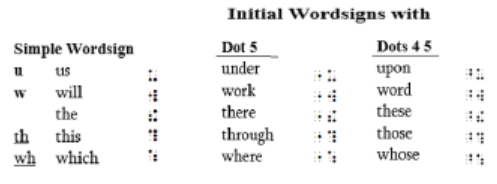
There are six initial signs using all the dots on the right hand side of the firstcell (Dots 4 5 6).
Apart from had, these initial word signs may generally be used as group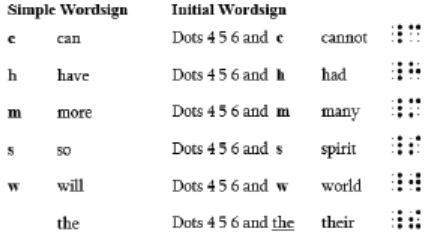
signs wherever the letters they represent occur. The “had” may be used asa group sign when the “a” is short.
These six initial signs may be remembered by the sentence: “Many in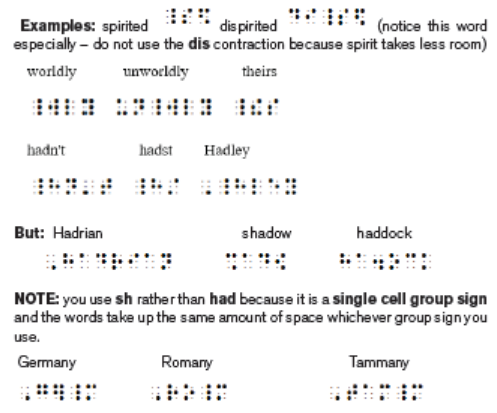
this world cannot have had their spirit”. Therefore, we now have thefollowing:
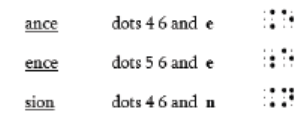
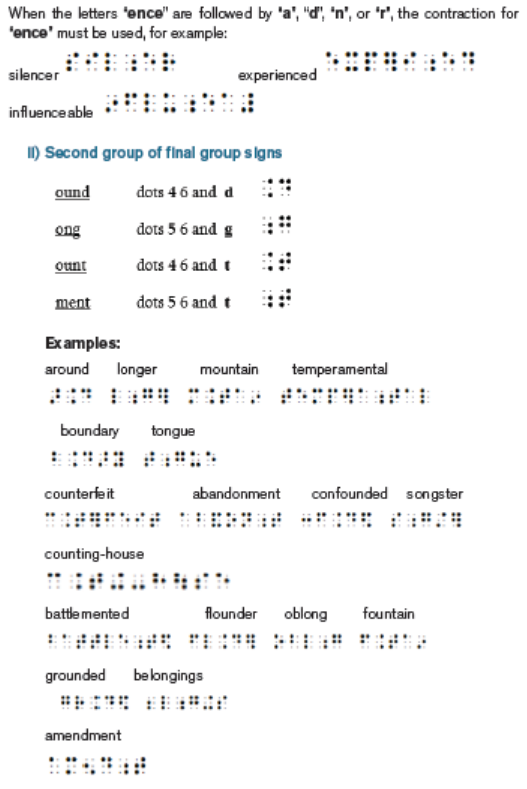
f) Final Group signs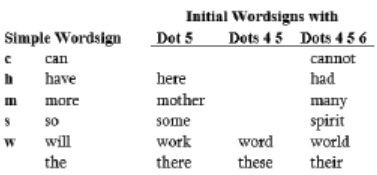
Final group signs are used to represent certain syllables in words. They consist
of the last letter of the contracted syllable or syllables preceded by one or two
dots-in no case more than two-from the right side of the first cell: either Dots
4 6, or 5 6.
Final group signs are so called because the last letter of the contracted
syllable(s) is used and not, as in the case of initial word signs, the first letter of
the contracted word.
They may only be used as a group sign, for instance, to represent part of a
word, never as a word sign to represent a whole word.
They may not be used after the hyphen in a hyphenated word; as, otherness
(not a frequent case).
They need not be at the end of a word, but they may not be used at the very
beginning of it; where, however, the word is divided at the end of the braille line,
they may, like other group signs, stand at the beginning of the new line.
There are twelve group signs: they will be divided into three groups.
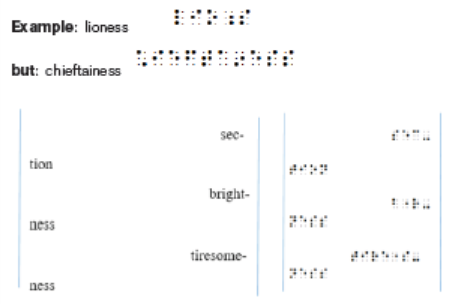
i) First group of final group signs
In this group there are three pairs: in each pair the letter is the same, but the“introductory” dots are different.
The contraction for ness may be used in feminine endings, except when preceded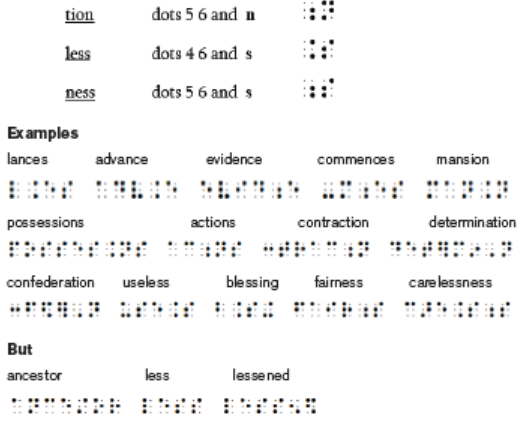
by “e” or “i”, in which case the contractions for en or in should be used.

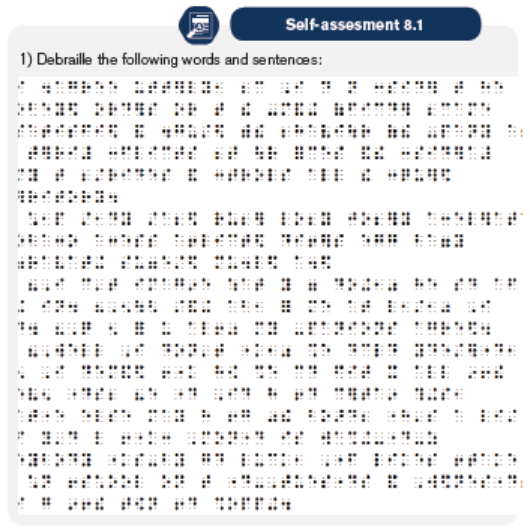
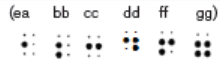
2) Write in Braille the following paragraph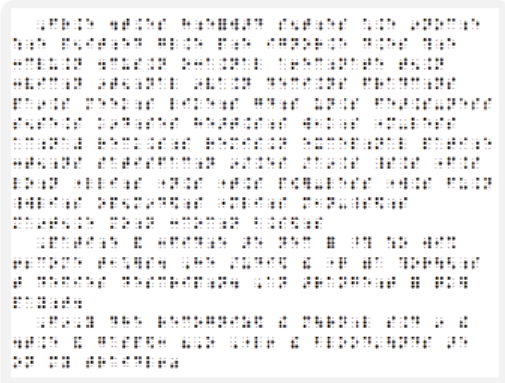
On 2 April 2004 Unified English Braille was agreed by the International
Council on English Braille as sufficiently complete for consideration by
member countries for adoption as their national Braille code. On 14 May 2005
the Australian Braille Authority adopted Unified English Braille as Australia’s
braille code with full implementation envisaged over the next five years. This
primer is a decisive step towards that goal. This May 2006 edition of the
primer represents a work in progress. We are taking a pragmatic approach
to the development of this document, not waiting until all details are finalized,
in order to share information and obtain user feedback. In particular, we have
the inherent flexibility to expand the scope of the primer to cover new topics
considered especially important in the context of Unified English Braille.
We shall take advantage of modern communication technologies to publishregular updates of the primer as deemed appropriate.
8.2. Teaching approaches for learners with visual
difficulties and related techniques (Mobility &
Orientation, sighted guiding, white cane techniques,etc…)
Orientation and mobility is a set of skills that allow for a person who is blind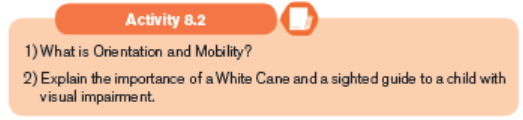
or has low vision to independently and safely navigate their way through their
environment. Orientation skills enable people with visual impairments to use
sensory information to know their location in different settings, and mobility skills
enable them to travel in different areas. There are a variety of ways people can
travel in the environment. Examples are trailing a wall, using the sighted guide/
human guide technique, using assistive devices like the long cane or a wheelchair,
having a dog guide.
a) Mobility aids
Mobility aids are a huge benefit to many and through orientation and mobility
consultations, people who are blind or have low vision can find the aid that suits
them.
Mobility aids include white canes, Seeing Eye Dogs and monocular – small
devices which magnifies information such as street signs, public transport
route numbers and destination signs on trains, trams and buses.
Newer mobility aids include devices like the Sunu Band, which uses sonar and
vibrations to help people detect obstacles.
An orientation and mobility specialist will work with their client to find the right
mobility aids for them and incorporate them into their training, whether that’s
being guided, locating dropped items or safely navigating their way across a
street or down a busy road.
Orientation refers to a person’s ability to use their senses to know where they
are positioned in their environment. Mobility refers to the person’s capability
and readiness to move in their environment.
b) How to use a white canei) Obtain a suitable cane of the right length for your height
Generally speaking this will mean that the cane grip will reach your armpit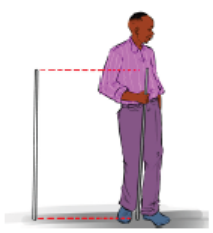
when the tip is resting on the floor.ii) Use the cane with whichever hand feels most comfortable
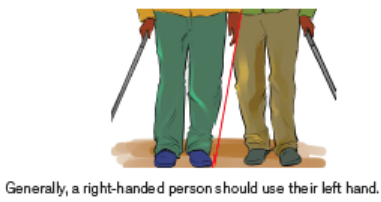
iii) Understand the parts of a cane
Note that all canes consist of 3 main parts; the grip, the tip, and the cane.
Hold the grip firmly but loosely in your hand. If it has a flat surface, (like agolf club grip) lay your index finger on the flat surface.
iv) Handle the cane
Let your wrist settle to somewhere between your belly button and waist,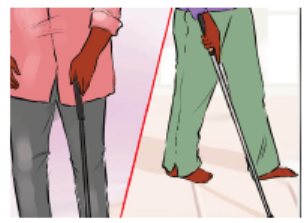
slightly to one side, and gently swing the cane from side to side. The tip
should always stay in contact with the ground, swinging approximately thewidth of your shoulders.
v) Know how to walk
When you walk, alternate the swing with your steps. As you step with the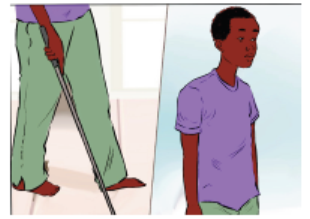
right foot, your cane should go to the left, and vice versa. If you find that your
cane is swinging in the wrong direction, let the cane stay in that general
direction and fix it with your next few steps. Your head should be held high
and your shoulders kept relaxed. This will allow you to use any remainingvision and whatever hearing you have to aid your mobility.
vi) Know how to use the stairs
When going down stairs, let the cane tip fall onto the next step and don’t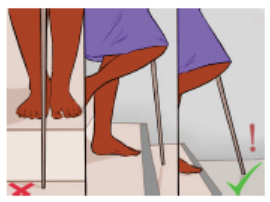
swing it in case other people are trying to go down the stairs too. When
going up the stairs, the cane will hit the first step when you are on the
ground level. Grab the cane so it’s relatively vertical, and let the cane hit
each step as you ascend. Once you reach the top, go back to swinging.
When going down the stairs, let the cane tip fall onto the next step and then
step down to it.
For a smoother descent push the cane forward along the step and allow the
cane drop two steps below, so that it is always a step ahead of you.
• Keep the cane from swinging to allow other people to use the stairs.
• When pushing the cane forward doesn’t result in it dropping you
know you’ve reached the end of that set of stairs. To avoid a nasty fall,
remember that after the cane has reached the bottom of the stairs, youstill have another step to take!
vii) Practice using a cane; it takes a while to get used to
Make sure you are confident in your cane mobility skills before going out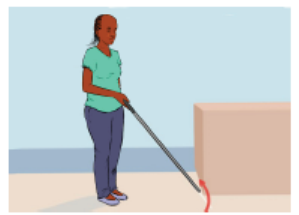
alone.
Note: when training students who do not have visual problems you should
cover their eye with blindfold.
c) Travel tools and techniques of people who are blind or who have
low vision
i) Several choices
People who are blind or visually impaired make choices when it comes to
traveling. At any given time, they can travel using a human guide, which
involves holding onto someone’s arm; using a long, white cane to identify
and avoid obstacles or elevation changes; using a dog guide; using special
optical or electronic aids; or using no additional aid.
The choice of tools depends on the extent and nature of visual impairment,
personal preference, lighting, and familiarity with the area. In order to travel
independently, people with visual impairments use whatever vision they
have, auditory and tactual information, and any gathered knowledge of an
area to keep track of their location and make travel decisions.ii) Human Guide (sometimes referred to as Sighted Guide)
At one time or another, most people who are blind will make use of the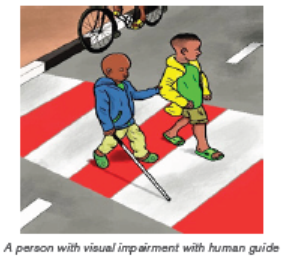
human guide technique, in which a person with sight serves as a guide to aperson who is blind or visually impaired.
iii) Long white cane
Many individuals who are blind or visually impaired use a long white cane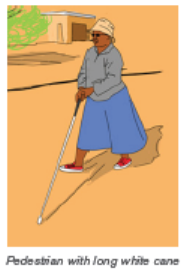
as a mobility device. In the most common technique, the cane is extended
and swung back and forth across their body in rhythm with their steps to
provide information about the environment directly in front of them, such as
elevation changes or obstacles. In another technique often used by people
with low vision, the cane is held diagonally across their body, with the tip
about an inch above the ground. When those individuals are unsure about
what they are seeing, they usually check the object or sidewalk surface with
their cane.iv) Dog guide
Dog guides are carefully trained service animals used as travel tools
by approximately 2% of people who are blind. The dog responds to the
commands of its handler, such as right, left and forward. The dog guides the
handler around obstacles and stops at curbs or stairs. However, the handler
must know where they are going and make decisions about the proper time
to begin a street crossing. Dog guides move in response to directions from
their handlers but may disobey commands to avoid danger.
v) No aid
Not all persons considered blind use a long white cane or dog guide. People
who are visually impaired often rely on their remaining sight and auditory
and tactile cues in their surroundings for orientation and travel. Some may
also use aids such as telescopes for specific tasks.
vi) Orientation and mobility training
Many pedestrians who are visually impaired or blind have received Orientation
and Mobility training, provided by an Orientation and Mobility (O&M)
Specialist. O&M Specialists usually have an undergraduate or graduate
degree in teaching travel skills to persons who have visual impairments.
Orientation is the ability to understand where one is located in space and
Mobility refers to being able to travel through that space safely. The goal of
most O&M training is to prepare a person who is visually impaired to travel
in a variety of environments, both familiar and unfamiliar, and to assess new
intersections and travel new routes. It is important to note that orientation
training and assistance is not provided for every route that a person who is
blind needs to travel.
8. 2.4. How people with visual impairment cross streets
a) Traditional techniques
Techniques and cues used in crossing streets are diverse and vary by the type
of location and by the individual and his or her level of vision. Individuals who
are blind or visually impaired often travel to unfamiliar areas and intersections
and gather information from available sources in order to do so safely.
The discussion of techniques below describes typical techniques used at
unfamiliar intersections, although most travel by pedestrians who are blind
is probably on routes with which they are familiar. However, it is also not
uncommon for bus drivers or taxi drivers to provide incorrect information about
the location or drop off a person at a slightly different location than expected,
so it is necessary to regularly confirm information using nonvisual techniques
described below.
Once pedestrians who are blind are familiar with an intersection, they do not
usually need to analyze the intersection and traffic control system at length
every time. However, they still may need to listen long enough to determine
that they are at the correct location and that the signal is functioning as usual.
Pedestrians who are blind will still need to detect the street, align to cross,
identify the walk interval, and maintain alignment while crossing. APS can
particularly assist with the task of identifying the walk interval at familiar and
unfamiliar locations.
b) Detecting the street
The first information needed by pedestrians who are blind is “Have I arrived at
a street?” People who are blind or visually impaired use a combination of cues
to recognize the street edge. These may include:
• Curb or the slope of the ramp
• Truncated dome detectable warnings, if available
• End of building line and open sound of the intersection
• Sound of traffic on the street beside them (the parallel street)
• Sound of traffic stopping on the street they are approaching (the
perpendicular street)
• Presence of pedestrians
• Presence of an intersecting sidewalk
c) Identifying the street
The next information needed for decision-making at unfamiliar intersections is:
“Which street is this?”
• This information is only occasionally provided in any accessible format.
• Pedestrians who are visually impaired develop a mental map and keep track
of where they are within that map, usually by counting blocks and street
crossings.
• Where necessary, and available, assistance may be sought from other
pedestrians.
d) Analysing intersection geometry
The next information needed is: “What is the geometry of this intersection?”
including:
• Is my destination curb straight in front of me, or must I angle to the left or
right to reach it?
• How many streets intersect here?
• How wide is this street?
• Should I expect to encounter any islands or medians as I cross this street?
• Am I standing within the crosswalk?
This information may be immediately available to pedestrians having full vision,
but it may not be possible for pedestrians who are blind to determine this
information by listening to traffic patterns. Incorrect or missing information for
any of these questions may result in missing the destination curb or median.
e) Analysing the traffic control system
Next, pedestrians with visual impairments need to know: “What is the type of
traffic control system at this intersection:
• Is this a signalized intersection?
• Do I need to push a button to actuate the walk interval? If so, where is the
button?
• Is the button close enough to the crosswalk that I will have time to push
the button, position myself correctly at the crosswalk, and re-establish my
alignment facing the destination curb before the onset of the walk interval?
• Which button controls the walk interval for the street I want to cross?
• Does it stop traffic on one street, or all traffic?
• Do cars still turn during the walk interval?
• Is there a second button on the median or crossing island that I must push?
• Will there be a surge of parallel traffic telling me the walk interval has begun?
Will I be able to hear it over other, concurrent traffic sounds?
Techniques for gathering this information include listening to traffic patterns
through several signal cycles and searching the sidewalk area for poles with
pushbuttons. Missing information for any of these questions may result in
failure to use pedestrian pushbuttons, not beginning the crossing during the
walk interval, not completing the crossing before perpendicular traffic begins
moving, and crossing at times other than the pedestrian phase.
f) Aligning to cross
Before starting to cross, the pedestrian must align to cross or choose a
heading for the crossing. Typical techniques for this task include maintaining
the alignment used on the approach to the intersection and listening to parallel
traffic through a signal cycle to confirm alignment to parallel traffic. The need
to use pedestrian pushbuttons often prevents the use of parallel traffic for
alignment. After pushing the button, the pedestrian must cross on the next
pedestrian phase, which is usually the next time that traffic begins moving
parallel to the pedestrian’s crosswalk.
g) Identifying the walk interval
After determining the geometry of the intersection, aligning to face towards
the destination curb, determining that the intersection is signalized and having
pushed a button, where necessary, pedestrians who are blind need to know:
“When does the walk interval begin?”
In the most common technique utilized for crossing at signalized intersections,
pedestrians who are blind or visually impaired begin to cross the street when
there is a surge of traffic on the street parallel to their direction of travel. This
technique is dependent upon the presence of traffic and consistent signal
phasing. Various types of phasing and intermittent or low volumes of traffic
traveling parallel to the pedestrian may affect the reliability of that technique.
h) Maintaining crossing alignment
Once the pedestrian who is blind has begun to cross the street, the next
question is: “Am I headed straight towards my destination curb?”
• Traffic going in the same direction on the parallel street provides helpful
auditory guidance to many persons if it is present. In addition, pedestrians
who are blind may use traffic waiting on the perpendicular street as a partial
alignment cue.
• Turning traffic can make it difficult to hear and align with the traffic traveling
straight through the intersection.
In the absence of traffic on the parallel street, pedestrians who are blind are
more likely to veer toward or away from the intersection.
BIBLIOGRAPHY
– Braille Authority of North America (1994). English Braille American Edition.
American Printing House the Blind.
– Braille Authority of the United Kingdom (2004). British Braille: A Restatement
of Standard English Braille Compiled and Authorized. Royal National Institute
of the Blind Bakewell Road, Orton Southgate Peterborough, Cambridgeshire
– Brown, S. Rust, C. & Gibbs, G. (1994). Strategies for Diversifying Assessment
in Higher Education. The Oxford Centre for Staff Development, Oxford.
Oxonion Rewley Press.
– Brown, G., Bull, J. & Pendlebury, M. (1997). Assessing Learner Learning in
Higher Education, Routledge, London.
– Cowan, J. (2005). In: Designing assessment to enhance learner learning.
– Florian, L & Linklater, H. (2010). Preparing Teachers for Inclusive Education:
Using Inclusive Pedagogy to Enhance Teaching and learning for All.
Cambridge Journal of Education, 40(4), 369-386. Doi: 10.1080/0305764X.
2010.526588 .
– Howard G. (2010). Multiple intelligences. http://www.howardgardner.com/
MI/mi.htm
– Hughes, I E. (1995). Peer assessment of learner practical reports and its
influence on learning and skill acquisition. Capability. 1, 39-43.
– Howse, J., Kathy, R., and Leona, H. (2013). Unified English Braille. Australian
Training Manual. Australia: Round Table on Information Access for People
with Print Disabilities
– Howse, J. (2006). Unified English Braille Primer. Australia. The NSW
Department of Education and Training Publisher.
– Skinner, M. (2008). The School Counselor, Vol.33, No.2
– Karangwa, E. (2008). Initiation a l’Education Speciale et Inclusive. Manuel
de formation pour les Enseignants au Rwanda, Kigali.
– Linklater, H. (2013). Teaching and the individuality of everybody FORUM
51(5).
– Pantic, N & Florian, L. (2015). Developing teachers as agents of inclusion
and social justice. Education Inquiry 9Edu. Inq.) 6(3), 333-351 & nbsp.
– Padden. (1992). Learning Sign Language. Englewood: Prentice hall.
– Race, P. Brown, S. and Smith, B. (2005). 500 Tips on assessment: 2nd
edition, London: Routledge.
– Ramsden, P. (1988). Improving Learning: New Perspectives. London. Kogan
Page.
– Thomas, P. (2003). Inclusive Education Training in Cambodia: In-service
teacher training on Disability and special needs issues, Disability Action
Council Cambodia, published by EENET.
– United Kingdom Association for Accessible Formats (2013). Unified English
Braille (UEB). Summary of changes for ordinary braille.
– UNESCO Bangkok. (2004). Embracing Diversity: Toolkit for creating
inclusive learning Friendly environments, UNESCO Bangkok.
– UNESCO Bangkok. (2004). Creating Inclusive Learning-Friendly
Classrooms, Booklet 4 from the ‘Embracing Diversity’ toolkit, UNESCO
Bangkok.
– William, N; Stinson, M., Castle, D.; Mallery, R.; Holcomb. B. (2013). RwandanSign Language Dictionary. First edition.