UNIT 9 : FIRST AID
Key unit competence: Apply/perform the practice of first aid.
9.1. Prerequisite (knowledge, skills, attitudes and values)
Student teachers will learn better this lesson, if they could be able to understand
key concepts related to first aid.
9.2. Cross-cutting issues to be addressed
• Gender
In teaching and learning process, the tutor must prepare and provide first aid
activities that engage both girls and boys equally to exploit their full potential
and talents without any discrimination or prejudice.
• Inclusive education
The tutor as a facilitator he/she must consider different special education
needs and select activities to adapt his teaching approaches to student
teachers. This creates a positive attitude and helps all student teachers to
participate actively and develop their competence levels.
• Financial education
The tutor should integrate Financial Education into his teaching/learning
activities by providing the local and no cost teaching material where is possible.
He/she must encourage student teachers to make their own materials that
can help them to develop competences not only in first aid at school but also
in their life.
• Standardization culture
The tutor must choose and select the standardized materials to use in his/her
teaching/learning process. It is necessary to provide appropriate materials
required to the levels of student teachers and help them to develop culture
of checking and using the quality of first aid materials for the competitions
before using them in order to provide first aid to injured people.
• Environment and sustainability
The tutor should provide materials and deliver the lesson by encouraging
student teachers to protect the environment and well use of materials. The
tutor helps them to develop of cleaning an area where first aid has been
provided.
• Peace and values education
The tutor helps student teachers to develop fair play and social values by
avoiding violence and conflict in the game and by setting clear and relevant
instructions. He/she should provide the activities that help student teachers
to develop their competence peacefully.
• Comprehensive sexuality education
The tutor provides first aid activities and sets instructions that prevent sexual
harassment, any kind of gender-based violence like sexual abuse and physical
contacts oriented to the sexuality intention during providing of first aid.
• Genocide studies
While conducting basics first aid a tutor should take a time to explain student
teachers how first aid should be used during Genocide memorial events.
9.3. Guidance on introductory activity
Before introducing the lesson one of this unit, you must introduce the whole unit.
The tutor as a guide, facilitator and expert, ask questions or give activity relatedto first aid in order to help them to predict what to be learned in the whole unit.
9.4. List of lessons/sub-heading
Lesson 1: Introduction to first aid
a) Learning objective
Student teachers will be able:
• To define key terms used in first aids.
• To explain the importance of first aid.
• To identify different accident/injury which may result during performing
sports activities.
b) Teaching resources
Images/pictures that show injured people, first aid books, first aid kit, watch,
chalk, notebook and pens.
c) Prerequisites/Revision/Introduction
Student teachers of Year 3 will learn better introduction to first aid if they have
learned human skeletal, joint and movement, circulatory system in humans,
muscular system in previous years.
d) Learning activities
As a facilitator, help student teachers in the following ways:
• Form six groups.• Assign to each group their first aid term to discuss as follow:
• Pass around groups by guiding and facilitating student teachers.
• Ask groups to present their findings to the whole class by requesting the
group representative to write them on the chalkboard or flip chart.
• Enable the class to ask questions related to the presented findings. Initially,
request the members of the groups that have presented on to respond to
the questions: if they are not able to clarify, ask other groups to contribute.
• Assess the lesson by letting student teachers attempt the application
activity.
• During presentation of findings by different groups, observe that the
information given is full for fractures, lesions of articulations their sign and
symptoms and their emergencies. If is not complete support their answers
by using information given below.
• Remind student teachers that Injuries to bones, joints and muscles are
common even though they are usually not life threatening, they can be
painful and debilitating. Appropriate first aid for these injuries can reducethe pain and prevent further injury.
Some information about skeletal and articulation attacks
i) Types of fractures
• Closed: where the bone has broken but the skin over the fracture isnot broken.
• Open: where the bone is broken and the skin over the fracture is broken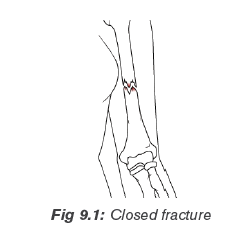
so that the bone is visible.
ii) Causes, signs and symptoms of fracture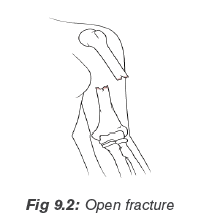
Causes
• A direct force (e.g. a punch or kick) and an indirect force (e.g. a fall), or
by a twisting force.
• Certain bone diseases, such as osteoporosis, make bones very brittle
and they can break without much force.
• Old age and related conditions (osteoporosis) can weaken bones making
them brittle and at risk of breaking.
Signs and symptoms
• Pain and tenderness: Worse when the injury is touched or moved.
• Loss of function: The casualty cannot use the injured part.
• A wound: The bone ends may be sticking out.
• Deformity: Any unnatural shape or unnatural position of a bone or joint.
• Distortion/bending/ or shortening of the affected limb.
• Unnatural movement.
• Crepitus: A grating sensation or sound that can often be felt or heard
when the broken ends of bone rub together.
• Swelling and bruising: Fluid accumulates in the tissues around the
fracture.
iii) Signs and symptoms of spinal cord injury
• Swelling and/or bruising at the site of the injury.
• A loss of feeling in the arms and legs on one or both sides of the body.
• An injured person is not able to move arms and/or legs on one or both
sides of the body.
• Pain at the injury site.• Signs of shock.
You should suspect a spinal injury if the person has been involved in an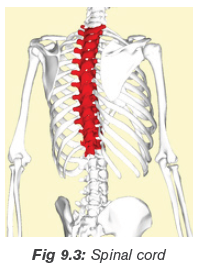
incident that is directly affected their spine, such as a fall from height or
being struck directly in the back complains of severe pain in their neck or
back, not moving their neck, feels weak, numb or paralysed, has lost control
of their limbs, bladder or bowels.
If you think a person may have a spinal injury, do not attempt to move
them until the emergency services reach you.
iv) Rib fracture and chest
Broken ribs or thoracic cage are painful and can hurt with every breath and
if they are broken severely they can seriously damage internal organs in
thoracic cavity.
Cause of ribs/chest breaking
• A traffic accident.
• Being punched in your rib cage during sports activities.
• Contact sports for example: football, handball, rugby, boxing, karate, etc.
• Repeated movements, like swinging a golf club, rowing or swimming.
• Coughing very hard repeatedly.
• A fall onto a hard surface.• Breaking of ribs while getting Cardiopulmonary Resuscitation.
v) Signs and symptoms for ribs or chest injury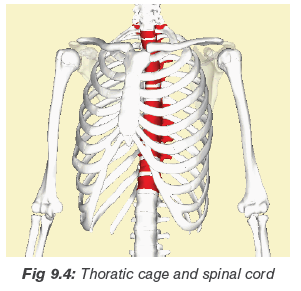
• Pain at injury site when casualty moves, coughs or breathes deeply.
• Shallow breathing.
• Deformity and discoloration.
• The existence of the wound.
• May cough up frothy blood.
• May show signs of shock.
• Bruising over the affected fracture site.
• Pain on breathing, particularly inspiration.
vi) Dislocation
A dislocation is when the bones of a joint are not in proper contact.
Causes and consequences of dislocation
A force stretches and tears the joint capsule, causing the dislocation. Once
this occurs, the bones can put pressure on blood vessels and nerves, causing
circulation and sensation impairments below the injury. The most commonly
dislocated joints are shoulder, elbow, thumb, fingers, jaw, and knee.
The signs and symptoms of a dislocation are similar to those of a fracture,
and may include:
• Deformity or abnormal appearance (a dislocated shoulder may make the
arm look longer).
• Pain and tenderness aggravated by movement.
• Loss of normal function (the joint may be “locked” in one position).• Swelling of the joint.
Lesions of articulations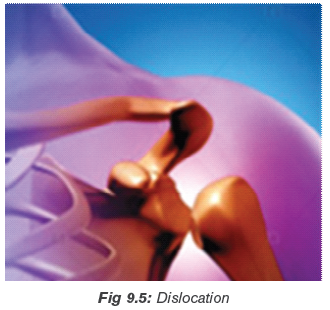
i) The signs and symptoms of sprains
Sprain is when there is stretching or tearing of ligaments at a joint.
• Pain that may be severe and increase with movement of the joint.
• Loss of function.• Swelling and discoloration.
ii) The signs and symptoms of strains
Strain is when there is stretching or tearing of muscles or tendons.
The signs and symptoms of a strain often show up many hours after the
injury.
• Sudden sharp pain in the strained muscle.
• Swelling of the muscles causing severe cramps.
• Bruising and muscle relaxedness.• Casualty may not be able to use the affected body part (loss of function).
Muscles injuries
i) Muscle cramp
These are painful, spasmodic muscle contractions.
Causes:
• Long periods of exercise or physical labor, particularly in hot weather,
can lead to muscle cramps.
• Some medications and certain medical conditions also may cause
muscle cramps
Signs of muscle cramp:
• Sharp pain.
• Feel or see a hard lump of muscle tissue beneath your skin.
Emergency for muscle cramp:
• Gentle stretch.
• Massage and drinking fluid especially in hot weather.
See a doctor if your cramps:
• Cause severe discomfort.
• Are associated with leg swelling, redness or skin changes.
• Are associated with muscle weakness.
• Happen frequently.
• Do not improve with self-care.• Are not associated with an obvious cause, such as strenuous exercise.
Prevention of muscle cramp
Avoid dehydration: Fluids help your muscles contract, relax, and keep
muscle cells hydrated and less irritable. During activity, drink fluids at regular
intervals, and continue drinking water or other fluids after you are finishedyour activity.
Stretch your muscles: Warm and stretch muscles before and after you
use any muscle especially for an extended period.
ii) Rupture
This is complete tearing of muscle, which may occur in the freshy part of
the tendon.
• Partial tears: These tears damage the soft tissue but do not completely
sever the tendon.
• Complete tears: A complete tear will detach the tendon completely
from its attachment point at the bone.
Causes:
• Injuries
• Some medicaments like Corticosteroid medications
Signs or symptoms:
• Pain.
• Swelling.
• Tenseness.
• Bruising.
• Inability/weakness to move.
• Visible bruising in the elbow and forearm
Emergency and treatment:
Nonsurgical Treatment
It focuses on relieving pain and maintaining as much arm function as
possible. Treatment recommendations may include the use of RICE and
physical therapy (after the pain decreases, your doctor may recommend
rehabilitation exercises to strengthen surrounding muscles in order to
restore as much movement as possible).
Surgery
This is carried out to reattach the tendon to the bone is necessary to regain
full muscle functions. Surgery to repair the tendon should be performed
during the first 2 to 3 weeks after injury.
Treatment of common muscles injuries
Use RICE
–– Rest: Ensure rest, steady and support of injured area in the most
comfortable position.
–– Ice: If the injury has just happened, apply ice pack or cold compress to
cool the injured area to reduce swelling, bruising and pain.
–– Compress: Apply gentle, massage even pressure or compression, to the
injured area using cotton wool or plastic foam.–– Elevation: Raise and support the injured limb.
Application activity
Question 1: Explain the following terms used in first aid
a) Sprain
b) Open fracture
c) Dislocation
d) Bruise
e) Symptom
Question 2: Explain any four importance of first aid in the society.
Question 3: Discuss common emergency for injuries to bones, joint and
muscles.
Question 4: Choose the right answer
i) What is the correct sequence for the Primary Survey?
a) Damage, Response, Airway, Breathing.
b) Danger, Response, Airway, Breathing.
c) Danger, Reply, Artery, Breathing.
d) Danger, Response, Advice, Back
ii) What is normal body temperature?
a) 36-37.5°C
b) 39°C
c) 31.5°Cd) 40.5°C
Lesson 2: Practical aspect of first aid
a) Learning objective
Apply the appropriate emergency care to people who have injuries or accidents.
b) Teaching resources
Band-Aid(compulsory), wound cleaning agent (optional)such as sealed
moistened towelette, scissors(compulsory), at least one blanket (optional),
latex gloves( compulsory), wound cleaning agent(optional), triangular
bandage(compulsory), thermometer(compulsory), cleansing agents
(isopropyl alcohol, soap/germicide)(optional), first aid manual, water, razor
blades, chair, stretcher, clothes, trees for making improvised stretchers, watch/chronometer, notebook and pen.
c) Prerequisites/Revision/Introduction
Student teachers of Year 3 will perform better in practical aspect of first aid if
they have learned introduction to first aid in lesson one.
d) Learning activities
Tutor as a guide and facilitator, starts the lesson by asking student teachers
questions related to the lesson one.
Tell student teachers that their roles as first aiders are:
• To recognize the emergency.
• To protect themselves and others.
• To access help.
• To act according to their skills and training.
Remind student teachers that they may call emergency if:
• There is a danger to them or others.
• If an injured person:
Is not easily accessible, is not breathing normally, has persistent chest pain or
pressure, has severe bleeding, has a head, neck, or spinal injury and has an
observable mental health crisis.
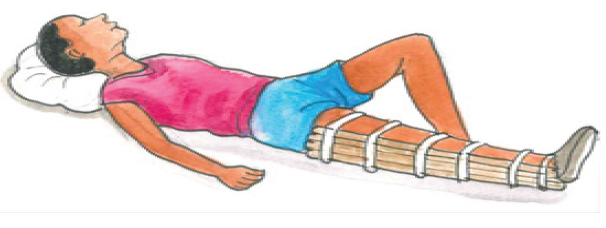
General first aid for injuries to bones and joints
Tell student teachers that the aim of first aid given to a person with bone and
joint injuries is to prevent further tissue damage and to reduce pain.
The following are procedures to follow while applying first aid to bones and
joints:
Check for potentially fatal conditions, the ABCs.
A = Airway (If the casualty is conscious, ask, “What happened?” How well the
casualty responds will help you determine if the airway is clear. Use a head-tiltchin-
lift to open the airway of an unresponsive casualty).
B = Breathing (If the casualty is conscious, check by asking how their
breathing is, If the casualty is unconscious, check for breathing for at least
five seconds, and no more than 10 seconds. If breathing is effective, move on
to check circulation. If breathing is absent or ineffective (gasping and irregular,
agonal), begin CPR.
C = Circulation ( Control obvious, severe bleeding, Check for shock by
checking skin condition and temperature, Check with a rapid body survey for
hidden, severe, external bleeding and signs of internal bleeding ).
Rapid body survey: The rapid body survey is a quick assessment
of the casualty’s body, which is performed during the primary survey.When performing the rapid body survey:
Wear gloves when possible, and check gloves for blood every few seconds, be
careful not to cause any further injuries while performing the survey, look at thecasualty’s face to notice any responses to the rapid body survey.
Perform a scene survey and a primary survey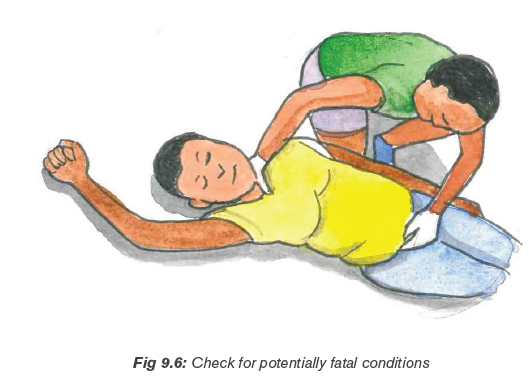
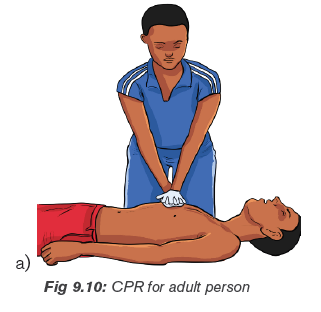
• CPR (Cardiopulmonary Resuscitation)
CPR is an artificial respiration and artificial circulation.
–– Artificial respiration provides oxygen to the lungs.
–– Artificial circulation causes blood to flow through the body.
It is used to circulate enough oxygenated blood to the brain and organs
to delays damage until either the heart starts beating again, or medical
help takes over from you. There are two main steps in CPR: Applying chest
compressions and then providing breaths.
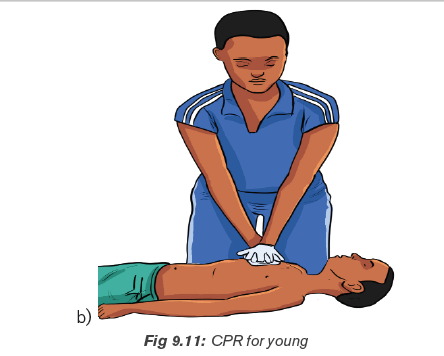
• Applying 30 chest compressions
The first aider should kneel next to the person who is injured. They should be
lying on their back.
–– For adults, place the heel of one hand in the middle of the chest. Place
your other hand on top of the first hand and interlace the fingers.
–– Push the chest down about 3.5cm to 5cm. If the person is a child aged
between 1 and 8 years, compress to a maximum of 3.5cm with one
hand. Let go, and wait for the chest to come back up completely before
repeating. Your elbows must remain straight throughout.
–– Push the breastbone up and down to a depth of about 5 cm about 30times, at a pulse rate of 100 beats per minute.
Provide two breaths: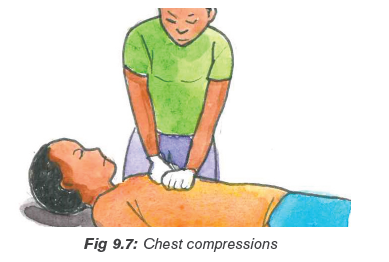
• Make sure the airway is open, and pinch the nose so it closes.
• Gently raise the chin upwards with two fingers of your other hand.
• Take a deep breath, seal your mouth over that of the person with the
injury, and exhale into the airway.
• You should see the chest rise and fall.
• To get another breath, lift your head and breathe in deeply. Perform steps
1, 2, 3, and 4 again.
Repeat the 30 chest compressions followed by the two breaths about five
times, and then check for normal breathing. If they are not breathing normally,
carry on performing CPR. If breathing restarts as normal, stay with the injured
person until help arrives.
It is important not to let your hands bounce when performing chest
compressions. Make sure the heel of your hand is touching the chestthroughout chest compressions.
Remind student teachers that once they have begun CPR, do not stop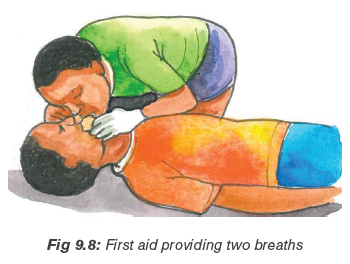
except in one of these situations:
• There is a sign of life, for example breathing.• Another trained responder take over.
The secondary survey is applied if: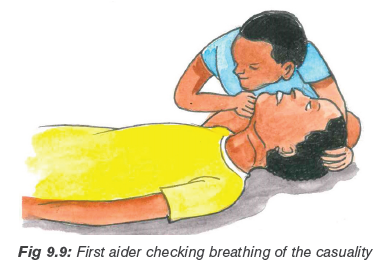
• The casualty has more than one injury.
• Medical help will be delayed more than 20 minutes: Steady and support
the injured part and maintain support until medical help takes over, or
the injury is immobilized, protect protruding bones. Do not push the bone
ends back in, do not attempt to apply traction to a limb (pull on it) or
manipulate it in any way,
• Medical help is not coming to the scene and you have to transport the
casualty: immobilize the injury, apply cold to the injury, as appropriate, if
medical help is on the way and will arrive soon, steady and support theinjury with your hands until they arrive.
Emergency for bones and articulations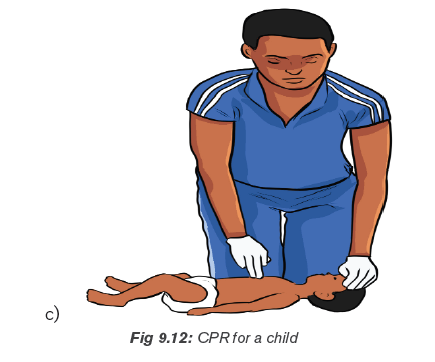
• Expose the injured area and look for a wound. If there is a wound, put a
dressing on the wound and get medical help quickly.
• If injuries permit, place the casualty in a semi-sitting position, leaning
slightly toward the injured side for easily breathing.
• Support the arm on the injured side to restrict movement.• Give ongoing casualty care, monitor breathing often and get medical help.
Bleeding and wound emergency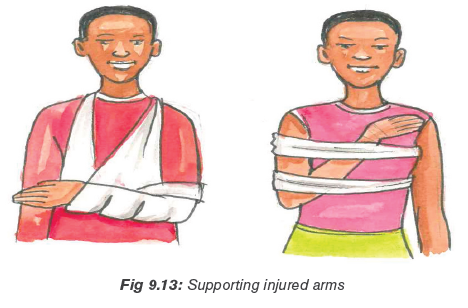
i) Nose bleeding
How to stop nose bleeding?
• Lean forward slightly with the head tilted forward (Leaning back or tilting
the head back allows the blood to run back into the sinuses and throat,
and can cause gagging or inhaling of blood).
• Do not spit out any blood that may collect in your mouth and throat (It
may cause nausea, vomiting, or diarrhoea if swallowed).
• Pinch all the soft parts of the nose together between the thumb and
index finger.
• Press firmly toward the face (compressing the pinched parts of the nose
against the bones of the face, breathe through your mouth).
• Hold the nose for at least five minutes. Repeat as necessary until the
nose has stopped bleeding.
• Sit quietly, keeping the head higher than the level of the heart. Do not lay
flat or put your head between your legs.
• Apply ice (wrapped in a towel) to nose and cheeks afterwards.
Stuffing cotton or tissue into your nose is not recommended.
• Resting with your head higher than your heart.
• Talking to your doctor about skipping blood-thinning medications, such
as aspirin, warfarin (Coumadin) and clopidogrel (Plavix).
• Avoiding blowing your nose or putting anything in your nose.
• Limiting bending.
• Not lifting anything heavy.
• Quitting smoking.
• Avoiding hot liquids for a minimum of 24 hours
• Sneezing with your mouth open, trying to push air out of your mouth andnot your nose.
ii) Wound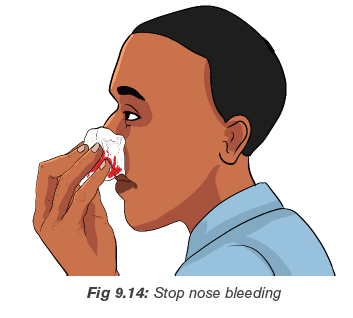
Open wound: An open wound is an injury involving an external or internal
break in body tissue, usually involving the skin.
–– Abrasion: An abrasion occurs when the skin rubs or scrapes against
a rough or hard surface. Road rash is an example of an abrasion. There
is usually not a lot of bleeding, but the wound needs to be scrubbed
and cleaned to avoid infection.
–– Laceration: A laceration is a deep cut or tearing of your skin. Accidents
with knives, tools, and machinery are frequent causes of lacerations.
In the case of deep lacerations, bleeding can be rapid and extensive.
–– Puncture: a puncture is a small hole caused by a long, such as a nail
or needle. Sometimes, a bullet can cause a puncture.
–– Avulsion: an avulsion is a partial or complete tearing away of skin and
the tissue beneath. Avulsions usually occur during violent accidents,
such as body crushing accidents, explosions, and gunshots. They
bleed heavily and rapidly.
Closed wound
–– Contusions: a kind of wound causing pressure damage to the skin
and/or underlying tissues (includes bruises).
–– Blisters: a kind of wound that has fluid filled pockets under the skin.
–– Seroma: a wound that has a fluid filled area that develops under the
skin or body tissue (commonly occur after blunt trauma or surgery).
–– Hematoma: a blood filled area that develops under the skin or body
tissue (occur due to internal blood vessel damage to an artery or vein).
–– Crush injuries: can be caused by extreme forces, or lesser forcesover a long period.
Common emergency for injuries to bones, joint and muscles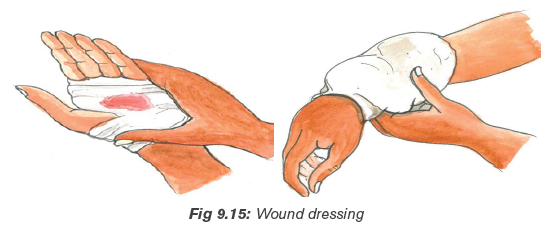
Use RICE for emergency
R stands for Rest: Stop the activity that has caused the injury. Have the
injured person rest comfortably.
I stands for Immobilize: Suspecting a fracture whenever there is an
injury to an arm or a leg and taking steps to prevent movement of the injured
limb.
C stands for Cold: Applying cold to the injury as soon as you can once
the injury has been immobilized.
E stands for Elevate: Raising the injured part if possible. Only elevate if it
will not cause more pain or harm to the casualty. Elevation helps to reduce
swelling and makes it easier for fluids to drain away from the injury. This inturn, helps reduce swelling (do not elevate a “locked” joint).
Remind student teachers to consider the following when making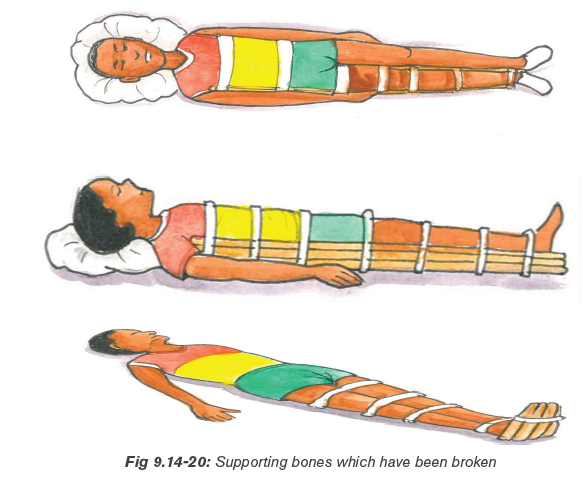
their decisions during providing first aid to the casualty
• Are there other risks to the casualty?
• Are there risks to themselves or others?
• If medical help can get to the scene, how long will it take?
• Do you have the materials needed to properly immobilize the injury?
• How long will it take to immobilize the injury compared to how long it will
take medical help to arrive?
Proper ways used in transportation of injured person/casualty
• Pick-a-back
It is used for transporting a conscious casualty with lower limb injuries in
case a casualty can use his arms. The casualty must be able to help get intoposition on your back or be already seated at chair or table height.
• Cradle carry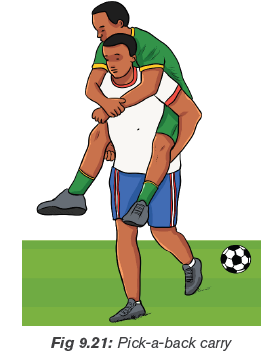
It is suitable for carrying children and light weighted adults.
Procedures
–– Kneel on one knee at the casualty’s side.
–– Place the casualty’s arm around your neck as you support the back and
shoulders.
–– Pass your other arm under the knees to grasp the thighs.
–– Ensure a solid footing and place the feet apart for good balance.
–– Lift using your legs; keep your back straight, and your abdominal musclestense.
• Fire fighter’s carry
This way should be used for casualties who are helpless and are not too
heavy for the rescuer.
Procedures
–– With the casualty lying face up in front of you, stand with your toes
against the casualty’s toes.
–– Grasp her wrists and pull her upward and forward.
–– Maintain a grip on one wrist as you turn and bend to catch the casualty’s
upper body across your shoulder. The lifting manoeuvre is a continuous,
smooth motion to bring the casualty through a sitting position to an
upright position, finishing with the casualty draped over your shoulder.
–– Adjust the weight across your shoulders, with the casualty’s legs
straddling your shoulder.
–– Pass your arm between the casualty’s legs and grasp her wrist. This willstabilize the casualty on your shoulders and leave your other hand free.
Two first aiders can carry a casualty who is unable to support his upper body.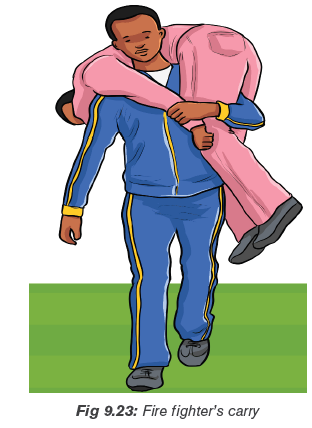
Procedures
–– The first aiders crouch on either side of the casualty.
–– Each first aider reaches across the casualty’s back to grasp his clothing
at the waist on the opposite side.
–– Each first aider passes his other hand under the thighs, keeping his
fingers bent and holding padding to protect against the fingernails. Hook
the bent fingers together to form a rigid seat. Alternatively, the rescuers
can hold each other’s wrists.
–– The first aider lifts with their legs, keeping their backs straight. Once
in the standing position, the rescuers adjust their hands and arms for
comfort. When the casualty is securely positioned, the bearers step offtogether, each using the inside foot.
It is used by the single first aider to drag a casualty who is either lying on their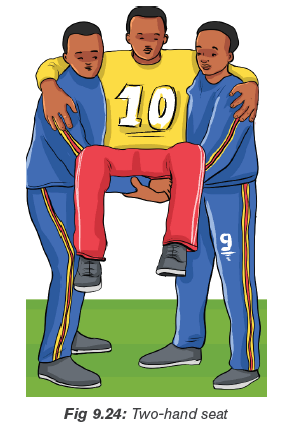
back or in a sitting position. The drag carry provides maximum protection to
the head and neck, and therefore should be used when you are moving a
casualty with this type of injury.
Procedures
To perform a drag carry:
–– Stand at the casualty’s head facing their feet.
–– Crouch down and ease your hands under the casualty’s shoulders.
Grasp the clothing on each side. Support the casualty’s head between
your forearms to stop movement.
–– Drag the casualty backward only as far as necessary for their safety.
As an alternate method, the first aider can use a blanket to support and drag
the casualty.
Because of the risk of aggravating any injuries, only use drag carries in theextreme cases when there is an immediate threat to life.
This carry is used if a leg or foot is injured; help the casualty to walk on their
good leg while you give support to the injured side.
Procedures
–– Take the weight of the casualty’s injured side on your shoulders by
placing the casualty’s arm (on the injured side) around your neck and
grasping the wrist firmly, Reach around the casualty’s back with your
free hand, and grasp the clothing at the waist, Tell the casualty to step
off with you, each using the inside foot. This let you, the first aider to takethe casualty’s weight on the injured side.
• Chair carry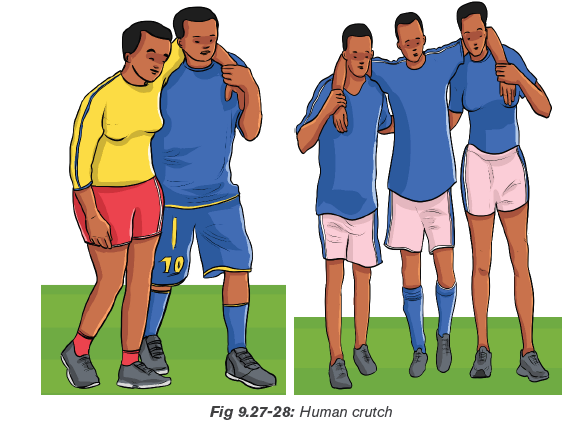
This carry enables two first aiders to carry a conscious or unconscious casualty
through narrow passages and up and down stairs.
Do not use this carry for casualties with suspected neck or back injuries.
Specially designed first aider chairs are available and should be used for this
type of carry.
If the casualty is unconscious or helpless:
–– Place an unconscious casualty on a chair by sliding the back of the chair
under their legs and buttocks, and along the lower back.
–– Strap their upper body and arms to the back of the chair.
–– Two first aiders carry the chair, one at the front and one at the back.
–– The first aider at the back crouches and grasps the back of the chair,
while the first aider at the front crouches between the casualties’ knees
and grasps the front chair legs near the floor.
–– The first aiders walk out-of-step.
Tell student teachers that while going down stairs:
–– The casualty faces forward.
–– The front first aider faces the casualty.
–– A third person/first, aider should act as a guide and support the front firstaider in case they lose their footing.
• Extremity carry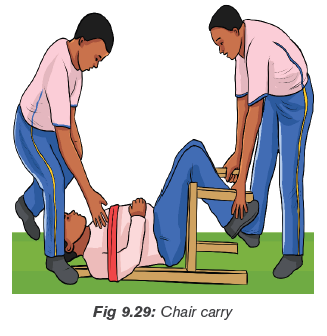
Use the extremity carry when you do not have a chair and do not suspect
fractures of the trunk, head, or spine.
Procedures
–– One first aider passes their hands under the casualty’s armpits, and
grasps the casualty’s wrists, crossing them over their chest.
–– The second first aider crouches with their back between the casualty’s
knees and grasps each leg just above the knee.–– The first aider step off on opposite feet.
• Stretchers (commercial stretchers, improvised stretchers)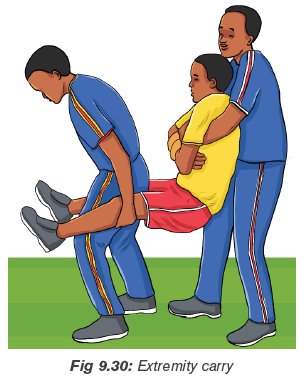
If the casualty cannot walk, or if the injury or illness allows only the gentlestmovement, a stretcher should be used.
Principles of using stretchers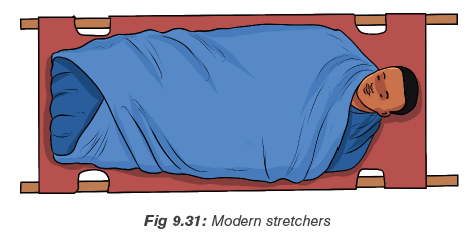
–– Complete all essential first aid and immobilization before moving the
casualty onto a stretcher.
–– Bring the blanketed and padded stretcher to the casualty, rather than
moving the casualty to the stretcher.
–– As the first aider in charge, take the position that permits you to watch
and control the most sensitive area of the body, usually at the head and
shoulders, or the injured part.
–– Tell the bearers what each is expected to do. If the move is difficult, and
time permits, it is a good idea to practice with a simulated casualty. This
reduces risks and reassures the conscious casualty.
–– Test an improvised stretcher with someone equal to or heavier than the
casualty to ensure that, it will hold.
–– Check the clearance of an improvised stretcher to ensure that it will pass
through hallways, doors and stairways without harm to the casualty.
–– Use clear commands to ensure smooth, coordinated movements.
Improvised blanket stretcher
Procedures
–– Place the blanket flat on the ground and place a pole one-third of the
way from one end. Fold the one-third length of blanket over the pole.
–– Place the second pole parallel to the first so that it is on the doubled part
of the blanket, about 15 cm from the doubled edge.
–– Fold the remaining blanket over the two poles. The casualty’s weight onthe blanket holds the folds in place.
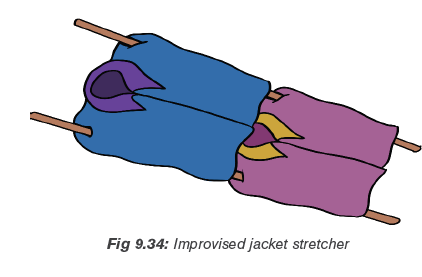
Improvised jacket stretcher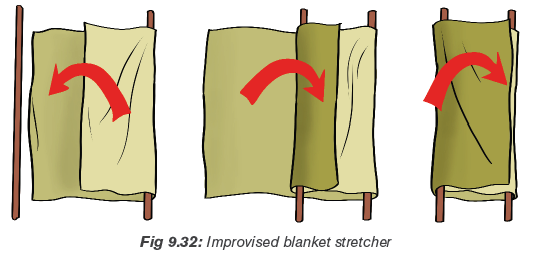
A non-rigid stretcher can also be improvised from two jackets and two or four
poles/strong trees.
Procedures
–– Button and zipper the jackets closed and pull the sleeves inside out so
that the sleeves are inside. Lay the jackets on the ground so that the top
edge of one jacket meets the bottom edge of the other.
–– Pass the poles through the sleeves of the two jackets on either side to
complete the stretcher.
–– If the casualty is tall, prepare another jacket as before and add it to thestretcher with the head of the jacket towards the middle.
Application activity 1
In pairs or group, let student teachers perform different carries used in first aid.
Application activity 2
In an assimilated situation, let student teachers apply how to perform CPR onassimilated injured person.
9.5. Summary of the unit
In first aid, there are different terms, which should be used. Those terms are
as the follow: wound, accident, airway, amputation, bruise, Cardiopulmonary
Resuscitation (CPR), casualty, choking, defibrillation, dehydration, dislocation,
fainting, first aid, fracture, inflammation, ligament, R.I.C.E (Rest Ice Compression
Elevation), re-oxygenate, first aider breaths, shock, spinal cord, spinal injury, splint,sprain, strain, stroke, symptom, syncope, tendon, unconscious.
Carrying out first aid during sports activities helps to:
• Preserve life
The overriding aim of all medical care, which includes first aid, is to save lives
and minimize the threat of death.
• Alleviate suffering
First aid done correctly should help reduce the patient’s level of pain and calmthem down during the evaluation and treatment process.
• Prevent further harm
Prevention of further harm includes addressing both external factors, such
as moving a patient away from any cause of harm, and applying first aid
techniques to prevent worsening of the condition, such as applying pressureto stop a bleed becoming dangerous.
• Promote recovery
First aid also involves trying to start the recovery process from the illness or
injury, and in some cases might involve completing a treatment, such as in thecase of applying a plaster to a small wound.
Different accident/injury may result during performing sports activities. Some
of those injuries and accidents are as the following: closed and open fracture,spinal cord injury, ribs and chest fracture, dislocation, sprain and strain.
9.6. Additional Information for tutors
• Terminologies used in first aid
–– A wound: is an abnormal break in the skin or other tissues of the body
that permits the escape of blood internally or externally and may allow
the entrance of germs and infection.
–– Accident: unplanned event or act that may result in injury, property
damage, death or is suddenly ill.
–– Airway: The tubes from the nose and mouth to the lungs.
–– Amputation: Cutting off a finger, toe or limb.
–– Bruise: is the damage to soft tissues and blood vessels causing bleeding
under the skin.
–– Cardiopulmonary Resuscitation (CPR): A life saving procedure that
includes the timed external compression (pushing) on the casualty’s
chest (to stimulate blood flow) by pumping the heart, and alternating
with mouth-to-mouth breathing to provide oxygen. Usually administered
as 30 chest compressions to every two breaths.
–– Casualty: The person who is ill or injured.
–– Choking: is obstruction of the flow of air from the environment into the
lungs.
–– Defibrillation: Delivering a dose of electrical energy to the affected heart
with a device called a defibrillator to stop the heart shaking.
–– Dehydration: Insufficient (not enough) fluid in the body because of loss
of body water or not drinking enough.
–– Dislocation: is an injury in which the ends of bones are forced from their
normal positions.
–– Fainting: is a temporary loss of consciousness caused by a shortage of
oxygenated blood to the brain.
–– First: aid is the initial assistance or treatment given to a person who is
injured or suddenly becomes ill.
–– Fracture: A fracture is a lesion produced by mechanical force on the
hard or mineralized tissues such as bone, which are characterized
by whether there is a solution of continuity or tissue breakage (there
is a break in the continuity of the bone).Graze: Usually a minor injury
removing the top layer of skin
–– Inflammation: Redness, heat and swelling around an injury.
–– Ligament: A band of fibrous tissue that connects bones or cartilage to
support and strengthen joints.
–– R.I.C.E (Rest – Ice – Compression – Elevation): treatment used during
the first 48 hours for most soft tissue damage. (Bruises, sprains, strains
etc.)
–– Re-oxygenate: To give more oxygen to someone or something.
–– Rescue breaths: Blowing air into an unconscious casualty through the
nose or mouth to get the chest to rise and get air into their lungs to reoxygenate
them.
–– Shock: physical condition that happens when the body is unable to
circulate blood properly.
–– Spinal cord: The nerve fibres within the backbone (spine) which allow
nerves to connect between the brain and muscles.
–– Spinal injury: An injury to the backbone, which can lead to spinal cord
damage, which can cause paralysis (inability to move).
–– Splint: support that helps keep a possible fracture from moving.
–– Sprain: the tearing of ligaments at a joint.
–– Strain: an overstretched muscle or tendon.
–– Stroke: A bleed or blocking of a blood vessel of the brain.
–– Symptom: What a casualty experiences and feels e.g. ‘it hurts’ ‘I feel
sick’.
–– Syncope: A medical word to faint.
–– Tendon: A fibrous, strong, connective tissue that connects muscle to
bone.
–– Unconscious: Does not respond to pain.
• General guidelines for safe practice
As the person in charge of the session, you are advised to monitor the day-today
health of those in your group. If students show signs of illness or injury, for
example shivering or muscle soreness, during the session, you must decide
whether they should continue. Most ailments become even worse under the
strain of physical activity and therefore the safest option is always to stop.
Remember that some injuries are accidental and unavoidable; others result
from negligence or overuse when the body is tired.
–– If students are tired or stressed, you may be wise to advise them to rest.
–– If they do have an injury, be sure it has fully recovered before they return
to sporting activities and build up the intensity gradually.
When you take sports sessions, you need to be familiar with basic first aid
procedures. Make sure you know where to find the nearest first aid worker
and, if possible, have a first aid kit at hand. Standard contents should cater for
strapping and bandaging, cleansing and dressing. If you do not have access
to a first aid kit, use clean water and clean material (preferably cotton) instead
to clean any wounds in the event of an injury, you should ‘STOP’:
• S stands for: Stop the activity and stay calm.
• T stands for: Talk to the injured student; reassure the student; ask what
happened and whether or where he or she feels pain.
• O stands for: Observe the student while speaking; is his or her behaviour
normal or confused. Is any part of the body swollen? If you are worried,
get help.
• P stands for: Prevent further injury and decide if the injury is severe use
your emergency action plan (see under Emergency procedures).
Emergency procedures
In case of emergencies, there must always be a plan of action. As each school is
different, a Physical Education and Sports tutor must plan him/herself how to give
first aid to their student teachers by doing the following:
–– Assess the situation and the injury.
–– Know how to contact a first aid worker or other medical help.
–– Know where you might get transport.
–– Keep a note of the events, for example how the injury happened, when,
what you saw and heard, for your own records and so you can pass on
accurate information.
–– Contact friends and family if necessary, and tell them the situation clearly
and calmly.
• For minor injuries
Most injuries in sport do not require emergency treatment. They need time
and a sensible course of action to make a full recovery. It is important forinjuries to be dealt.
Do not use heat or massage with any of the above injuries, for minor injuries,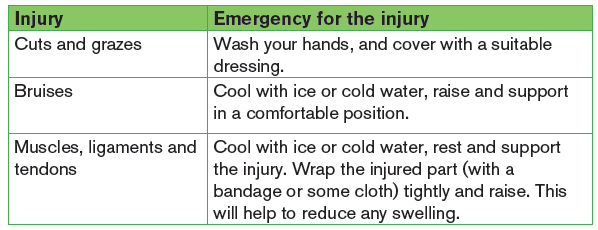
remember ‘RICE’:
–– Rest: Stop the activity immediately.
–– Ice: Apply ice or cold water (see bruises above) to the injured area; you
can protect skin from ice burns with a thin layer of doth.
–– Compress: Wrap the injured area tightly with a bandage or some cloth.
–– Elevate: Raise the injured limb.
Remember helping your students to prevent suffering from dehydration or
heat exhaustion/exposure by encouraging them to:
–– Drink plenty before, during and after exercise.
–– Eat sensibly.
–– Wear cool, breathable clothing, for example cotton T-shirts.
–– Wear light-coloured clothing because dark colours retain more heat.
–– Keep the sun off their heads and faces by wearing caps or similar items.–– Stay in the shade as much as possible.
• Movement of the major joints of the body
Recovery position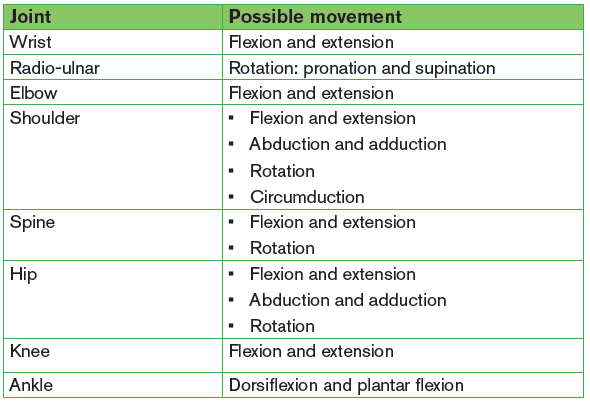
The most effective position is lying propped on the side with the mouth and
head positioned to allow drainage. The First Aider should obviously be very
careful if neck or other injury is suspected but remember airway always comes
first.
Use the recovery position for:
–– Any unresponsive casualty who is breathing normally, but you are
concerned about a risk to their airway, e.g. they may vomit.
–– Any conscious player if they are going to be left alone whilst help is
summoned and they are at risk of lapsing back into unconsciousness,
and becoming unresponsive.
To place a player into the recovery position
–– With the person lying on their back, kneel on the floor at their side.
–– Extend the arm nearest you at a right angle to their body with their palm
facing up.
–– Take their other arm and fold it so the back of their hand rests on the
cheek closest to you, and hold it in place.
–– Use your free hand to bend the person’s knee farthest from you to a right
angle.
–– Carefully roll the person onto their side by pulling on the bent knee.
–– Their bent arm should be supporting the head, and their extended arm
will stop you rolling them too far.
–– Make sure their bent leg is at a right angle.
–– Open their airway by gently tilting their head back and lifting their chin,
and check, that nothing is blocking their airway.
–– Stay with the person and monitor their condition until help arrives.
If a person is unconscious but is breathing and has no other life-threatening
conditions, they should be placed in the recovery position.
Principles to follow in placing an injured person in recovery position
–– The casualty should be in as near a true lateral position as possible with
the head dependent to allow free drainage of fluid.
–– The position should be stable.
–– Any pressure of the chest that impairs breathing should be avoided.
–– It should be possible to turn the victim onto the side and return to the
back easily and safely, having particular regard to the possibility of
cervical spine injury.
–– Good observation of and access to the airway should be possible.–– The position itself should not give rise to any injury to the casualty.
• The skeletal system
The framework of the human body is made up of just over 200 bones, whichvary considerably in size and shape.
• Muscular system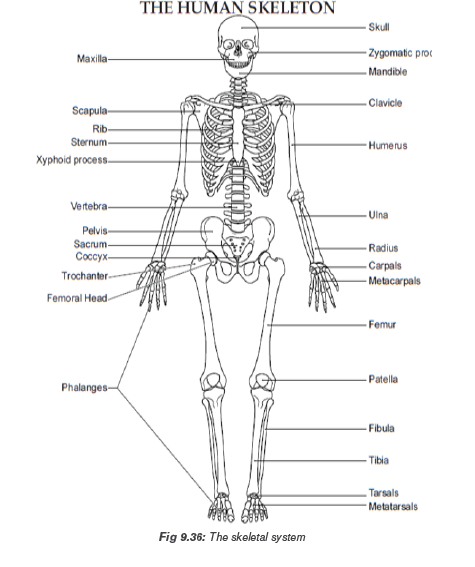
The muscular system constitutes about 45% of our total body weight. Muscles
are made up of 30% protein and 70% salt solution. Without muscles, not
all actions, including movements as simple as maintaining normal posture,breathing, and walking, would be possible.
• Cardio-vascular system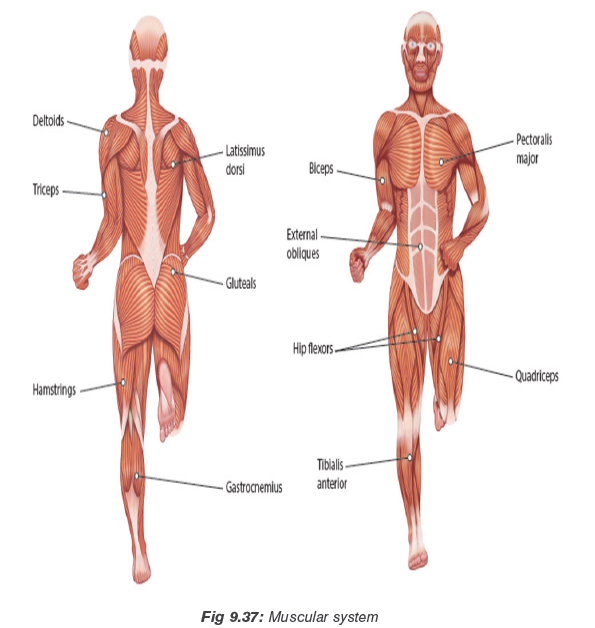
The cardiovascular system (the circulatory system or circulation) it is the
system formed by your heart, blood vessels and blood. The heart is a muscular
pump. It has four chambers:
–– Two atria: that collect the blood as it comes into the heart.
–– Two ventricles: that pump the blood out of the heart.
The structure of the blood vessels
There are three main types of blood vessel:
–– Arteries (Red): which generally take blood away from the heart.
–– Veins (blue): which return blood it to the heart.
–– Capillaries: distribute blood within the organs.
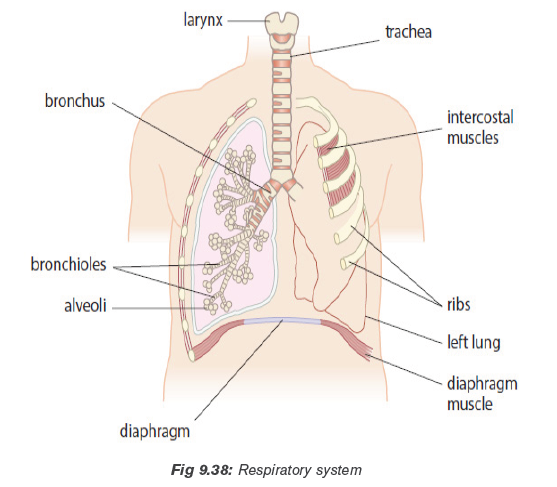
• Respiratory system
Every tissue within the body needs oxygen to function. The respiratory system
is the system of organs and vessels that gets oxygenated blood to the bodytissues and removes waste gases.
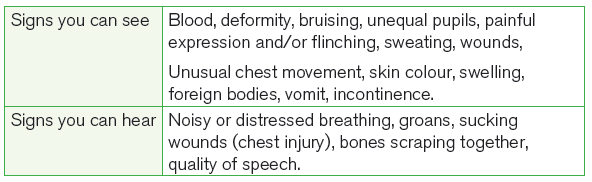
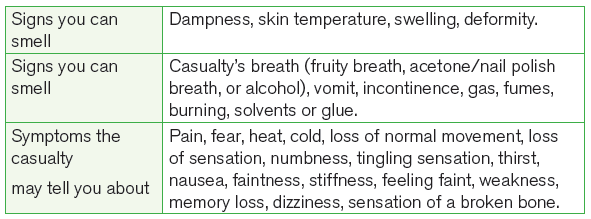
• Signs and symptoms for casualty
• CPR skills comparison
9.7. End unit assessment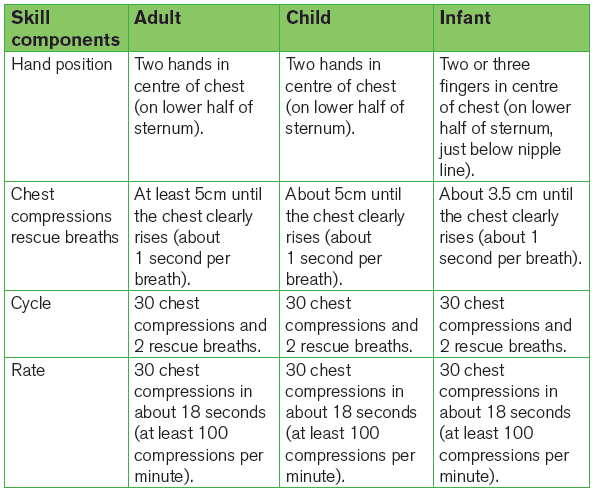
1)
a) Assume you are attending a football match in your local area. Unfortunately,
there are accidents where one of players breaks his tibia. Briefly explain
how you can provide basic first aid to this player.
b) After giving basic first aid to the above player describe how you can carry
this casualty to the nearest dispensary or hospital because no other means
of transport is possible in this area.
2) Explain when and how to use CPR during providing basics first aid.
9.8. Additional activities
9.8.1. Remedial activities
Student teachers discuss the implication of first aid in any sports situation at
school.
9.8.2. Consolidation activities
By using a scenario, student teachers perform first aid to support injured people.
9.8.3. Extended activities
Encourages student teachers to provide first aid during sports competitionsorganized by the school or sector.
REFERENCES
1. Dave Carnell, John Ireland, Claire Jones, Ken Mackreth, Sarah van Wely
(2002), Advanced PE for OCR, Oxford U.K
2. ELIAS, A. HILGERS, W. JETTER, M. RASHDORFF. J. WINTERMEIIER, D.
WOLFARTH Education Physique et Sportive pour les Ecoles Primaire et
les CERAI, F, Kigali.
3. FIFA. (2018). Coaching manual
4. Goldberger, M. and Howarth, K. (1990). The National Curriculum in Physical
Education and the Spectrum of Teaching Styles. British Journal of Physical
Education.
5. Ken Jones and Pat Welton (1979) Soccer Skills and Tactics, Crown
Publishers.
6. Ministry of Education. (1998). Physical and Sports Training Programme in
Ordinary Level. National Curriculum Development Centre.
7. Peter J L Thomson (2009) The Official IAAF Guide to Teaching Athletics
8. REB (2019). The Teacher Training Colleges (TTCS) COMPETENCE
BASED CURRICULUM ORIENTATION MANUAL, Kigali.
9. REB. (2015). Ordinary level Physical Education syllabus
10. REB (2019). TTCs Physical Education and Sports syllabus
11. REB. (2016), Physical Education for Rwandan Schools. Teacher’s Guide,
Ordinary level 1, MK Publishers, Kigali, Rwanda.
12. REB. (2016), Physical Education for Rwandan Schools. Teacher’s Guide,
Ordinary level 2, MK Publishers. Kigali, Rwanda.
13. Right to Play, (2007). Football for development. Coaching manual
14. Williams, A. (1993). Aspects of Teaching and Learning in Gymnastics.
British Journal of Physical Education.
15. St John Ambulance (2019) saving lives REFERENCE GUIDE, Fourth
Edition, Canada.
16. Gina M. Piazza, DO, FACEP (2014) First Aid Manual, fifth Edition, New
York.
17. AL JUFAILI Mahmood S. Dr (all) (2015) Football Emergency Medicine
Manual, 2nd Edition, Zurich.
Electronic references
1. http://vcdm.org/global/images/misc/SIT_Drills_All.pdf.
2. http://vcdm.org/global/images/misc/SIT_Systems_Offensive.pdf.
3. http://www.blazesports.org.
4. http://www.dhamilton.net/goalball/HOW_TO_PLAY_GOALBALL/How_
to_Play_GOALBALL.htm.
5. http://www.education.auburn.edu/wpcontent/uploads/2015/09/
Handball-handbook.
6. http://www.olympichandball.org/wpcontent/Basic%20Handball%20
Methods.
7. https://www.disabled-world.com/sports/goalball.php.
8. https://www.nchpad.org/1073/5480/Sitting~Volleyball~~A~Skill
Enhancing~and~Physically~Demanding~Activity.
9. https://www.quora.com/What-are-the-best-techniques-for-efficientlyrunning-
long-distance.
10. http://www.worldparavolley.org/disciplines/sitting-volleyball/).
11. www.cifstate.org
12. www.fiba.com
13. www.fifa.com
14. www.fivb.com
15. www.ihf.com
16. www.iaaf.com17. www.netbalnation.com.