General
- S1: Biology TG File Uploaded 16/08/22, 11:10
- S1: Biology SB File Uploaded 16/08/22, 11:23
UNIT 4 Magnifying instruments and biological drawings
Key unit
competence
To be able to explain
the components and
demonstrate proper
use and care of a
hand lens and light
microscope.Cross-cutting issue
Environment and
sustainability: Think
about how you dispose
of microscopes and
other old pieces of
technology. How can
you do this in a way
that doesn’t damage
the environment?At the end of this unit, you should be able to:
• Explain why we need to use magnifying instruments
• Identify a given unknown specimen
• Recall that a hand lens is a simple magnifying glass for observing relatively small
objects
• Identify the different components of a light microscope and explain their
functions
• Recall that microscopes are delicate instruments that need great care
• Explain that the light microscope has various levels of magnification
• List the features of a good biological drawing
• Explain that magnification is the number of times larger an image is than the
object (specimen) under the microscope
• Manipulate a hand lens to observe relatively small specimens
• Manipulate a light microscope to observe various specimens from prepared
slides
• Illustrate the biological specimens observed under a light microscope
• Illustrate well labelled biological diagrams of specimens
• Compare the relationship between the actual size of the specimen and its image
• Measure and calculate the magnification of a given specimen
• Appreciate the need for using a light microscope and a hand lens in observation
of specimens
• Show perseverance when making scientific observations
• Show care and proper use of the magnifying instruments.Oral activity
In your groups, think about what you learnt in previous grades.
Th en, brainstorm the answers to these questions.
1. Give two reasons why scientists need to observe things using
instruments that make these things bigger.
2. Work out a defi nition of the word ‘magnify’.
3. Discuss whether you have ever used a magnifying instrument.
If you have, then describe what you used it for and what you saw. Figure 4.2 Microscopes are important instruments for observation.
Topic 2: Organisation and maintenance of life
Why do we need magnifying instruments?
Biologists make many observations when they work. Observations enable
them to see the details of living things. Many things are too small for us
to see using only our eyes, so they need to be made bigger, or magnified.
There are two instruments that biologists use for this. When they work
outside the laboratory, they can use a hand lens. Inside the laboratory, they
can use a microscope.Hand lenses
A hand lens is a magnifying instrument that is held in the hand. We use it
to look at small things, such as insects, flowers and animal parts, that are
too big to put on a microscope slide.Microscopes
The first microscope was invented by Robert Hooke in 1665. He used it
to look at cells. Today, we can use powerful microscopes to see viruses,
bacteria and cells. There are many types of microscopes.
Figure 4.3 Hand lens

Figure 4.4 The first
microscope, invented by
Robert Hooke, in 1665Experiment 4.1
Work in groups.
You will need: a hand lens; a light microscope; newsprint; moss plants; a
pencil; paper
Procedure
1. Place the lens just above the newsprint, and then look down through
the lens.
2. Move the lens closer to your eyes, and then further away from your
eyes.
3. Repeat step 2, above, using a moss plant. Identify the small green
leaves and the tiny transparent rhizoids.
Questions
1. How does the image appear when the hand lens is close to the object
and when it is further away from the object?
2. Make a simple drawing of a moss plant, and label the structures you
have identified; for example, the leaves, rhizoids and stem.Unit 4: Magnifying instruments and biological drawings
Parts of a microscope
In the following experiment, you will learn about the different parts of a
light microscope and what the function of each part is.Experiment 4.2
Work in groups.
You will need: a microscope, or you can use the diagram below if your
school does not have a microscope
Procedure
1 eyepiece – the lens that
you look through; it
usually has 10× or 15×
power
2 body tube
3 nosepiece – holds two or
more objective lenses; it is
rotated to change power
4 objective lenses – lenses
of different magnification;
the shortest lens has the
lowest power; the longest
lens has the highest
power
5 stage clip – holds the
slide in place
6 stage – the flat platform
where you place your
slides; it can be moved left
and right to view the slide
and up and down to focus
7 diaphragm – a rotating
disk with holes of different
sizes; it is used to vary
the intensity and size of
the cone of light that is
projected upwards into the slide8 condenser – focuses the
light onto the slide
9 light source – bulb or
lamp; if the microscope
has a mirror, it is used
to reflect light from an
external light source up
through the bottom of
the stage
10 coarse focusing knob –
brings the specimen into
focus under a low-power
objective lens; it cannot
be used with high-power
objective lens
11 fine focusing knob –
brings the specimen into
focus under mediumand
high-power
objective lenses
12 light switch – turns the
light source on
Topic 2: Organisation and maintenance of life
The functioning of a microscope
If your school does not have enough microscopes, your teacher will
demonstrate how to use one correctly.
Activity 4.1
Work in pairs or groups.
1. Carefully carry a microscope to your workbench or desk using both
hands. One hand should be on the arm of the microscope and the other
underneath, below the base.
2. Identify the different parts of the microscope using Figure 4.5, on
page 42, to help you. Do not touch the surface of the lenses.
3. Turn the nosepiece so that the objective lens with the lowest
magnification is in position.
4. Turn the coarse focus knob and observe what happens to the objective
lens.
5. Turn the mirror so that light is reflected through the lens.Activity 4.2
Work in the same pair or group you were in for Activity 4.1. Your teacher
will give you a slide with a specimen on it. Follow these steps to view the
specimen using your microscope.
1. Make sure that the lowest power objective lens is in place.
2. Turn the coarse focus knob until the lens is as far away from the stage
as possible.
3. Put the slide onto the stage and clip it in place. Move the slide until the
specimen is directly under the lens.
4. Slowly turn the coarse focus knob until the specimen is in focus. You
can use the diaphragm above the mirror to change the amount of light
passing through the specimen.
5. Once the specimen is in focus with one lens, it will be nearly in focus
with the other lenses. Now you will need to turn only the fine focus
knob.
6. Turn the nosepiece so that a more powerful objective lens is in place
above the slide.
7. Use the fine focus knob to bring the specimen into focus.Unit 4: Magnifying instruments and biological drawings
How to store a microscope
Microscopes are expensive instruments that must be used and stored with
care.
1. Place the lowest power objective above the stage, and turn the coarse
focus knob so that the lens is as far away from the stage
as possible.
2. Make sure that there is no water on the stage. Use a tissue to clean it if
there is.
3. Store the microscope in a box or with a cover over it.Experiment 4.3
Work in groups.
You will need: a microscope; a hand lens; slides; glycerine; a razor blade;
pollen grains; cover slips; a needle; forceps or small tweezers;
a dropper; an onion bulb; iodine solution; a dead fly or mosquito
ProcedurePart A
1. Use the hand lens to look at the insect specimen.
2. Discuss how much detail you can see.Part B
You will now prepare a slide for viewing using a light microscope. Look
at Figure 4.6, on page 45, to help you as you work.
1. Make sure that the glass slide is clean. Use a tissue to clean it if it is
dirty. Try to hold the slide on the edges.
2. Place a small drop of iodine in the centre of the slide (see A in Figure
4.6).
3. Use forceps to peel off the thin outer layer that surrounds the fleshy
white storage leaves of the onion (see B). This layer is the epidermis;
it is made up of a single layer of cells.
4. Carefully, use a razor blade to cut off a small piece of the epidermis,
about one centimetre square.
5. Place the piece of onion skin in the drop of iodine (see C). Try to
flatten it against the slide, using the needle.
6. Hold one side of the cover slip as shown in the diagram, and slowly
lower it on top of the iodine (see D). Do this carefully to avoid
trapping air bubbles.Topic 2: Organisation and maintenance of life
7. If there is iodine around the slip cover, clean it away using a tissue
(see E).
8. Place the slide onto the stage of the microscope (see F).
Part C
1. Adjust the microscope to view the specimen (as you learnt to do in
Activity 4.2).
2. Make an accurate drawing of what you see.
3. Make other slides using specimens such as a fly’s wing and pollen
grains. Use glycerine instead of iodine for these slides.
Figure 4.6 Preparing a specimen for viewing under a microscope
Questions
1. List two differences between a hand lens and a microscope.
2. Give one advantage of using a hand lens and one advantage of using
a microscope for magnifying specimens.
3. Explain why you must NOT use the coarse focus adjustment knob
when the high power objective is in place.Care of a microscope
Microscopes are expensive instruments that can be damaged easily, so it is
important to handle them with care. These are some of the ways of caring
for a microscope.
1. Always place the microscope in its box when it is not in use, or cover it
with a plastic cover.
2. Avoid touching any lens surface of the condenser and objectives. Polish
these regularly using a tissue.Unit 4: Magnifying instruments and biological drawings
Never force the coarse and fine focus adjustments beyond the end of
their range of movement.
4. Always carry a microscope by the arm and stand, and use
two hands.
5. Keep the stage dry and clean.
6. Always cover the specimen on the slide with a cover slip, to protect the
objective lens.
7. Always move the lens up when focusing, to avoid breaking
the slide.
8. Clean the mirror occasionally using a tissue.
9. Never unscrew the lens components.Biological drawings
Biologists need to make careful and accurate observations. They need to
record what they see, and so they need to draw accurate biological drawings
of their specimens. We can learn the skill of drawing biological specimens
accurately, through practice.
A good biological drawing should:
• have a detailed, underlined title at the top of the page
• have smooth, fairly thin, solid pencil lines made by controlled
movements of the hand
• be large enough to show all the parts
• be neat
• show the magnification (you will learn about this in the
next section).
Topic 2: Organisation and maintenance of life
Magnification
The magnification of a specimen is a measure of how much bigger it is when
viewed with a hand lens or a microscope compared with its actual size.
The magnification of a hand lens is usually written on it. Hand lenses can
magnify specimens between 2 and 6 times.
For a light microscope, the magnification of each lens is written on its
side. It can be written in the form of ‘×40’, or ‘40×’ or simply ‘40’. There are
two lenses: the eyepiece lens and the objective lens. The total magnification
of an image through a microscope is calculated
as follows:
Total magnification of microscope = eyepiece magnification × objective
lens magnificationWorked example: Calculate total magnification
A learner views a specimen using a microscope with an eyepiece lens that has a
magnification of 10×. She uses an objective lens of 50×.
What is the total magnification?
We use this formula.
Total magnification = eyepiece magnification × objective lens magnification
So total magnification = 10 × 50
= 500×Magnification of biological drawings
When you draw a specimen, you usually also magnify it. Your drawing will
be bigger than the image that you see through the hand lens or microscope.
If you have an image or biological diagram of a specimen, you can work
out how many times it has been magnified. You work with three factors
when working out the magnification of an object. These are:
• the image size (how large an image is or how big a drawing of the
specimen is)
• the actual size of the specimen (how large it is in the real world)
• the magnification (how much larger the image size is compared with
the actual size; how many times the image has been enlarged).
We use this formula to work out the magnification of a drawing.
In this formula, size could be length or breadth, but the same measurement
must be taken of both the specimen and the drawing.
Always include a magnification or scale bar on your drawing.Unit 4: Magnifying instruments and biological drawings
Worked example: Calculate magnification of a drawing
Uwimana measures a bean seed. It is 3 cm long. She makes a biological
drawing of the seed. The length of the seed in her drawing is 15 cm. By
how much has the bean seed been magnified?
This means that the drawing is five times bigger than the bean
specimen.Exercise 4.1
1. A leaf measures 4 cm in length. A diagram of the leaf that appears in
a Biology textbook measures 12 cm. By how much has the leaf been
magnified?
2. A group of learners use a microscope to view a cell. The eyepiece lens
magnifies objects 10× and the objective lens that they use magnifies
25×. What is the total magnification?Homework
1. Collect two biological specimens. They can be a flower, leaf or plant
you collected outside the classroom.
2. Use a hand lens to view your specimens.
3. Make careful biological drawings of your specimens. Label anything
you can. Remember to give the magnification of
your drawing.
4. Which part of this activity did you find the most difficult? Explain
what you would do differently if you had to do the activity again.Exercise 4.2
1. Copy Figure 4.7, on page 46, to practise biological drawing.
2. A learner looks through a microscope using a 20× eyepiece lens and
a 40× objective lens. What is the total magnification that the learner
is using?Topic 2: Organisation and maintenance of life
Checklist of learning
In this unit, I have learned that:
Biologists use two types of instruments to observe things: hand lenses and microscopes.
These instruments magnify things, which means that they make them appear larger than their actual
size.
A hand lens is often used outside on fieldtrips as it is easy to carry and use.
Microscopes are used in laboratories, and specimens can be seen at higher magnifications than
when using a hand lens.
The different parts in a microscope are designed to make it function properly.
Biologists need to observe specimens and record their observations by drawing biological drawings.
The total magnification of a specimen when viewed with a microscope can be calculated by
multiplying the eyepiece magnification by the objective lens magnification.
The magnification of a biological drawing of a specimen can be calculated by measuring the size of
the drawing and dividing it by the actual size of the specimen.Self-assessment
1. Name two types of instruments that can be used to magnify things.
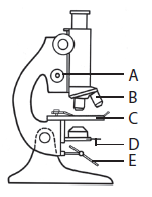
2. Complete the table.Eyepiece magnification Objective lens magnification Total magnification 5× 25× 10× 100× 3. Look at the drawing of a bee. 4. Provide labels for the micros part A to E.
If the bee’s actual length is 1,5 cm, how
many times has it been magnified
in the drawing?