General
- P5: Mathematics File Uploaded 31/07/22, 11:26
- P5: Mathematics TG File Uploaded 1/08/22, 18:29
- P5 MATH TG ( Adapted ) File Uploaded 2/11/22, 08:28
- END UNIT 1 ASSIGNMENTOpened: Saturday, 27 May 2023, 12:00 PMDue: Monday, 29 May 2023, 12:00 AM
UNIT 11: Drawing and construction of angles
11.1 Parallel lines, intersecting lines andtransversals
Activity 11.1• Observe the tables, desk, chairs and walls of the class
• You can observe other objects in your class like boxes or cartons.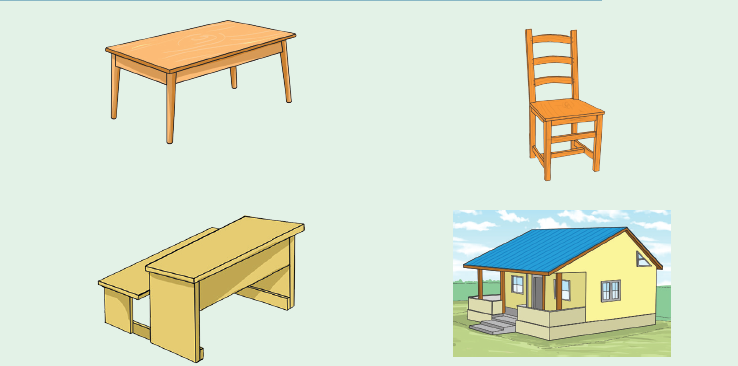
• Identify different lines such as;
(i) straight lines.
(ii) lines that meet.
(iii) lines that do not meet.(iv) Present your findings.
Tip:
• A line joins two points on a flat surface.
• When the lines do not meet, they are said to be parallel.
• When two lines meet, we say they have intersected.• When straight lines intersect they form angles.
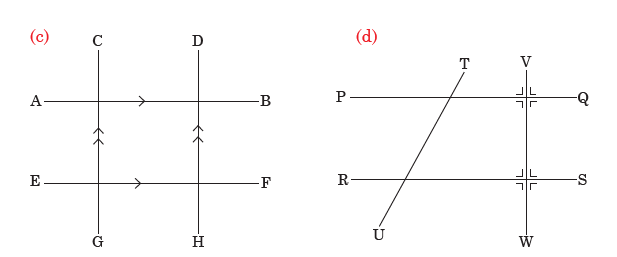
Example 11.1Below is a picture of a table. Study and answer the following questions
(i) Identify the lines that do not meet.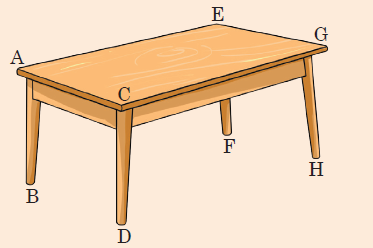
(ii) Identify the lines that meet.
(iii) Identify lines that cut parallel lines.
Solution
(i) • Lines AB, CD, EF and GH do not meet.
• Lines AC and EG do not meet.
• Lines AE and CG do not meet.
(ii) • Lines AB, AE and AC meet at A.
• Lines AC, GC and DC meet at C.
• Lines AE, GE and FE meet at E.
• Lines CG, HG and EG meet at G.
(iii) Lines that cut parallel lines are:
• CG cutting DC and HG.
• EG cutting FE and HG.
• AE cutting AB and FE.
• AC cutting AB and DC.
Parallel lines do not meet. CD is parallel to EF. We write CD//EF.
(iii) Intersecting lines
Intersecting lines meet at a point. Point O is intersection
point
(iv) The transversal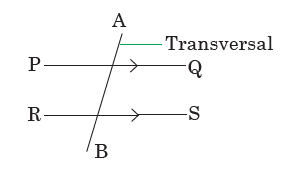
Transversal
• The transversal cuts parallel lines.
• PQ//RS• AB is transversal to PQ and RS.
Task: Now, draw your own:(i) parallel lines (ii) intersecting lines (iii) transversal
Practice Activity 11.1
1. Name lines that are parallel to each other from the diagrams below.
3. Observe the diagrams below. Explain and justify straight lines,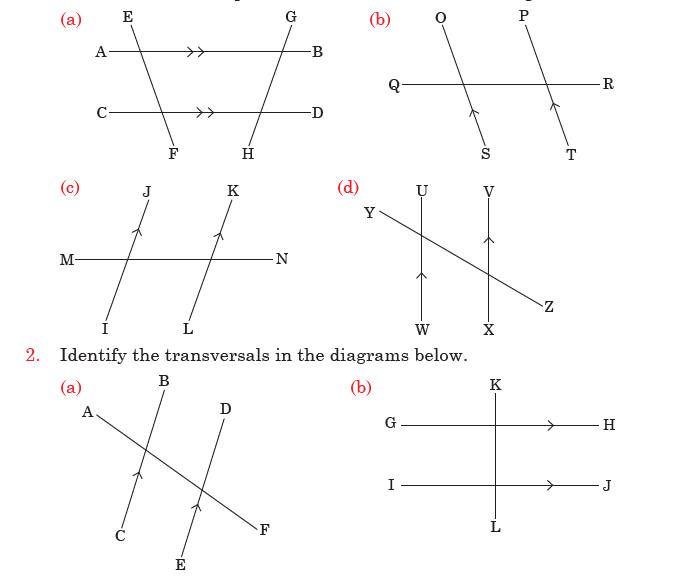
parallel lines and intersecting line.
4. Explain how you would identify intersecting lines from the lines drawn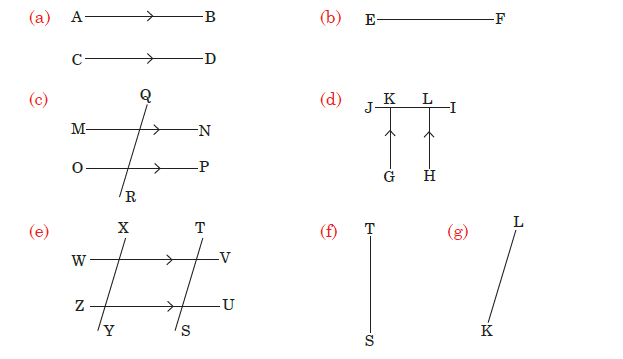
below.

11.2 Perpendicular lines
Activity 11.2
• Observe the walls of the classroom. Measure the angle where the
walls are meeting. What do you notice? Present your observation.
• Observe the windows of the classroom. Look at the corners wherethe frames join each other. Measure the angle. What is the angle?
Example 11.2Observe the rectangle drawn below.
Measure each of the angles at the corners of rectangle using a protractor.
Present what you notice about each angle to the class.
Solution
Each of the angles is 90°.
Tip:
Lines AB meet line BD forming a right angle. A right angle is 90°.
(a) From the rectangle in Example 11.2, we note:
• Lines that intersect at 90° are called perpendicular lines.
• Line AB is perpendicular to line BD.
• Line BD is perpendicular to line DC.
• Line BA is perpendicular to line AC. Give more examples.
(b) Lines CO and AOB are perpendicular in the figure below. The symbolsin the diagram shows the angles are 90°.
Practice Activity 11.2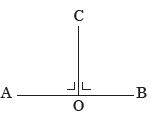
1. Identify the perpendicular lines in the following diagrams.

2. Observe the frame of the chair below.

Which lines are perpendicular to each other? Explain
11.3 Properties related to angles formed byintersecting lines
Activity 11.3
Study the figure below. Draw any two intersecting lines. Note angles a,b, c and d.
(i) Use a protractor to measure the angles a, b, c, d.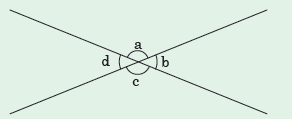
What do you notice about: a and c, and d and b?
(ii) Add angle; a + b, c + d, a + b + c + d and give the sum. Present yourresults.
Example 11.3Two straight lines AB and CD intersect as shown below.
(i) Use a protractor to measure the angles p, q, r and s.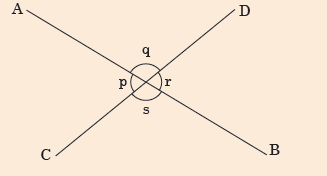
(ii) Find the sum of p + q, r + s.
(iii) What do you notice about angle q and s?
(iv) What do you notice about angle p and r?
(v) Find the sum of angle p, q, r and s.
Solution
(i) Angle p = 70°
Angle q = 110°
Angle r = 70°
Angle s = 110°
(ii) • Angle p + angle q: • Angle r + angle s:
p + q = 70° + 110° r + s = 70° + 110°
= 180° = 180°
(iii) Angles q and s are equal.
(iv) Angles p and r are equal.
(v) Sum of angles p, q, r, s
p + q + r + s = 70° + 110° + 70° + 110°= 360°
Tip:
(i) Angles on straight line add up to 180°. They are called supplementaryangles

a + b = 180°
(ii) • Angles at a point add up to 360°.
• Angles p and r are equal.Angles s and q are equal.
Angles p and r or s and q are called vertically opposite angles.
Practice Activity 11.31. Use a protractor to measure the angles shown by the letters below.
(a) Angle a = (b) Angle b =
(c) Angle c = (d) Angle d =
(e) What do you notice about angle a and angle d?
2. In the diagram below the value of one of the angles is given .
.
(a) Explain the steps involved to find the size of the following:
(i) Angle x =
(ii) Angle y =
(iii) Angle z =
(b) Angle y is vertically opposite to angle ___.
(c) Angle x + angle z = ___
3. Find the size of angles marked f, g and h. Explain your steps.
11.4 Angle properties of parallel linesCorresponding angles
Activity 11.4
Measure and discuss the angles marked with letters given in thediagrams below.
What do you notice about the size of angle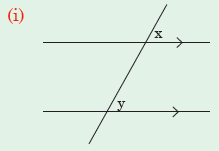
x and y?
Explain what you can notice about the size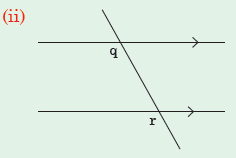
of angle q and r.
Example 11.4
Use a protractor to find the angles marked with letters and explain theirrelationship.
Solution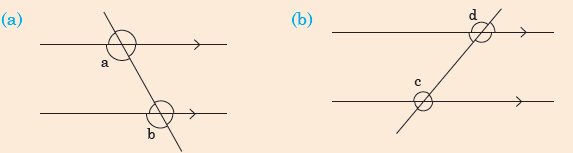
(a) a = 120° (b) c = 130°
b = 120° d = 130°Angles a nd b are equal. Angles c and d are equal.
Tip:
• When a transversal intersects two parallel lines, two pairs of equal
angles are formed as shown above. They are called corresponding
angles.
• We can say angle a corresponds to angle b. Angle c corresponds to
angle d.• Corresponding angles are equal.
Practice Activity 11.4Find the value of the angles marked with letters.
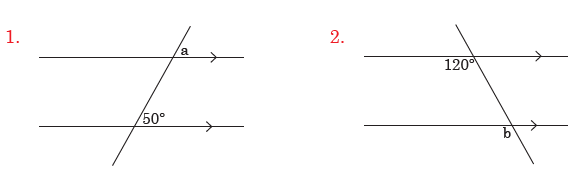
Find the angles marked with letters. Justify your answer.
11.5 Alternate angles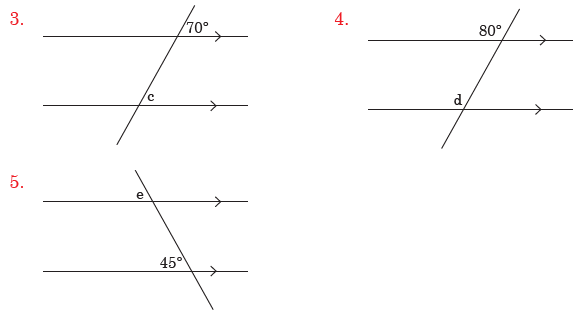
Activity 11.5
Use a protractor to measure and discuss the angles marked with letterson the diagram given below.
• Measure angles a, b, c and d.
• What do you notice about angle a and angle b?• Explain the relationship between angles c and angle d.
Example 11.5
Use a protractor to measure the angles marked with letters. Discuss therelationship between angles w and x? What is common between y and z?
Practice Activity 11.5
Find the value of the angles marked with letters and explain the relationship.
11.6 Co-interior angles
Activity 11.6Discuss and measure the angles marked with letters
• Add angles p + q, s + t.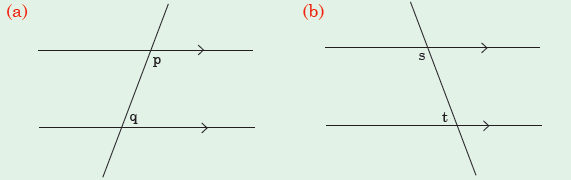
• What do you notice with the sum of angle p and angle q?• What do you notice with the sum of angle s and t? Explain.
Tip: Co-interior angles add up to 180°.
Example 11.6(a) Measure angles x and w from the figure below.
Solution
By measuring using a protractor,
angle w = 70°
angle x = 110°(b) Find the size of angle y in the diagram below.
Solution
Co-interior angles add up to 180°.
Therefore y + 70° = 180°
y = 180° – 70°y = 110°
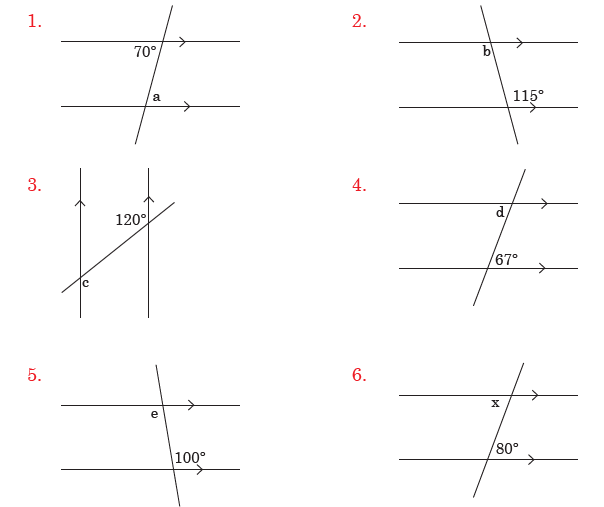
Practice Activity 11.6Find the value of the angles marked with letters.

Find the size of angles marked with letters. Justify your answers.

11.7 Drawing angles with a protractor
Activity 11.7
• Draw a straight line, AB = 10 cm. Mark its centre O. Have centre
O meet with the centre of your protractor. Mark a point where the
angle is 50° from left side.
• Repeat the steps above but do it from the right side of protractor.Discuss your steps.
Example 11.7
How to draw an angle;
• Draw a straight line and mark a point Y on it.
• Place the protractor on the line so that the centre point lies on Y and
the line passes through the zero marks of the lines and outer scales.
We can draw an angle between 0° and 180° by using either of the
scales.
• To draw an angle of 130° by using the outer scale. Mark a point W
on the paper at the 130° mark.
• Mark two more points X and Z on the line as shown in the figure.• Draw a line from Y through W.
• Angle XYW = 130°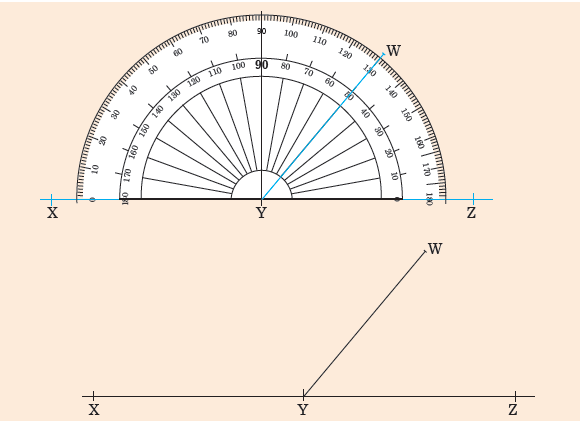
• YW also passes through the 50° mark of the inner scale. Thereforeangle ZWY = 50°.
Practice Activity 11.7
Use a protractor and a ruler to draw the following angles.
1. 120° 2. 60° 3. 70° 4. 110° 5. 80°
Use a protractor and a ruler to draw the following angles. Justify whether
you have used the inner or outer scale.
6. ABC = 100° 7. DEF = 85° 8. PQR = 95°9. GEF = 40° 10. XYZ = 140°
11.8 Bisection of angles (Using folding)
Activity 11.8
• Draw angles 120°, 90°, 80° on a paper.
• Cut out the angles. Fold each of the paper angles into two equal halves
• Cut out the angles along the line created from folding.
• Measure the angles of each of the halves.• Present your findings to the class.
Tip: To bisect an angle, we divide its size into 2 equal parts. When youbisect 90°, you get 45°.
Example 11.8Bisect the angle given below by folding.
Solution
Step I: Draw angle ABC on a paper. Make a paper cutout for the angle.
Fold the angle ABC into two equal parts.
Step II: Unfold the angle. Draw a line along the folded part as shownby the dotted line.
Step III: Measure the size of the angle on each of the two pieces. What
do you notice?
Practice Activity 11.8
Draw the following angles. Then explain how to bisect them using folding.
1. 60° 2. 100° 3. 80°
4. 120° 5. 90° 6. 130°7. 140° 8. 50° 9. 180°
11.9 Bisecting angles using a pair of compasses anda ruler
Activity 11.9• Look at the angle below.
• Make a paper cutout of the angle above. Fold it in half. What do you
get?
• Use a pair of compasses to bisect the angle ABC. What steps do youfollow? Discuss your steps.
Example 11.9Describe the steps involved in bisecting the angle below.
Solution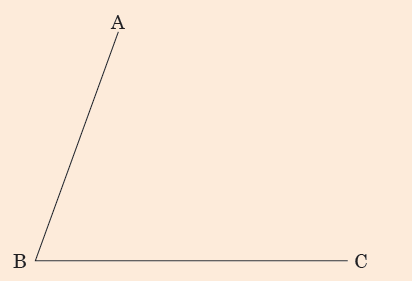
Step I: At point B, make an arc of any radius to cut line AB and BCat point x and y respectively.
Step II: With points x and y as the centres, make arcs to intersect at
point Z.Step III: Using a ruler, draw a line from point B to Z.
Line BZ divides angle ABC into two equal parts.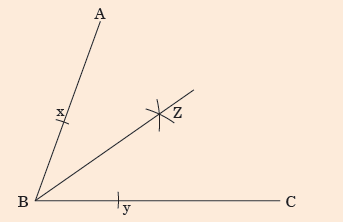
Angle ABZ is equal to angle CBZ.
Practice Activity 11.9Using a pair of compasses and a ruler, bisect the following angles.
Bisect the following angles using a ruler and a pair of compasses. Explain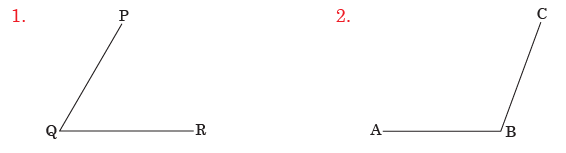
your steps.
11.10 Constructing 90°, 45° and 22.5° angles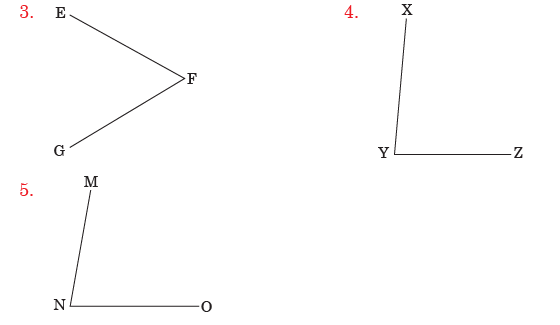
Activity 11.10
(a) • Make a paper cutout for 90°.
• Fold it to make an angle of 45°.
• Fold the paper cutout for 45° to form 22.5 °
(b) • Now construct an angle of 90°. Use a pair of compasses and a
ruler.
• Bisect 90° to have 45°.• Bisect 45° to have 22.5°.
Tip:
• Starting with 90° you bisect to have 45°.• When you bisect 45° you get 22.5°
Example 11.10
Explain the steps involved in constructing 90° using a ruler and a pair
of compasses only.
Solution
Step I: Mark an arc A on a straight line. Using A as the centre, make
two other arcs on both sides of point A. Label them as B andC.
Step II: Increase the radius and use points B and C as centres to draw
arcs intersecting at point D above the line.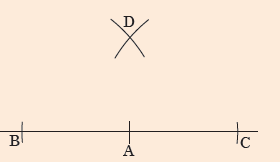
Step III: Join point A to D.
Angle DAC = 90°
Angle BAD = 90°
Example 11.11
Describe the steps involved in constructing 45° using a pair of compasses
and a ruler
Solution
Step I: Construct 90°. With point E as the centre, mark arcs to cut lineEF and EG at point J and K respectively.
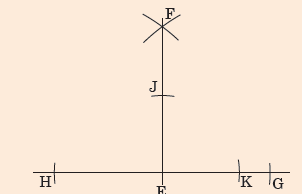
Step II: With J and K as the centres, mark arcs to intersect at point L.
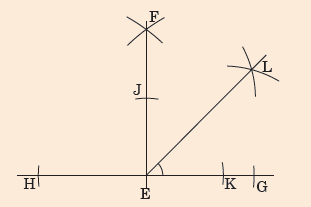
Angle LEG = 45°. Angle FEL = 45°.
Example 11.12
Explain the steps involved in constructing 22.5° using a ruler and a pair
of compasses.
Solution
Hint: Construct 90° then bisect the angle to have 45°. Bisect 45° to have22.5°.
Step I: Construct 90°. Bisect angle 90° to have MJO = OJL = 45°.
Step II: With point J as the centre, mark arcs. The arcs cut line OJ at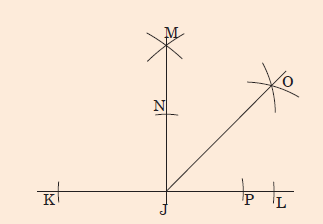
Q and line JL at R.
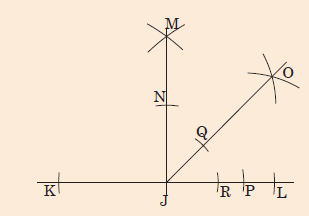
Step III: With Q and R as the centres, mark arcs to intersect at point S.

Angle SJL is half of 45°. Angle SJL = 22.5°.
Practice Activity 11.10
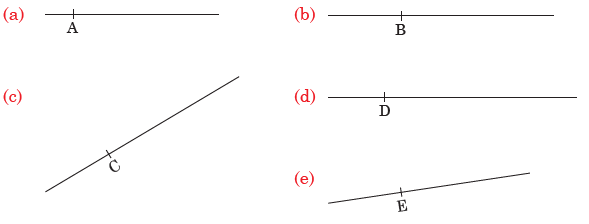
1. Construct 90° angle at the points marked with letters on the linesbelow.
2. Explain the steps involved in constructing a 45° angle at the points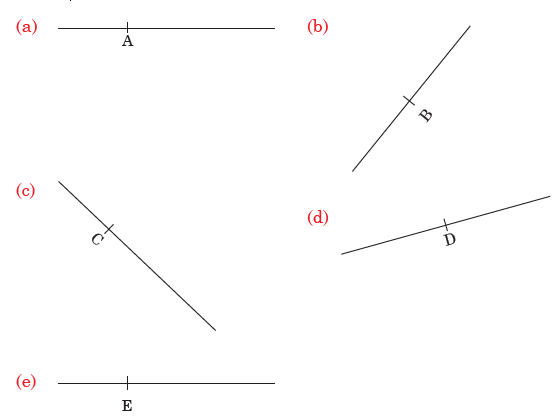
marked with letters.
3. Explain the steps involved in constructing a 22.5° angle at the points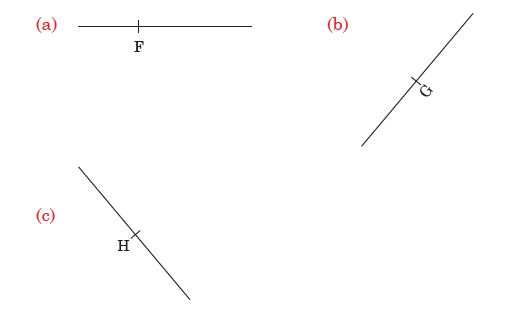
marked with letters.
11.11 Constructing 60°, 30° and 15° angles
Activity 11.11
(a) Construct 60° angle using a pair of compasses and a ruler.
• State the steps involved in constructing a 60° angle.
(b) Construct a 30° angle using a pair of compasses.• Discuss the steps involved in constructing a 30° angle.
Example 11.13(a) Construct a 60° angle at point X using a ruler and a pair of compasses
Solution
Step I: Use point X as the centre to mark an arc of any radius to cutthe line at Y.
Step II: Keep the same radius and use Y as the centre. Draw another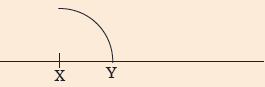
arc to intersect the first arc at Z.
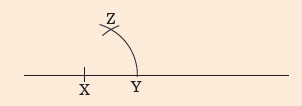
Step III: Draw a line through XZ. Angle ZXY = 60°.
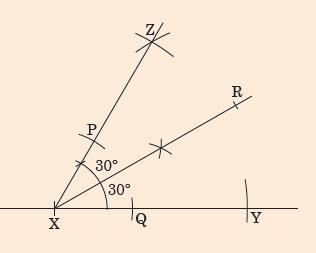
(b) Use a pair of compasses and a ruler to construct a 30° angle at X.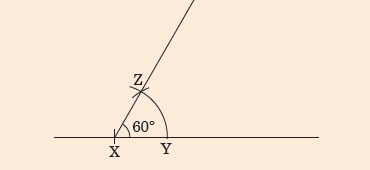
Discuss your steps.
Solution
Hint: Construct a 60° angle then bisect it to get 30°.
Step I: Construct 60° at X. With X as the centre, draw arcs to cut lineXZ and XY at point P and Q. See the diagram below.
Step II: With points P and Q as the centre, draw arcs to intersect at
point R. Join X to R. Measure angle RXY.
Angle RXY = ZXR = 30°.
Example 11.14
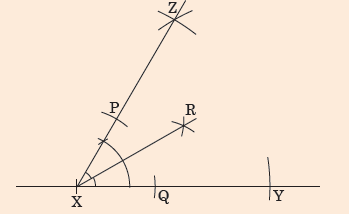
Construct a 15° angle at point X using a ruler and a pair of compasses.Discuss your steps.
Solution
Hint: Construct a 60° angle. Bisect 60° to get 30°. Bisect 30° to get 15°.Step I: Construct a 60° angle at X. Bisect 60° to get 30°.
Step II: With point X as the centre, draw arcs to cut XR at S and XY at T.
Step III: With S and T as the centres, draw arcs to intersect at point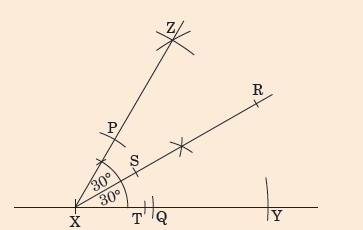
W. Then join XW. Measure angles RXW and WXY.
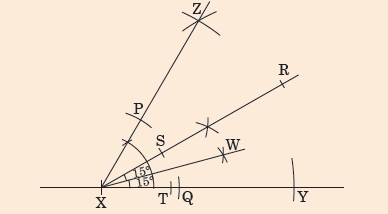
Angle RXW = WXY = 15°.
Practice Activity 11.111. Construct a 60° angle at the points marked with letters.
2. Construct a 30° angle using a ruler and a pair of compasses at the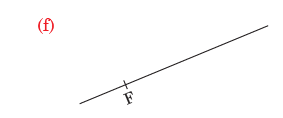
points marked with letters. Discuss your steps
3. Construct a 15° angle using a ruler and a pair of compasses at the
points marked with letters. Explain your steps.
11.12 Constructing angles 120° and 150° angles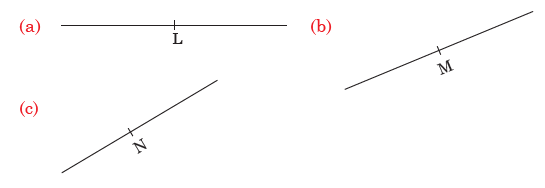
Activity 11.12
• Construct 120° and 150° angles using a ruler and a pair of compasses.Discuss your steps.
Example 11.15
Construct the following angles using a ruler and a pair of compasses.
Describe your steps.
(i) 120° (ii) 150°
Solution
(i) Constructing a 120° angle at point P.
Hint: 120° = 180° – 60°. We construct a 60° angle on a straight line. The
supplementary of 60° is 120°.Step I: Construct a 60° angle on one side of point P on line QPR.
Angles QPS = 120°.
(ii) Constructing a 150° angle
Hint: 150° = 180° – 30°. We construct a 30° angle on a straight line. The
supplementary of 30° is 150°.Step I: Construct a 60° angle at point B on line ABC.

Step II: Bisect a 60° angle to get 30°.
Since ABC = 180° and DBC = 30°, then angle ABD = 150°. Measure it
to confirm
Practice Activity 11.12
1. Construct a 120° angle at the points marked with letters. Use a pair ofcompasses and a ruler.
2. Discuss the steps involved in constructing a 150° angle at the point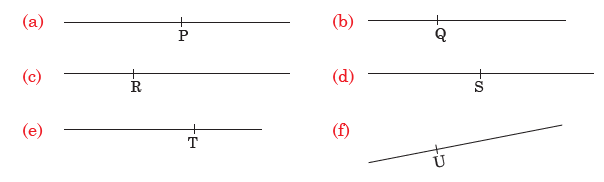
marked with letters. Use a pair of compasses and a ruler.
11.13 Angle sum of a triangle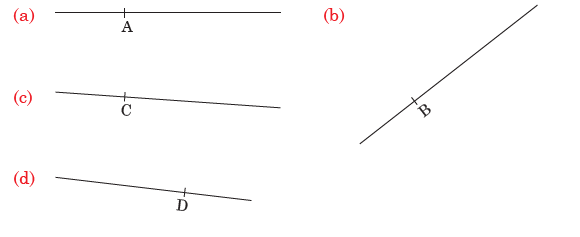
Activity 11.13
• Study the following triangles. We have labelled its angles with letters
a, b, c.• In each case, use a protractor to measure angles a, b and
• In each case, find the sum of a + b + c. What do you notice?
• Present your findings in class.
Tip: For any triangle, the sum of its interior angles is 180°.
• a, b, c are the interior angles of the triangle.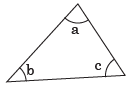
• a + b + c = 180°
Example 11.16
In triangle PQR below, two of the angles are given. Find the value ofangle x.
Solution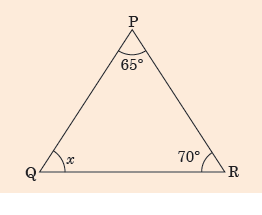
The interior angles of a triangle add up to 180°.
Therefore x + 65° + 70° = 180°
x + 135° = 180°
x = 180° – 135°x = 45°
Practice Activity 11.13
Study each triangle below. Then find the value of the angles marked withletters.
Explain the steps involved in getting the angles marked with letters in
each of the following.
Revision Activity 11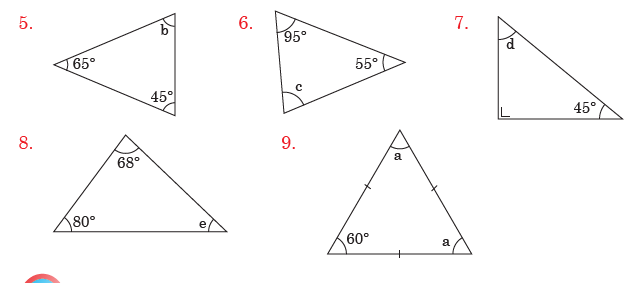
1. State two items in your classroom that have parallel sides.2. In the diagram below, identify lines that are parallel.
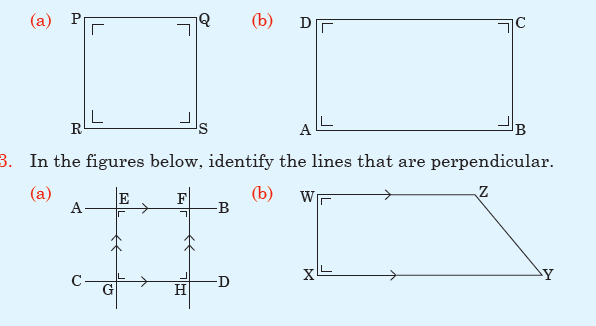
4. The diagram below represents intersecting lines
Find the value of the angles marked with letters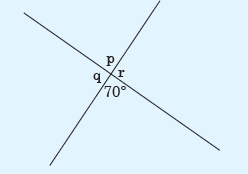
(i) p = _____ (ii) q = _____ (iii) r = _____5. Study the diagram drawn below.
Find the size of the angles marked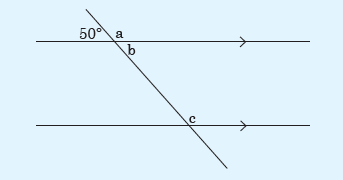
(i) a (ii) b (iii) c6. In the diagram below, angle d = 150°.
Find the size of the angles marked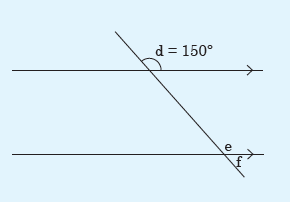
(i) e (ii) f
(iii) Explain the relationship between angle d and angle e.
7. Study the transversals and parallel lines below. In each case, findthe size of the marked angle. Explain your steps.
8. Draw a 80° angle using a protractor.
9. Explain the steps involved in constructing a 60° angle using a ruler
and a pair of compasses.10. Explain the steps involved in constructing a 150° angle at point X.
Word list
Parallel lines Intersecting lines A transversal
Perpendicular line Vertically opposite angles Supplementary angles
Corresponding angles Alternate angles Co-interior angles
Construct Draw A pair of compasses
Angle properties Protractor Bisect
Task
Do the following.
(i) Read each word aloud to your friend.
(ii) Write the meaning of each of the words above. Discuss with your friend.(iii) Write sentences using each of the words above. Read with your friend.