- This topic
UNIT 4: POWER POINT PRESENTATION
Introductory activity
1) Normally, at the beginning of the academic year,
when there is student meeting, the head teacher
used to present the different topics to the new and
old students using different tools. The topic of the
meeting includes the school description, schoolhistory and how the school perform in National Exam.
According to the above information, answer the following
questions:a) Which program the head teacher uses to make1.1Creating a PowerPoint presentation
his/her presentation?
b) List different tools the head teacher uses during
the presentation
c) The presentation contains which kind of content?
d) Which are the main things that you can follow to
make a good and attractive presentation?e) Explain the term audience and presenter
Activity 4.1
The teacher makes a presentation about the use of social media in youth life
and ask students to do the following tasks:
1. By using Ms Word, write a composition of 80-100 words about the
use of social media in Rwanda.
2. Present the findings from above question to the rest of the class
3. Open PowerPoint and paste the presentation from word to the PowerPoint
document
4. Compare the presentation in Word with the one you have created inPowerPoint
A. Key Terms
PowerPoint is a presentation software that allows you to create dynamic
slide presentations. Slideshows can include animation, narration, images, videos, and much more.
A presentation: A presentation is an organized report or message prepared
as talk to an audience, with the help of a computer program such as Microsoft
PowerPoint, Harvard Graphics, etc. a presentation software is used to create
slide shows for that presentation on screen to an audience.
A slide is a single page of information in a presentation created with a program
such as PowerPoint. A presentation is composed of several slides.
A slide show is a collection of pages arranged in sequence that contain
text and images for presenting to an audience. It often refers to a Microsoft
PowerPoint presentation
A PowerPoint presentation can be used for the following purpose:
– Conveying information about an important issue such as disease
control measures.
– Introducing a new idea for a business
– Reporting progress using charts or graphs.– Training by demonstrating how it is done.
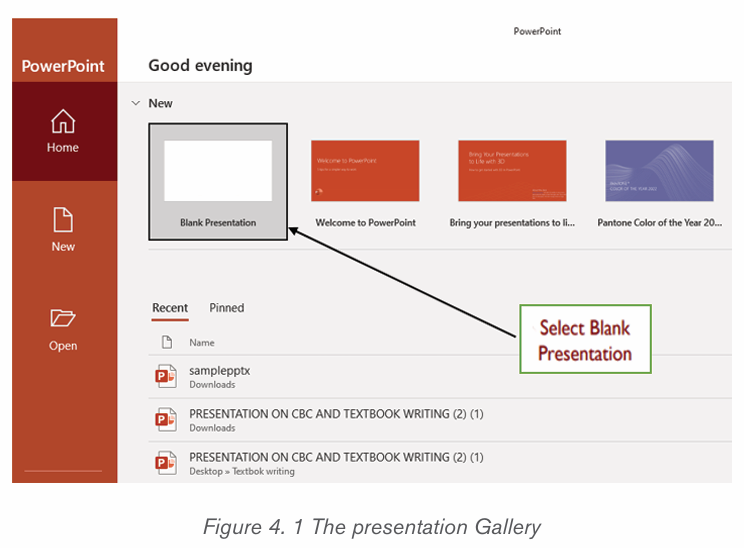
A. Launching Microsoft PowerPoint Presentation
STEPS:
1. Click Start button and click all apps.
2. Scroll down and select PowerPoint 2019 or other related versions (or
click Microsoft office and the select Microsoft PowerPoint).3. Select the Blank Presentation as shown in the figure below
A. Components of PowerPoint environment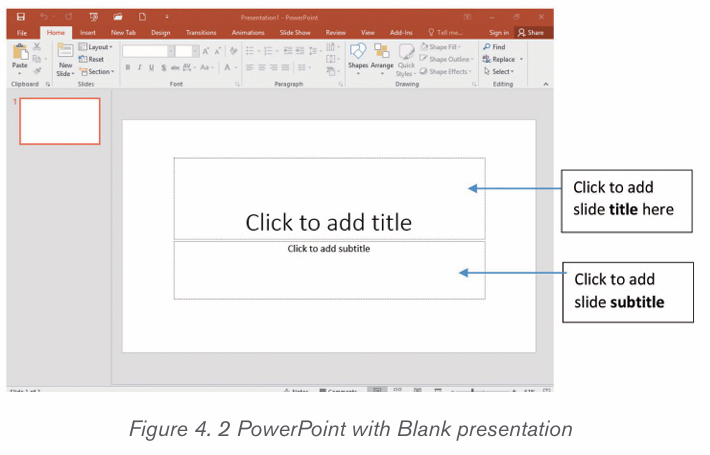
There are different tools in the Microsoft PowerPoint environment which help
the user perform different actions. Those are shown in the screenshot below: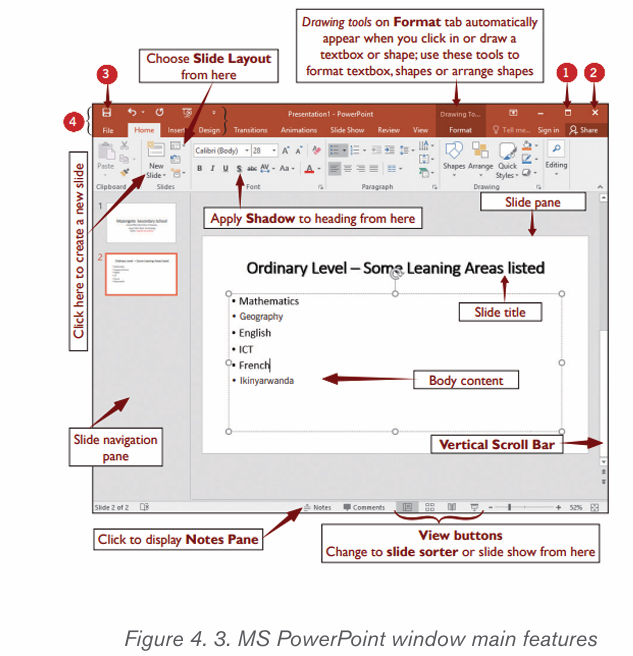
The tools labelled with numbers are the following:
1. Maximize button which makes a window fill the whole screen
2. Close button used to close a presentation
3. The save button
4. The quick access toolbar
A. Slide layouts
When a new slide is inserted, it will usually have placeholders to show where the
content will be placed. Slides have different layouts for placeholders, depending
on the type of information to be included.
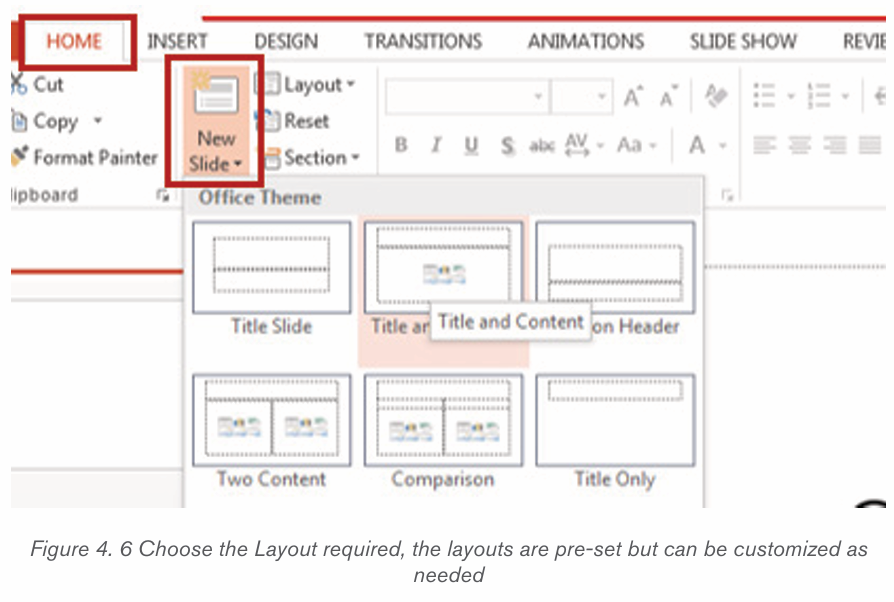
A. Inserting a New Slide
Whenever a new presentation is started, it will contain one slide with the Title
Slide layout, but there is an option of inserting many slides from a variety of
layouts. A new slide is created in the following way:
1. From the Home tab, click the bottom half of the New Slide command.
2. Choose the desired slide layout from the menu that appears.
3. The new slide will appear. Click any placeholder and begin typing to
add text. There is a way to click an icon to add other types of content,such as a picture or a chart.
Application activity 4.1
1. lowing slides in that presentation
Slide 1: Title as “Causes of Environmental Problems in Rwanda”. The
text in this slide should be in bullet style and should contain at least the
following main points:
• Population growth and pressure on land
• Declining resources · Over exploitation of natural resources
• Land scarcity
Slide 2: Title as “Rwanda Environmental Management Authority (REMA)”.
It will contain this text:
• REMA is Government organ responsible for execution of
environment related policies and laws in Rwanda.
• REMA designs policies and procedures used to conserve natural
resources, preserving the state of current environment and where
possible reversing its degradation.
• Add more text to give the vision and mission of REMA and its
achievements
Slide 3: Title as “How to protect environment in Rwanda” and should
contain the text about the following points:
• Harvest rain water and conserve all waters for proper use
• Use biodegradable items and practice re-using packaging
products. And others
Slide 4: Title as “Rwanda Environmental Features” should contain the text on:
Natural environment e.g., relief, climate, vegetation
• Natural resources and biodiversity
Note: You can write more text in the slides apart from the points indicated
for each slide
1.1 Organizing slides
Activity 4.2
1. In the presentation created the application activity 4.1. one student
wants to change the arrangements of slides so that the last slide
becomes the first. Explain how he/she will do it.
2. Use the procedure you gave in question 1 and see if it gives the expected
result
3. This same students wants to present that presentation to the class but
does not want to show the third slide. Explain how he/she can do it.
PowerPoint presentations can contain one or more slides. The Slide Navigation
pane on the left side of the screen makes it easy to organize slides. From
there, you can manipulate your presentation. The following are the different
options that can be done using the slide navigation pane:– Duplicate slides: To duplicate a slides, select the slide to be duplicated
in the Slide Navigation pane, do a right-click and choose Duplicate
Slide from the menu that appears. There is also an option to duplicate
multiple slides at once by selecting them first.
– Moving a slide: It is to change the order of slides in a presentation.
Select the slide to be moved (a border will appear around the selected
slide), and drag it to where to reposition it and drop it there. The slide
number sequence will automatically update itself.
– Deleting a slide: To delete a slide select it and press the Delete key
on the keyboard OR right click on the selected slide and select Delete
Slide from the menu.
– Copying a slide: Select the slide to be copied, right click on the
selected slide and select Copy from the menu. The shortcut key Ctlr +
C can also be used to copy a selected slide.
– Pasting a slide: Position the cursor where to paste the slide in the
Slide Navigation Pane and click on Paste or on the paste tool icon. It
is also possible to use the shortcut key Ctrl + V .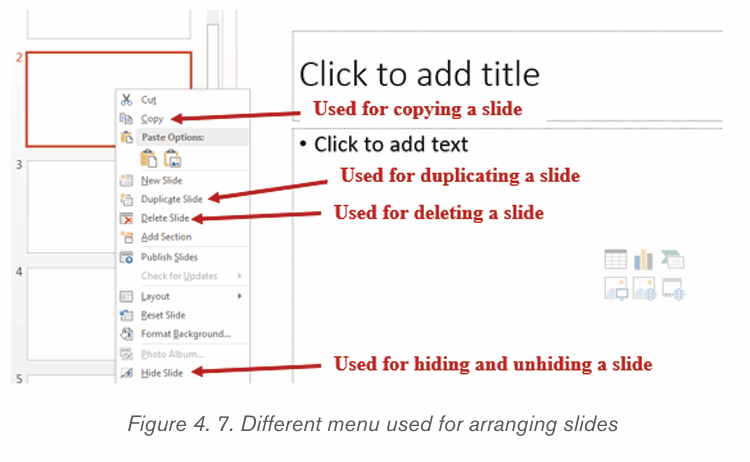
– Hiding a slide: When a slide is not currently needed it can be hidden
by selecting it then doing a Right click and clicking on Hide Slide.
The hidden slide will continue to appear in the slide pane and can be
opened by double clicking it but it won’t appear if the presentation is
opened in the Slide Show mode. To unhide the hidden slide go through
the same process.
– Dividing slides into sections: Sections are subdivisions in a
PowerPoint presentation slide used preferably for bigger presentations
that can be logically grouped. Slides in the same group should be
logically related so as to facilitate their understanding during presentation
or while reading them. Putting slides into sections can also be done
when slides are to be presented by different people thus each person
presents his/her section.
To create a section in a PowerPoint presentation, do the following:
1. Select in between the slides where to insert the section or the slide
behind which to insert the section
2. Do a right click and click on Add Section in the provided options.
3. Rename the section by selecting its default name, do a right click and
click on Rename. The default name of a section is Untitled Section.
4. Write the new name and click on the Rename button
A created section can be removed by selecting it, doing a right click and
choosing Remove Section. It can be moved by choosing the Move Section Upor Move Section Down option.
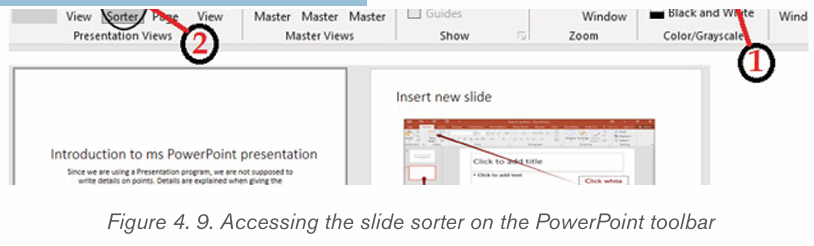
Slide Sorter View is good to use when organizing your slides. It allows to
view all slides in a grid arrangement and therefore makes it easy to find a slide to
move (or do any other operation) and easily identify where to place it. To accessthis view:
– Click on the View tab then– Click on Slide Sorter too.
Application activity 1.1
1. Create a PowerPoint presentation on “Computer software” with 3 dis
tinct slides in the presentation where each slide is about the following:
a. Word processing software
b. Spreadsheets software
c. Presentation software
2. Move second slide to the third position
3. Add 2 more slides to your presentation, 1 slide is about the differ
ence between Word Processing and Spreadsheet, the last slide is
about the importance of Presentation software.
5. Hide the fourth slide of your presentation6. Save the presentation as My first presentation
1.3 Apply Design themes and format background
Activity 4.3
Open My first presentation created while doing the
application activity 4.2. Make it more attractive by
applying design. Save changes and run the slide show
1.1.1Apply design theme in a presentation
A Theme gives the slides a consistent appearance throughout the presentation.
Themes contain color schemes with custom formatting, styled fonts, and layouts.
When applying a design template to the presentation, the slide master and
color scheme of the template replaces the original blank slide.
1. Select the Design tab on the Ribbon, then click the More drop-down
arrow to see all of the available themes.
2. Select the desired theme.
3. The theme will be applied to the entire presentation.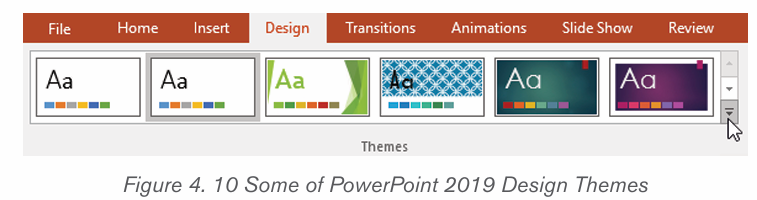
Once a theme is applied to the slides in presentation, another option is there to
select a variant for that theme from the Variants group. Variants use different
theme colors while preserving a theme’s overall look.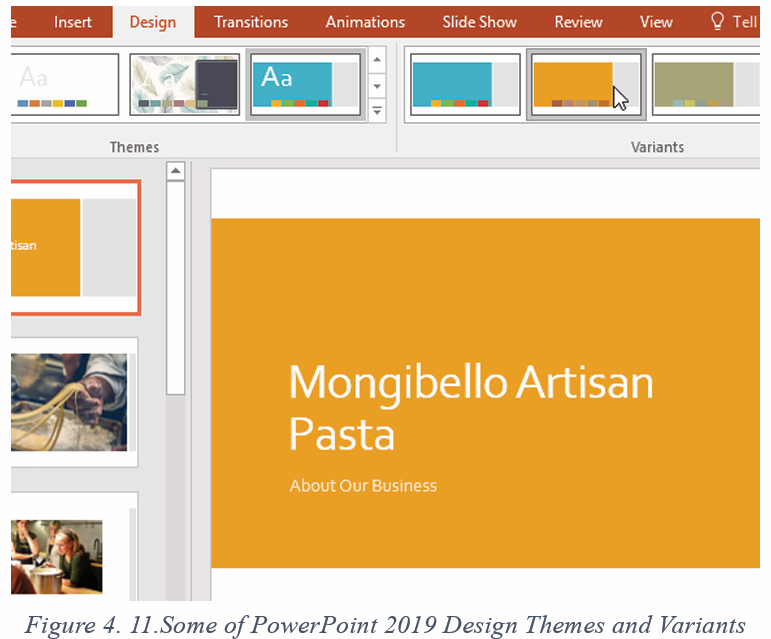
The following figure is a sample of a slide on which a design theme has been applied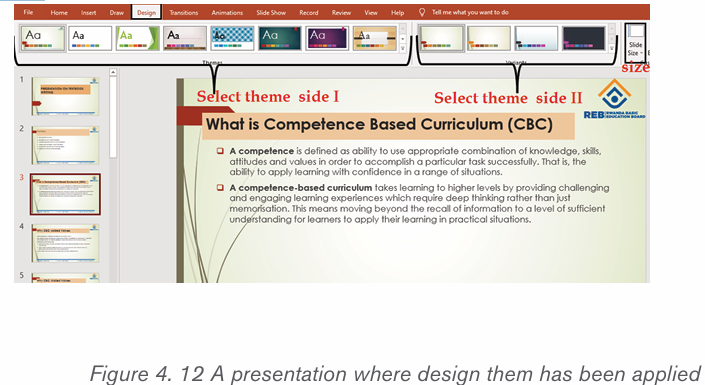
To format the slide background
To format a slide is to change the appearance of the slide and or its contents.
Backgrounds can have a solid, gradient, pattern, or picture fill. Use the
steps given below and apply any color you want.
Step1: Select the Design tab, then click the Format Background command.
Step2: The Format Background pane will appear on the right. Select the
desired fill options.
Step3: The background style of the selected slide will update.
Note: Apply to All means to apply the same background style to all slides in
a presentation.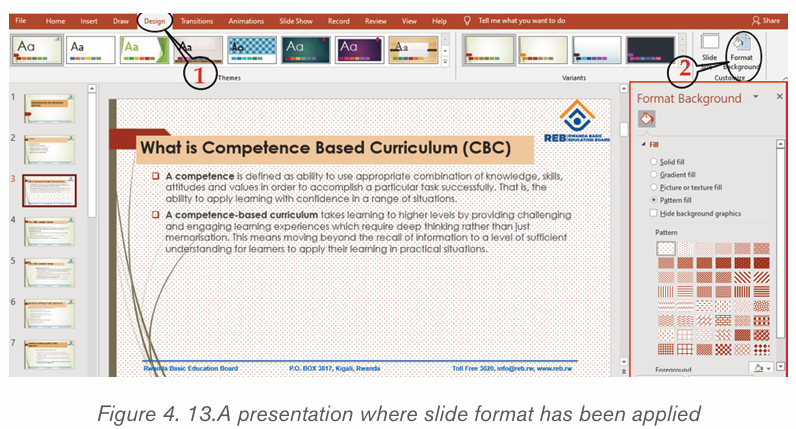
1.1.1.Adding notes and comments, Inserting header and footer
i) Adding comment
In PowerPoint presentation, a comment is an explanation that is attached to a
text or an object on a slide, or to an entire slide. To add a comment in a slide, go
through the following steps:
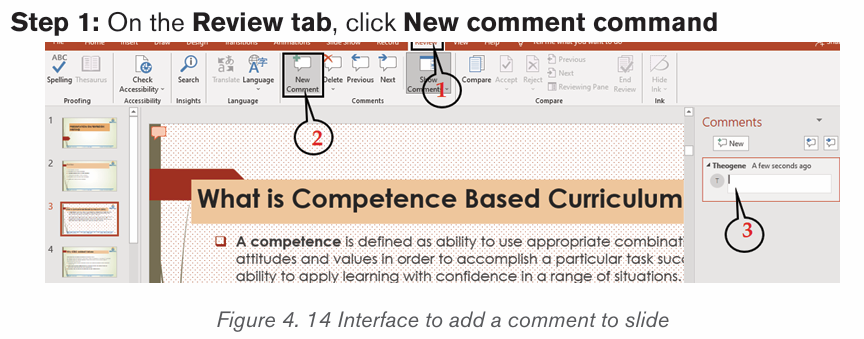
Step 2. Write the comments in the provided space as visible in the zone No 3
of the above image
Note: Comments can be added to a PowerPoint presentation by using a simple
method of clicking at the Comment option located at the bottom middle of an
opened PowerPoint window.
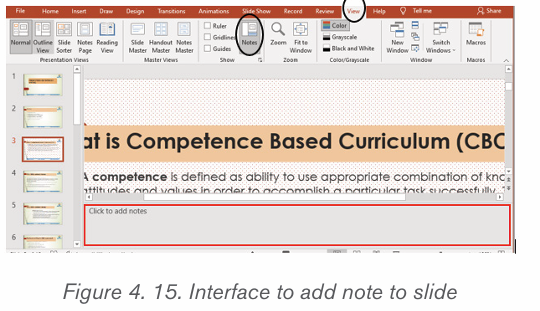
i) Adding notes
In a PowerPoint presentation Notes are words added to a presentation as
reference and only visible to the one presenting the slides. They serve as
additional information for the presenter that can be read for guidance as the
presentation goes on
To add notes to a presentation, do the following:
1. On the View menu, Click Normal
2. Select the thumbnail of the slide to add notes to
3. The notes pane will appear under the slide. Click where it says Click toadd notes and type whatever notes depending on your choice.
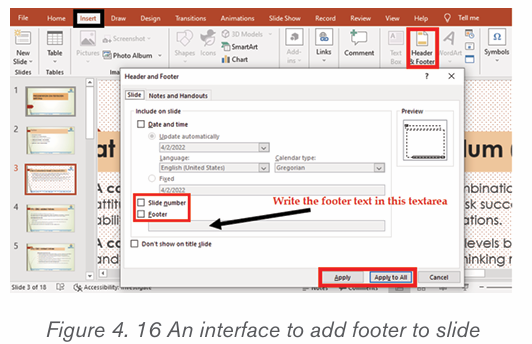
i) Insert header and footer
Header and footer in a presentation is the top and bottom parts of the slides.
These include the slide number, text footer and date. To add a header or footer
follow these steps:
1. Click Insert then go to Header & Footer
2. In the box below Footer, type the text to use as footer such as the
presentation title
3. Check Date and time to add that to the slides
4. Check Slide number to add to the created slides5. Click on Apply or Apply to all if all slides are to have the same header or footer
Application activity 4.3
Create a PowerPoint presentation “Understanding Gender Equality” contai
ning at least 5 slides and do the following:
1. Change the theme of the presentation to “Organic”.
2. Give this presentation a picture background
3. Change the background of the presentation to “Pattern Fill”.
4. Create a new section that you name “Gender equality in the develop
ment of Rwanda” with 5 slides. This section should have “Main event” as
the theme of the presentation.
5. Apply new theme with color and font to the working presentation
6. Add notes and comments to the created slides that will help you while
presenting
7. Add header as “Understanding Gender Equality”
1.1.Inserting objects in a presentation
Activity 4.4
1. What are types of objects that can be inserted in a presentation?
2. Give the benefits of adding objects in a presentation
3. Differentiate a presentation with objects to a presentation without objects
1.1.1Inserting a picture
An image is the actual picture or mental picture of something. Adding pictures
can make a presentation more interesting and attractive. A picture can be inserted
directly from a computer or from the internet.
i) Inserting pictures from the computer
To insert pictures in a slide do the following: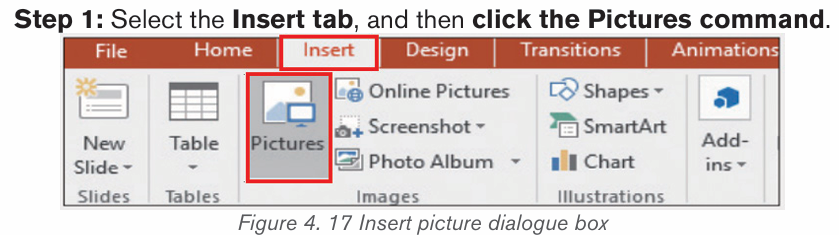
Step 2: Browse in the computer folders where the image is located and select
one image and click Insert.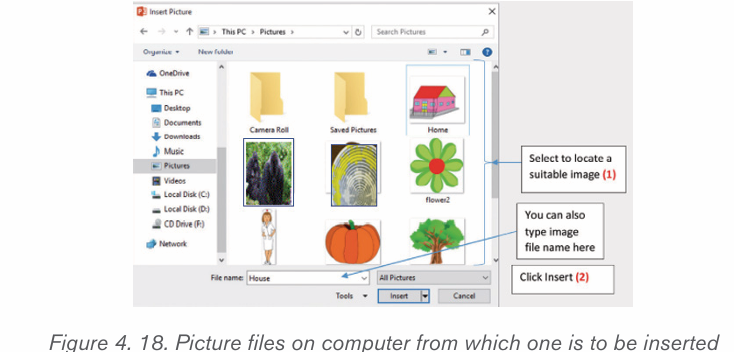
Note: It is also possible to insert image in a slide by using a Picture placeholder
which is found in every slide.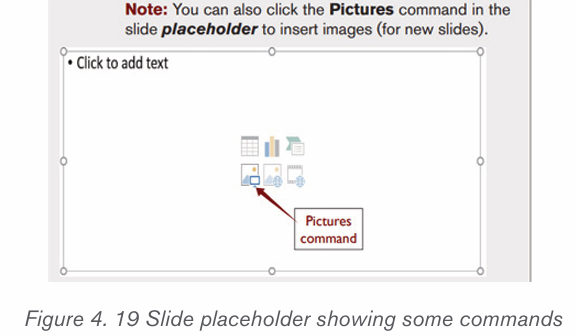
i) Inserting online pictures
In case a desired picture is not available on a computer, a suitable picture can
be found online and then inserted in a presentation. Online pictures are used
instead of ClipArt that exist in earlier versions of the program.1. Under the Insert tab, click on the Online Pictures button
1. In the Search box, type the word Classroom, and then press the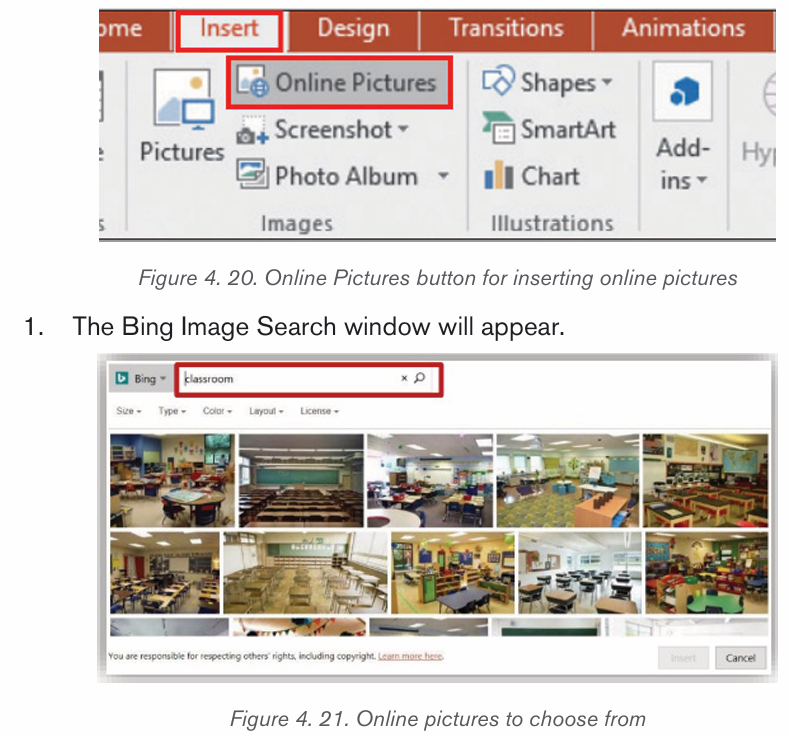
Search icon. A variety of online images associated with the search term
classroom»» will appear.
2. Scroll through the Pictures window to find the desired image
3. To insert the image, place the mouse pointer on the image and then clickon the left mouse button twice.
1.1.1.Inserting a Table
A table is made of rows and columns. Data or information can be arranged
using these rows and columns. Two methods can be used:
– Create and format a table within a presentation.
– Import a table from Word or from Excel
Step 1: Select the slide in which the table will be added.Step2: On the Insert tab, select Table.
Step 3: Select the rows and column to insert and click, in this case the table is created.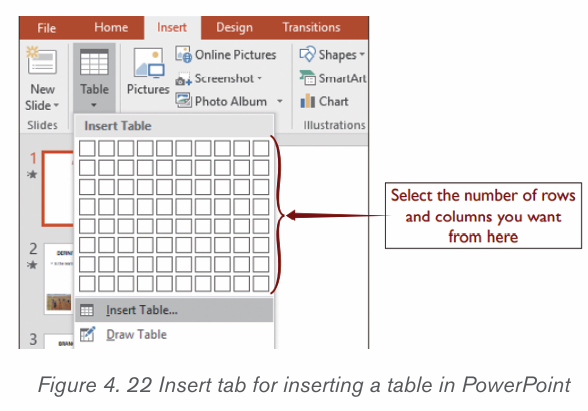
Or click on the Insert Table command that appear below the many cells as
shown in the image above then in the dialog box write the number of rows andcolumns then click OK.
1.1.1.SmartArt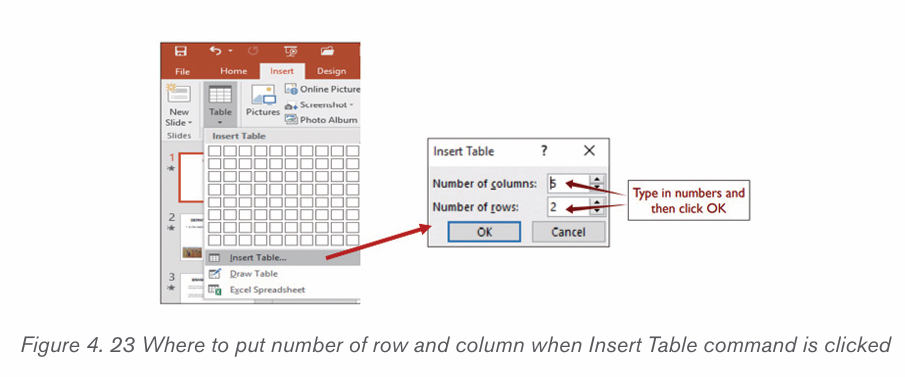
SmartArt is a picture used to communicate information in many different ways.
It is an option that allows the user to create diagrams easily.
Use the steps given below to insert a SmartArt graphic to the presentation.
Step 1: Open a file presentation and insert a new slide where a SmartArt is needed.Step 2: On the Insert tab, in the Illustrations group, click SmartArt.
Step 3: In the Smart Graphic dialog box that displays, click the type and desired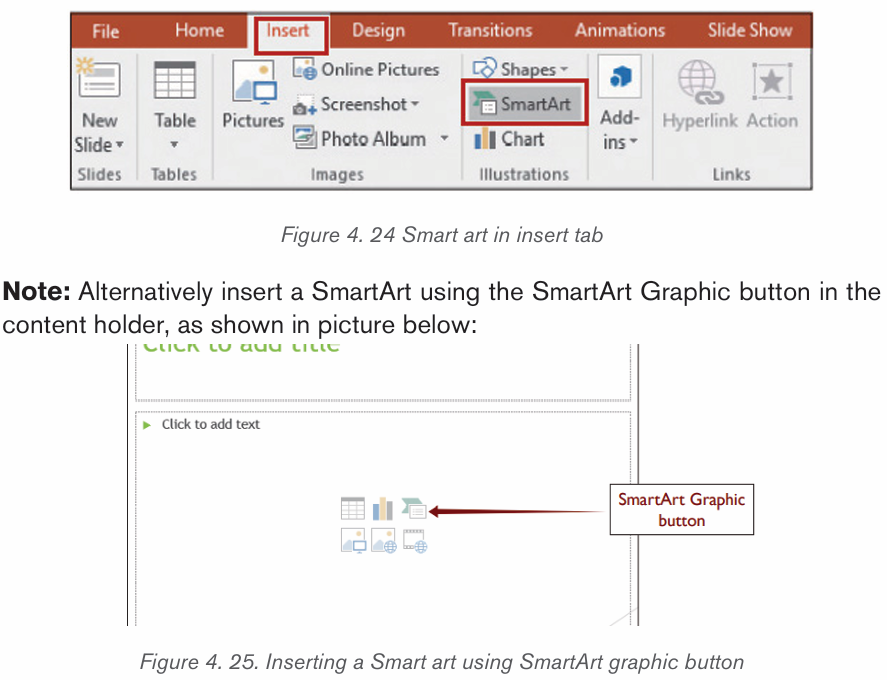
layout. In this case, let create a hierarchy of officers for any school.
Step 4: Enter the text by either: Clicking in the text pane (left) and then type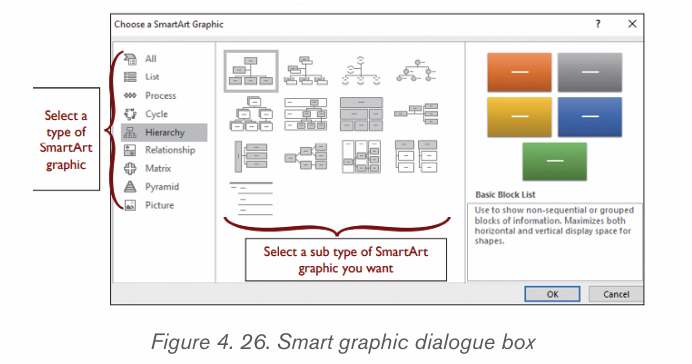
the text or clicking directly in the Smart Graphic and type the desired text.Afterwards save it.
1.1.1.Shapes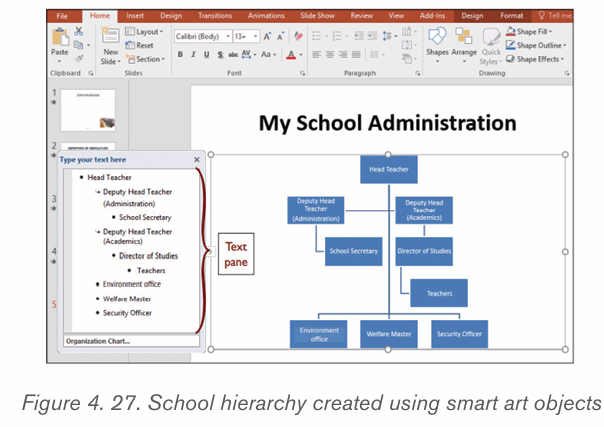
A shape is an outline form of an object. In office applications such as Microsoft
PowerPoint, shapes such as boxes and circles can be added to slide show
presentation. Use the steps given below and insert any desired type of shape.
Step 1: Click on Insert tab.Step 2: Click Shapes from the Illustrations group.
Step 3: Select a shape such as a rectangle and then click and drag to draw the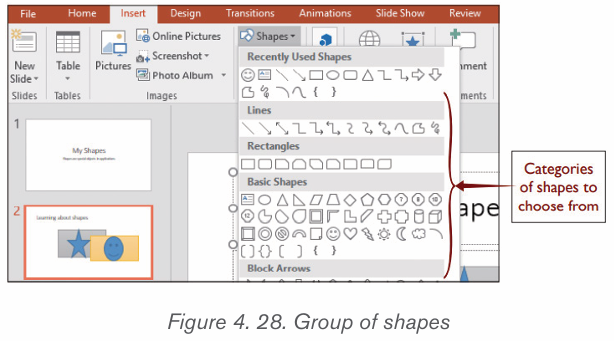
shape in the desired place. After drawing a shape, text, bullets and numbering
can be added to it.The change of fill, outline and other effects can be applied on the Format tab
1.1.1.A chart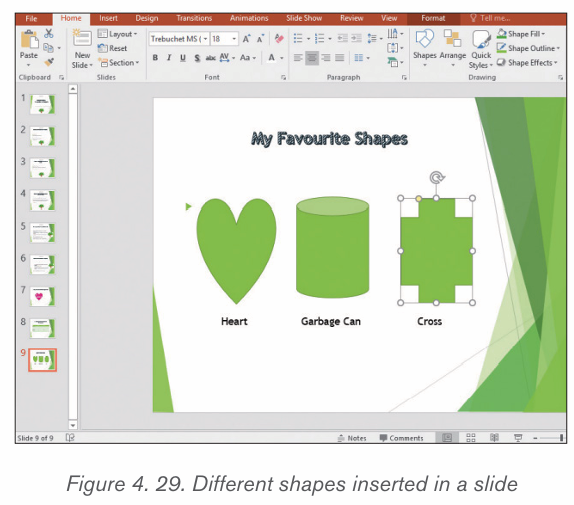
This is a pictorial representation of numerical data. There are many charts that
can be created in a slide, but common charts frequently used are: column charts,
line charts and pie charts.
Step 1: Insert a new slide (Title and content layout)
Step 2: Click the Chart icon in the content holder to generate a column chart.Alternatively click on the Insert tab then click Chart tool in the Illustrations group.
Step 3: The column chart appears together with a data sheet that can be edited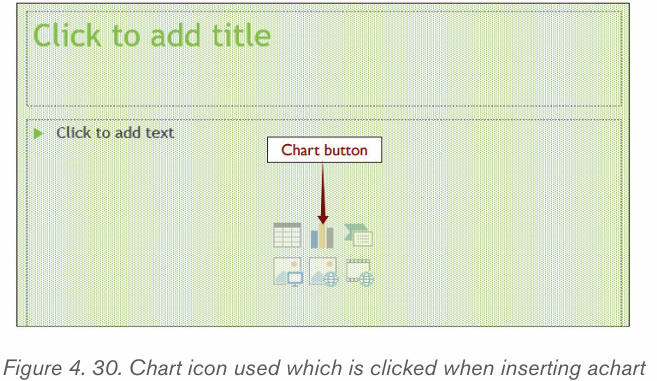
to suit the desired chart.
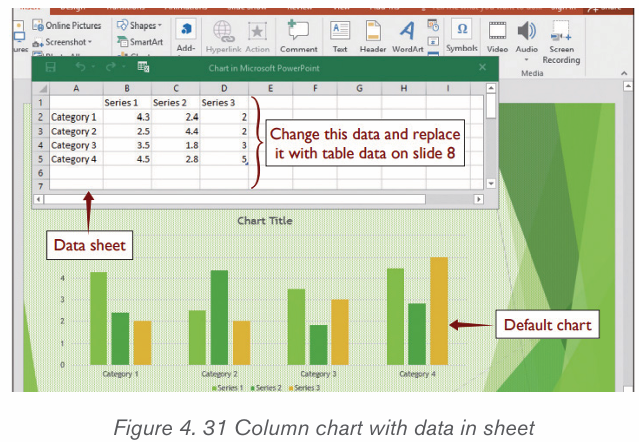
Step 4: Edit data sheet by replacing default data with desired data.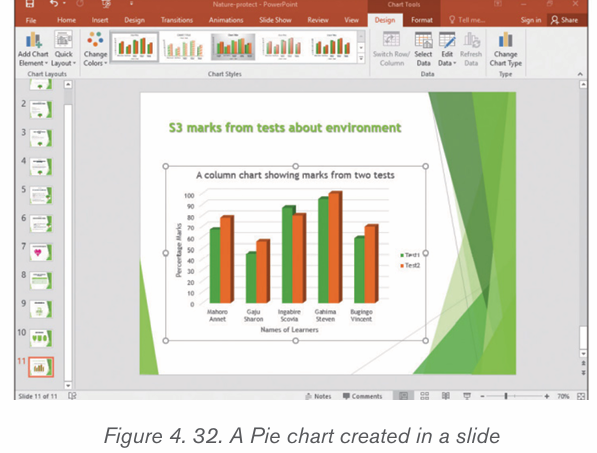
1.1.1.Media clips
Media clip is a small segment of an electronic media either an audio clip or a
video clip
i) Audio clip
To insert audio clip, follow the steps given below:
1. Select the slide where to insert an audio clip.
2. On the Insert tab, in the Media group, click arrow under Audio, andthen click Audio on My PC.
1. In the Insert Audio dialog box, select a folder with the desired audio then select the file.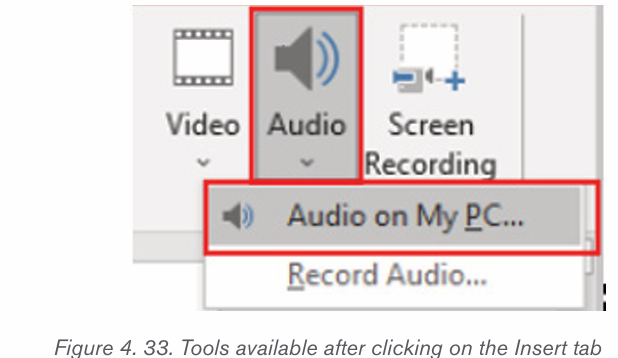
2. Click on Insert button to insert the audio.
The slide where audio has been inserted will appear as shown below. Play using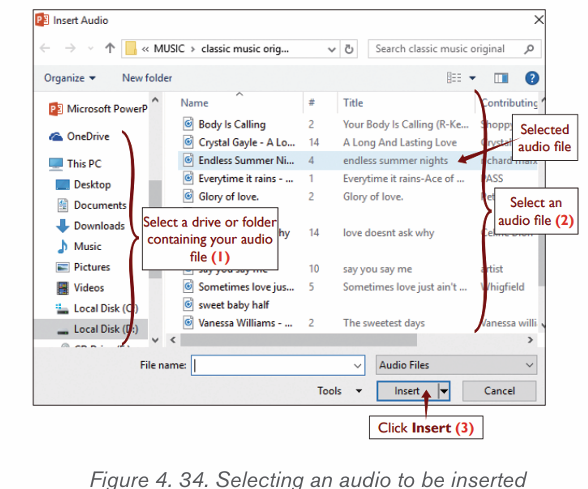
the media buttons displayed.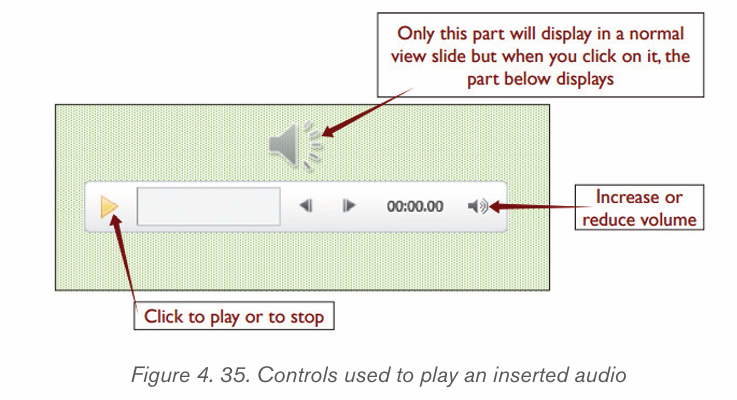
i) Video clip
There are two ways to insert video which are by linking and by embedding a
video directly from the PC into the presentation. Use the following steps below
to insert a video clip in a presentation.
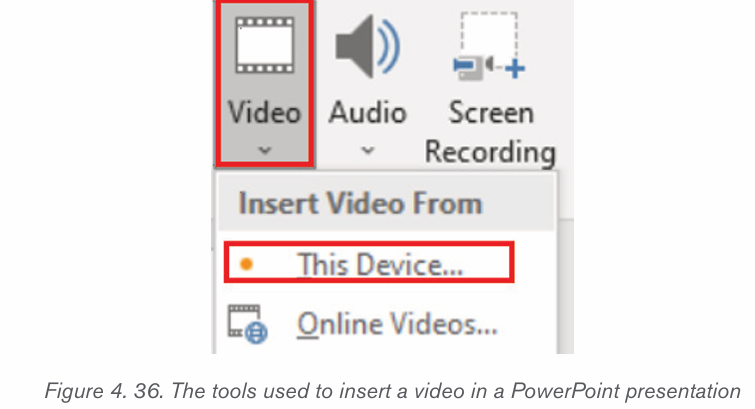
1. Select the slide where to insert a video clip.
2. On the Insert tab, in the Media group, click arrow under Video, andthen click Video on My PC.
1. In the Insert Video dialog box, click the desired video from a specific folder. Click Insert.
1. In the Insert Video box, click the desired video from a specific folder.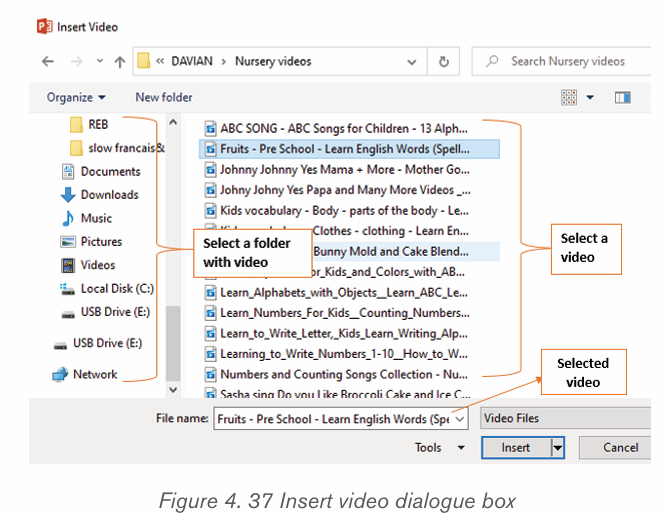
Click Insert.A slide with an embedded video will appear as shown below:
Application activity 1.1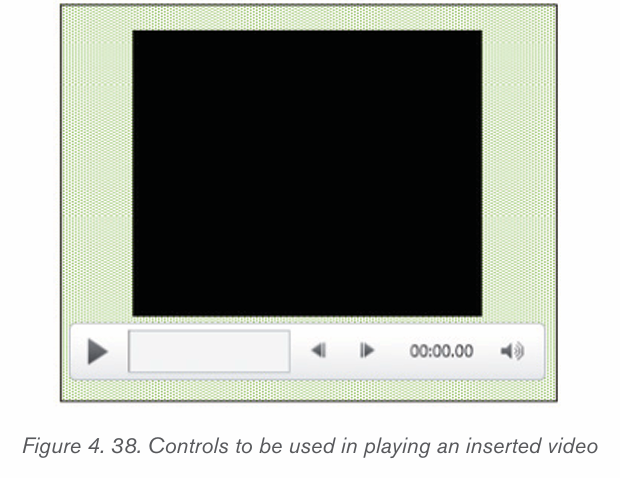
Create a presentation of your school description. Animate the presentation
as follow:
a) The title to “Fade”,
b) The text to “Appear”
c) The image to “Pulse”
1. Insert an audio from your computer into the next one slide of your
presentation
2. Add new slide and insert a SmartArt graphic that will present the
hierarchy of staff in. your school.
3. Basing on the information given by the school secretary, insert in
the last slide of your presentation, the table showing separately thenumber of boys and girls in O’ level
1.1.Applying animation in a presentation
Activity 1.1
1. Explain the terms animations and transitions in a presentation
1) Open an existing presentation from your computer and apply
animations to all text and pictures by clicking on the ANIMATIONS
tab then clicking on one transition. Examples of transitions are shownin the images below:
Animations are presentation features that give motion or life to text or object in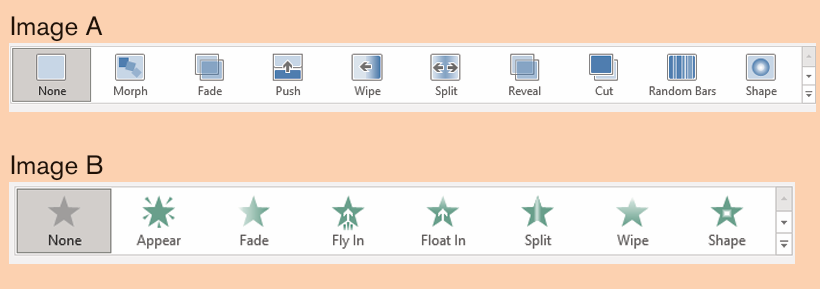
the slide show. Animation effect can be added to text or graphics objects and if
well applied, brings excitement and increase the audience ability to understand
a message.
A. To apply animations to text or objects in PowerPoint presentation
1. Select a text or object to animate.
2. On the Animations tab, in the Animation Group, select one desired
animation e.g. fade, Fly in, etc. Apply Timing to animation, that is, inTiming group, increase or reduce the duration or delay of the animation.
A. Applying slide Transitions in a presentation
Slide transitions are the effects that occur when slides are moving from one
slide to the next during a presentation. The presentation creator can control the
speed, add sound, and customize the properties of the transition effects.
Types of transitions: In PowerPoint 2019 the main slide transitions are subtle,
exciting and dynamic content.
a) In Subtle transition: Simple transitions are used to move from one
slide to another
b) Exciting: Additional visual effects are used to catch the eye of the
audience
c) Dynamic content will move only the placeholders, not the slidesthemselves.
Follow the steps given below for applying slide transitions: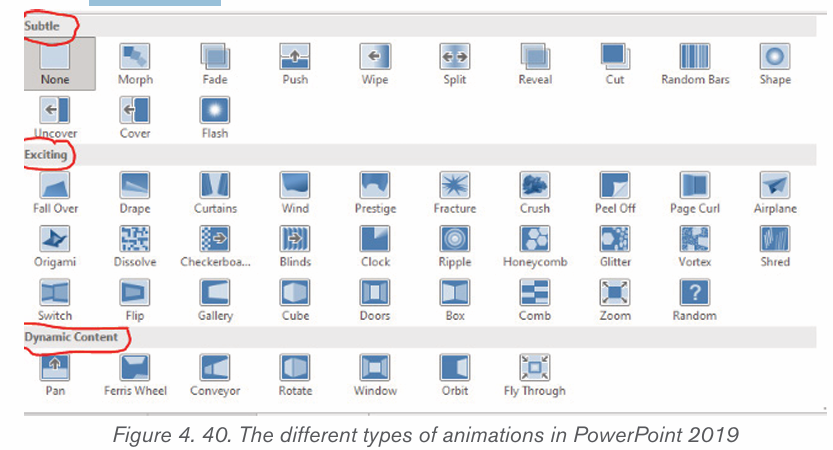
1. Select the desired slide from the Slide Navigation pane.
2. Click the Transitions tab, then locate the Transition to This Slide group.By default, None is applied to each slide.
1. Click a transition to apply it to the selected slide. This will automatically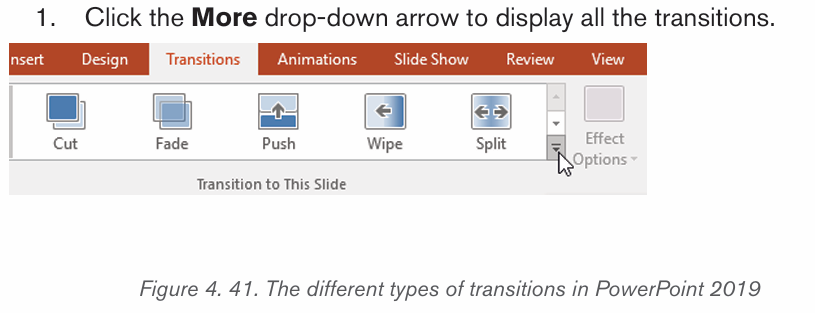
preview the transition.Note: The Apply To All command in the Timing group is to apply the same
transition to all slides in the presentation. Keep in mind that this will modify any
other transitions that had been applied before.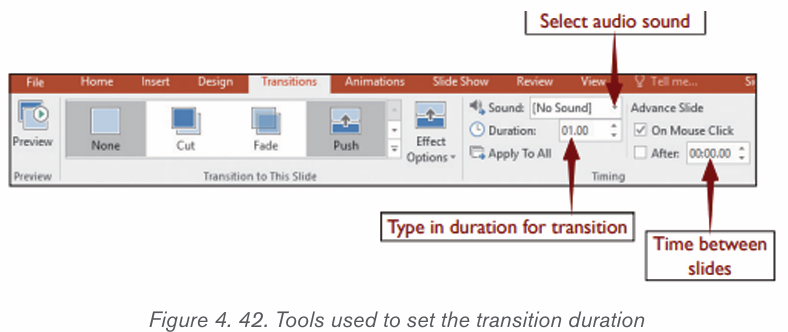
Preview a transition: To preview the transition for a selected slide at any
time use either one of these two methods:
1. Click the Preview command on the Transitions tab.
2. Click the Play Animations command in the Slide Navigation pane.
A. Modifying transitions
i) To modify the transition effect, follow these steps:
1. Select the slide with the transition to modify.
2. Click the Effect Options command and choose the desired option.These options will vary depending on the selected transition.
1. The transition will be modified, and a preview of the transition will appear.
i) To modify the transition duration, follow these steps:
1. Select the slide with the transition to modify.
2. In the Duration field in the Timing group, enter the desired time for the
transition. In this example, the time will be decreased to half a second or00.50 to make the transition faster.
A. To add sound, follow these steps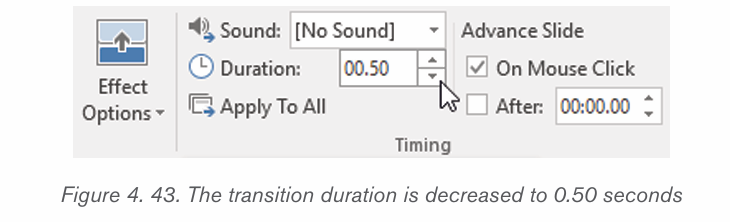
1. Select the slide with the transition to modify.
2. Click the Sound drop-down menu in the Timing group.
3. Click a sound to apply to the selected slide, then preview the transition
to hear the sound.
Sounds are best used in moderation. Applying a sound between every slide
could become overwhelming or even annoying to an audience when presenting
the slide show.
A. To remove a transition, follow these steps
1. Select the slide on which the transition is to be removed.
2. Choose None from the Transition to This Slide group. The transition
will be removed.
To remove transitions from all slides, apply the None transition to a slide, thenclick the Apply to All command.
Application activity 4.5
Create a presentation on «Taxation system in Rwanda» which
contain 5 slides and do the followings:
1. Make the Font type =”Candara” ; Font Size =”24” and Paragraph
groups available in PowerPoint
2. Make the slide titles and each bullet in every slide have the Fly inanimation.
3. If the title of the slide changes, change the sound accompanyingthe projection of the title (not the whole slide)
4.End the presentation with a visible and audible clap of the hands
5. Change the transition Duration to 2.00.
6. Use the Apply to All command to apply your changes to every slide.
7. Save your work
Skills lab 3:
You are a businessman and wants to engage in a new business.Prepare a business plan for that business and present it to others
End of unit assessment 4
Q1. Create a presentation of six slides on the topic of ICT in Accounting in
Rwandan context
Slide 1: Should have the title of the topic, and Name of presenter
Slide 2: should have the definition of ICT and accounting terms
Slide 3: Should have the impacts of ICT in Accounting
Slide 4 and Slide 5: should have the list of ICT tools in accounting
Slide 6: should have the thanks message
Save the presentation as question 1 and run the presentation
Q2. Create a presentation containing the table below in the first slide. In the
second slide and put a graph summarizing the data from the table in the firstslide. Save the presentation as Question 2
Q3. Create a presentation about Deforestation in Rwanda following the
procedures below: –
•In the first slide: Topic and definition– • In the second slide: Importance of Deforestation