UNIT 6: DATA COLLECTION
Key unit competence:
Carry out a comprehensive data collection of clientsIntroductory activity 6
Look at the figures (A, B, C, D, E and F) and reflect on the activity below:
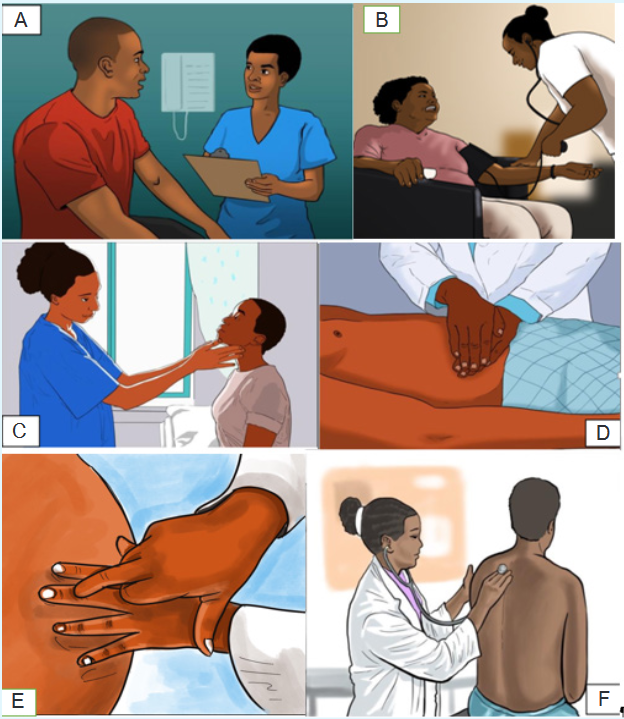
1) Referring to the figure A, what do you think is the Nurse doing?
2) What do you think is the Nurse doing in figure B, C, D, E and F?
3) According to you, what is the purpose of doing all the above actions
(Figures A, B, C, D,E and F) by the Nurse to the client?6.1. Introduction to data collection
Learning activity 6.1.
Use the provided books of Fundamentals of Nursing, read about data collection
or assessment and make a short note on the following
1) Definition of data collection?
2) Purpose of data collection or assessment
3) Sources of data
4) Types of data
5) Types of assessment
6) Methods of data collection
After, you will present your work in class6.1.1. Definition and purpose of data collection
Data collection or assessment means the gathering of information (data) about a
patient in order to facilitate effective nursing care and medical management. The
purpose of assessment is to establish a database concerning a client’s physical,
psychosocial, and emotional health in order to identify health-promoting behaviors
as well as actual and potential health problems.6.1.2. Types of assessment
The assessment can be comprehensive or focused (ongoing).
A comprehensive assessment is usually the initial assessment. It is usually
performed upon admission to a health care agency and includes a complete
health history and physical examination to determine current needs of the client. A
comprehensive assessment examines the patient’s overall health status. A focused
or ongoing assessment is frequently performed on an ongoing basis to monitor
and evaluate the patient’s progress, interventions, and response to treatments. A
focused assessment is problem oriented and may be the initial assessment or an
ongoing assessment. Focused assessments are not as detailed as comprehensive
assessments. The nurse and physician both perform a patient history and a physical
examination, but they use different formats and analyze the data based on their
discipline’s focus.6.1.3. Types of data
In all assessments, only two types of data are obtained: Subjective and Objective
data.Subjective data, also known as symptoms, are collected by interviewing the patient
and/or caregiver during the nursing history. This type of data includes information
that can be described or verified only by the patient or caregiver. It is what the
person tells you either spontaneously or in response to direct questioning. Objective
data, also known as signs, are data that can be observe or measured. You obtain
this type of data using inspection, palpation percussion, and auscultation during
the physical examination. Objective data are also acquired by diagnostic testing.
Usually subjective data are obtained by interview, and objective data are obtained
by physical examination.6.1.4. Sources of data
Data are collected from a variety of sources where the client is considered the
primary source of data (the major provider of information about self). Sources of
data other than the client are considered secondary sources and include family
members, other health care providers, and medical records. Examples of sources
of data are: Client, Family and significant other, Other health care professionals,
Medical records, Interdisciplinary conferences, rounds, and consultations, Results
of diagnostic tests, Relevant literature.6.1.5. Methods of data collection
Assessment requires sharp observation skills and the ability to distinguish relevant
from irrelevant and important from unimportant data. Data collection can occur
through interviews, observation, and physical assessmentSelf-assessment 6.1.
1) What is data collection?
2) With examples, differentiate primary and secondary sources of data
3) With examples, differentiate the subjective and objective data
4) What are the main components of a comprehensive client assessment?
5) How does comprehensive assessment differ from focused assessment?
6) List the methods of data collection6.2. Interview and Health History: Subjective Data
CollectionLearning activity 6.2.
For Overview:
Use the provided books of Fundamentals of Nursing, read topics about
interview and Health History and make a summary note on the following:
1) Definition of interview
2) Phases of the interview
3) Interviewing techniques
4) Definition of health history
5) Purpose of health history
6) Description of components of health historyAfter, you will present your work to your classmates
For the technique of taking the health history:
Through role play, two paired learners will follow the interview phases and use
effective interviewing skills/techniques to take the health history of his/her partner6.2.1. Interview
Interviewing is the method by which health care providers take health histories and
gather subjective data. Interview is a therapeutic interaction that has a specific
purpose. A primary focus of the data collection interview is the health history. The
nurse interviews for a variety of reasons throughout the nurse-client relationship,
including data collection, teaching, exploration of the client’s feelings or concerns,
and provision of support. Effective interviewing depends on the nurse’s knowledge
and ability to skillfully elicit information from the client using appropriate techniques
of communication. Observation of nonverbal behavior during the interview is also
essential to effective data collection.a) Phases of the interview
The interview is divided into three phases: the introductory phase, the working
phase, and the termination phase. Each phase has a specific purpose and different
communication patterns.i) Introductory phase
The introductory phase is the time to introduce yourself to your patient, put him or
her at ease, and explain the purpose of the interview and the time frame needed to
complete it. The nurse also asks the patient his or her preferred name. The nurse
shakes hands if that seems comfortable with the patient and is appropriate for culture
and setting. The beginning phase may continue with discussion of neutral topics
(eg, the weather) if the patient seems anxious. Questions should be nonprobing
and patient centered. Explain to the patient that you will be taking notes, but keep
your writing to a minimum. Reassure your patient that the information collected is
confidential.ii) The Working Phase
The working phase is often where data collection occurs. It is usually very
structured; it is also the longest phase. Make sure you allow enough time for the
working phase. Although you will need to take notes, stay focused on your patient.
Listen to what the patient is saying both verbally and nonverbally. With experience,
you will become skilled at taking minimal notes and then documenting your data
after the interview rather than during it. During the working phase the nurse asks
specific questions, two types of which are closed ended and open ended. Each has
a purpose, which the nurse chooses to elicit appropriate responses. Closed-ended
(direct) questions yield “yes” or “no” answers. An example is “Do you have a family
history of heart disease?”. Closed -ended questions are important in emergencies
or when a nurse needs to establish basic facts. Open-ended questions require
patients to elaborate. They are broad and provide responses in the patient’s own
words. They are key to understanding symptoms, health practices, and areas
requiring intervention.iii) The Termination Phase
The end of the interview is the termination or closing phase. During this phase, you
need to summarize and restate your findings. This provides an opportunity to clarify
the data and share your findings with the patient. The nurse also ends the interview
by stating what the two to three most important patterns or problems might be, as
well as asking patients if they would like to mention or need anything else. Based
on this information, both the nurse and the patient can discuss follow-up plans.
The nurse also thanks patients and family members for taking the time to provide
information.d) Interviewing techniques
Begin the interview by establishing trust and conveying a caring attitude. Make
sure that the environment is comfortable and that privacy is ensured with minimal
distractions. Effective interviewing skills evolve through practice and repetition and
include the following:Active listening: is the ability to focus on patients and their perspectives. It requires
the nurse to constantly decode messages, including thoughts, words, opinions, and
emotions.Restatement: relates to the content of communication. The nurse makes a simple
statement, usually using the same words of patients. The purpose is to ask patients
to elaborate.Reflection: is similar to restatement; however, instead of simply echoing the
patient’s comments, the nurse summarizes the main themes. Patients, thus, gain
a better understanding of underlying issues, which helps to identify their feelings.Encouraging elaboration (facilitation): assists patients to more completely
describe problems. Responses encourage patients to say more, continue the
conversation, and show patients that the nurse is interested.Purposeful silence: allows patients time to gather their thoughts and provide
accurate answers. Silence can be therapeutic, communicating nonverbal concern.
It gives patients a chance to decide how much information to disclose.Focusing: helps when patients stray from topic and need redirection. It allows the
nurse to address areas of concern related to current problems.Clarification: is important when the patient’s word choice or ideas are unclear.
Summarizing: happens at the end of the interview, when the nurse reviews and
condenses important information into two or three of the most important findings.
Doing so also helps to reassure the patient that he or she has been heard accurately.6.2.2. Health History
The health history is a review of the client’s functional health patterns prior to the
current contact with a health care agency. In other words, the health history is a
record of information about a person’s health. Health history provides the subjective
database for your assessment. The health history is subjective, it consists of what the
patient tells you, what the patient perceives, and what the patient thinks is important.
It provides a holistic, qualitative picture of your patient. All history information isconsidered subjective data. Clues that you obtain from the health history will direct
your physical assessment and are essential in developing a successful plan of
care for your patient. While the medical history concentrates on symptoms and the
progression of disease, the nursing health history focuses on the client’s functional
health patterns, responses to changes in health status, and alterations in lifestyle.a) Purpose of Health history
The purpose of the health history is to:
Provide the subjective databased
Identify patient strengths
Identify patient health problems, both actual and potential
Identify supports.
Identify teaching needs.
Identify discharge needs.
Identify referral needsb) Components of Health History
Components of the Nursing Health History are:i) Biographical Information
Biographical information is factual demographic data that include a patient’s age,
gender, address, insurance information, occupation, working status, marital status,
and referral source. The staff who works in the admitting office usually collects this
information.ii) Chief Concern or Reason for Seeking Health Care
The chief concern is a brief statement about why a patient (in his or her own
words) is seeking health care. This information offers a focus to explore a patient’s
concerns and issues. Once you learn a patient’s chief concerns, you will compare
those findings with what you learn during your assessment. Often you will learn
much more.Ask a patient why he or she is seeking health care (e.g., “Tell me, Ms. Richard,
what brought you to the clinic today?”). Once you learn a chief concern, you then
gather more comprehensive data and probe for a full description of the patient’s
health status. You record a patient’s response in quotations to indicate a subjective
statement. As you explore a patient’s reason for seeking health care, you will learn
the chronological and sequential history of his or her health problems.iii) Patient Expectations
It is important to assess a patient’s expectations of health care providers (e.g.,
being diagnosed correctly, obtaining pain relief, or being treated for a disease).Patient satisfaction, a standard measure of quality for all hospitals throughout the
country, can be perceived by patients as poor if their expectations are unmet.Patients typically expect to receive information about their treatments, prognosis,
and a plan of care for their return home (whether they are inpatients or outpatients).In addition, they expect relief of pain and other symptoms and to have caring
expressed by health care providers.During the initial interview have a patient express expectation when entering the
health care setting. Later, as the patient interacts with health care providers, assess
whether these expectations changed or were met.iv) History of the Present Illness or Health Concerns
The nurse begins with open-ended questions and asks patients to explain
symptoms. A complete description of the present illness is essential. Questions
about symptoms (subjective sensations or feelings of patients) in six to eight
categories assist patients to be more specific and complete: location, duration,
intensity, description, aggravating factors, alleviating factors, pain goal, and
functional impairment.Common mnemonics used to remember the key elements of the presenting
symptom(s) are OLDCARTS (Onset, Location, Duration, Character, Associated/
Aggravating factors, Relieving factors, Timing, Severity) and PQRSTU (Provocative/
Palliative, Quality, Region, Severity, Timing, Understanding patient perception).P—Provokes (precipitating and relieving factors): How did it come about? What
might be the causes for the symptom? What makes it better or worse? Are there
activities ( e.g., exercise, sleep) that affect it?Q—Quality: What does the symptom feel like? (Have the patient explain in his or
her own words.) If the patient has difficulty in describing symptoms, offer probes
(e.g., “Is the pain sharp? Dull?” or “Do you feel light-headed, dizzy, off balance?”).
What does the illness or symptom mean to the patient?R—Radiate: Where is the symptom located? Is it in one place? Does it go anywhere
else? Have the patient be as precise as possible.S—Severity: Ask a patient to rate the severity of a symptom on a scale of 0 to 10
(with no symptom at 0 and the worst intensity at 10). This gives you a baseline with
which to compare in follow-up assessments.T—Time: Assess the onset and duration of symptoms. When did a symptom start?
Does it come and go? If so, how often and for how long? What time of day or on
what day of the week does it occur?Also assess whether the patient is experiencing other symptoms along with the
primary symptom. For example, does nausea accompany pain? Does the patient
have pain along with shortness of breath?v) Past Health History
A health history provides a holistic view of a patient’s health care experiences
and current health habits. Assess whether a patient has ever been hospitalized or
injured or has had surgery. Has any illness or injury limited the patient’s ability to
function? Include a complete medication history (including past, current, and recent
medications). Review the use of any prescription medications, herbal supplements,
etc. Also essential are descriptions of allergies, including allergic reactions to food,
latex, drugs, or contact agents (e.g., soap).Asking patients whether they have had problems with medications or food clarifies
the type and amount of agent, the specific reaction, and whether a patient has
required treatment.If the patient has an allergy, note the specific reaction and treatment on the
assessment form and the special armband provided. When considering allergies,
also ask if the patient has ever had a blood product transfusion and whether any
reactions occurred.The history also includes a description of a patient’s habits, emotional status, and
lifestyle patterns. Assessing for the use of alcohol, tobacco, caffeine, or recreational
drugs (e.g., methamphetamine or cocaine) determines a patient’s risk for diseases
involving the liver, lungs, heart, or nervous system.vi) Family History
The family history includes data about immediate and blood relatives. Your objective
is to determine whether a patient is at risk for illnesses of a genetic or familial nature
and to identify areas of health promotion and illness prevention.For example, a patient with a strong family history of breast cancer will be
recommended to pursue mammography more often, and female children may be
recommended for genetic counselling.vii) Psychosocial profile
The psychosocial profile focuses on health promotion, protective patterns, and roles
and relationships. It includes questions about healthcare practices and beliefs, a
description of a typical day, a nutritional assessment, activity and exercise patterns,
recreational activities, sleep/rest patterns, personal habits, occupational risks,
environmental risks, family roles and relationships. Details on the psychosocial
profile is described in the next lesson of bio-psycho-social model.viii) Spiritual Health
Life experiences and events shape a person’s spirituality. Review with patients their
beliefs about life, their source for guidance in acting on beliefs, and the relationship
they have with family in exercising their faith.Also assess rituals and religious practices that patients use to express their
spirituality.Patients may request availability of these practices while in a health care setting.
ix) Review of Systems
The review of systems (ROS) is a systematic approach for collecting subjective
information from patients about the presence or absence of health-related issues
in each body system.The ROS is used to obtain the current and past health status of each system and
to identify health problems that your patient may have failed to mention previously.
Remember, if your patient has an acute problem in one area, every other body
system will be affected, so look for correlations as you proceed with the ROS.During the ROS ask the patient about the normal functioning of each body system
and any noted changes.Use a series of questions to assess each system as needed. For example, the
review of the skin, hair, and nails includes assessment of whether a patient has
noticed any rash or skin lesions or has itching or abnormal nail or hair growth.Self-assessment 6.2.
1) You are obtaining a health history on a newly admitted patient with the
diagnosis of congestive heart failure. He tells you, “I’m having trouble
breathing since yesterday.” Once the chief complaint is identified, which
part of the history should be completed next?
a) Symptom analysis
b) Past health history
c) Review of systems
d) Family history2) Which section of the health history identifies environmental health risk
factors?
a) Review of systems
b) Psychosocial profile
c) Past health history
d) Family history3) What is the purpose of the review of systems in the health history?
a) Identify actual problems
b) Determine cause of current problem
c) Identify current/past health of systems
d) Validate current symptoms4) Mr. Brunner, 35 years old, is complaining of abdominal pain. You perform
a symptom analysis of the abdominal pain. Which question would best
assess the severity of the pain?
a) Is the pain really bad?
b) On a scale of 0 to 10, rate the pain
c) Does the pain feel knifelike?
d) Does the pain go anywhere else?5) Mr. Brunner, 35 years old, is complaining of abdominal pain. You perform
a symptom analysis of the abdominal pain. Which question would best
assess the quality of the pain?
a) What does it feel like?
b) Is the pain sharp?
c) When did the pain start?
d) Does the pain go anywhere else?6.3. Bio-Psycho-Social model to collect holistic client
dataLearning activity 6.3.
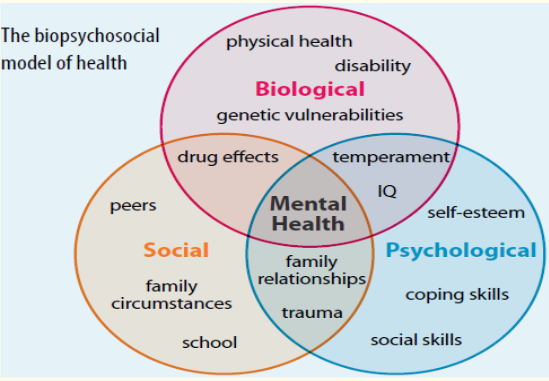
Look at this Biopsychosocial model of health conceptualized by George Engel
in 1977, read the Fundamentals of Nursing book (topic on psychosocial profile
under the Health History) for additional information about the model and answer
the following questions:
1) Define the Biopsychosocial model
2) Describe the domains of the Biopsychosocial model
3) Explain how the Biopsychosocial model can be integrated while
assessing the clientAfter you will present your work in class
6.3.1. Introduction
The biopsychosocial model is an inter-disciplinary model that looks at the
interconnection between biology, psychology, and socio-environmental factors.
The biopsychosocial model was first conceptualized by George Engel in 1977,
suggesting that to understand a person’s medical condition it is not simply the
biological factors to consider, but also the psychological and social factors. The late
George Engel also believed that to understand and respond adequately to patients’
suffering, the healthcare provider must attend simultaneously to the biological,
psychological, and social dimensions of illness. This model is attributed to improvepatient care, compliance, and satisfaction. This model is important to remember
the World Health Organization defines health as complete well-being, not just the
absence of disease.6.3.2. Domains of the Biopsychosocial model of health
Three domains of the Biopsychosocial model are: biology, psychology, and
sociology.Biology: Bio (physiological pathology). Biological factors involve genetics,
physiology, chemistry, and neurology. Psychology: Psychological factors involve
a person’s personality, thoughts, and ensuing emotions and behaviour such as
psychological distress, fear/avoidance beliefs, current coping methods and
attribution. Social: Social factors involve socio-economical, socio-environmental,
and cultural factors that affects a person’s thoughts, feelings, and behaviour such
as work issues, family circumstances and benefits/economics.According to Gurung, 2014, some of the factors that fall under Biological are:
Gender, Physical Illness, Disability, Genetic Vulnerability, Immune Function,
Neurochemistry, Stress Reactivity and Medication Effects. Some of the factors that
fall under Psychological are: Learning & Memory, Attitudes & Beliefs, Personality,
Cognitions, Behaviors, Emotions, Coping Skills and Past Trauma. Some of the
factors that fall under Social are: Social Support, Family Background, Cultural
Traditions, Socioeconomic Status, Education, Society, and community6.3.3. Biopsychosocial assessment
The psychosocial assessment focuses on health promotion, protective patterns,
and roles and relationships. It includes questions about healthcare practices and
beliefs, a description of a typical day, a nutritional assessment, activity and exercise
patterns, recreational activities, sleep/rest patterns, personal habits, occupational
risks, environmental risks, family roles and relationships, and stress and coping
mechanisms. The psychosocial assessment enables you to identify how your
patient incorporates health practices into every aspects of her or his life. This will
therefore help you in teaching and reinforcing health promotion activities that your
patient can incorporate into her or his everyday life.During the biopsychosocial assessment, interview questions are related to its three
domains, namely biology, psychology, and sociocultural influences.For biology domain, questions will address biological aspects that may include
diet, sleep habits, and family history. Some examples of biology questions are as
follows:
Do you currently take any prescription medication or supplements? If yes,
what are they?
Do you have any current medical problems that you believe significantly
impact your life?
Is there a family history of significant medical problems or disease? If yes,
what are they?For the psychology domain, questions will address current cognitive functioning,
coping skills, and mood. Examples of psychology questions are: (1) How would
you describe your mood? Do you have a history of suicidal thoughts or acts of self-
harm? (2) Do you have a family history of psychiatric illness? (3) Name three of
your strengths and three of your weaknesses.For social domain, questions may address the quality of family relationships,
financial stability, and educational background. Examples of social questions are
the following: (1) Do you have close relationships with family members? Do you
find them a source of emotional support? (2) Do you currently have a job? Does it
provide you personal satisfaction and financial stability? (3) What is happening in
your life right now that increases your stress level? What about in the past?6.3.4. Benefits of the biopsychosocial model
The biopsychosocial approach can be applied to understand a variety of health
behaviors. For example, the biopsychosocial approach can be used to understand
the health behavior of excessive drinking. A person may excessively drink because
they have a genetic disposition for an addiction to alcohol (Biological). A person
may be struggling with negative emotions and use alcohol as a coping mechanism
(Psychological). A person may also be prone to drink excessively when they are
with friends that also drink excessively (Social).The Biopsychosocial approach can also be used in understanding what determines
health behaviors. It is a beneficial approach because it looks at all the possible
biological, psychological, and social influences affecting overall health and health
behaviors.Self-assessment 6.3.
) Explain the three domains of the biopsychosocial model of health?
2) During history taking a nurse asks this question to the client “Do you find
your family members a source of emotional support?” In which domain of
the biopsychosocial model this question belongs?
a) Biology domain
b) Psychology domain
c) Social domain
d). Psychosocial domain
3) What does the biopsychosocial model serve for during client assessment?6.4. Introduction to physical examination
Learning activity 6.4.
Use the provided textbooks of Fundamentals of Nursing and read topics about
Physical Examination and make a summary note of the following:
1) Definition of physical assessment.
2) Description of purposes of physical assessment.
3) Physical and psychological preparation of the patient for physical
assessment
4) Explanation of different vital signs and parameters6.4.1. Definition of Physical Examination
A physical examination is an investigation of the body to determine its state of
health. The examination involves use of the techniques of inspection, palpation,
percussion, auscultation, and smell. In other words; Physical assessment is the
process you use to collect physical data that are relevant to the patient’ s health.To collect physical data about the patient’s current condition, you will perform a
physical examination of the patient, using four of your senses: sight, smell, hearing,
and touch.Nurses perform systematic physical assessments on a regular basis in nearly every
health care setting. In acute care settings you will perform more comprehensive
assessments when patients are admitted to agencies and brief physical assessments
at the beginning of each shift to identify changes in a patient’s status for comparison
with the previous assessmentA routine physical assessment takes 10 to 15 minutes and reveals information that
supplements a patient’s database.Nurses are often the first to detect changes in patients’ conditions. For this reason,
the ability to think critically and interpret patient behaviours and physiologic changes
are essential.The skills of physical assessment are powerful tools for detecting both subtle and
obvious changes in a patient’s health.Although you may use additional tools to assist you in assessment, the most
important tools you will need are your eyes, ears, hands, nose, and critical thinking
ability.When use of the four senses produces evidence of illness or injury, the findings are
objective and measurable, and are classified as signs.When evidence of illness or injury is verbalized by the patient, the findings are
subjective, not directly measurable, and classified as symptoms.In other words, signs of disease are those that can be detected by the nurse, while
symptoms of disease are apparent only to the patient, so they must be verbally
communicated by the patient to the nurse.A complete examination includes a patient’s height, weight, vital signs, and a head-
to-toe examination of all body systems.The data from a hands-on physical assessment allow you to collect valuable
objective information needed to form accurate diagnostic conclusions.Always conduct an examination competently with a caring and culturally sensitive
approach.6.4.2. Purposes of the Physical Examination
A physical examination is conducted as an initial evaluation in triage for emergency
care; for routine screening to promote wellness behaviours and preventive health
care measures; to determine eligibility for health insurance, military service, or a
new job; or to admit a patient to a hospital or long-term care facility.After considering the patient’s current condition, a nurse selects a focused physical
examination on a specific system or area. For example, when a patient is having a
severe asthma episode, the nurse first focuses on the pulmonary and cardiovascular
systems so treatments can begin immediately.When the patient is no longer at risk for a bad outcome or injury, the nurse performs
a more comprehensive examination of other body systems.For patients who are hospitalized, a nurse integrates the collection of physical
assessment data during routine patient care, validating findings with what is known
about the patient’s health history. For example, on entering a patient’s room a
nurse may notice behavioral patient cues that indicate comfort, anxiety, or sadness;
assess the skin during the bed bath; or assess physical movements and swallowing
abilities while administering medications.Purpose of physical assessment
Physical assessments are performed for several purposes:
To establish the patient’s current condition, a baseline against which future
changes may be measured
To identify problems the patient may have or have the potential to develop
To evaluate the effectiveness of nursing interventions or the outcomes of care
To monitor for changes in body function
To detect specific body systems that need further assessment or testing6.4.3. Preparation of the patient for physical assessment
a) Physical Preparation of the Patient
Gather the necessary equipment to perform the assessment, including;
a stethoscope, sphygmomanometer, thermometer, pulse oximeter, and
penlight.
Upon entering the patient’s room, ask any visitors to step out into the hallway
or waiting room.
Close the door, provide privacy, and explain what you are about to do.
To show respect for a patient, ensure that physical comfort needs are met.
Before starting, ask if the patient needs to use the restroom.
Give the patient time to empty the bowel or bladder if needed. An empty bladder
and bowel facilitate examination of the abdomen, genitalia, and rectum.
If you require urine or stool specimens, now is a good time to collect them.
Be careful to protect the patient’s modesty by keeping the patient covered
with a sheet, except for the body part that is being assessed.
Make certain the room temperature is comfortable for the patient.
Maintain a professional demeanor at all times.
Speak in a relaxed tone of voice and exhibit a relaxed facial expression.These preparatory steps serve to gain the patient’s cooperation and decrease his
or her anxiety.Physical preparation involves making certain that patient privacy is maintained with
proper dress and draping. The patient in the hospital likely is wearing only a simple
gown. In the clinic or health care provider’s office the patient needs to undress and
usually is provided with a disposable paper cover or paper gown.If the examination is limited to certain body systems, it is not always necessary for
the patient to undress completely. Provide the patient privacy and plenty of time to
undress to avoid embarrassment. After changing into the recommended gown or
cover, the patient sits or lies down on the examination table with a light drape over
the lap or lower trunk.Make sure that he or she stays warm by eliminating drafts, controlling room
temperature, and providing warm blankets. Routinely ask if he or she is comfortable.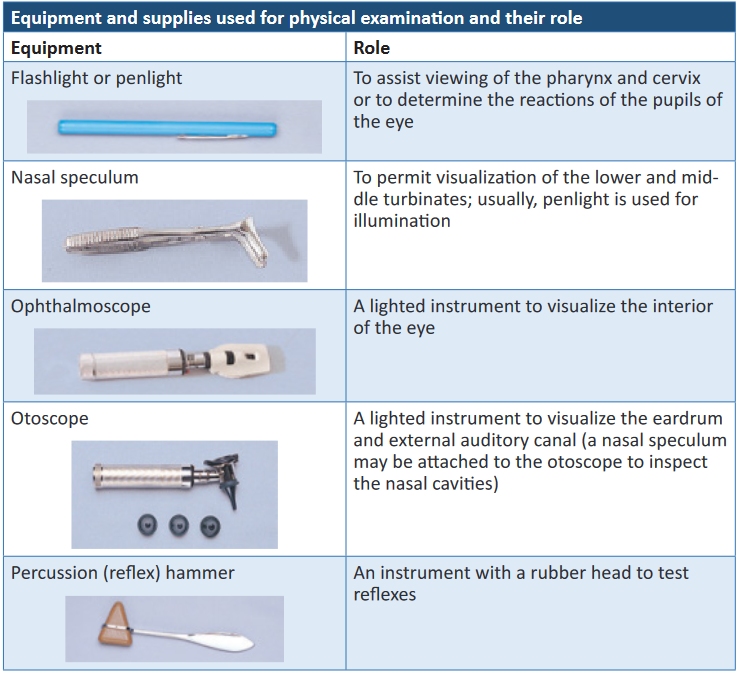
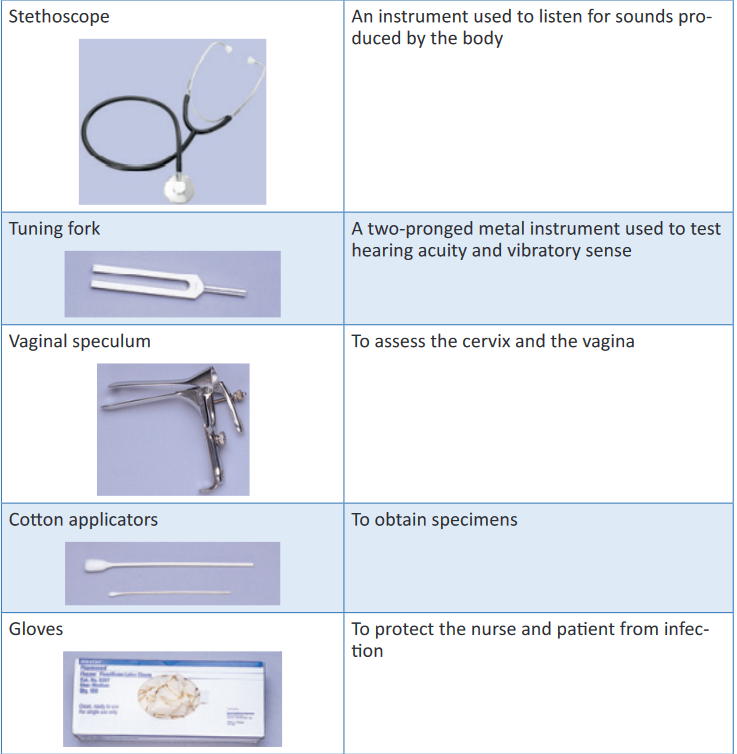
Other equipment and supplies that may be needed are: Disposable pad/paper
towels, Drapes/cover, Forms (e.g., physical, laboratory), Gown for patient, Pulse
oximeter, Scale with height measurement rod, Specimen container, slides, wooden
or plastic spatula, and cytological fixative if needed, Tape measure and Watch with
second hand or digital display.b) Psychological preparation of the patient
Many patients find an examination stressful or tiring, or they experience anxiety
about possible findings. A thorough explanation of the purpose and steps of each
assessment lets a patient know what to expect and how to cooperate.Adapt explanations to the patient’s level of understanding and encourage him or
her to ask questions and comment on any discomfort.Convey an open, professional approach while remaining relaxed.
A quiet, formal demeanor inhibits the patient’s ability to communicate, but a style
that is too casual may cause him or her to doubt an examiner’s competence.During the examination, watch the patient’s emotional responses by observing
whether his or her facial expressions show fear or concern or if body movements
indicate anxiety.When you remain calm, the patient is more likely to relax. Especially if the patient is
weak or elderly, it is necessary to pace the examination, pausing at intervals to ask
how he or she is tolerating the assessment.If the patient feels alright, the examination can proceed. However, do not force
the patient to cooperate based on your schedule. Postponing the examination is
advantageous because the findings may be more accurate when the patient can
cooperate and relax.i. Assessment of Age-Groups
It is necessary to use different interview styles and approaches to physical
examination for patients of different age-groups. Your approach will vary with each
group.When assessing children, show sensitivity and anticipate the child’s perception of
the examination as a strange and unfamiliar experience.
When examining children, the following tips help in data collection: Gather all or part of the history on infants and children from parents or
guardians.
Perform the examination in a nonthreatening area; provide time for play to
become acquainted.
Because parents sometimes think the examiner is testing them, offer support
during the examination and do not pass judgment.
Call children by their first name and address the parents as “Mr., Mrs., or
Ms.” rather than by their first name unless instructed differently.
Use open-ended questions to allow parents to share more information and
describe more of the children’s problems. This also allows observation of
parent-child interactions. You can interview older children, who often provide
details about their health history and severity of symptoms.
Treat adolescents as adults and individuals because they tend to respond
best when treated as such.
Remember that adolescents have the right to confidentiality. After talking
with parents about historical information, speak alone with adolescentsii. Cultural Sensitivity
Respect the cultural differences among patients from a variety of backgrounds
when completing an examination.It is important to remember that cultural differences influence patient behaviors.
Consider the patient’s health beliefs, use of alternative therapies, nutrition habits,
relationships with family, and comfort with physical closeness during the examination
and history. These factors will affect your approach as well as the type of findings
you might expect.Be culturally aware and avoid stereotyping on the basis of gender or race. There is
a difference between cultural characteristics and physical characteristics.Learn to recognize common characteristics and disorders among members of
ethnic populations within the community.It is equally important to recognize variations in physical characteristics such as
in the skin and musculoskeletal system, which are related to racial variables. By
recognizing cultural diversity, you show respect for each patient’s uniqueness,
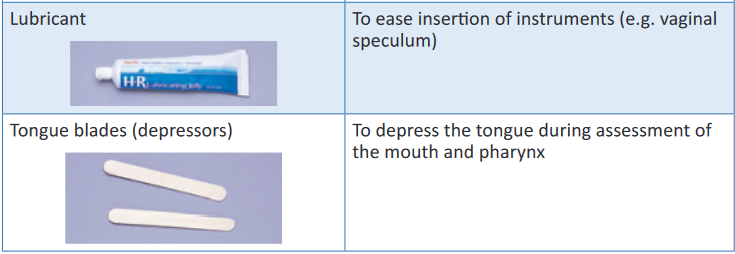
leading to higher-quality care and improved clinical outcomesc) Positioning.
During the examination ask the patient to assume proper positions so body parts are
accessible and he or she stays comfortable. Table 6-4 lists the preferred positions
for each part of the examination and contains figures illustrating the positions.Patients’ abilities to assume positions depend on their physical strength, mobility,
ease of breathing, age, and degree of wellness.After explaining the positions, help the patient to assume them.
Take care to maintain respect and show consideration by adjusting the drapes so
that only the area examined is accessible.During the examination a patient may need to assume more than one position.
N.B. To decrease the number of position changes, organize the examination so all
techniques requiring a sitting position are completed first, followed by those that
require a supine position next, and so forth.Use extra care when positioning older adults with disabilities and limitations.
The table below shows various patients’ positions for physical assessment

d) Explanation of Different Vital signs and Parameters
i. Vital Signs
After completing the general survey, measure the patient’s vital signs.
Measurement of vital signs is more accurate if completed before beginning positional
changes or movements. If there is a chance that the vital signs are skewed when
first measured, recheck them later during the rest of the examination.Pain, considered the fifth vital sign, should also be assessed.
Begin each head-to-toe shift assessment by assessing the patient’s six vital signs:
Blood pressure, Temperature, Pulse, Respirations, SpO2, and pain level.Because the vital signs serve as important indicators of numerous processes
occurring throughout the body, their assessment serves to establish a basic
foundation of the patient’s condition, possibly alerting you to problems or areas of
concern that you may want to assess in more depth.All six vital signs can also serve as possible indicators of infection, and all but the
SpO 2 and pain may relate to functioning of the immune system.1. Blood Pressure
Blood pressure provides data associated with the cardiovascular system. As we age,
atherosclerosis (hardening of the arteries) increases, contributing to the widening of
the pulse pressure, or the difference between the systolic and diastolic readings.Blood pressure also relates information regarding the kidneys, which excrete renin,
a major component in the control of blood pressure.Blood pressure also provides us with data relating to the level of hydration or fluid
volume within the cardiovascular system.A pulse pressure of 20 mm Hg or less may be indicative of severe dehydration.
In a patient who has fluid overload, blood pressure will be increased.2. Temperature
An elevated temperature can direct your attention to infection or injury to the
hypothalamus, the portion of the central nervous system that helps regulate
body temperature. If the immune system is working correctly, it raises the body
temperature whenever there are signs of microorganism invasion of the body.Hypothermia might indicate exposure to an environment that was too cold or a
disorder of the body’s temperature-regulating mechanisms.In a new-born, hypothermia may identify that the infant is not yet able to regulate
body temperature. It also can be a sign of sepsis or severe hypothyroidism, or it can
be a result of trauma.3. Pulse
Pulse assessment may reveal hypovolemia, due to either dehydration or blood loss.An elevated pulse rate can possibly indicate pain, anxiety, fear, stress, physical
exertion, low blood pressure, infection, effects of medication, and many other
conditions.4. Respirations
Assessment of respirations provides detail about the patient’s respiratory system
as well as the acid-base balance of the blood. The rate and depth of respirations
may provide insight into the patient’s pain intensity and level, anxiety or fear, or
recent exertion.5. Pulse Oxygen Saturation (SpO2)
The patient’s SpO2 level provides further insight as to the state of oxygenation.
6. Pain
Pain assessment includes the site of pain, characteristics of the pain, and strength
of the pain, which can affect assessment of the other vital signs. Include any body
language the patient may exhibit supporting the idea that he or she is in pain, such
as facial grimacing; rubbing, holding, or guarding any particular part of the body
such as the abdomen or head; or any additional verbal sounds such as moaning.
Pain also can direct you to problems in any of the body systems. The intensity and
characteristics of pain can relate the severity of illness or injury and also detail the
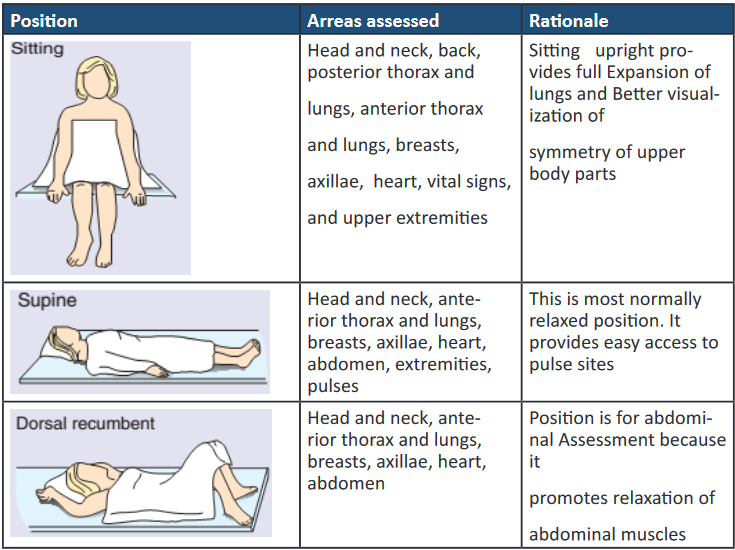
effectiveness of pain medication.Pain is normally assessed using a pain scale of 0 to 10 (or other facility-approved
scale) for adults and a scale using a series of facial expressions for children.Pain Scale
Use a pain scale, such as a scale of 0 to 10, with 0 being “no pain” and 10 being
“worst pain you can imagine,” when assessing the patient’s pain. Because pain is a
subjective matter for the patient, use of the numerical scale allows for introduction
of a certain amount of objectivity.For young children or patients with impaired cognition, you probably will use the
Wong-Baker FACES Pain Rating Scale, which consists of a picture of a series
of faces that show varying degrees of comfort, from smiling, to frowning, to crying.The child can point to the picture that matches his or her pain level
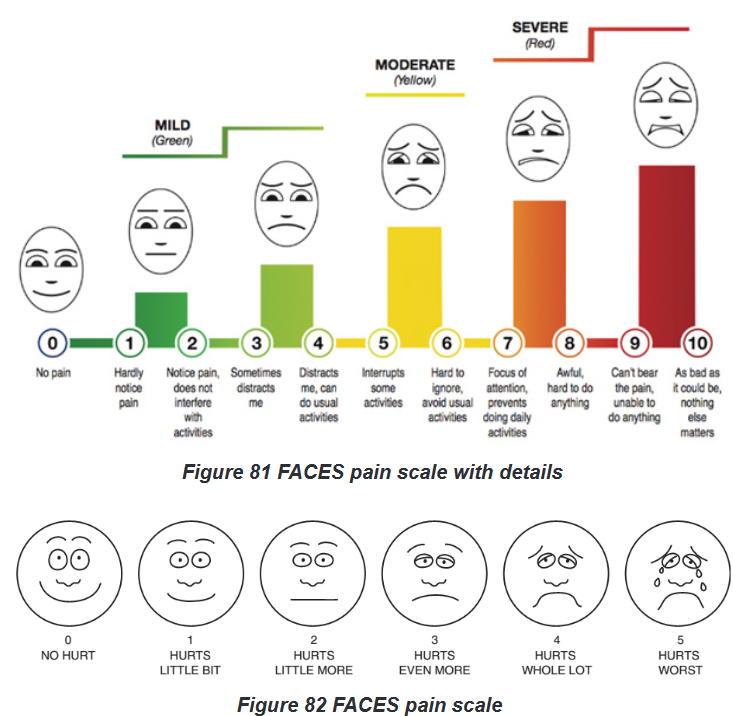
Explain to the person that each face is for a person who feels happy because he
has no pain (hurt) or sad because he has some or a lot of pain. Face 0 is very happy
because he doesn’t hurt at all. Face 1 hurts just a little bit. Face 2 hurts a little more.
Face 3 hurts even more. Face 4 hurts a whole lot. Face 5 hurts as much as you
can imagine, although you don’t have to be crying to feel this bad. Ask the person
to choose the face that best describes how he is feeling.Rating scale is recommended for persons age 3 years and older.
Brief word instructions: Point to each face using the words to describe the pain
intensity. Ask the child to choose the face that best describes own pain and record
the appropriate number Pain intensity or rating scales.
The single most important indicator of the existence and intensity of pain is the
person’s report of pain. In practice, however, D’Arcy (2011) found that nurses tend
to use less reliable measures for assessing pain. The top factors identified by nurses
were culturally influenced (e.g. facial expressions, verbalization, request for relief).
The use of pain intensity scales is an easy and reliable method of determining the
person’s pain intensity. Such scales provide consistency for nurses to communicate
with the person and other health care providers.To avoid confusion, scales should use a 0 to 10 range with 0 indicating ‘no pain’
and the highest number indicating the ‘worst pain possible’ for that individual.The inclusion of word modifiers on the scale can assist some people who find it
difficult to apply a number level to their pain. For example, after ruling out ‘0’ and
‘10’ (neither no pain nor the worst possible pain), a nurse can ask the person if : it
is mild (2), mild to moderate (4),moderate to severe (6), or severe (8).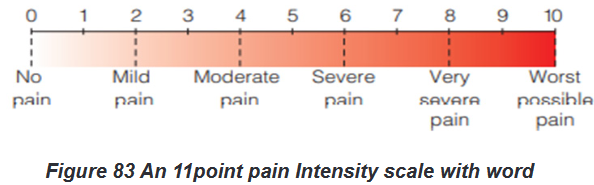
Another way to evaluate the intensity of pain for people who are unable to use the
numerical rating scales is to determine the extent of pain awareness and degree of
interference with functioning.
For example,
0 5 no pain,
2 5 awareness of pain only when paying attention to it,
4 5 can ignore pain and do things,
6 5 can’t ignore pain, interferes with functioning,
8 5 impairs ability to function or concentrate, and
10 5 intense incapacitating pain.
It is believed that the degree that pain interferes with functioning is a good marker
for the severity of pain, especially for those with chronic pain.After pain medication has been given, it is important to reassess the patient’s
pain using the same pain scale used before treatment of the pain so that you can
objectively determine whether or not the medication was effective.This is part of the evaluation phase of the nursing process.
7. Height and Weight
Height and weight reflect a person’s general health status. Assess every patient to
identify if he or she is at a healthy weight, overweight, or obese. Weight is routinely
measured during health screenings, visits to physicians’ offices or clinics, and on
admission to the hospital.Infants and children are measured for both height and weight at each health care
visit to assess for healthy growth and development. If older adults are underweight,
difficulty with feeding and other functional activities is a possibility.A patient’s weight normally varies daily because of fluid loss or retention. Ask the
patient to report current height and weight, along with a history of any substantial
weight gain or loss. A weight gain of 5 pounds (2.3 kg) in 1 day indicates fluid-
retention problems.A weight loss is considered significant if the patient has lost more than 5% of body
weight in a month or 10% in 6 months.When a patient is hospitalized, daily weight is measured at the same time of day,
on the same scale, with approximately the same clothes. This allows an objective
comparison of subsequent weights.Accuracy of weight measurement is important because health care providers base
medical and nursing decisions (e.g., drug dosage, medications) on changes.Several different scales are available for use. Patients capable of bearing their own
weight use a standing scale.The standard platform scale is calibrated by moving the large and small weights to
zero. Electronic scales automatically display the weight within seconds. They are
calibrated automatically each time they are usedSelf-assessment 6.4.
1) Define the following terms associated with physical assessment:
a) Physical assessment
b) Symptoms
c) Signs
2) Describe five purposes of physical assessment.
3) Name the various vital signs and parameters to be assessed during the
physical examination
4) Explain the action to be taken by a nurse during the physical examination
after considering the patient’s current condition and give an example.6.5. Techniques of physical assessment
Learning activity 6.5.
For Overview of Physical Assessment techniques
Use also the provided textbooks of Fundamentals of Nursing to read information
about Techniques of Physical Assessment and make a summary note of the
following:
1) Definition of each technique of Physical Assessment
2) Describe the techniques used with each physical assessment skill.
The summary will be presented to the class for discussion and clarificationFor Physical Assessment techniques
Images about conducting the techniques of Physical Assessment;
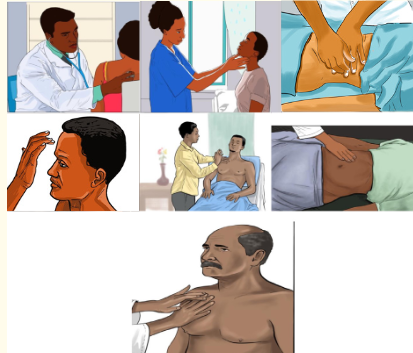
After observing the above images under section (b) for your guidance and after
carefully reading the guidelines provided to be followed under each technique
used in Physical Examination, each learner should demonstrate the techniques
used in physical assessment skill as follows:
1) Form pairs of 2 students and each one will conduct each technique used
during physical assessment namely: Inspection, Palpation, Percussion
and Auscultation.
2) Write down findings for your partner; Interpret results showing normal
and abnormal findings.The four techniques used in a physical examination are inspection, palpation,
percussion, and auscultation.5.6.1. Inspection
Inspection is the visual examination or assessment using the sense of sight.An initial visual assessment should be part of the procedure of greeting the person,
in which such aspects as the person’s overall demeanor and appearance, hygiene,
skin colour and skin appearance can be noted.Nurses frequently use visual inspection to assess: moisture, colour and texture of
body surfaces, as well as shape, position,size and symmetry of the body.Lighting must be sufficient for the nurse to see clearly and may be either natural or
artificial light.When using the auditory senses, it is important to have a quiet environment to
enable accurate hearing. Observation can be combined with the other assessment
techniques.To inspect, carefully look, listen, and smell to distinguish normal from abnormal
findings. To do so, you must be aware of any personal visual, hearing, or olfactory
deficits. It is important to deliberately practice this skill and learn to recognize all of
the possible pieces of data that can be gathered through inspection alone.Inspection occurs when interacting with a patient, watching for nonverbal
expressions of emotional and mental status. Physical movements and structural
components can also be identified in such an informal way. Most important, be
deliberate and pay attention to detail.Follow these guidelines to achieve the best results during inspection:
Make sure that adequate lighting is available, either direct or tangential.
Use a direct lighting source (e.g., a penlight or lamp) to inspect body cavities.
Inspect each area for size, shape, color, symmetry, position, and abnormality.
Position and expose body parts as needed so all surfaces can be viewed
but privacy can be maintained.
When possible, check for side-to-side symmetry by comparing each area
with its match on the opposite side of the body.
Validate findings with the patient. While assessing a patient, recognize
the nature and source of body odors. An unusual odor often indicates an
underlying pathology. Olfaction helps to detect abnormalities that cannot be
recognized by any other means. For example, when a patient’s breath has a
sweet, fruity odor, assess for signs of diabetes. Continue to inspect various
parts of the body during the physical examination.
Palpation may be used concurrently with inspection, or it may follow in a more
deliberate fashion.6.5.2. Palpation
Palpation is the examination of the body using the sense of touch to gather
information.The pads of the fingers are used because their concentration of nerve endings
makes them highly sensitive to tactile discrimination.There are two types of palpation: light and deep.
Through touch you make judgments about expected and unexpected findings of
the skin or underlying tissue, muscle, and bones.Palpation is used to determine: texture (e.g. of the hair); temperature (e.g. of a skin
area); vibration (e.g. of a joint); position, size, consistency and mobility of organs
or masses; distention (e.g. of the urinary bladder); pulsation; and tenderness or
pain.General guidelines for palpation
General guidelines for palpation include the following:
The nurse’s hands should be clean and warm, and the fingernails short.
Areas of tenderness should be palpated last.
Deep palpation should be done after light palpation (see below).Light (superficial) palpation should always precede deep palpation because
heavy pressure on the fingertips can dull the sense of touch.
For light palpation, the nurse extends the dominant hand’s fingers parallel
to the skin surface and presses gently downward while moving the hand in
a circular motion.
With light palpation, the skin is slightly depressed.
If it is necessary to determine the details of a mass, the nurse presses lightly
several times rather than holding the pressure.Deep palpation is done with two hands (bimanually) or one hand.
In deep bimanual palpation, the dominant hand is extended (for light
palpation), then the finger pads of the non-dominant hand are placed on the
dorsal surface of the distal interphalangeal joint of the middle three fingers
of the dominant hand of deep bimanual palpation). The non-dominant hand applies pressure while the lower hand remains
relaxed to perceive the tactile sensations.
For deep palpation using one hand, the finger pads of the dominant hand
press over the area to be palpated. Often the other hand is used to support
a mass or organ from below
Deep palpation is usually not done during a routine examination and requires
significant practitioner skill. It is performed with extreme caution by doctors
because pressure can damage internal organs. It is usually not indicated in
people who have acute abdominal pain or enlarged abdominal organs and
where the source of pain is yet to be diagnosed.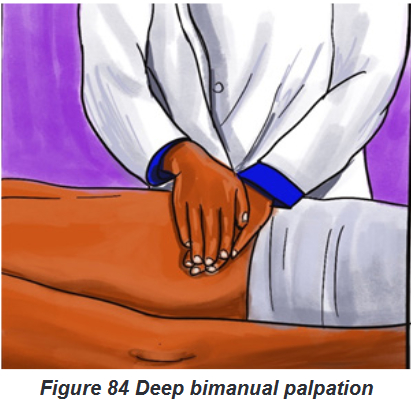
The palmar surface of the hand and finger pads is more sensitive than the fingertips
and should be used to determine position, texture, size, consistency, masses, fluid,
and crepitus.Assess body temperature by using the dorsal surface or back of the hand.
The palmar surface of the hand and fingers is more sensitive to vibration.
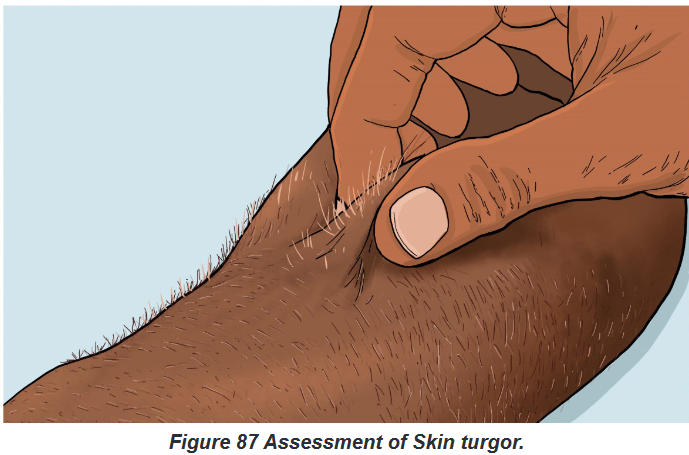
Measure position, consistency, and turgor by lightly grasping the body part with the
fingertips.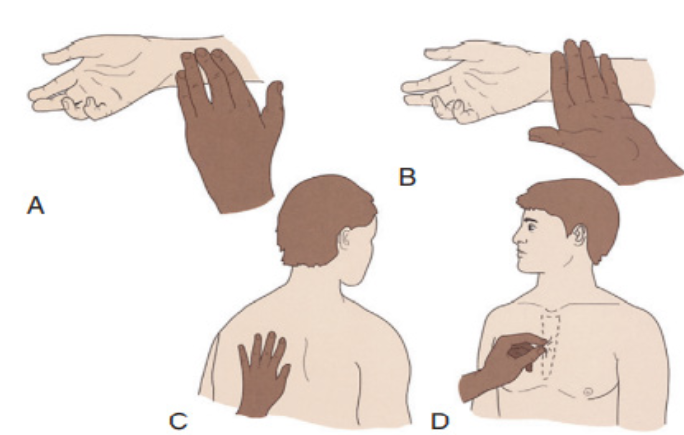
Figure 85 A, Radial pulse is detected with the pads of fingertips, the most
sensitive part of the hand. B, Dorsum of the hand detects temperature
variations in skin. C, The bony part of the palm at the base of the fingers
detects vibrations. D, Skin is grasped with the fingers to assess the turgor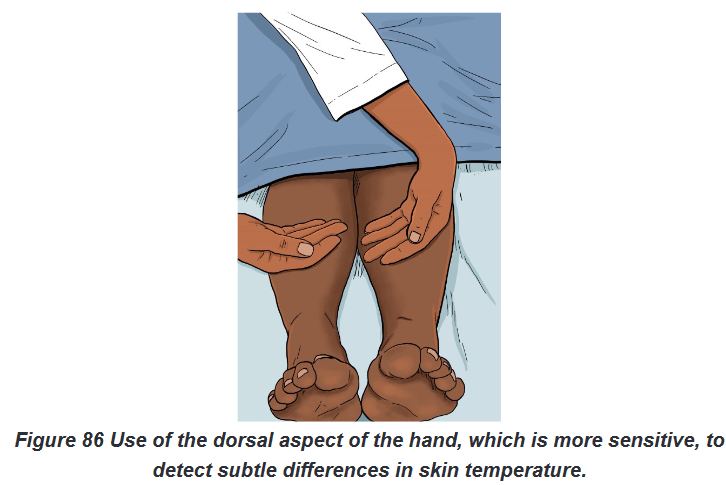
General considerations:
Touching the patient is a personal experience for both you and the patient.
Display respect and concern throughout the examination.
Before palpating consider the patient’s condition and ability to tolerate the
assessment techniques, paying close attention to areas that are painful or tender.In addition, always be conscious of the environment and any threats to the patient’s
safety.Prepare for palpation by warming hands, keeping fingernails short and using a
gentle approach.Palpation proceeds slowly, gently, and deliberately.
The patient needs to be guided to relax and feel comfortable since tensed muscles
make assessment more difficult. To promote relaxation, have him or her take slow,
deep breaths and place both arms along the sides of the body.Ask the patient to point to more sensitive areas, watching for nonverbal signs of
discomfort.Palpate tender areas last one hand (sensing hand) and place it lightly over the
patient’s skin. The other hand (active hand) helps apply pressure to the sensing
hand.The lower hand does not exert pressure directly and thus remains sensitive to
detect organ characteristics.
For safety deep palpation should be observed by your clinical instructor when you
first attempt the procedure.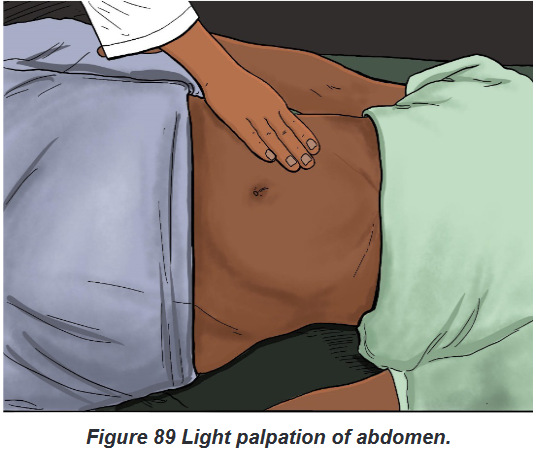
6.5.3. Percussion
Percussion is the act of striking the body surface to elicit sounds that can be heard
or vibrations that can be felt.Percussion involves tapping the skin with the fingertips to vibrate underlying tissues
and organs.The vibration travels through body tissues, and the character of the resulting sound
reflects the density of the underlying tissue.The denser the tissue, the quieter the sound. By knowing how various densities
influence sound, it is possible to locate organs or masses, map their edges, and
determine their size.An abnormal sound suggests a mass or substance such as air or fluid within an
organ or body cavity.The skill of percussion is used more often by advanced practice nurses than by
nurses in daily practice at the bedside.There are two types of percussion: direct and indirect.
a) Direct technique of percussion Procedural guideline
Direct percussion:
The nurse strikes the area to be percussed directly with the pads of two,
three or four fingers, or with the pad of the middle finger.
The strikes are rapid and the movement is from the wrist (see Figure 31.4).
This technique is not generally used to percuss the thorax but is useful in
percussing an adult’s sinuses.The most commonly used percussion technique is the indirect technique.
b) Indirect technique of percussion Procedural guidelines:
Indirect percussion is the striking of an object (e.g. a finger) held against the body
area to be examined.
You perform the indirect technique by placing the middle finger of your
nondominant hand referred to as the pleximeter, , firmly on the person’s
skin against the body surface.With palm and fingers remaining off the skin, the tip of the middle finger of the
dominant handcalled the plexor, strikes the base of the distal joint of the finger.Use a quick, sharp stroke, keeping the forearm stationary.
Relax the wrist to deliver the proper blow. Once the finger has struck, the
wrist snaps back.
The motion comes from the wrist; the forearm remains stationary.
The angle between the plexor and the pleximeter should be 90 degrees and
the blows must be firm, rapid and short to obtain a clear sound.If the blow is not sharp, if the hand is held loosely, or if the palm rests on the body
surface, the sound is softened; and you will not detect the presence of underlying
structures.A light, quick blow produces the clearest sounds.
Percussion elicits or produces five types of sound: flatness, dullness, resonance,
hyper resonance and tympany:
1. Flatness is an extremely dull sound produced by very dense tissue, such as
muscle or bone.
2. Dullness is a thud-like sound produced by dense tissue such as the liver, spleen
or heart.
3. Resonance is a hollow sound such as that produced by lungs filled with air
4. Hyperresonance is not produced in the normal body. It is described as booming
and can be heard over an emphysematous lung.
5. Tympany is a musical or drum-like sound produced from an air-filled stomach.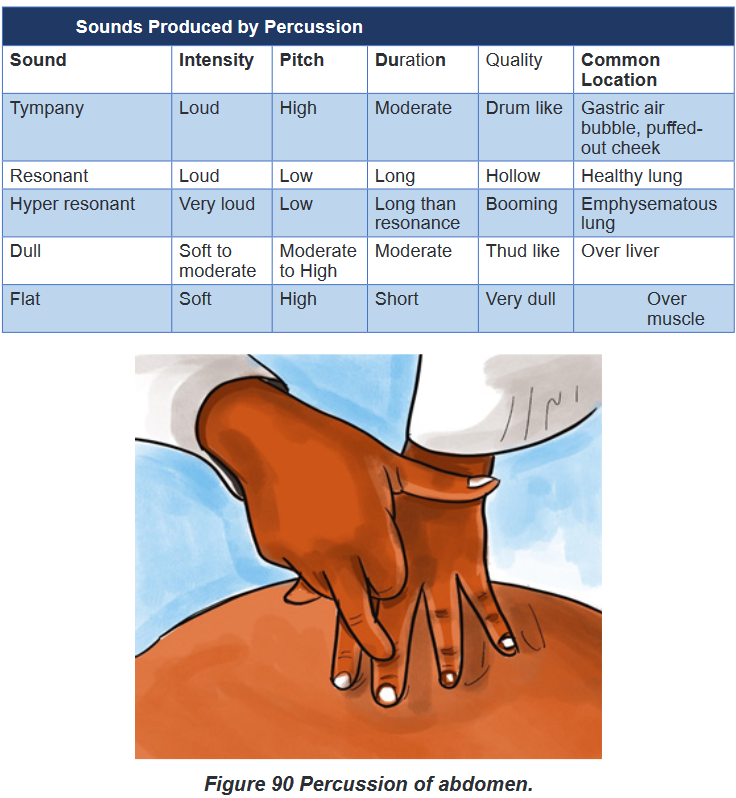
6.5.4. Auscultation
Auscultation is the process of listening to sounds produced within the body in
order to detect variations from normal.Auscultation may be direct or indirect: Direct auscultation is the use of the unaided
ear; for example, to listen to a respiratory wheeze or the grating of a moving joint
whereas Indirect auscultation is the use of a stethoscope, which transmits the
sounds to the assessor’s ears.A stethoscope is used primarily to listen to sounds from within the body, such as
bowel sounds or valve sounds of the heart and blood pressure. In other words, a
stethoscope is necessary to hear internal body sounds.Internal body sounds are created by blood, air, or gastric contents as they move
against the body structures. For example, normal heart sounds are created when
the heart valves close, moving blood to the next portion of the cardiovascular
system. Learn to recognize abnormal sounds after learning normal variations.Becoming more proficient in auscultation occurs by knowing the types of sounds
each body structure makes and the location in which the sounds are heard best.To auscultate internal sounds, you need to hear well, have a good stethoscope, and
know how to use it properly. Nurses with hearing disorders can obtain stethoscopes
with extra sound amplification.The bell is best for hearing low-pitched sounds such
as vascular and certain heart sounds, and the diaphragm is best for listening to
high-pitched sounds such as bowel and lung sounds.By practicing with the stethoscope, you become proficient at using it and realize
when sounds are clear and when there are extraneous sounds. Extraneous sounds
created by rubbing against the tubing or chest piece interfere with auscultation of
body organ sounds. By deliberately producing these sounds, you learn to recognize
and disregard them during the actual examination.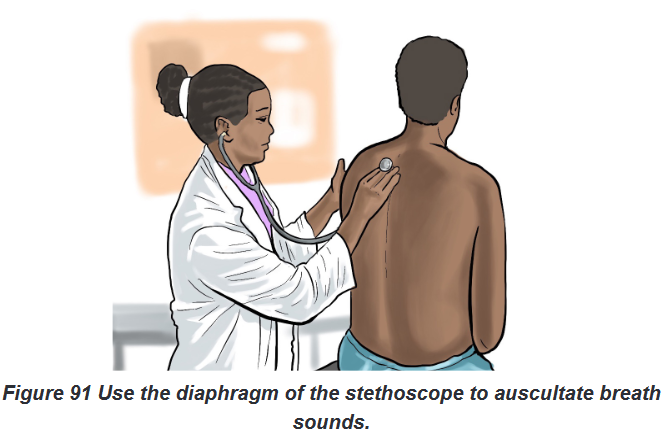
Auscultated sounds are described according to their pitch, intensity, duration and
quality:
The pitch which is the frequency of the vibrations; indicates the number of
sound wave cycles generated per second by a vibrating object. The higher
the frequency, the higher the pitch of a sound and vice versa. Low-pitched
sounds, such as some heart sounds, have fewer vibrations per second than
high-pitched sounds, such as bronchial sounds. Loudness (Intensity)refers to the amplitude of a sound wave. Auscultated
sounds range from soft to loud. Quality refers to sounds of similar frequency and loudness from different
sources. The quality of sound is a subjective description of a sound; for
example, whistling, blowing, gurgling or snapping. Duration means the length of time that sound vibrations last (long or short).
The duration of sound is short, medium, or long. Layers of soft tissue dampen the
duration of sounds from deep internal organs.Auscultation requires concentration and practice: while listening, know which
sounds are normally produced in certain parts of the body and what causes the
sounds.After understanding the cause and character of normal auscultated sounds, it
becomes easier to recognize abnormal sounds and their originsSelf-assessment 6.5.
For (a) section: Techniques of Physical Assessment Overview;
1) Define the four methods/ techniques used for physical assessment
2) List and explain the five types of sounds produced by Percussion
3) What are the conditions to be fulfilled in order to auscultate internal
sounds?
4) Why Light or Superficial palpation should always precede deep
palpation?
5) Provide the contra-indication of Deep Palpation.
6) Explain the four Characteristics according to which Auscultated Sounds
are described.
For (b) section: Procedure of conducting out the techniques of Physical
Assessment;
Learners will practice in skills lab under guidance of the facilitator.
Images /videos if possible and Guidelines will be provided.
After observing the above images under section (b) for your guidance and after
carefully reading the guidelines provided to be followed under each technique
used in Physical Examination; each learner should demonstrate the techniques
used in physical
assessment as follows:
1) Form pairs of 2 students and each one will conduct each technique used
during physical assessment namely: Inspection, Palpation, Percussion
and Auscultation.
2) Write down findings for your partner, interpret results showing normal
and abnormal findings.End unit assessment 6
1) The patient health history and physical examination provide the
nurse with information to primarily
a) Diagnose a medical problem.
b) Investigate a patient’s signs and symptoms.
c) Classify subjective and objective patient data.
d) Identify nursing diagnoses and collaborative problems2) The nurse is preparing to examine a patient’s abdomen. Identify the
proper order of the steps in the assessment of the abdomen, using the
numbers 1-4 with 1 =the first technique and 4 =the last technique:
(1) Inspection
(2) Palpation
(3) Percussion
(4) Auscultation3) The nurse is performing an admission assessment. Which of the following
are examples of objective data? Select all that apply.
a) 10 cc of emesis in basin
b) Cool, clammy skin
c) Client says, ‘‘My feet are swollen.’’
d) Complaint of nausea by client
e) Oral temperature 1030F
f) Rapid, thready pulse4) When performing an assessment, which of the following would the nurse
use as a primary source of data?
a) All health care personnel
b) Client
c) Client family and/or friends
d) Client medical records5) During interview, a nurse asks this question to the client “Do you
have a family history of psychiatric illness?” In which domain of the
biopsychosocial model this question belongs?
a) Biology domain
b) Psychology domain
c) Social domain
d) Psychosocial domain6) What is the purpose of health history?
7) Put “Words” under figures or numbers for each Pain scale as far as pain
assessment is concerned: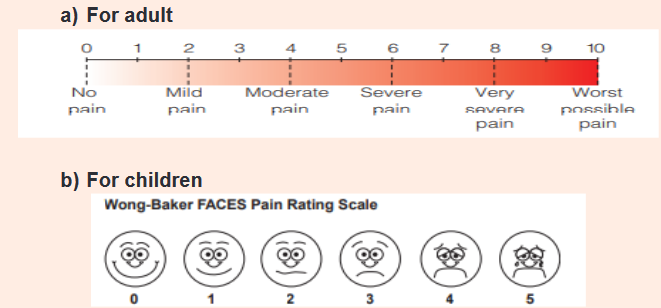
8) List the elements assessed frequently by Nurses using Visual Inspection.
9) What is the difference between Direct auscultation and Indirect
Auscultation?
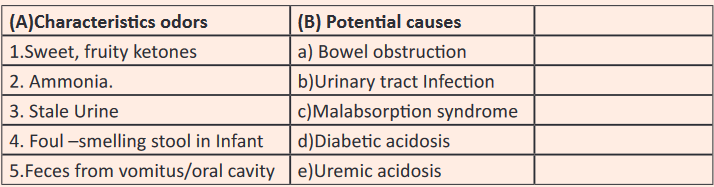
10) Match the Characteristics odors in column (A) to Potential causes in
column (B)