UNIT 3: VITAL SIGNS AND PARAMETERS
Key unit competence:
Interprets correctly the measured vital signs and parametersIntroductory activity 3
PERSON A
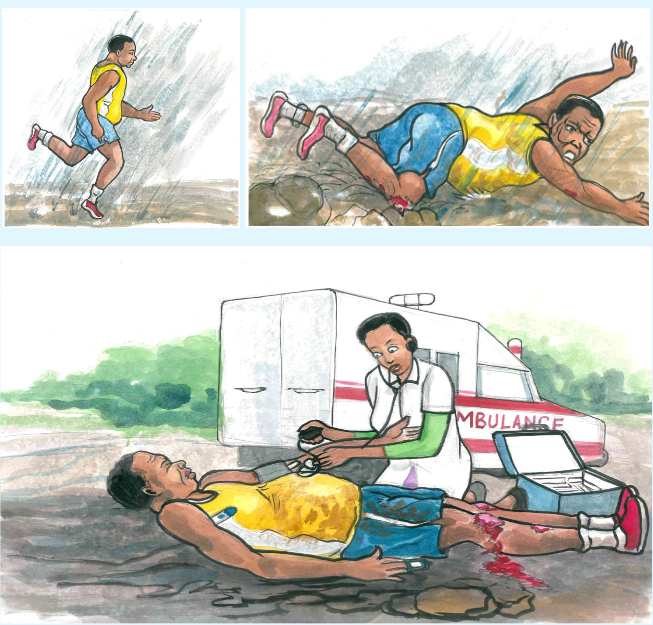
1) By observing these pictures above, what do you think has happened to
the person A?
2) What can you conclude about the health condition of this injured person?
3) According to your observation, what do you think is the nurse doing to
the person A?
4) In your view, what do you think can happen to the person A in case
these actions being done by the nurse are not done?3.1. Introduction to vital signs
Learning activity 3.1.
Do searching of the Fundamentals of Nursing book and read the vital signs unit
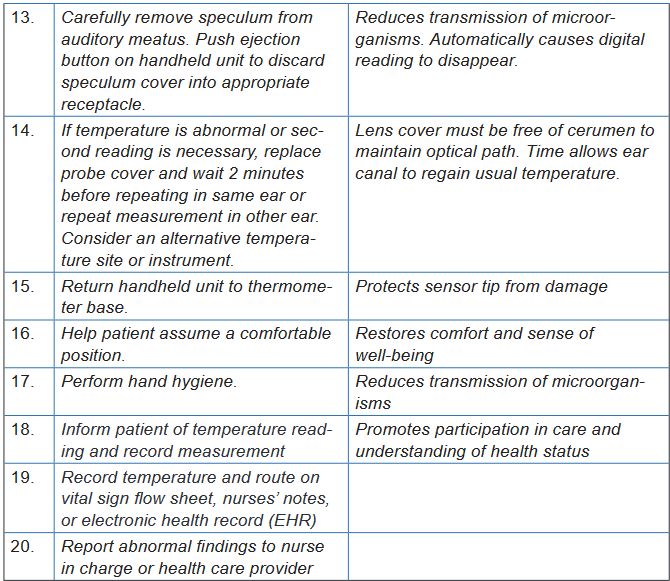
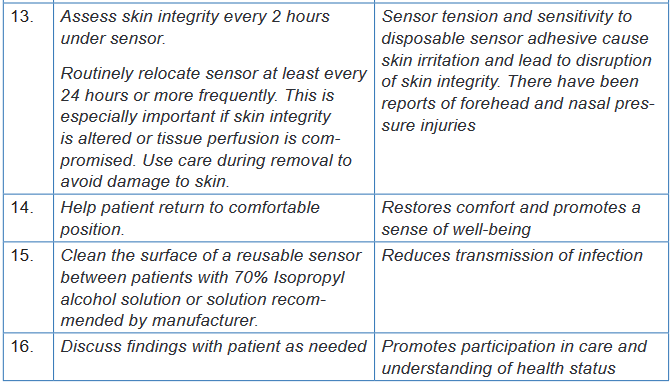
and come up with a summary of the following:
1) Definition of vital signs
2) The cardinal vital signs
3) Times to assess the vital signs
4) Guidelines for vital signs assessmentVital signs are the fundamental measurements of life signs. The term vital signs
(VS) suggests assessment of vital or critical physiological functions. Vital signs
provide important information about the interrelationship between body systems.
The vital signs reflect changes in function that otherwise might not be observed.
Vital signs that are within normal limits reflect a person’s physiological wellbeing,
whereas abnormal vital signs may be an early warning of clinical deterioration.The cardinal vital signs are body temperature, pulse, respirations, and blood
pressure. Oxygen saturation is also commonly measured at the same time as the
traditional vital signs. An alteration in vital signs signals a change in physiological
function and the need for medical or nursing intervention.a) Uses of vital signs
Very often the vital signs are used: To establish the diagnoses of the patients:
The disruption of one or several vital signs can orient the diagnosis because it can
be the first sign of disease; to prescribe treatments and for medical follow-
up: They permit to have a control on the patient’s general state. That means that
they are used to evaluate the success of the implementation and good evolution of
prescribed treatment (recovery, relapse of the illness); and to establish nursing
care planb) Times(moments) to assess vital signs
When and how often to assess a specific patient’s vital signs are chiefly nursing
judgments, depending on the patient’s health status. A patient’s vital signs may be
recorded on a routine basis (every 8 hours for most hospitals), however if there is a
change in the patient’s condition then the vital signs may need to be recorded more
frequently depending on the physician orders or according to nurse judgment. Below,
are examples of times (moments) to assess vital signs though the list is not exhaustive: On admission to a health care facility
When a person has a change in health status or reports symptoms such as
chest pain or difficulty breathing.
Before, during and after surgery or an invasive procedure.
Before and/or after the administration of a medication that could affect the
respiratory or cardiovascular systems.
Before and after any nursing intervention that could affect the vital signs
(e.g. ambulating a person who has been on bed rest or when a person is
receiving a blood transfusion).
Following an incident, accident or injury in the health care setting (e.g. when
a person has fallen or has been administered an incorrect medication).c) Guidelines for assessing vital signs
Vital signs are part of the assessment data base. You include them in a complete
physical assessment or obtain them individually to assess a patient’s condition.
Establishing a database of vital signs during a routine physical examination serves
as a baseline for future assessments. Guidelines for assessment of vital signs
include:
Use of functional and appropriate equipment in regard to the size and age
of the patient.
Select equipment based on the patient’s condition and characteristics
Being familiar with normal ranges of vital signs for different ages.
Always compare the patient’s usual range of vital signs with later findings.
Determine the patient’s medical history, therapies, and prescribed
medications. Some illnesses or treatments cause predictable changes in
vital signs.
Control or minimize environmental factors that affect vital signs.
Use an organized, systematic approach when taking vital signs. Each
procedure requires a step-by-step approach to ensure accuracy.
Use vital sign measurements to determine indications for medication
administration. For example, give certain cardiac drugs only within a range
of pulse or BP values. Analyze the results of vital sign measurements. Vital signs are not interpreted
in isolation. You need to also know related physical signs or symptoms and
be aware of the patient’s ongoing health status.
Communicate significant changes in vital signs to the patient’s health care
provider or the charge nurse. Document findings and compare with baseline
measurements to identify significant changes.
Instruct the patient or family caregiver in vital sign assessment and the
significance of findings.
Vital sign measurements can require removing clothing or exposing areas.
Provide patient privacy while being sensitive to cultural norms w h e n
measuring vital signs.Vital signs serve different role. Vitals signs can orient the diagnosis because it can
be the first sign of disease. They are also used to evaluate response to intervention.Self-assessment 3.1.
1) List the vital signs you know
2) What do vital signs serve for?
3) What is the right time to measure the vital signs?
4) Why is it important for the nurse to know the patient’s usual range of
vital signs?3.2. Body temperature
3.2.1. Body temperature overviewLearning activity 3.2.1.
Use the provided book of Fundamentals of Nursing to read the materials on
body temperature under the vital signs unit and make a summary note of the
following:
1) Definition of body temperature
2) Difference between core and surface temperature
3) Normal values of body temperature
4) Factors affecting body temperature
5) Routes of body temperature assessmenta. Concept of Body Temperature
Body temperature is defined as the balance between the heat produced by
the body and the heat lost from the body, measured in heat units called degrees
either Fahrenheit or Celsius. There are two kinds of body temperature: core
temperature and surface temperature. The core temperature which remains
relatively constant is the temperature of the deep tissues of the body, such as the
abdominal cavity and pelvic cavity. The surface temperature is the temperature
of the skin, the subcutaneous tissue, and fat. It rises and falls in response to the
environment.The normal core body temperature is a range of temperatures. No single value
can be considered “normal” since the body temperature fluctuates as a result of
differences in metabolism. The normal range for adults is considered to be between
36°C and 37.5°C (96.8°F to 99.5°F) with the average being 98.6°F(37°C). The core
temperature is generally 1°F to 2°F (0.6°C to 1.2°C) higher than surface (skin)
temperature. This normal temperature range is maintained by keeping a balance
between heat production and heat loss.Box 3.2.
To convert Fahrenheit to Celsius: subtract 32 from Fahrenheit reading
and multiply by 5/9.
C=(F-32°)×5/9
Example104°-32°)×5/9=40°C
To convert Celsius to Fahrenheit: Multiply the Celsius reading by 9/5
and add 32.
F=(C×9/5)+32
Example: (40°C ×9/5)+32=104°F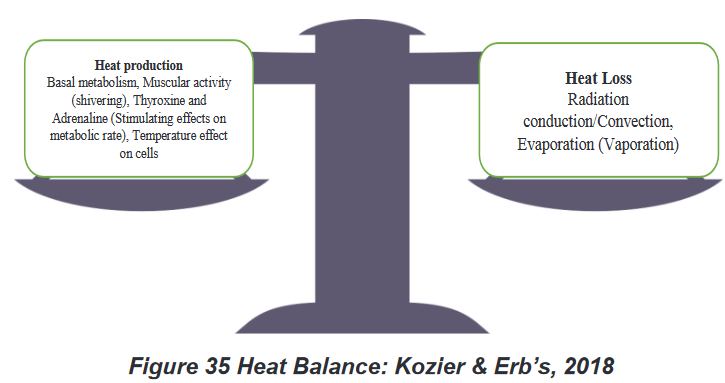
b. Factors affecting body temperature
A variety of internal and external factors affect body temperature. Nurses should
be aware of physiological factors that affect a person’s body temperature so that
they can recognize normal temperature variations and understand the significance
of body temperature measurements that deviate from normal. The common
factors are environment, time of day, gender, age, physical activity and exercise,
medications, food or liquid intake, stress, and illness. Age: Infants have an immature thermoregulatory mechanism and their
temperature is greatly influenced by the environment and must be protected
from extreme changes. Elderly people have decreased thermoregulatory
controls and are also more sensitive to extremes of environmental temperature
changes. Elderly individuals are particularly at risk for hypothermia for a variety
of reasons, such as poor activity, limited metabolism and poor diet, as well
as poor temperature-regulating mechanisms. Many older people, particularly
those over 75 years old, are at risk of hypothermia (temperature below 360C) The action of hormones: At ovulation, a woman’s body temperature may
increase by about 0.30C to 0.60C, due to the influence of progesterone. Just prior
to ovulation the estrogen peak may cause a slight decrease in body temperature.
Thyroxin, adrenaline and noradrenalin all increase body temperature. Rest and sleep: The metabolism slows down during these periods. The
temperature can go down from a few tenth degrees. Time of the day: Body temperature is lowest in the early morning, when
metabolic rate and heat production are at their lowest. The body temperatureis highest in the afternoon and early evening when we are active. Body
temperatures normally change throughout the day, varying as much as 1.00C
between the early morning and the late afternoon. Exercise and physical labor: The role of muscles is predominant in the
production of heat; the muscular activities can increase the metabolism 4 to 5
times to the initial value of rest. Therefore, the temperature can rise from 0.2 to1. 50C according to the activity. However, hard work or strenuous exercise can
increase body temperature to as high as 38.3 to 400 C measured rectally. Stress: Stimulation of the sympathetic nervous system can increase the
production of epinephrine and norepinephrine, thereby increasing metabolic
activity and heat production. The digestion: The combustion of the nutritious substances increases
the production of heat. The abundant meals increase the temperature by
the activation of the metabolism. On the other hand the fasting lowers the
temperature in the beginning, but if it is prolonged, it can increase it. Hot and
cold fluids can have mild effects on the oral temperature reading for 15 to 30
minutes after ingestion. The climate: The temperature of individuals living in tropical countries is of 1
degree more elevated than normal. Contrary in cold countries the temperature
is below the normal. If the patient has been outside in extremely cold weather
without suitable clothing, the body temperature may be low.
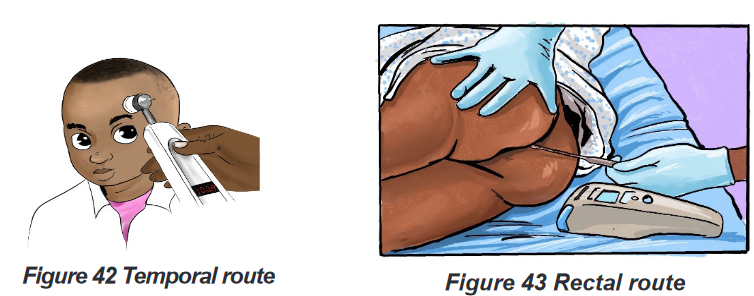
Body temperature is most accurate when measured at sites where there is a rich
blood supply. The common routes used to measure temperature are the axillary
(Figure 39 Axillary route) ,oral (Figure 40 Oral route), tympanic (Figure 41
Tympanic route), temporal artery(Figure 42 Temporal route), rectal (Figure 43
Rectal route) and skin routes. Rectal and tympanic membrane measurements
are used to represent core temperatures; oral and axillary measurements reflect
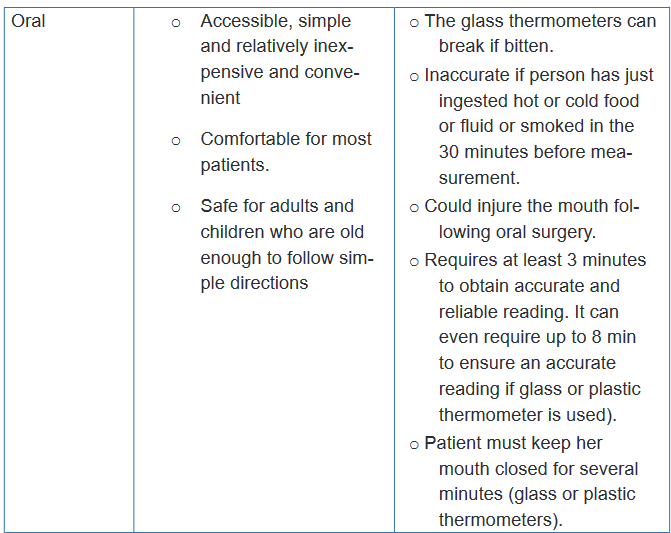
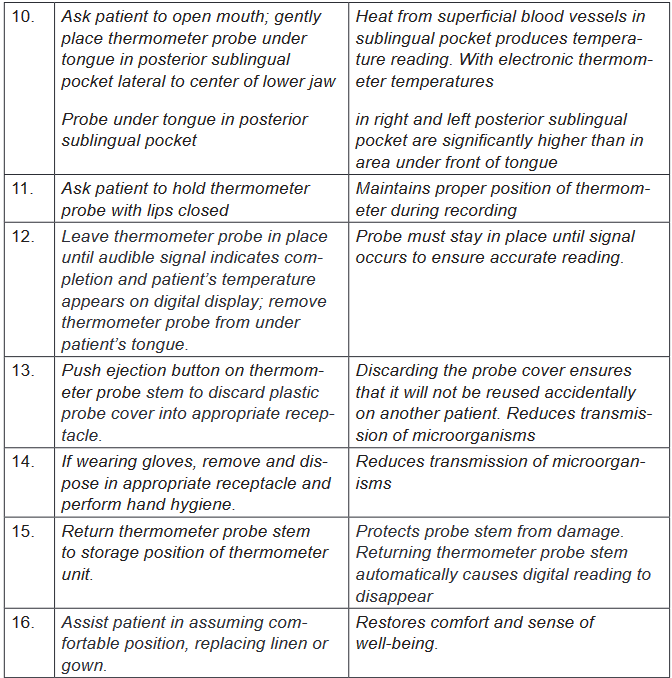
surface temperatures.Oral temperature is the most commonly used and probably the most convenient
method. Provided that it is done correctly, the oral temperature is a reasonably
accurate reflection of the body temperature. To accurately measure an oral
temperature, you must make certain the patient has not eaten, drunk, or smoked
within the last 15 to 30 minutes. After applying a disposable thermometer cover
sheath, the thermometer should be placed deep into the sublingual pocket under
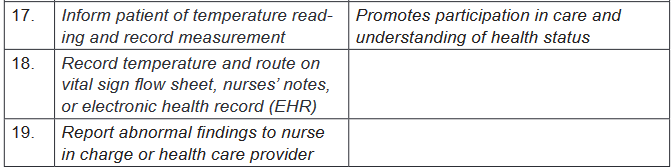
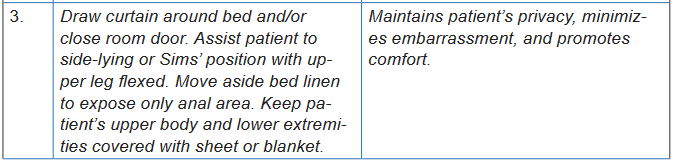
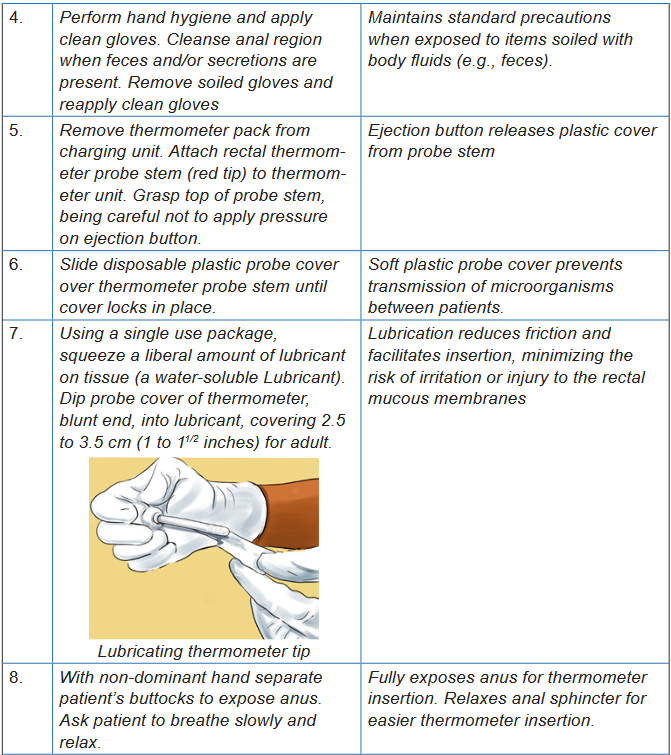
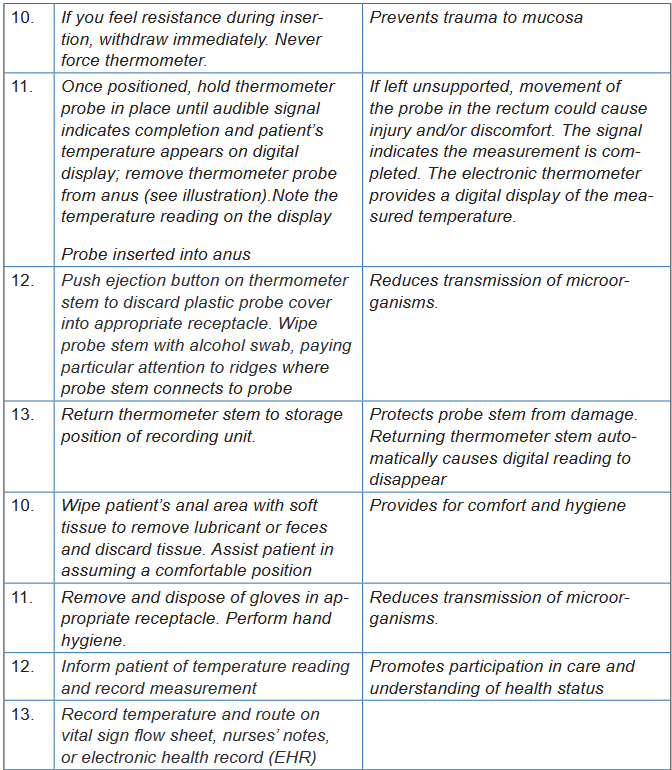
the tongue.Rectal temperature readings are considered the most accurate, and they are the
true reflection of the core temperature of the body. However, rectal temperature is
contraindicated in many clinical situations; for example, people who are undergoing
rectal surgery, have diarrhea or diseases of the rectum, are immunosuppressed,
have a clotting disorder or have significant hemorrhoids. The rectal temperature is
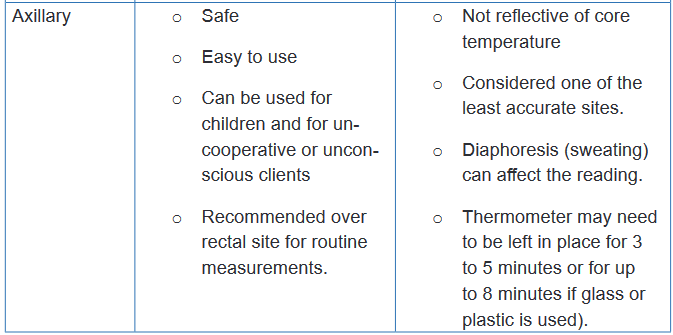
approximately 1°F higher than the oral temperature.The axilla temperature is the preferred site for measuring temperature in newborns
because it is accessible and safe. It measures the surface temperature of the body,
and this method is not accurate if not correctly carried out. Properly carried out,
an axillary temperature is a reasonably accurate reflection of body temperature.
Axillary temperatures are lower than rectal temperatures. The axillary route is used
for patients who cannot hold the oral thermometer in place or for patients for whom
the oral route might pose a safety risk, such as a patient who is having seizures.The axillary route temperature is approximately1°F lower than the oral temperature.
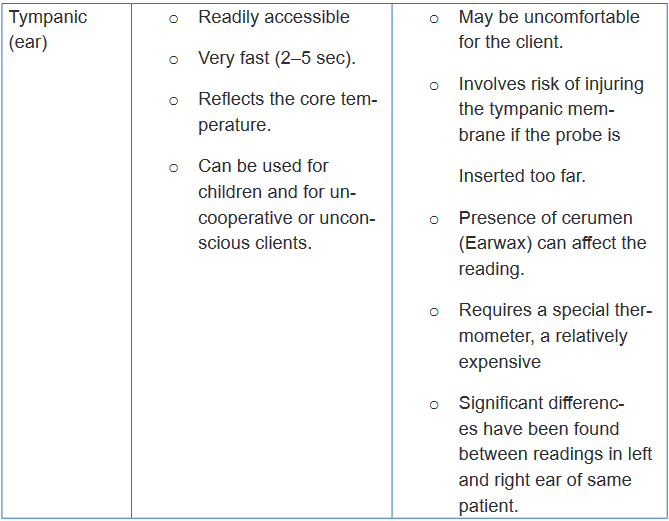
The tympanic membrane is a frequent site for estimating core body temperature.
Like the sublingual oral site, the tympanic membrane has an abundant arterial
blood supply, primarily from branches of the external carotid artery.
Normal range of adult body temperature per site:
Orally 36,7oC to 37,2o C , average: 37oC
Axillary 35,6oC to 36,7o C, average: 36,5oC
Rectally 36,7oC to 37,8o C , average: 37,5oC
New born 36.1-37.7 (axillary)d. Advantages and disadvantages of sites for body temperature
measurement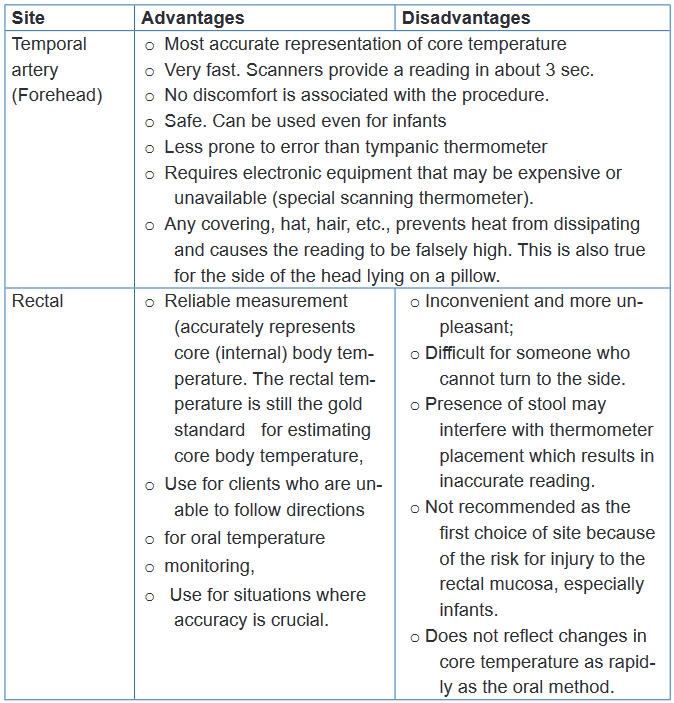
e. Pathological variations (Alterations) of body temperature
There are two primary alterations in body temperature: pyrexia, hyperthermia or
fever and hypothermia. Pyrexia or fever is a body temperature above the normal
range. A very high fever that is above 40oC such as 41oC is called hyperpyrexia.
The client who has fever is referred to as febrile; the one who has not is afebrile.Very high temperatures, such as 41 to 420C, damage the cells throughout the body,
particularly in the brain where destruction of neuronal cells is irreversible. Damage
to the liver, kidneys and other body organs can also be great enough to disrupt
functioning and eventually cause death.Hypothermia which is a core temperature below 95°F (35°C), slows body
metabolism. Mild hypothermia is treated with warm clothes or blankets and ingestion
of warm drinks such as broth or soup. Because up to 40% of body heat can be lost
through the head, coverings such as a hat or scarf can dramatically help reduce
heat loss.Every patient with a fever will not present signs and symptoms of fever in the
same manner. Some of the common signs and symptoms that may indicatefever include: Flushed face , dry hot skin, dry mucous membranes, elevated pulse
rate and rapid respirations, droopy eyes, increased irritability or restlessness,
photophobia, which means the eyes have increased sensitivity to light, thirst,
headache, myalgia (muscle aches), lethargy or drowsiness, diaphoresis, anorexia
and nausea. A patient with hypothermia often presents the following signs and
symptoms: Decreased body temperature, pulse and respirations, severe shivering
initially and feeling of cold and chills, pale, cool, waxy skin, hypotension, lack of
muscle coordination, disorientation, drowsiness progressing to coma, decreased
urinary output.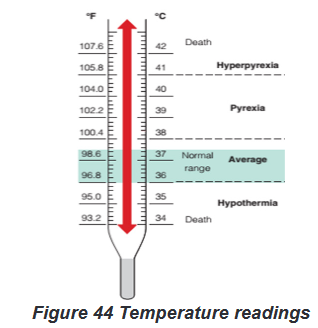
f. Nursing interventions for a patient with alterations of body
temperature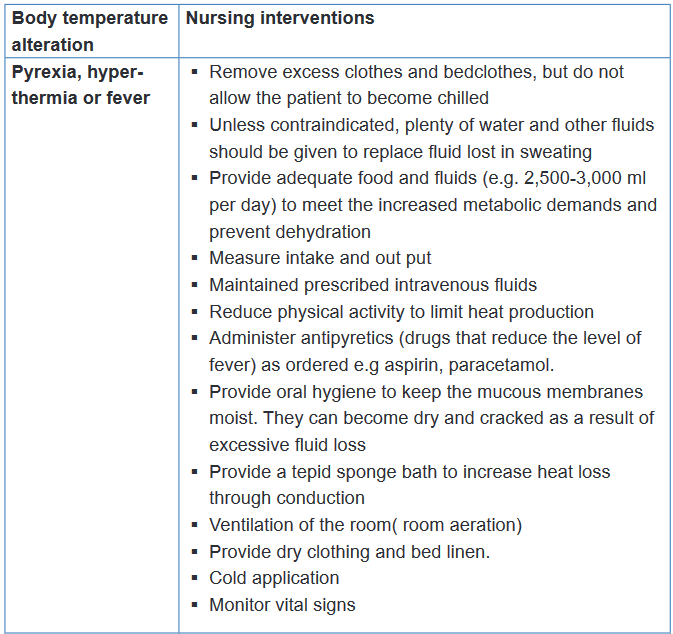
Self-assessment 3.2.1
1) What is the difference between core and surface temperature?
2) Among the following sites of body temperature assessment, which one is
the safest and most convenient site?
a) Oral
b) Tympanic
c) Axillary
d) Rectal
3) Mr. TA, 30 years old is hospitalized in a district hospital in room B
(Private room). During his assessment, the nurse notices that his body
temperature is 1030F.
a) How will the nurse interpret the body temperature of Mr. TA?
b) Based on the body temperature of Mr. TA, what will be the appropriate
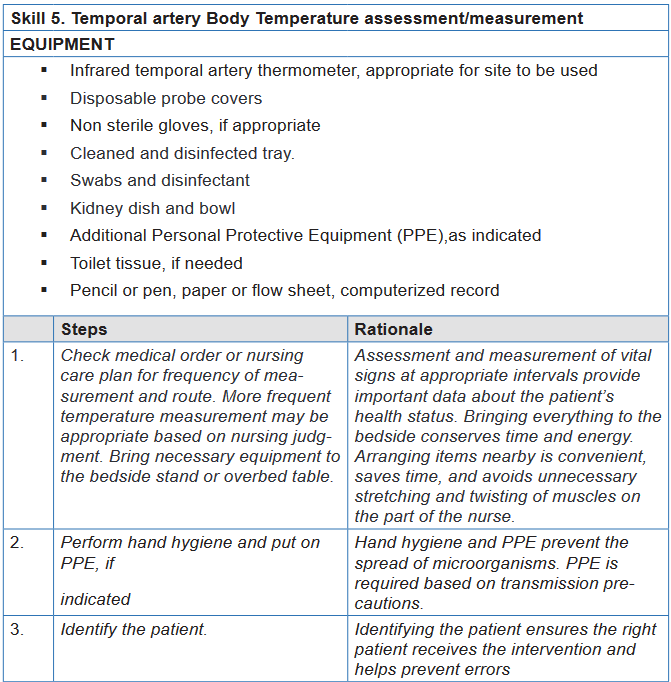
nursing interventions by the nurse?3.2.2 Body Temperature measurement/assessment
Learning activity 3.2.2.
In small groups of four (4) learners per each, read firstly the required equipment
and all the steps of axillary, oral, rectal, tympanic membrane and temporal artery
body temperature assessments in the provided procedural guides. Secondly,
use the provided materials for axillary, oral, rectal, tympanic membrane and
temporal artery body temperature assessments and measure the axillary, oral,
tympanic membrane and temporal artery body temperature of your partner.
N.B. In a group of four learners, two learners will pair and everyone will measure
the body temperature (axillary, oral, tympanic membrane and temporal artery)
of his/her partner, write down the results , interpret them and communicate the
results to his/her partner. For the measurement of rectal body temperature, you
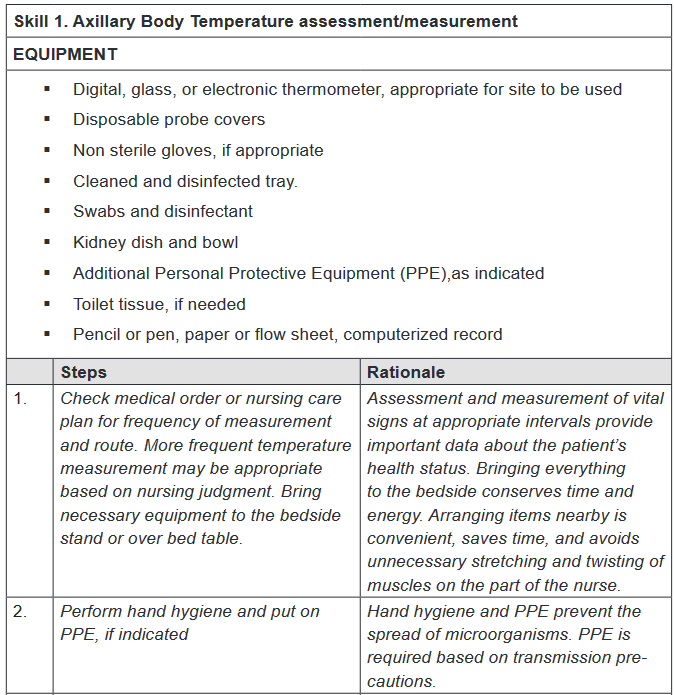
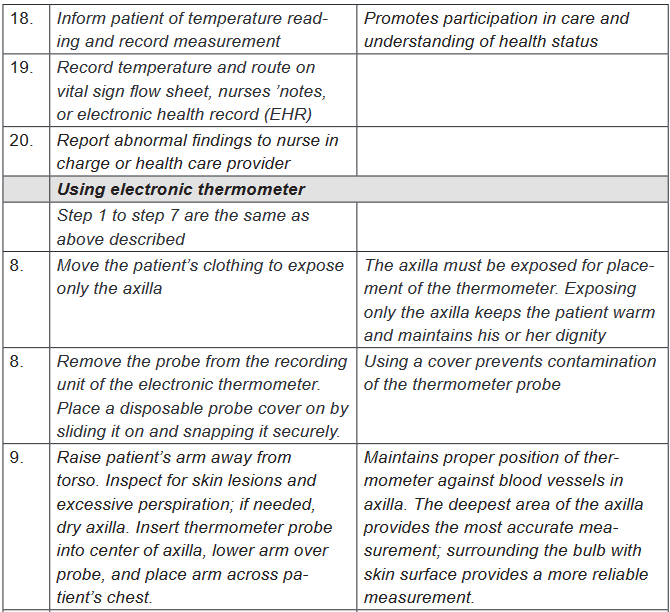
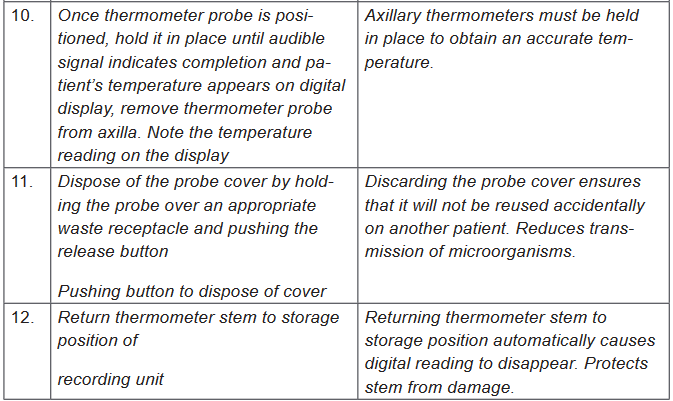
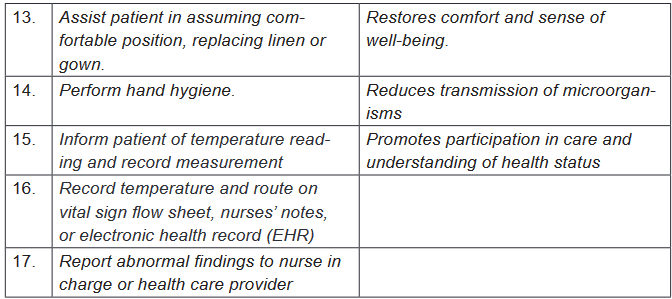
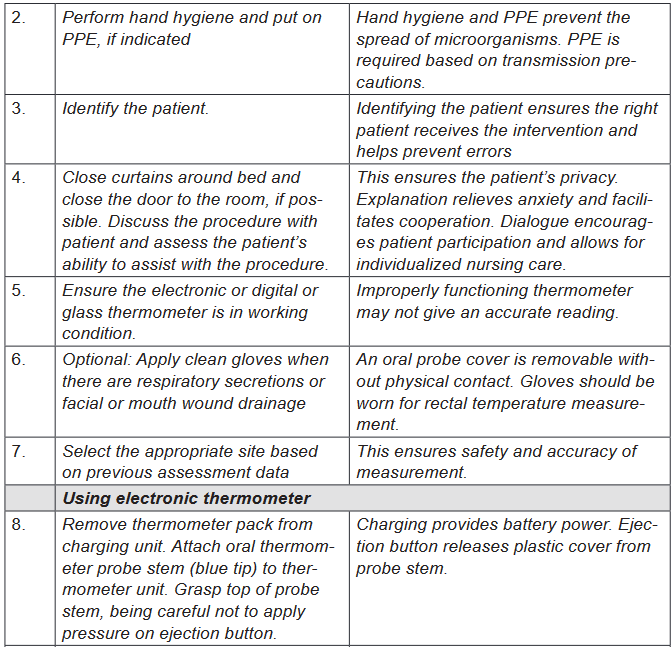
will measure it on the provided mannequins.a) Axillary body temperature assessment
To measure body temperature, several types of equipment and different procedures
might be used. To obtain an accurate measurement, choose an appropriate site,
the correct equipment, and the appropriate tool based on the patient’s condition. If
a temperature reading is obtained, it is better to document also the site used along
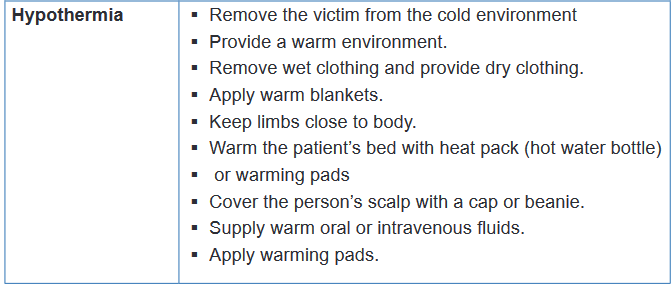
with the measurement.Various types of clinical thermometers may be used to assess the axillary body
temperature, including mercury glass thermometer, a plastic non-mercury
thermometer, electronic contact thermometer. Plastic non-mercury thermometers
have a digital readout, with oral, axillary, and rectal settings, requiring you to preset
the correct route before taking the temperature. Electronic contact thermometers
consists of a rechargeable battery-powered display unit, a thin wire cord, and
a temperature-processing probe covered by a disposable probe cover. This
thermometer can provide a reading in 2 to 60 seconds, depending on the model
and may be used to assess oral, axillary, or rectal temperatures. The mercury-
in-glass thermometer has been eliminated from health care facilities (no longer
advised) because of the environmental hazards of mercury.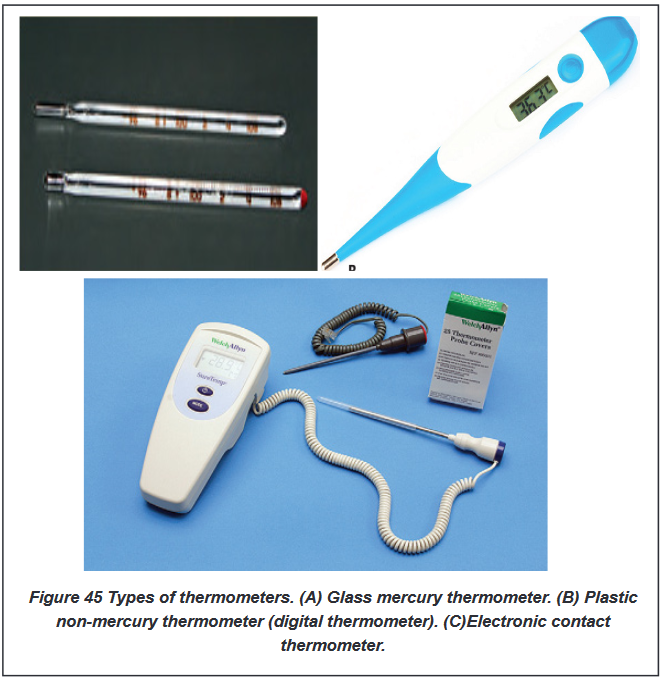

b) Oral body temperature assessment
Various types of clinical thermometers may be used to assess the oral body
temperature, including mercury glass thermometer (no longer advised), a plastic
non mercury thermometer (digital) and electronic contact thermometer.

c) Rectal body temperature assessment
Various types of clinical thermometers may be used to assess the oral body
temperature, including mercury glass thermometer (no longer advised), a plastic
non-mercury thermometer (digital) and electronic contact thermometer.

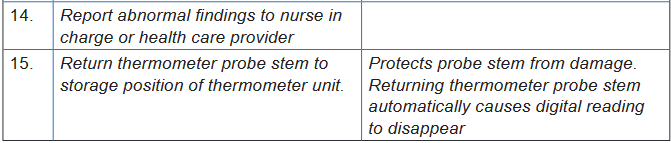
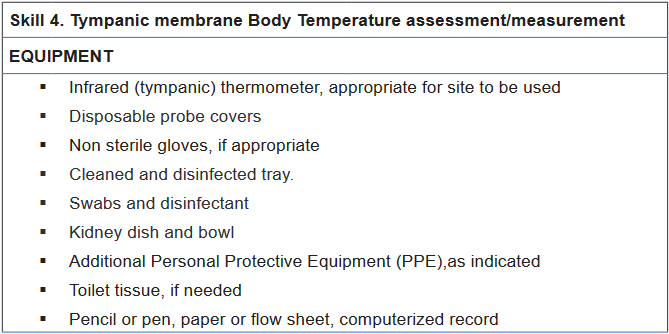
d) Tympanic membrane body temperature assessment
Infrared (tympanic) thermometer is used,. Infrared (tympanic) thermometers
(another form of electronic thermometer); is an otoscope-like speculum with an
infrared sensor tip which detects heat radiated from the tympanic membrane.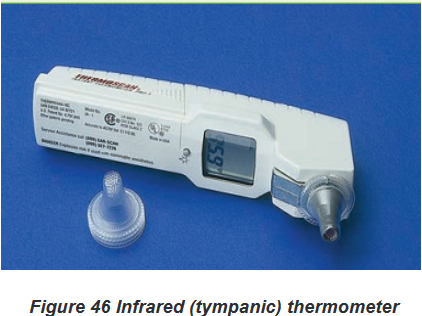
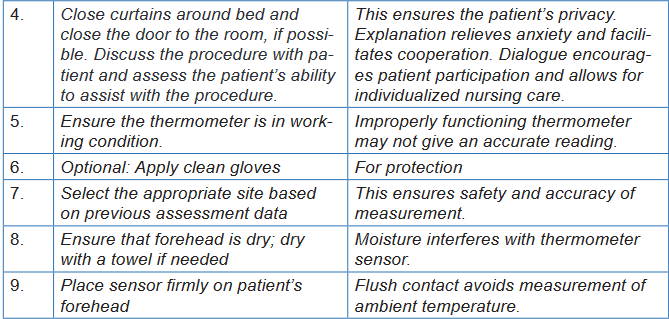
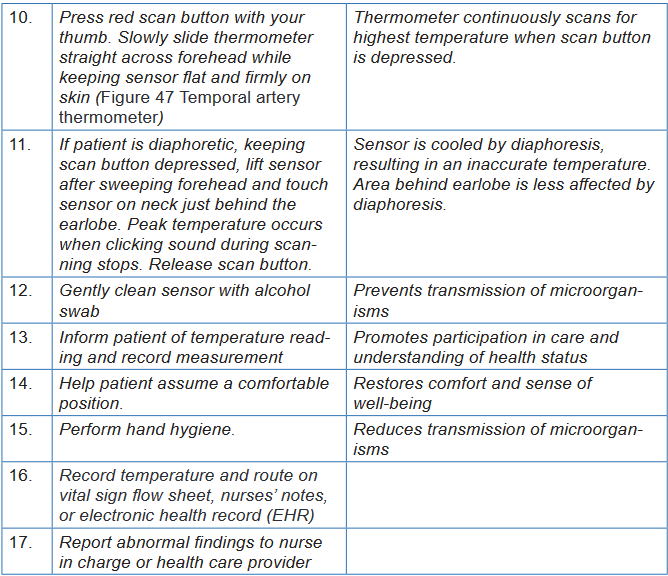
e) Temporal artery body temperature assessment
For a temporal artery thermometer (another form of electronic thermometer); a
handheld scanner with an infrared sensor tip detects the temperature of cutaneous
blood flow by sweeping the sensor across the forehead and just behind the ear.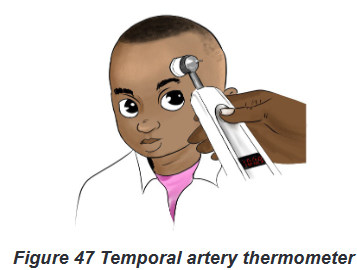
Self -assessment 3.2.2
Instructions:
For you to master the technique of temporal artery body temperature
measurement; go back to your previous groups of four ; let each learner
measures one more time the temporal artery body temperature. The teacher
will be facilitating and observing each student while carrying out the procedure.
After measuring temporal artery body temperature, do the following:
a) Record the temperature reading
b) Interpret the temperature reading.
c) Communicate the result to your partner.3.3. Pulsation/Pulse measurement
Learning activity 3.3.
For Overview
Use the provided book of Fundamentals of Nursing to read the materials on
Pulse under the vital signs unit and make a summary note of the following:
1) Definition of Pulse
2) Normal values and abnormal values of pulse
3) Factors affecting Pulse
4) Sites of pulse palpation
5) Different methods of Pulse taking or How to assess the pulse rate
6) Basic nursing interventions during abnormal pulse.For procedure
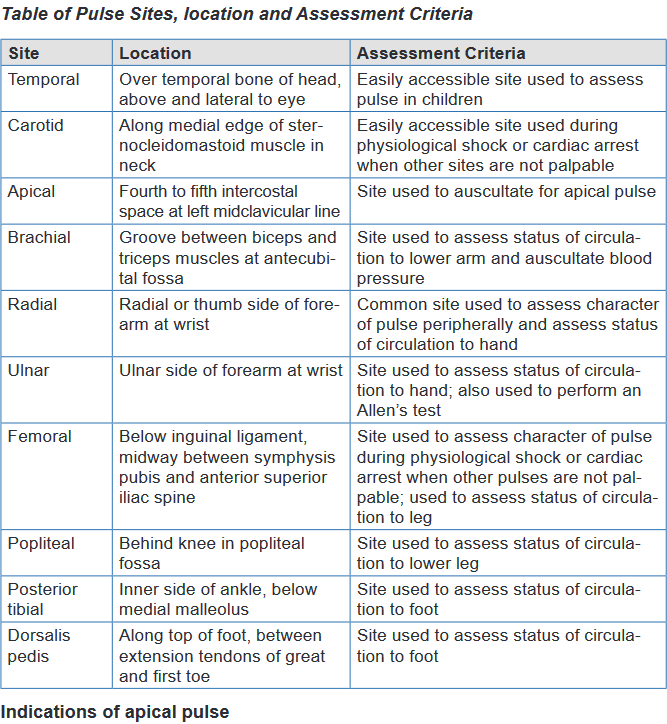
Using checklist provided and equipment for pulse taking (see checklist); read all
steps of pulse rate taking in order for you to measure correctly the pulse for your
partner.
1) Observe the images of pulse taking for your guidance. (Figure 48 to
Figure 55)
2) Form pairs of 2 students and each one of you measure a peripheral pulse
selecting the site of Radial artery used for routine assessment of vital
signs
3) Assess the pulse at the apex of the heart (apical pulse) or at a place
where an artery can be pressed by the fingers against a bone (peripheral
pulses).
4) Use Different methods of how to assess the pulse rate:
5) Write down the results for your partner; Interpret results of pulse showing
normal and abnormal values.3.3.1. Pulse overview
The pulse corresponds to the contractions or beats of the heart and is counted by
the number of beats per minute (bpm). The pulse is the rhythmic expansion of an
artery produced when a bolus of oxygenated blood is forced into it by contraction of
the heart. The pulse is the palpable bounding of blood flow noted at various points
on the body and is an indicator of circulatory status.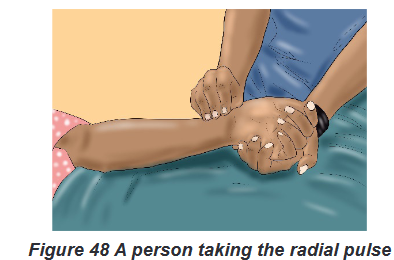
a) Normal and abnormal values of Pulse
i. Normal Pulse Rate
The normal range for healthy young and middle-aged adults is 60 to 100 beats/
min (bpm), with an average rate of 70 to 80 beats/min. The normal range of
pulse rate for adults is 60 to 100 bpm and is measured in beats per minute. Taking
the pulse is a quick and simple way to assess the condition of the heart, blood
vessels, and circulation. While assessing pulse rate as a nurse, you will assess
three characteristics of the pulse: Rate, Rhythm and Volume (strength).ii. Abnormal values of Pulse
A pulse less than 60 bpm is known as bradycardia; a pulse greater than 100
bpm is termed tachycardia.b) Pathological variations of Pulse
There are three abnormalities of Pulse: Tachycardia, Bradycardia and
DysrhythmiaThe first two abnormalities (Tachycardia, Bradycardia) are related to the pulse rate
and the third one (Dysrhythmia) is related to pulse rhythm.Tachycardia is an abnormally elevated HR (Heart Rate), above 100 beats/min in
adults. Bradycardia is a slow rate, below 60 beats/min in adults. In other words, a
pulse less than 60 bpm is known as bradycardia (brady = slow, cardia = heart); a
pulse greater than 100 bpm is termed tachycardia (tachy = rapid, cardia = heart).Dysrhythmia: is an abnormal rhythm when the intervals between beats vary
enough to be noticeable, and is called dysrhythmia.There are also abnormal rhythms which are a group of irregular beats that form a
pattern. An irregular heart rhythm can be very serious and may require additional
assessment by electrocardiogram (ECG), a procedure that traces the electrical
pattern of the heart.c) Factors Affecting Pulse Rate
Because the heart and blood vessels are regulated by the nervous system, conditions
that interfere with normal functioning of the nervous system also affect the pulse.Other factors that may cause variations in pulse rate, rhythm, or quality
include the following: Developmental level (Age): New-borns have a rapid pulse rate. The rate
stabilizes in childhood and gradually slows through old age:
o New-borns: 120–160 bpm
o 1–2 years: 90–120 bpm
o 3–18 years: 80–100 bpm
o Adults: 60–100 bpm
Gender: Adult women have a slightly more rapid pulse rate than do adult men.
Exercise, Meditation, rest, sleep: Muscle activity or exercise normally
increases the pulse rate but meditation, rest and sleep lower the pulse rate.
Food: Ingestion of food causes a slight increase in pulse rate for several
hours.
Stress, Emotions and hormones: Stimulate sympathetic nervous system,
increasing pulse rate.
Fever or Body temperature: The pulse rate tends to increase about 10
beats/ min for each degree Fahrenheit of temperature elevation. As body
temperature increases, each degree Fahrenheit results in speeding the
heart approximately 10 bpm. As the body cools, each degree results in
slowing the pulse by 10 bpm
Disease: Diseases, such as heart disease, hyperthyroidism, respiratory
diseases, and infections, are generally associated with increased pulse
rates. Hypothyroidism is associated with decreased pulse rates.
Blood loss: Small blood loss is generally well tolerated and produces only
a temporary increase in pulse rate but a large blood loss brings about an
increase in pulse rate to compensate for the decreased blood volume. Position changes: Standing and sitting positions generally cause a temporary
increase in pulse rate and decrease in blood pressure as a result of blood
pooling in the veins of the feet and legs. This decreases blood return to the
heart, decreasing blood pressure and subsequently increasing heart rate Medications: Stimulant drugs (e.g., epinephrine) increase pulse rate.
Cardiotonics (e.g., digitalis) and opioids (e.g., narcotic analgesics) or
sedative drugs decrease pulse rate. Hypoxia: Increases the pulse rate.
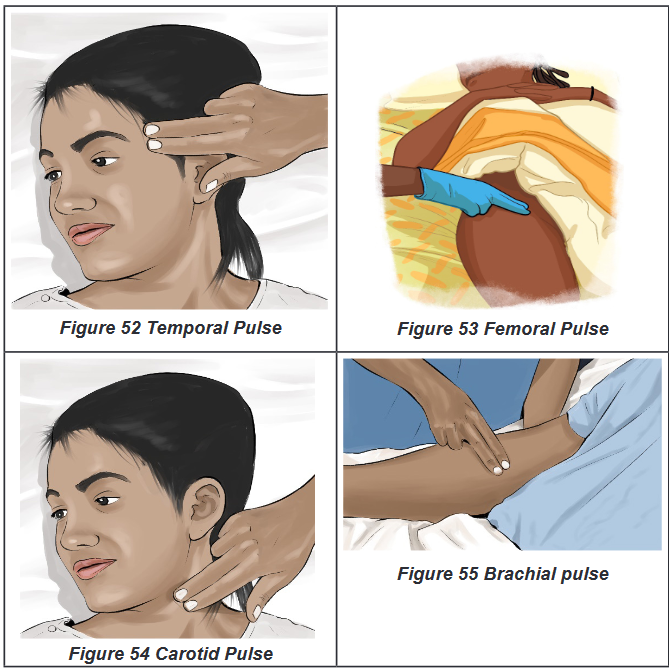
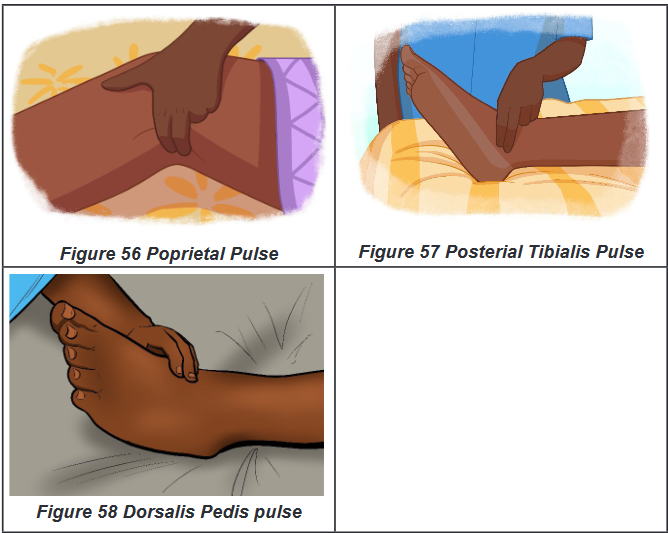
d) Sites of Pulse palpation
i. Peripheral Pulse Sites:
There are various other pulse sites where the pulse may be palpated by applying
gentle fingertip pressure over the artery against the underlying bone. These sites
are known as the peripheral pulses.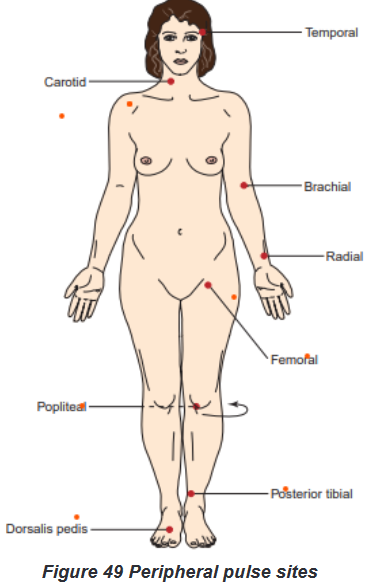
The peripheral pulse sites include the following: Temporal: can be used when
radial pulse is not accessible; Carotid: used in cardiac arrest and cardiopulmonary
resuscitation (CPR); Brachial: used to measure BP; can be used to assess pulse
rate in small children; Radial: routinely used for pulse rate assessment; Femoral:
used to determine circulation to the leg, cardiac arrest; Popliteal: used to determine
circulation to the lower leg; Posterior tibialis: used to determine circulation to the
foot and Dorsalis pedis: used to determine circulation to the foot.ii. Apical Pulse Site:
For Apical pulse; Nurses assess the pulse at the apex of the heart. Auscultate
(listen to) an apical pulse over the apex of the heart, as the heart beats.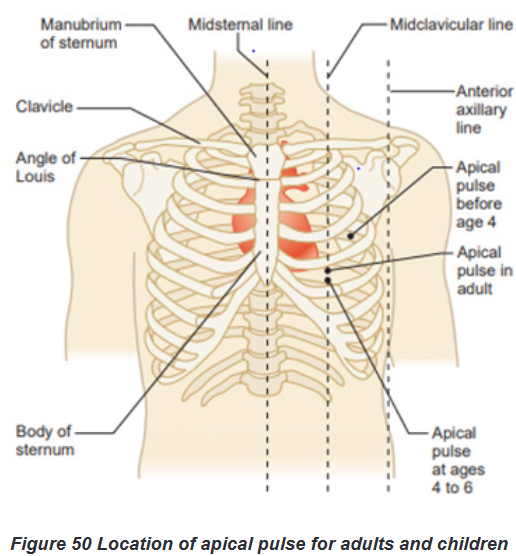
Indications of apical pulse
When cardiac output declines significantly, peripheral pulses weaken and
are difficult to palpate. The radial and apical locations are the most common
sites for pulse rate assessment If the radial pulse is abnormal or intermittent resulting from dysrhythmias or
if it is inaccessible because of a dressing or cast, assess the apical pulse. When a patient takes medication that affects the HR, the apical pulse
provides a more accurate assessment of heart function. The brachial or apical pulse is the best site for assessing an infant’s or
young child’s pulse because other peripheral pulses are deep and difficult
to palpate accurately.a. Nursing interventions during abnormal Pulse
Specific nursing activities and focused assessments for a patient with a dysrhythmia
depend on the cause of the problem and on specific orders from the physician. For
example, a client with a pulse rate of 50 beats/min is usually considered to have
bradycardia. However, such a slow resting heart rate would be perfectly normal for
a well-trained athlete.Some dysrhythmias are benign; that is, they are not dangerous to the client, and
they require no interventions. Nursing strategies that address dysrhythmias,
regardless of cause, include the following: Closely monitor the patient’s VS (Vital Sign): A reduced heart rate
may alter blood pressure and tissue perfusion. The extent of intervention
depends on the effect of the dysrhythmia on the client’s other vital signs. Monitor the patient’s activity tolerance: The degree of activity, orientation,
and level of fatigue while the dysrhythmia is present are indicators of the
patient’s ability to tolerate the dysrhythmia. Collect and assess laboratory data as prescribed: Cardiac function
depends on normal electrolyte balance, particularly potassium, calcium,
and magnesium levels. If a client is receiving medications that affect cardiac
rhythm, serum levels of these medications must be checked periodically. Help determine the cause of the dysrhythmia: Determine when the client
experiences the dysrhythmia. Are there precipitating or alleviating factors? Administer antidysrhythmic medications: These are prescribed to
control the heart rhythm Provide emotional support: The client experiencing a dysrhythmia may be
frightened by the experience. Explain all procedures to the client and family
members, and maintain a calm presence.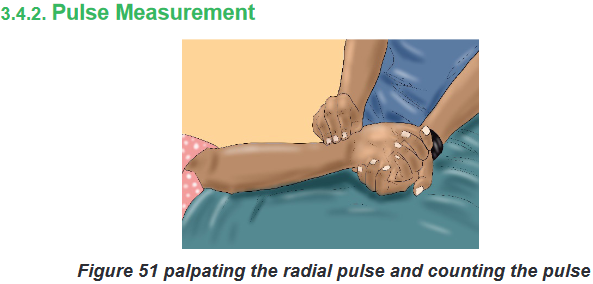
a) Assessment of pulse
To assess the pulse rate, count the number of beats per minute while palpating or
auscultating. Begin the count with one, rather than zero. For normal, healthy adults,
you can determine the rate of a regular heart rhythm by counting the pulse for 15
seconds and multiplying the result by 4. Research is conflicting, but some studies
indicate that a 30-second count is more accurate. If the pulse is irregular or slow,
always count for 1 full minute.i. Assessing Peripheral Pulses
Make sure the client is resting while you assess the pulse.
Count for 15 or 30 seconds if the pulse is regular; count for 60 seconds if it
is irregular.
Note pulse rate, rhythm, and quality.
Compare pulses bilaterally.ii. Assessing the Apical Pulse;
Assessing the apical rate requires a stethoscope and is done as follow:
Position the patient supine or sitting.
Palpate and place the stethoscope at the 5th intercostal space at the
midclavicular line.
Count for 60 seconds.
Note pulse rate, rhythm, and quality and the S1 and S2 heart sounds.Assessing for an Apical-Radial Pulse Deficit
Palpate and place stethoscope over apex of the heart.
Palpate the radial pulse.
Have two nurses carry out the procedure, if possible.
Count for 60 seconds, simultaneously.
Compare the pulse rate at both sites; calculate the difference.Pulse Amplitude
Pulse amplitude typically is graded as 0 to 4:
0 (absent pulse): pulse cannot be felt, even with the application of extreme
pressure
1 (thread pulse): pulse is very difficult to feel, and applying slight pressure
causes pulse to disappear • 2 (weak pulse): pulse is stronger than a thready
pulse, but applying light pressure causes pulse to disappear
3 (normal pulse): pulse is easily felt and requires moderate pressure to
make it disappear
4 (bounding pulse): pulse is strong and does not disappear with moderate
pressureImplementation using the procedural guide for peripheral pulse measurement
Equipment
Watch with second hand or digital readout
Pencil or pen, paper or flow sheet, computerized record
Nonsterile gloves, if appropriate; additional PPE, as indicated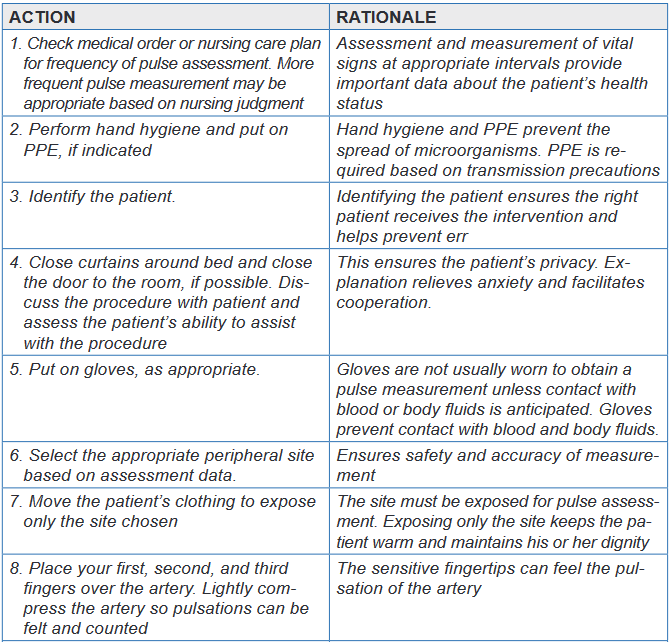
Evaluation
The expected outcomes are met when the patient’s pulse is assessed accurately
without injury and the patient experiences minimal discomfort.Unexpected situations and associated interventions
The pulse is irregular: Monitor the pulse for a full minute. If the pulse is
difficult to assess, validate pulse measurement by taking the apical pulse for
1 minute. If this is a change for the patient, notify the physician. The pulse is palpated easily, but then disappears: Apply only moderate
pressure to the pulse. Applying too much pressure may obliterate the pulse. In case you cannot palpate a pulse: Use a portable ultrasound Doppler
to assess the pulse. If this is a change in assessment or if you cannot find
the pulse using an ultrasound Doppler, notify the physician. If you can find
the pulse using an ultrasound Doppler, place a small X over the spot where
the pulse is located. This can make palpating the pulse easier because the
exact location of the pulse is known.Special considerations
General Considerations
The normal heart rate varies by age.
When palpating a carotid pulse, lightly press only one side of the neck at
a time. Never attempt to palpate both carotid arteries at the same time.
Bilateral palpation could result in reduced cerebral blood flow
If a peripheral pulse is difficult to assess accurately because it is irregular,
feeble, or extremely rapid, assess the apical rate.Infant and Child Considerations
For children younger than 2 years of age, assess the apical pulse.
Do not measure the radial pulse because it is difficult to palpate accurately
in this age group
Measure the apical rate if the child has a cardiac problem or congenital
heart defect.Self-assessment 3.4.
For overview
1) What are the normal values of pulse?
2) Explain the three abnormalities or variations of Pulse?
3) List the Eight peripheral pulse sites
4) Explain how to assess peripheral, and apical pulses?
5) Describe the seven Nursing strategies that address dysrhythmias,
regardless of causeFor procedure
For you to master the technique of Pulse rate taking; going back to your previous
groups of two; let each student takes one more time the pulse of his /her partner.
The teacher will be facilitating and observing each student while carrying out
the procedure.
1) Record the results
2) Interpret them.
3) Communicate results to your partner.3.4. Blood Pressure
Learning activity 3.4.
Section (a): For over view
Use the provided book of Fundamentals of Nursing and read the materials
on blood pressure under the vital signs unit and make a summary note of the
following:
1) Definition of blood pressure
2) Difference between systolic and diastolic blood pressure
3) Determinants of blood pressure
4) Normal values of blood pressure
5) Factors affecting blood pressure
6) Alterations of blood pressure
7) Nursing interventions for a patient with alterations of blood pressureSection (b): For measurement
In small groups of four (4) learners per each, read firstly the required equipment
and all the steps of blood pressure assessment in the provided procedural
guide. Secondly, use the provided materials for blood pressure measurement
and measure the blood pressure of your partner. N.B. In a group of four
learners, two learners will pair and every one will measure the blood pressure
of his/her partner, write down the results and interpret them.3.4.1. Blood Pressure overview
Blood pressure is the force exerted on the walls of an artery created by blood
as it flows through the arteries.Blood flows throughout the circulatory system because of pressure changes,
moving from an area of high pressure to an area of low pressure. Under high
pressure the left ventricle contracts and ejects blood into the aorta which creates
the peak pressure known as systolic pressure. When the ventricles relax, the
blood remaining in the arteries exerts a minimum pressure know as diastolic
pressure. Thus, Diastolic pressure is the minimal pressure exerted against the
arterial wall at all times. In other words, systolic blood pressure is the pressure
exerted by the blood flow on the arterial wall at the time of the systole: that means
that when the left ventricle of the heart contracts throws blood in the circulation, the
arteries are then to their maximum of tension. And diastolic blood pressure is the
pressure exerted by blood on the arteries during the diastole. That means that at
the time of the laxity of the ventricle (at rest).Blood pressure is measured in millimeters of mercury (mm Hg) and recorded as a
fraction: systolic pressure over the diastolic pressure. According to the National
Heart Foundation of Australia (2013), normal blood pressure for a healthy adult
is usually less than 120/80 mm Hg (i.e. systolic blood pressure less than 120 and
diastolic blood pressure less than 80 mm Hg). The difference between the diastolic
and the systolic pressures is called the pulse pressure. A normal pulse pressure
is about 40 mm Hg but can be as high as 100 mm Hg during exercise. A consistently
elevated pulse pressure occurs in arteriosclerosis. A low pulse pressure (e.g. less
than 25 mm Hg) occurs in conditions such as severe heart failure.a) Normal values of blood pressure
The systolic pressure varies between 90 and 140 mm Hg (adult), for men
aged of 45 years and more, it can go up to 150mmHg.
The diastolic pressure, it is between 60 and 90 mm Hg (adult)
The pulse pressure can vary from 30 to 50 mm Hg
Newborn: 65-90/ 30-60 mmHg (systolic/ diastolic)
Infants: 65-125/ 40-90 mmHg (systolic/ diastolic)
Children: 80-120/ 45-85 mmHg (systolic/ diastolic)
Adolescents: 95-135/50-70 mmHg (systolic/ diastolic)b) Determinants of blood pressure
Arterial blood pressure is the result of several factors: the pumping action of the heart,
the peripheral vascular resistance (the resistance supplied by the blood vessels through
which the blood flows), the blood volume, blood viscosity and elasticity of vessels. The pumping action of the heart: Cardiac output is the volume of blood
pumped into the arteries by the heart during 1 minute. When the pumping
action of the heart is weak, less blood is pumped into arteries, and the blood
pressure decreases. When the heart’s pumping action is strong and the volume
of blood pumped into the circulation increases, the blood pressure increase.
The cardiac output for an adult at rest is 4 to 6 liters of blood each minute. The peripheral vascular resistance: if the caliber (lumen) of the peripheral
vessels is abnormally small, the blood pressure increases, inversely if the
caliber is very large the blood pressure decreases. The blood volume: The volume of blood circulating within the vascular system
affects BP. Most adults have a circulating blood volume of 5000 ml. Normally
the blood volume remains constant, when it decreases, for example in case of
hemorrhage, the blood pressure is low. If it increases (blood transfusions), the
blood pressure rises. The blood viscosity or consistence of the blood: more blood is viscous
(thick); more the blood pressure will be raised. Because the resistance is
increased. The hematocrit, or percentage of red blood cells in the blood,
determines blood viscosity. When the hematocrit rises and blood flows slowly,
arterial blood pressure increases. The heart contracts forcefully to move the
viscous blood through the circulatory system. The elasticity of vessels: the vessels with a reduced elasticity, offer more
resistance to the blood passage. Therefore, if the resistance increases, the
blood pressure will be increasedc) Factors affecting blood pressure
Among the factors influencing blood pressure are age, exercise, stress, ethnicity,
obesity, gender, medications, obesity, diurnal variations, medical conditions and
body temperature. Age: The blood pressure varies with the age. It is usual to note a progressive
increase of blood pressure with the age. In elderly people, elasticity of the
arteries is decreased. The arteries are more rigid and less yielding to the
pressure of the blood. This produces an elevated blood pressure for the
elderly. Exercise: Physical activity increases both the cardiac output and hence
the blood pressure, thus a rest of 20 to 30 minutes following exercise is
indicated before the blood pressure can be reliably assessed. Stress: Anxiety, fear, pain, and emotional stress result in sympathetic
stimulation. Stimulation of the sympathetic nervous system increases
cardiac output and vasoconstriction of the arterioles, thus increasing the
blood pressure. Anxiety raises BP as much as 30 mmHg. Sex/ Gender: After puberty, females usually have lower blood pressures
than males of the same age, this difference is thought to be due to hormonal
variations. After menopause, women generally have higher blood pressures
than before. For men, the maxima are from 125 to 140 mm Hg whereas for
women of the same age it is less elevated at 115 to 130. For the minima, it
is generally the same for two sexes. Diurnal variations: Pressure is usually lowest early in the morning, when
the metabolic rate is lowest, then rises throughout the day and peaks in the
late afternoon or early evening. Disease process: any condition affecting the cardiac output, blood viscosity,
and/ or compliance of the arteries, has a direct effect on the blood pressure. Position: A person in lying down position normally the blood pressure is
low, while in standing or seated position the blood pressure is high. Medications: many medications may increase or decrease the blood
pressure. Obesity: pressure is generally high in some overweight and obese people
than in people of normal weight.d) Pathological variations or alterations of blood pressure
The two common alterations of blood pressure are hypertension and hypotension.i. Hypertension
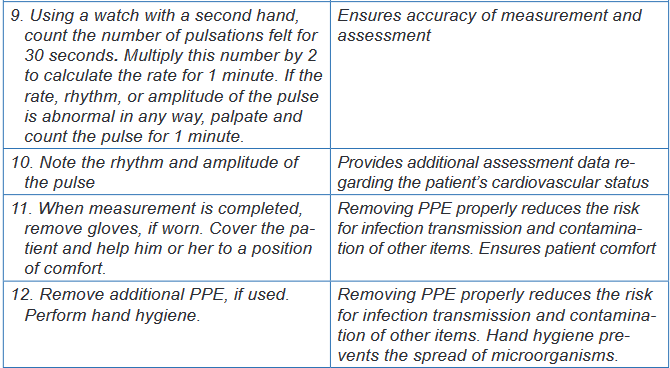
Hypertension is a blood pressure that is persistently above normal. In other words,
hypertension is defined as systolic blood pressure (SBP) greater than 140mmHg
and diastolic blood pressure (DBP) greater than 90mmHg. Hypertension is often
asymptomatic disorder characterized by persistently elevated blood pressure.
Factors such as obesity, cigarette smoking, excessive alcohol intake, elevated
blood cholesterol, lack of physical exercises and continued exposure to stress are
risk factors for hypertension.Hypertension cannot be diagnosed/confirmed unless an elevated blood pressure
is found when properly measured twice with well-maintained equipment at different
times, it is usually asymptomatic and is often a contributing factor to myocardial
infarctions and stroke. An elevated blood pressure of unknown cause is called
primary hypertension. An elevated blood pressure of known cause is called
secondary hypertension.
Classification of Blood Pressure for Adults ages (18yearsand older)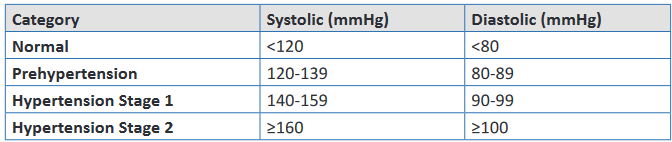
Nursing interventions for a patient with hypertension:
Put the patient in supine position
Assure calmness around him and to reassure maximum relaxation.
Give glucose solution drip
Give diuretic if the high blood pressure is very important
Continue observation
Treat cause
Refer to the hospital center if you are in health center or seek for medical
advice.ii. Hypotension
Hypotension is a blood pressure that is below normal. It is an SBP less than
90mmHg.For most individuals hypotension is an abnormal finding associated with an
illness (e.g., hemorrhage or myocardial infarction). Hypotension occurs when
arteries dilate, the peripheral vascular resistance decreases, the circulating
blood volume decreases, or the heart fails to provide adequate cardiac
output. Signs and symptoms associated with hypotension include pallor, s k i n
mottling, clamminess, confusion, dizziness, chest pain, increased heart
rate, and decreased urine output. Hypotension is usually life threatening and
needs to be reported immediately to the patient’s health care provider.Nursing interventions for a patient with hypotension
Put the patient in Trendelenburg
Give physiological solution drip of preference or Ringer Lactate
Continue observation
Treat cause
Refer to the hospital if you are in health center or alert the physician when
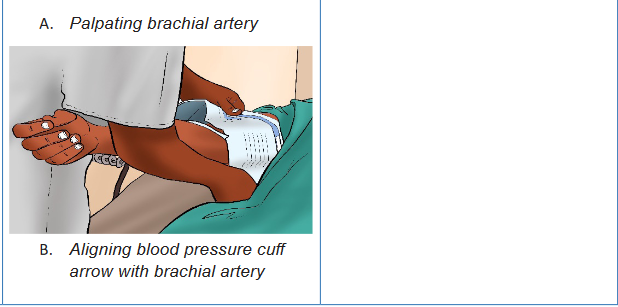
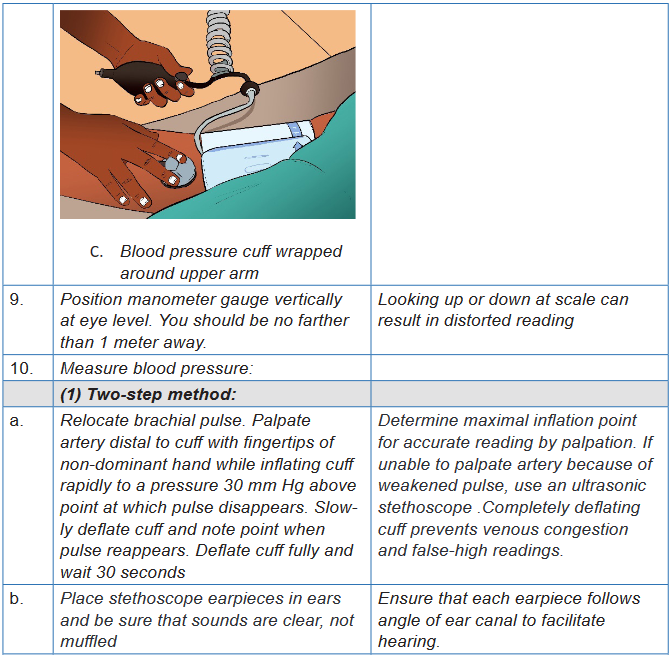
you are at the hospital3.4.2. Blood Pressure measurement
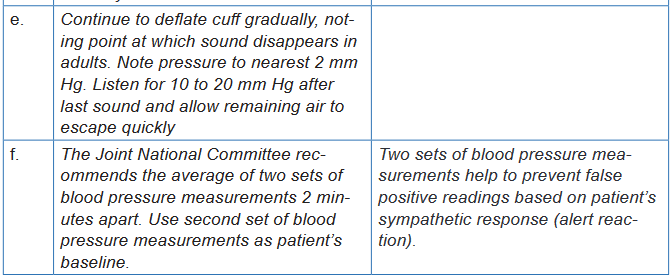
Blood pressure is measured with a blood pressure cuff, a sphygmomanometer
and a stethoscope. The blood pressure cuff consists of the bladder; that is, a rubber
bag that can be inflated with air. It is covered with cloth and has two tubes attached
to it. One tube connects to a rubber bulb that inflates the bladder. A small valve
on the side of this bulb traps and releases the air in the bladder. The other tube is
attached to a sphygmomanometer. The sphygmomanometer indicates the pressure
of the air within the bladder. There are two types of sphygmomanometers: aneroid
and digital (electronic).The aneroid sphygmomanometer is a calibrated dial with a needle that points to the
calibrations. Most clinical settings use digital (electronic) sphygmomanometers;
however, manual blood pressure measurements are more reliable and
accurate than electronic blood pressure devices, which need to be calibrated
regularly for accuracy. All health care facilities should have manual blood pressure
equipment available for use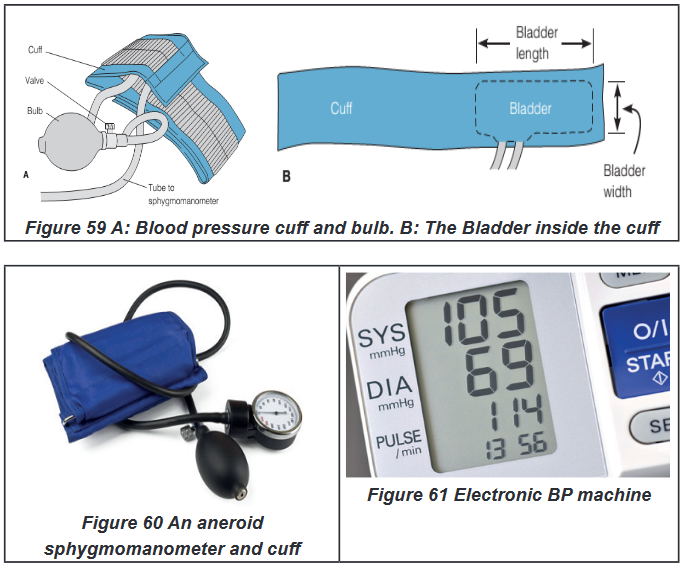

Self -assessment 3.4.
For Blood pressure overview:
1) What is the difference between systolic and diastolic blood pressure?
2) What are the five determinants of blood pressure?
3) The following blood pressures in mmHg, taken 6 months apart, were
recorded from adult patients screened by the nurse at the health center.
Which patient should be referred to the physician for hypertension
evaluation?
Patient 1: 120/80, 118/78, 124/82
Patient 2: 128/84, 124/86, 128/88
Patient 3: 148/82, 148/78, 134/86
Patient 4: 154/78, 118/76, 126/84
4) Explain why the blood pressure increases with age?For Blood pressure measurement:
For you to master the technique of blood pressure measurement; go back to
your previous groups of two; let each student measures one more time the
blood pressure of his /her partner. The teacher will be facilitating and observing
each student while carrying out the procedure.
1) Record the results
2) Interpret the results.
3) Communicate results to your partner.3.5. Respiration
Learning activity 3.5.
For overview
Use the provided book of Fundamentals of Nursing to read the materials on
Respiration under the vital signs unit and make a summary note of the following:
1) Definition of Respiration
2) Normal values and abnormal values of Respiration
3) Pathological variations of Respiration
4) (Risk) Factors affecting Respiration
5) Sites of pulse
6) Different methods of Respiration taking or How to assess the Respiration:
7) Basic nursing interventions during abnormal respiration or in case of
respiration alterations?For procedure
Using checklist provided and equipment for respiration rate taking (see checklist);
read all steps of pulse rate taking in order for you to measure correctly the
Respiration rate for your partner. Remember that you need a watch, a pen and
a sheet paper. Go back to your groups of 2 students and each one of you do
the following
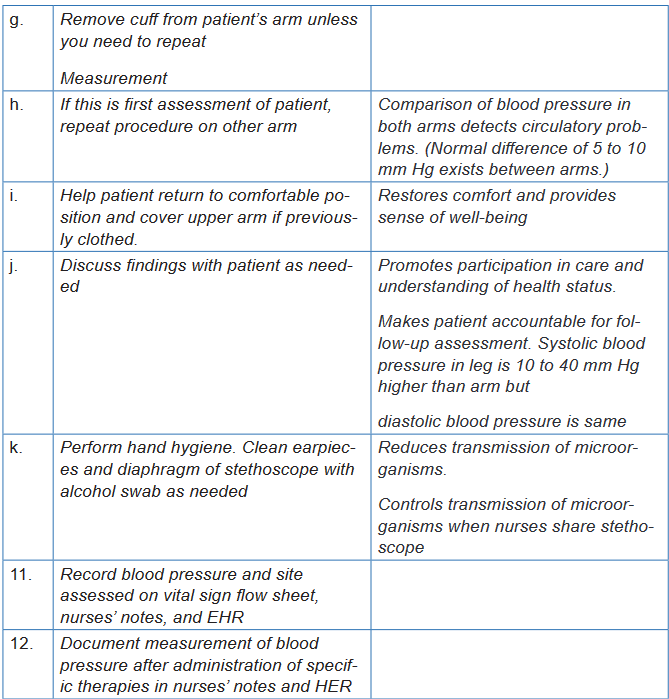
• Observe this image of a nurse assessing respirations of the patient.
• Position your pair in the supine or sitting position and
• Measure his/her respiration rate and vice-versa
• Compare your results.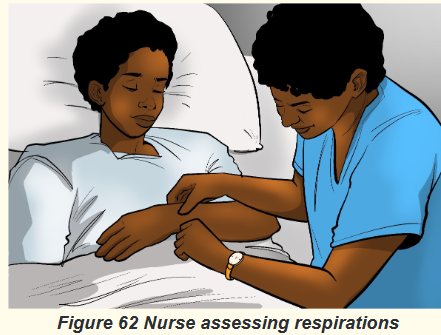
3.5.1. Respiration Overview
Respiration is the interchange of oxygen (O2) and carbon dioxide (CO2) between
the atmosphere and the body and involves both external respiration and internal
respiration.External respiration is the exchange of these gases between the lungs’ alveoli and
the blood found in the capillaries that surround the alveoli.Internal respiration is the process of exchanging gases between the circulating
blood and the tissue cells that make up the body.The movement of air into and out of the lungs is known as ventilation. The
mechanics of respiration involve the act of breathing in, termed as inhalation or
inspiration, and breathing out, described as exhalation or expiration.a. Inspiration
To effect inspiration, the medulla sends an impulse via the phrenic nerves to the
diaphragm muscle and along the intercostal nerves to the intercostal muscles,
telling the muscles to contractThe contraction of the diaphragm causes it to flatten and move downward, while
the contraction of the inter-costal muscles results in pulling the ribs upward and
outward, enlarging the chest cavity.b. Expiration
Once the medulla stops sending the motor impulses to inhale, the intercostal and
diaphragm muscles begin to relax, once again shrinking the thoracic or chest
cavity to the smaller, pre-inhalation state and compressing the lungs. The elastic
connective tissue of the alveoli recoils somewhat like a rubber band, forcing the air
that is mostly CO2 out of the alveoli so that it can be exhaled and returned to the
atmosphere.c. Rate
Each respiration consists of one inspiration and one expiration. Observe the rise
and fall of the chest or abdomen to count the rate.
d. Normal and Abnormal values
The normal rate for adults is between 12 and 20 bpm. When the rate, depth,
rhythm, pattern, and respiratory effort fall within normal parameters, the term
eupnea is used to describe the respirations.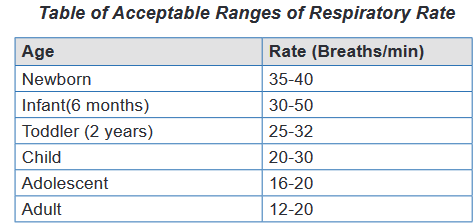
Bradypnea describes a respiratory rate below 12 respirations per minute; when
the rate exceeds 20 respirations per minute, the term is tachypnea. These are
abnormal values. When the breathing rate slows, it results in a decreased intake
of O2 that can result in a deficiency of O2 in the tissues and cells. When respirations
cease or are absent, this is known as apnea. You have only a brief window of 3 to
5 minutes in which to restore respirations before brain damage and death occur.Other things to consider when assessing respiration rate
Assess respiration for:
Rate per minute
Depth
Rhythm
Pattern
Respiratory effortRespiratory Effort
Respiratory effort refers to the amount of work required to breathe. Normally, the
act of breathing is effortless and is performed unconsciously. An individual who is
having labored or difficult breathing is said to be having dyspnea. Another sign
of difficult breathing is use of the accessory respiratory muscles: the neck and
abdominal muscles. It is important to assess which activities result in dyspnea,
document findings in the patient’s record, and report such findings to the supervisor.Some patients find it too difficult to breathe unless positioned in an upright position,
such as sitting or standing. This condition is known as orthopnea. In other words,
we define “Orthopnea” as an abnormal condition in which a person must sit or
stand to breathe deeply or comfortablye. Factors affecting Respiratory rate
Because the heart and lungs work together to provide circulation of nutrients and
oxygen, the factors that affect the heart rate generally affect the respiratory rate as
well. For example, as fever raises the pulse rate, it will also increase the respiratory
rate. Breathing speeds up in an attempt to meet the body’s increased metabolic
needs and to remove excess heat. For every 1°F rise in body temperature, the
respiratory rate increases approximately four breaths per minute. The table below
presents further factors that affect the respiratory rate.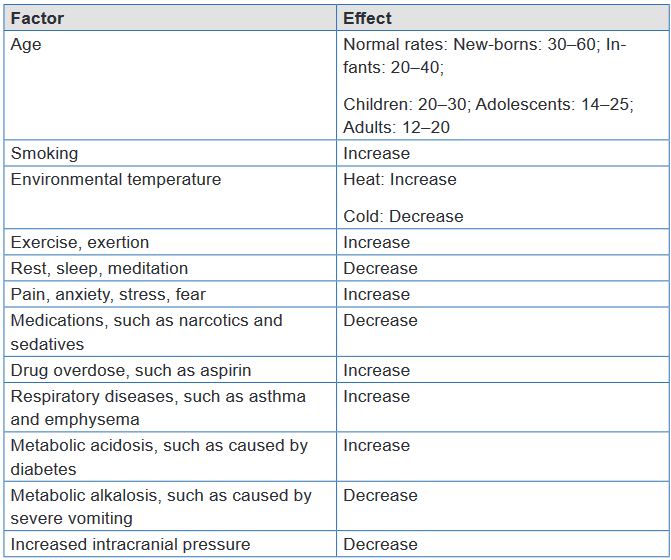
f. Pathological (abnormal) variations of Respiration rate
Some patients find it too difficult to breathe unless positioned in an upright position,
such as sitting or standing. This condition is known as orthopnea. In other words,
we define“Orthopnea” as an abnormal condition in which a person must sit or stand to
breathe deeply or comfortably.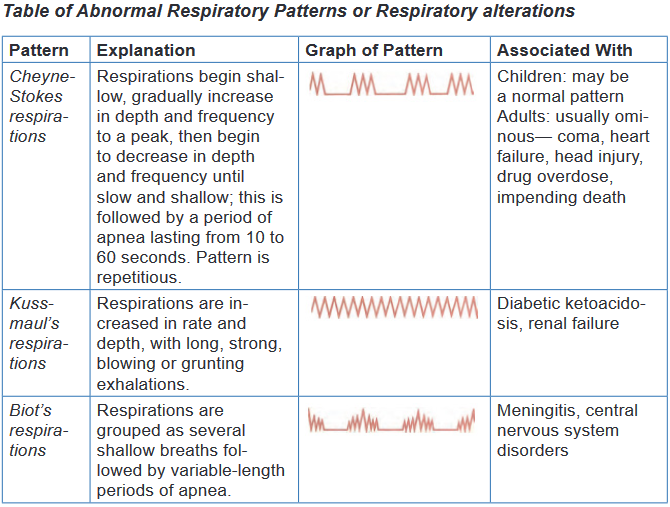
g. Sites of Respiration rate taking
The rate is usually measured when a person is at rest and simply involves counting
the number of breaths for one minute by counting how many times the chest rises.
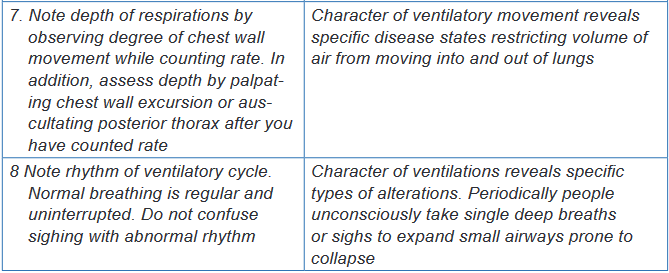
Note depth of respirations by observing degree of chest wall movement while
counting rate. In addition, assess depth by palpating chest wall excursion or
auscultating posterior thorax after you have counted rate. See Fig.5-8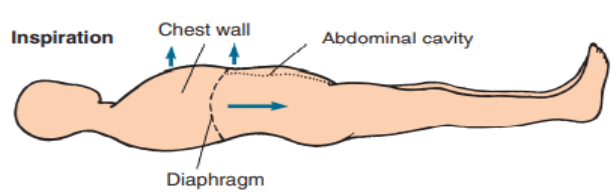
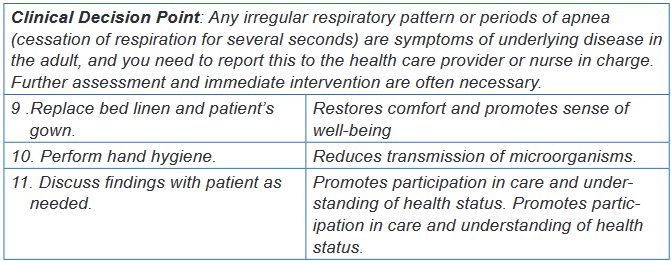
h. Basic Nursing interventions in case of respiratory alterations
In cases of: Apnea: You have only a brief window of 3 to 5 minutes in which to restore
respirations before brain damage and death occur. Call for help to start
Cardio Pulmonary resuscitation (CPR) Dyspnea: Patients with dyspnea experience more distress when lying flat.
Placing the patient in a semi-Fowler or Fowler position facilitates a better
respiratory pattern. Maximal lung expansion can be achieved by having
the patient assume a sitting position, leaning forward over a raised bedside
table with arms resting on the table, in what is called the tripod position.
People who have difficulty ventilating all areas of their lungs, those whose
gas exchange is impaired or people with heart failure may benefit from
oxygen therapy to prevent hypoxia3.5.2. Measurement of respirations
a) Methods of Respiration taking /How to assess Respiration
The only equipment required to assess respiration is a watch.
BOX 3.5.2.
N.B. Because individuals can voluntarily control their breathing for short
intervals of time:
• It is better to assess the respirations without the patient’s awareness.
• This may be accomplished by positioning the patient’s arm across his or
her chest or abdomen.
• Feel for the radial pulse and hold the pulse site while you assess first the
respirations and then the radial pulse. It will appear that you are simply
taking the patient’s pulse, and this will help to distract the patient from
concentrating on his or her breathing.
• While pressing two fingers against the pulse site, count the respiratory
rate for 30 seconds and multiply times two for a 1-minute rate, and then
continue to palpate the radial pulse site to assess the pulse rate.
• If the patient is critically ill or respirations deviate in any manner from
the norm, assess for a full minute.
• Without special equipment, you can only observe the rise and fall of
the chest to provide a subjective measurement of the depth, usually
described as shallow, normal, or deep.b) Respiratory rate assessment procedure
The checklists that will help student to acquire the skills of respiration rate taking
by following all steps and procedures are hereby provided: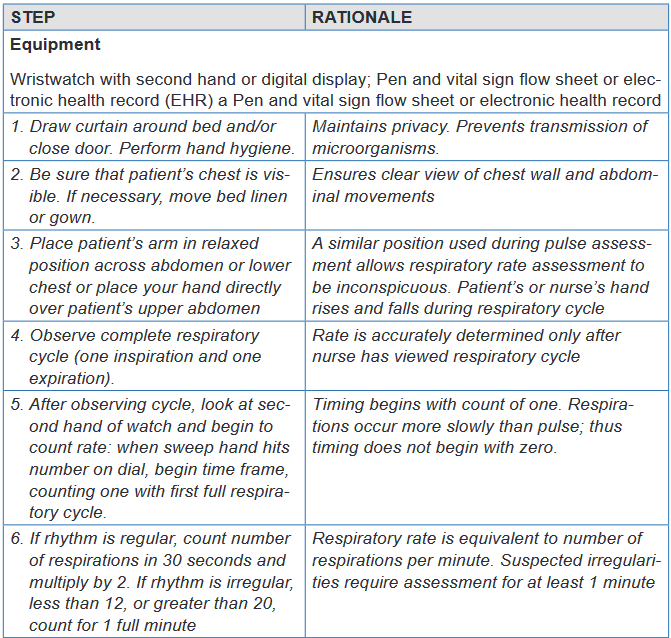
Self -assessment 3.5.
For Overview
1) What are the normal values or acceptable ranges of respiration rate for:
new-born, Infant (6 months), Toddler, Child, adolescent and Adult?
2) Explain the following terms:
a) Bradypnea and tachypnea;
b) Apnea, dyspnea, orthopnea
3) Name at least four abnormal Respiratory patterns
4) Identify at least five factors affecting Respiratory rate.
5) Provide the definition of the terms: Respiration, External respiration and
Internal respiration
6) Indicate the sites used for Respiration rate takingFor Measurement Procedure:
Instructions:
For you to master the technique of Respiration rate taking; going back to your
previous groups of two; let each student takes one more time the respiration
rate of his /her partner.
The teacher will be facilitating and observing each student while carrying out
the procedure by doing the following:
1) Take correctly the Respiration rate of your partner
2) Record the results
3) Interpret them.
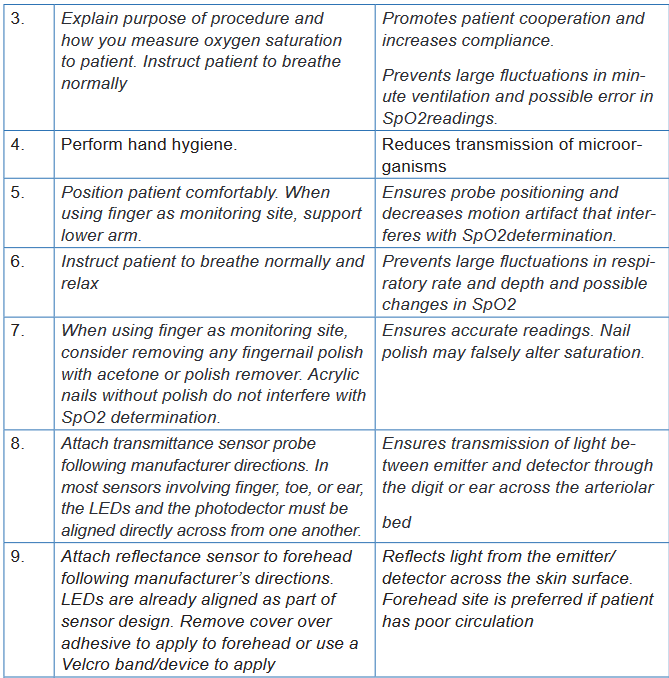
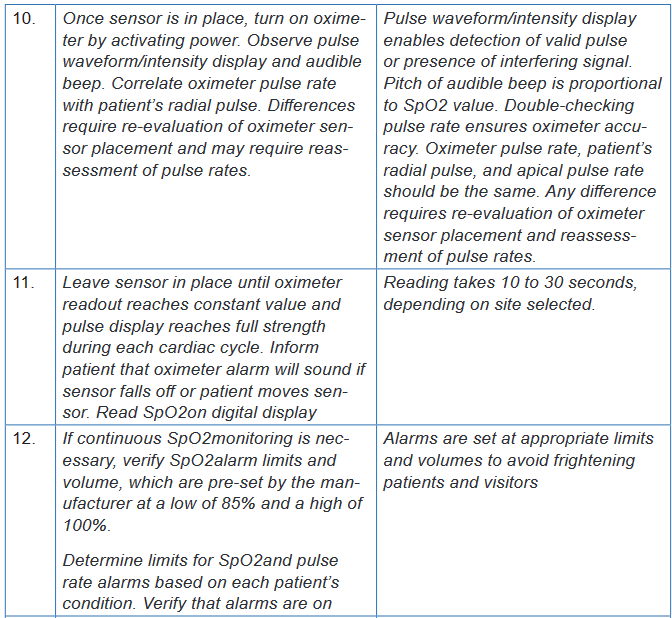
4) Communicate results to your partner.3.6. Oxygen saturation (Pulse Oximetry)
Learning activity 3.6.
In small groups of four (4) learners per each, use the provided Fundamentals
of Nursing book and read especially the material and procedural guide on
measurement of oxygen saturation (Pulse Oximetry) under vital signs unit.
After getting an overview information related to the meaning of pulse oximetry,
normal values, factors that may affect the oxygen saturation readings and the
equipment used to measure the oxygen saturation; two learners will pair and
every one will measure the oxygen saturation of his/her partner, write down the
results and interpret themPulse oximetry is the indirect measurement of oxygen saturation and is the
fifth vital sign. During ventilation, oxygen and carbon dioxide diffuse across the
alveolar capillary membrane. Each alveolus is a collection of air sacs surrounded
by a network of capillaries carrying arterial blood from the right ventricle. The
diffusion of these gases occurs in the alveoli and these gases diffuse from the area
of high concentration to the area of low concentration. There is a net movement of
oxygen from the air sacs into the alveolar capillaries, thereby increasing the oxygen
concentration of the blood in these capillaries. This arterial blood has a high carbon
dioxide concentration which diffuses from the alveolar capillaries into the air sacs.Oxygen is carried in the blood as either dissolved oxygen or as oxygen bound
to haemoglobin in red blood cells. The concentration of oxygen dissolved in the
plasma is represented as the partial pressure of arterial oxygen (PaO2). In
contrast, the saturation of arterial oxygen (SaO2) is a ratio of the oxygen bound
to haemoglobin compared with the oxygen-carrying capacity of the haemoglobin.After oxygen diffuses from the alveoli into the pulmonary blood, most of the oxygen
attaches to hemoglobin molecules in red blood cells. Red blood cells carry the
oxygenated hemoglobin molecules through the left side of the heart and out to the
peripheral capillaries, where the oxygen detaches, depending on the needs of the
tissues.A pulse oximeter is a non-invasive device that estimates a person’s arterial blood
oxygen saturation (SaO2) by means of a sensor attached to the person’s finger,
toe, nose, earlobe or forehead (or around the hand or foot of a neonate). The pulse
oximeter can detect hypoxaemia before clinical signs and symptoms such as
cyanosis (dusky/darker) skin colour and dusky nail bed colour) develop. Oxygen
saturation assessed using the invasive approach is documented as SaO2 (arterialoxygen saturation); oxygen saturation assessed by pulse oximetry is documented
as SpO2 (peripheral oxygen saturation or tissue oxygenation).The oximeter
calculates the pulse oxygen saturation (SpO2). SpO2 is a reliable estimate of SaO2.
More specifically, SpO2 is the percentage of oxygenated hemoglobin (hemoglobin
containing oxygen) compared with the total amount of hemoglobin in the blood.
Normally SpO2 is between 95% and 100%; however, in patients with extensive
respiratory disease such as chronic obstructive pulmonary disease (COPD), SpO2
greater than 90% may be an acceptable baseline.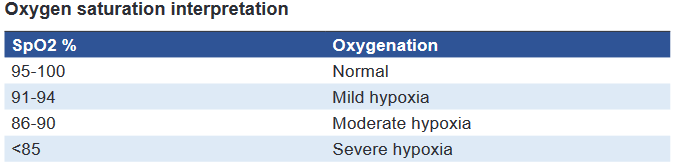
Note: Oximetry measurements should always be interpreted in conjunction with
other patient factors, including signs and symptoms of hypoxiaThe pulse oximeter’s sensor has two parts: (a) two light-emitting diodes (LEDs)—
one red, the other infrared—that transmit light through nails, tissue, venous blood,
and arterial blood; and (b) a photodetector placed directly opposite the LEDs (e.g.,
the other side of the finger, toe, or nose). The photodetector measures the amount
of red and infrared light absorbed by oxygenated and deoxygenated hemoglobin in
peripheral arterial blood and reports it as SpO2.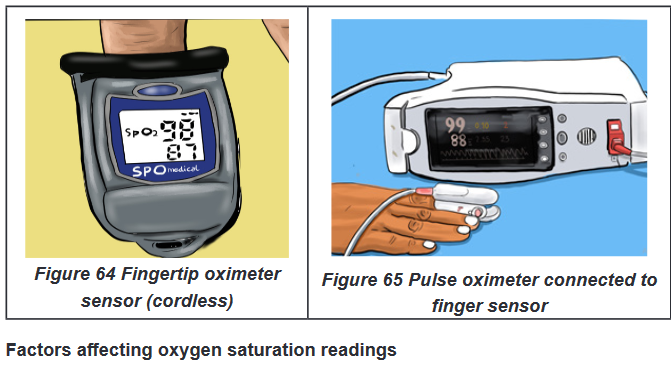
Hemoglobin. If the hemoglobin is fully saturated with oxygen, the SpO2will appear
normal even if the total hemoglobin level is low. Thus, the person could be severely
anemic and have inadequate oxygen to supply the tissues but the pulse oximeter
would return a normal value.Circulation. The oximeter will not return an accurate reading if the area under the
sensor has impaired circulation, such as occurs in peripheral vascular disease or if a
person is very cold. Other factors that result into reduction of pulse volume (reduction
of arterial pulsations) will also affect the oxygen saturation reading. Such factors
are peripheral vascular disease (atherosclerosis), hypothermia, pharmacological
vasoconstrictors (epinephrine, phenylephrine, and dopamine), low cardiac output
and hypotension, peripheral edema, tight probe (will record venous pulsations in
the finger that compete with arterial pulsations).Activity. Shivering or excessive movement of the sensor site may interfere with
accurate readings.Dark-colored nail polish or discoloration of the nail bed. False readings
typically arise when a person is wearing dark colored nail polish or if the nail bed
is discolored by a subdermal hematoma or other sources of nail bed discoloration,
such as nicotine stains.Carbon monoxide poisoning. Pulse oximeters cannot discriminate between
hemoglobin saturated with carbon monoxide versus oxygen. In this case, other
measures of oxygenation are needed.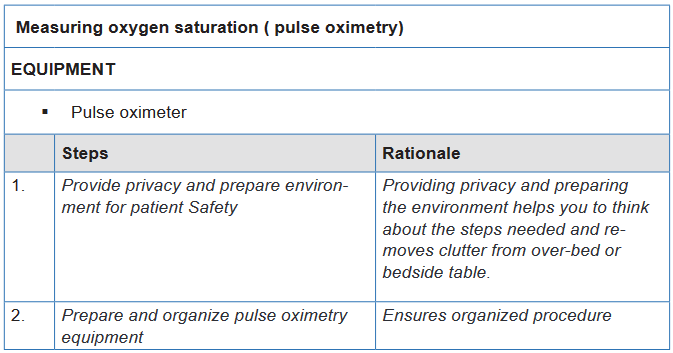

Self-assessment 3.6.
An Associate Nurse (AN) reports to the charge nurse that a patient’s pulse
oximeter machine continues to alarm with a reading of 88%. The charge nurse
enters the room and assesses for signs and symptoms of alterations in oxygen
saturation and finds none.
1) What action does the nurse take next?
1) Remove the current machine from service and ask the AN to use
another pulse oximeter device
2) Verify that the patient’s oxygen device and flow are correct
3) Verify that the oximeter sensor is intact and the skin under the sensor
is dry
4) Notify the health care provider immediately
2) What are the signs and symptoms of alterations in oxygen saturation?3.7. Parameters
Learning activity 3.7.
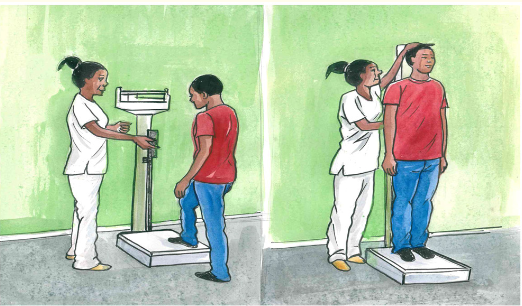
Observe the images above provided in your textbook under the vital signs
unit and parameters and after reading the sub-topic on Weight and Height
measurement; make a summary note of the following:
1) Definition of two parameters (Height and Weight)
2) Importance of Measuring Height and Weight
3) Specific reasons for weighing both a child and an adult
4) Identify material /equipment used to measure weight and HeightUsing procedural guide provided and equipment/Materials for Weight and
Height measurement; read all steps in order for you to measure correctly the
Weight and Height for your partner in the previous groups of two students. Go
back to your groups and each one of you do the following:
i. Position your partner in position
ii. Measure his/her Weight and Height and vice-versa
iii. Compare your results3.7.1. Weight and Height overview
Introduction and importance of weight and height
Measuring height and weight is as important as assessing the client’s vital signs.
Routine measurement provides data related to growth and development in infants
and children and signals the possible onset of alterations that may indicate illnessin all age groups. The client’s height and weight are routinely taken upon admission
to acute care facilities and during visits to prescribing practitioners’ offices, clinics,
and other health care settings.a) Weight
Weight is the quantitative expression of body that indicates the state of growth and
health measured in kg or grams.Materials/Equipment: A well weighing scale (for adults); Baby Weighing Machine
or Salter balance, a pen and weight recording flow sheetThe Purpose of weight measurement
The purpose is to obtain accurate weight of the patient, to aid in accurate diagnosis
of the patient’s condition, to evaluate the patient’s response to treatmentSpecific reasons for weighing
In a child: reasons are to follow up a good growth, to appreciate the nutritional
state, to follow the evolution of an illness, and to calculate some doses of medicineIn adult: reasons are to evaluate the patient’s general state, to help in the orientation
of the diagnosis, to inform on the evolution of the illness, to calculate doses of some
medicines, to follow up the evolution of treatment and to follow up the pregnant
womanb) Size/Height
It is the measurement from head to toe that indicates the state of growth and health
and is commonly expressed in centimeters (cm), or meters (m). In some countries;
measurement of height is also expressed in inches (in.), feet (ft).Guidelines:
The scale for measuring height, calibrated in either centimeters or meters,
is usually attached to a standing weight scale.
The metal rod attached to the back of the scale should be extended to
gently rest on top of the client’s head, and the measurement should be read
at eye level.
Have the patient’s shoes/slippers removed while taking height to avoid any
variations in the reading
If thick object is placed on the top of head at right angle to the scale indicating
the reading, note the bottom reading of the object.
The nurse should ask the client to stand erect on the scale’s platform.Equipment/Materials
A scale for measuring height
A standing weight scale.
The metal rod
Pen and Height recording flow sheetIndications:
Follow up of child growth
To measure the nutritional status.BOX 3.7.1.
Height increases gradually from birth to the pre-pubertal growth spurt. Girls
usually reach their adult height between the ages of 16 and 17 years, whereas
boys usually continue to grow until the ages of 18 to 20 years. The older adult
usually decreases in height as a result of a gradual loss of muscle mass and
changes in the vertebrae that occur in condition such as osteoporosis (a
process in which reabsorption exceeds accretion of bone).Use the patient’s weight and height measurements to calculate the patient’s
BMI. Weight in kilograms Body mass index height in meter (Additional
information to the teacher)Rationale: BMI is an indicator of total body fat stores in the general population
and provides a more accurate weight calculation than weight measurement
alone. In addition, it provides an estimation of risk for diseases, such as heart
disease, diabetes, and hypertension.3.7.2. Measurement of Weight and Height Procedures
a) Conditions required for weighing:
i. In adult:
The weighing scale must be well-designed and well controlled, that means
graduated on zero: very important!
It must be put on a plane surface
The patient must remove the shoes and must be undressed while only
keeping light clothes in order to reduce the weight He must stand up, free hands and does not hold any object
Weight must be taken regularly
ii. In childThe weight of a child can be taken, according to age with: Baby Weighing Machine
or Salter balance. If it is not available:
Weigh the mother and the child and to note the weight;
Weigh only mother
Then make the difference between the first weight and the second, what
corresponds approximately to the child’s weight.
c) Procedure for weight and height measurementi. Equipment /Materials:
A scale for measuring height
A standing weight scale.
The metal rod
Pen and Height recording flow sheetWhen measuring an infant’s height,
The nurse should place the infant on a firm surface.
Extend the knees, with the feet at right angles to the table.
Measure the distance from the vertex (top) of the head to the soles of the
feet with a measuring tape.N.B. The procedure usually requires two nurses, one to hold the infant still and
the other to measure the length. If the nurse needs to perform the measurement
without assistance, an object should be placed at the infant’s head, the infant’s
knees should be extended, and a second object should be placed at the infant’s
feet. Lift the infant and measure the distance between the two objects.For Adults measurement,
With shoes off, and standing erect
Measure the patient’s height using a wall-mounted measuring device or
measuring pole.
Compare height and weight with recommended average weights on a
standardized chart.Rationale: Ratio of height and weight is a general assessment of overall health,
hydration, and nutrition.Self-Self -assessment 3.7.
For Overview: Section (a)
1) Define the two parameters: Weight and Height/size
2) Explain the Purpose of weight measurement
3) What are the specific reasons for weighing both a child and an adult
4) List all materials used measuring Weight and Height both for Adult and
a childFor Weight and Height Measurement Procedure: Section (b)
Instructions:
For you to master the technique of Weight and Height measurement; going
back to your previous groups of two; let each student measures one more time
the Weight and Height of his /her partner. Be familiar with the use of the check-
list provided to you.End unit assessment 3
Question one
Mr. K is 25 years old male from a low income family. He consults the nearest
health center complaining of vomiting and diarrhea. During initial assessment
data collection, Mr. K tells to the nurse that it is the 3rd day having both vomiting
and diarrhea (vomiting: 4 times a day and diarrhea: 6 times a day), severely
nauseated and dizzy, tolerating sips of clear fluid. No past history of medications
and illnesses.
Think about these data from Mr. K and try to answer the following questions:
1) What infection control measures should the nurse implement?
2) What route should be used to measure body temperature for Mr. K?
3) Identify in the above case study the factors that may affect the pulse
and blood pressure of Mr. KQuestion two
During physical examination of Mr. K, the nurse measures his vital signs and
parameters and notes the following findings: Temperature: 102.20 F, Pulse: 120
bpm (radial), BP: 98/68 mmHg, RR: 22 bpm irregular rhythm, Sp02: 94%, Weight:
53kg, Height: 174cm. Reflect on these findings and respond to the following
questions:
1) Which findings are considered abnormal for Mr. K? What medical
terminologies are used to define/label the abnormal findings?
2) The nurse uses the two-step method of blood pressure assessment to
obtain accurate measurements for Mr. K. The nurse is explaining the
steps of this procedure to the associate nurse. Place the steps in correct
order:
a) Place stethoscope in ears and place the diaphragm of stethoscope
over the brachial artery
b) Palpate brachial artery while inflating blood pressure cuff 30mmHg
over the pulse disappearance.
c) Note point where you hear first Korotkoff sound.
d) Deflate cuff fully and wait 30 seconds
e) Apply blood pressure cuff 2.5cm above brachial artery.
f) Continue to deflate cuff until sound disappears.
g) Quickly inflate cuff to 30 mm Hg above patient’s estimated systolic
pressure
h) Slowly deflate cuff and note point when pulse reappears.