Unit 3: COMPUTER GRAPHICS TOOLS
3.0 INTRODUCTORY ACTIVITY
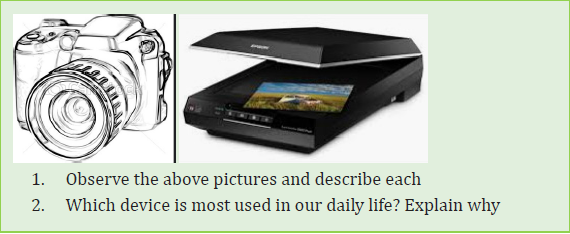
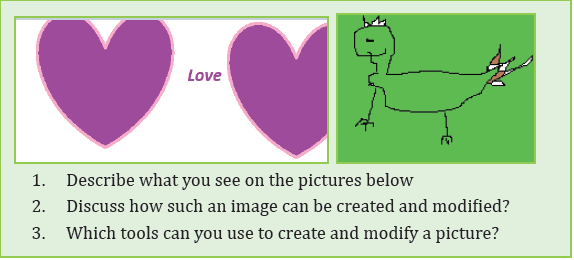
Observe the picture below and answer the following questions:
1. Describe what you see.
2. Differentiate a picture to an image
3. How do you measure the size of each picture?
4. Describe how the pictures inside are arranged. Are these pictures created using the same material?
5. What is the importance of modifying a picture? Give one example of an application that can be used to modify a picture
6. Why is it important to have good pictures in media communication?
7. Discuss the positive and negative effects on long time conservation of images
3.1.Introduction to computer graphics
ACTIVITY 3.1
Modifying a hard drawing can be hard, swapping colors or resizing a picture on such a drawing is more complicated.
That’s why it is more efficient to draw a picture on a computer screen and the drawing is now a piece of digital information
which is easy to modify.
Computer Graphics involves the ways in which images can be displayed, manipulated and stored using a computer.
Computer graphics provides the software and hardware techniques or methods for generating images.
3.1.1. Definitions of different terms
- Computer graphic: This is the use of a computer and specialized programs to produce and manipulate pictorial images.
- Pixel: is the smallest unit of a digital image or graphic that can be displayed and represented on a digital displayed device. Is also known as a picture element. A pixel can have different colors produced by mixing the three colors RGB (Red, Green and Blue) and each of the three colors can take values ranging from 0 to 256.
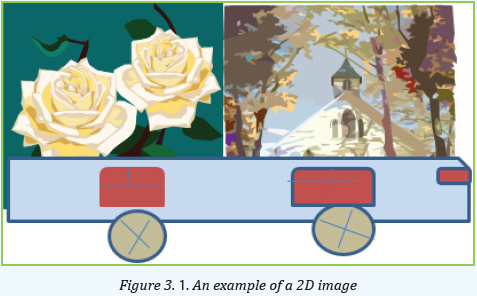
- 2D (2Dimensional) images are objects that are rendered visually on paper, film or on screen in two planes representing width and height (X and Y). Two-dimensional structures are also used in the construction of 3D objects.
Figure 3. 1. An example of a 2D image
- 3D computer graphics or three-dimensional computer graphics, (in contrast to 2D computer graphics) are graphics that use a three-dimensional representation of geometric data (often Cartesian) that is stored in the computer for the purposes of performing calculations and rendering 2D image.
Figure 3. 2. An example of a 3D Image
Morphing: is a technique which involves using a computer to make an image on film or television appear to change shape or change into something else. For example a human face may be transformed into a lion one and the human eye will find it unbelievable how the human has changed him/herself.
• Random scan: Random Scan System uses an electron beam which operates like a pencil to create a line image on the CRT (Cathode Ray Tube) screen. The picture is constructed out of a sequence of straightline segments. Each line segment is drawn on the screen by directing the beam to move from one point on the screen to the next, where its x & y coordinates define each point. After drawing the picture. The system cycles back to the first line and design all the lines of the image 30 to 60 time each second. The process is shown in figure:
Raster scan: A raster scan display is based on intensity control of pixels in the form of a rectangular box called Raster on the screen. Information about On and Off pixels is stored in a refresh buffer or Frame buffer. Televisions in homes are based on Raster Scan Method. The raster scan system can store information of each pixel position, so it is suitable for realistic display of objects. Raster Scan provides a refresh rate of 60 to 80 frames per second.
Frame Buffer is also known as Raster or bit map. In Frame Buffer the positions are called picture elements or pixels.
Beam refreshing is of two types. First is horizontal retracing and second is vertical retracing.
When the beam starts from the top left corner and reaches the bottom right scale, it will again return to the top left side
called at vertical retrace. Then it will again more horizontally from top to bottom.
The figure below illustrates the process
Figure 3. 4. Illustration of the working of a Raster scan screen
Comparison between Random scan and Raster Scan:
Table 3.1. Random vs Raster scan
APPLICATION ACTIVITY 3.1
3.2. Image format
ACTIVITY 3.2
1. Observe the above images and describe what you see
2. Are those images having the same formats? Explain
3. Discuss the importance of saving a document with a proper file extension
3.2.1. Definition
Image file formats are standardized means of organizing and storing digital images. Image files are composed of digital data in one of the formats that can be rasterized for use on a computer display or printer.
There are 4 main formats in which to store images including TIFF, JPEG, GIF and PNG.
Their differences are given in the table below:
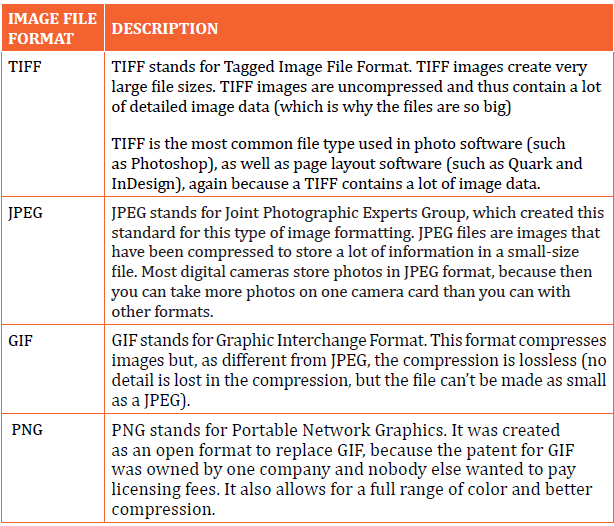
Table 3. 2. Different image formats and their descriptions
3.2.2. Image compression
Image compression is minimizing the size in bytes of a graphic file without degrading the quality of the image to an unacceptable level. The reduction in file size allows more images to be stored in a given amount of disk or memory space.
It also reduces the time required for images to be sent over the Internet or downloaded from web pages.
Know an image’s file size and dimensions before or after uploading it into the Library Image compression techniques
Lossy and Lossless
Lossless: The compression technique where compressed data (byte) will be the same replica of actual data.
In this case, compressed file is required to be reproduced exactly when get decompressed again.
Lossy: File compression results in lost data and quality from the original version.
Lossy compression is typically associated with image files.
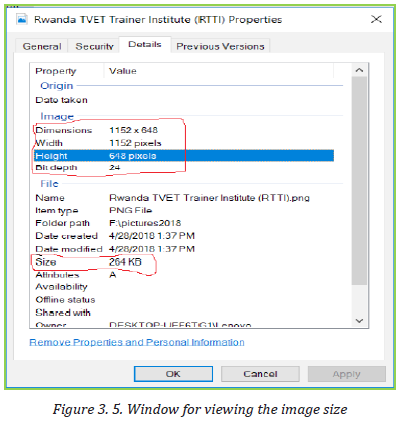
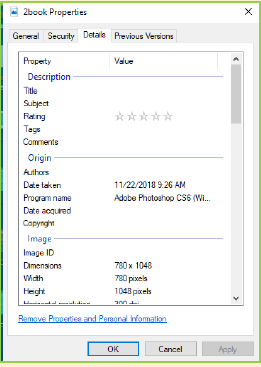
3.2.3. Viewing an image’s file size and dimensions
The determination of an image’s file size and dimensions depends on an Operating System being used.
Open the image in Windows Explorer to check dimensions and file size by clicking the Windows Start button on the taskbar.
- Right clicking the icon of the image file,
- In the pop up menu, click on property and details.
- The result will look like below. The wanted information are circled with red line.
Computer storage and memory is measured in Megabytes (MB) and Gigabytes (GB).
A bit is the smallest unit of measurement used to quantify computer data and byte is a group of 8 binary digits.
Unit of memory size.
1Byte= 8bits
1KB= 1024Bytes
1MB = 1024 KB
1GB=1024 MB
1TB=1024 GB
It takes 2 to 3 bytes to store one pixel of a color image. The pixels in an image store a color at a given point in the image,
but it takes 2 to 3 bytes of storage to record this value. If we consider 3 bytes of storage, the file size of a color image
is equivalent to: width * height * 3
Example: Let‘s consider an image whose Width is 1152 and height is 648.
If we consider 3 bytes of storage, the file size of a color image is equivalent to:
width * height * 3 which is =1152*648*3 = 2,239,458 which gives the file size in bytes. This file size number is so big,
it needs to be converted in Kilobytes or even megabytes. There are 1,024 bytes in a kilobyte and 1,024 kilobytes in a
megabyte which makes this file have the size of 2.187 Kilobytes
APPLICATION ACTIVITY 3.2
3.3. Image capturing tools
ACTIVITY 3.3
The process of obtaining a digital Image from a vision sensor, such as camera usually entails a hardware interface known
as a frame grabber, which captures single frames of video, converts the analogue values to digital, and feeds the results into
the computer memory.
3.3.1. Digital camera
The first digital camera was invented by STEVEN SASSON in 1975. Digital cameras are normally used to capture pictures or
video through the use of an electronic image sensor.
There are two types:
-- SLR: Single Lens reflex camera; which is a camera that typically uses a mirror and a prism system that permits the photographer to view through the lens and see exactly what will be captured.
-- DSLR: is a digital camera that combines the optics and the mechanisms of a single lens reflex camera with a digital
imaging sensor.
a. Definition
A digital camera is a camera which produces digital images that can be stored in a computer and displayed on screen.
It records and stores photographic images in digital format.
These stored images can be uploaded to a computer immediately or stored in the camera to be uploaded into a computer or printed later.
Digital cameras use an image sensor instead of photographic film.
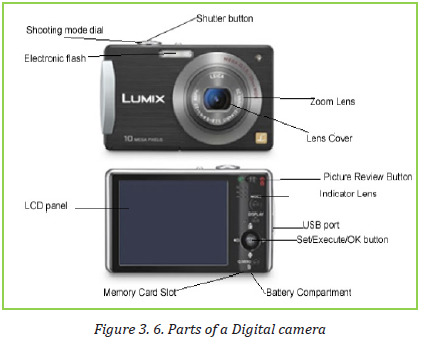
b. Digital camera parts
There are 10 basic camera parts to identify in today’s digital world. These parts will inevitably be found on most cameras
being digital compact or single-lens reflex camera (SLR)
- Lens
The lens is one of the most vital parts of a camera. The light enters through the lens, and this is where the photo process
begins. Lenses can be either fixed permanently to the body or interchangeable.
They can also vary in focal length, aperture, and other details.
- Viewfinder
The viewfinder can be found on all digital single-lens reflex cameras (DSLR) and some models of digital compacts.
On DSLRs, it will be the main visual source for image-taking, but many of today’s digital compacts have replaced the typical viewfinder with Liquid Crystal Display (LCD) screen.
- Body
The body is the main portion of the camera, and bodies can be in different shapes and sizes. DSLRs tend to be larger bodied and a bit heavier, while there are other consumer cameras that are a conveniently smaller size and even able to fit into a pocket.
- Shutter Release
The shutter release button is the mechanism that “releases” the shutter and therefore enables the ability to capture the image. The length of time the shutter is left open
- Aperture
The aperture affects the image’s exposure by changing the diameter of the lens opening, which controls the amount of light reaching the image sensor. Some digital compacts will have a fixed aperture lens, but most of today’s compact cameras have at least a small aperture range.
- Image Sensor
The image sensor converts the optical image to an electronic signal, which is then sent to the memory card. There are two main types of image sensors that are used in most digital cameras: Complementary Metal-Oxide-Semiconductor (CMOS) and Charge-Coupled Device (CCD) Both forms of the sensor accomplish the same task, but each has a different method of performance.
- Memory Card
The memory card stores all of the image information, and they range in different size and speed capacity.
Memory cards can be taken out of the camera and inserted in a computer memory card bay for reading.
- LCD Screen
The LCD screen is found on the back of the body and can vary in size. On digital compact cameras,
the LCD has typically begun to replace the viewfinder completely. On DSLRs, the LCD is mainly for viewing photos after
shooting, but some cameras do have a “live mode” as well.
- Flash
The on-board flash will be available on all cameras except some professional grade DSLRs.
It can sometimes be useful to provide a bit of extra light during dim, low light situations.
- User Controls
The controls on each camera will vary depending on the model and type.
The basic digital compacts may only have auto settings that can be used for different environments,
while a DSLR will have numerous controls for auto and manual shooting along with custom settings.
c. Importing pictures using USB cable
The images taken by using a camera are stored automatically in its memory. However, for different purposes,
the images can be printed or inserted in documents for illustrations. The camera is then connected to the printer or the computer by using a USB cable appropriately designed for such action.
The fact of taking pictures from the camera to the computer is called importing pictures.
The following steps are followed to successfully import a picture from camera to computer by using a USB cable.
Step 1: Connect one end of the USB cable to the port in your camera.
Step 2: Connect the other end of the USB cable to the USB port in the computer.
This may be in the front or back of the computer.
Step 3: Turn on the camera
Step 4: A dialog box may appear on the screen. If it does, select “View Files” or “Open Folder.”
If the dialog does not appear, click the Windows “Start” menu, select “Computer” and then choose the drive labeled for
the connected camera.
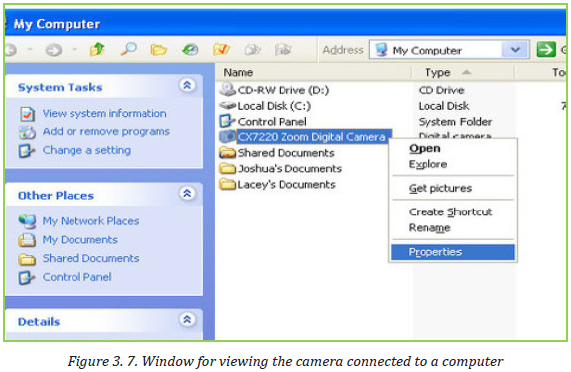
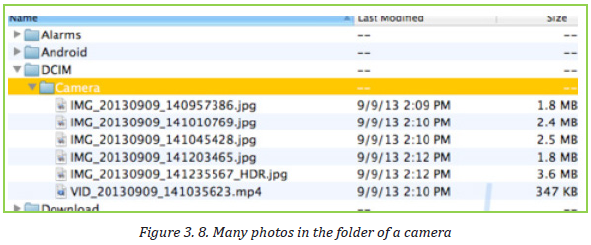
The pictures are probably located in a particular photo folder on the camera. Open that folder.
Drag individual photos from the folder to the desktop or some other folder on the computer.
All the photos can be selected by pressing “Ctrl-A” and then pasted into a folder on the computer by pressing “Ctrl-V.”
3.3.2. Scanner
A scanner is an electronic device which can capture images from physical items (printed text, handwriting,
photographic prints, posters, magazine pages, and similar sources) and convert them into digital formats, which in turn can be stored in a computer and viewed or modified using software applications.
Very high resolution scanners are used for scanning for high-resolution printing, but lower resolution scanners are adequate
for capturing images for computer display.
a. The different parts of scanner
A scanner has the following five parts visible externally: (1)Start button, (2) Copy button, (3) Scan to E-mail button, (4) Scan to Web button, (5) Scanner cover
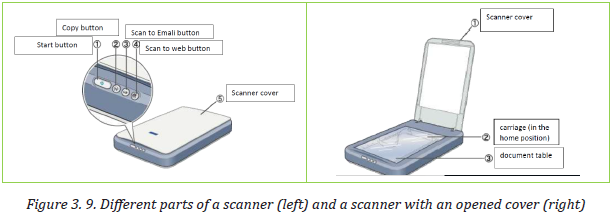
Note:
- Parts, size and looks of scanners vary depending on the type of scanner and some scanning and photocopying functionalities are combined in one physical device therefore some of the parts mat not be visible
- Some scanners have touch screen capabilities therefore they may not have some of the buttons
APPLICATION ACTIVITY 3.3
3.4. Screenshots capturing
ACTIVITY 3.4
A screenshot is an image of a computer desktop that can be saved as a graphic file.
(The mouse cursor is not included in the image). The main ways used to get the screen of computer is to use the
Print Screen key (PrtSc) or the Snipping Tool
3.4.1. Use of Print Screen Key
A print screen is a computer key which is used to copy to the clipboard an image of the screen and paste it in any other application for saving or manipulation
Steps to follow in screen shot capturing using Print screen key:
a. Open the screen that is going to be copied.
b. Press the Print Screen key
 Paste (CTRL+V) the image into an Office program or any other application.
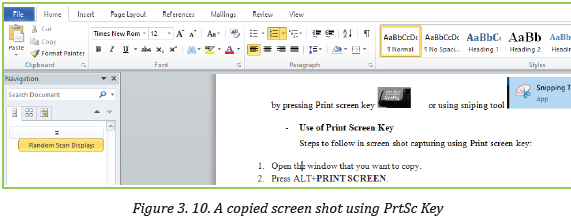
The taken image can be edited depending on the options provided by the program in which it is pasted.
For example in word an image can be edited using the Picture Tools available on the word menu when the image has been selected.
3.4.2. Use of Snipping tool
Snipping Tool is a Microsoft Windows screenshot utility included in Windows Vista and in later versions.
It can take still screenshots of an open window, rectangular areas, a free-form area, or the entire screen.
a. To open the Sniping tool:
- Click on Start
- Write Snipping Tool in the search box and once found click on it to launch or click on All Programs then click on Accessories and click on the snipping tool
An opened Sniping tool will look like in the image below:
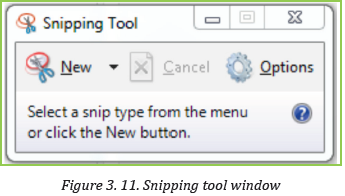
b. To take a screenshot using Snipping tool
To take a screenshot in the opened Snipping tool
- Click on New tab and choose among the snipping options (free form, Rectangular, Window, Full screen)
- Hold down the left button and hover over the screen area to take.
- Release the cursor to take the snip
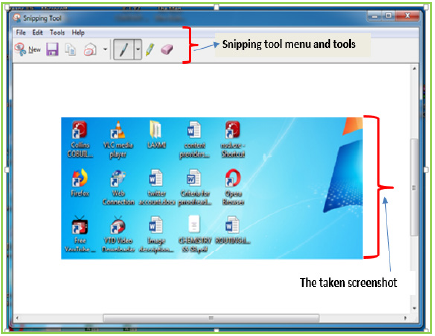
Figure 3. 12. Screenshot taken using snipping tool
c. Options with a taken screenshot
As provided by the Snipping tool menu a taken screenshot can be saved using the Save
 tool, can be copied using
 the copy
 tool, can be sent via email by using the message
  tool, can have its sections highlighted by using
 the Pen
 and the Highlight
  tools.
 The highlights added to the screenshot can be deleted by using the erase tool.
For additional options needed to be carried out on a taken screenshot, it can be pasted in other image manipulating
programs like Paint and edited to the user’s wish.
APPLICATION ACTIVITY 3.4
1. What is the difference between a snip and an image
2. Take a screenshot of the start menu of your computer and save it as JPEG on the desktop
3. Take a screenshot of Office MS Word 2013 environment and label its different parts using the pen tool
3.5. Graphic software-Paint
ACTIVITY 3.5
In computer graphics, graphics software refers to a program or a collection of
programs that enable a person to manipulate images on a computer.
Examples of such programs include Adobe Photoshop, Microsoft Publisher,Paint, Etc.
3.5.1. Starting and saving a Paint file
A paint program is a software graphics program that allows the user to draw or paint bitmapped images on a computer.
To start Paint go through the following steps:
1. Type Paint in the search box which appears in the startup menu
2. Click Paint to open the program. The following window will appear
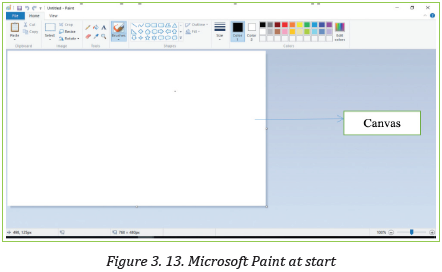
a. Understand the canvas
When Paint launches, the white “canvas” will appear on the screen.
Imagine this canvas as a piece of paper to draw or write on.
The size of the canvas can be adjusted before starting to create images.
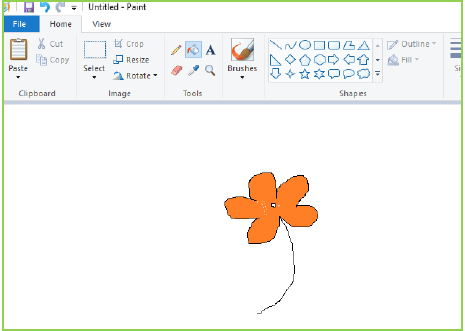
Figure 3. 14. A flower drawn in Canvas
The flower above has been drawn using the Pencil tool which was used to draw lines and the Fill with color tools was
used to fill the red color on the leafy part of the flower.
b. Saving a paint file
1. From File menu, choose Save as.
2. From a dialog box, choose PNG picture or any other image file format
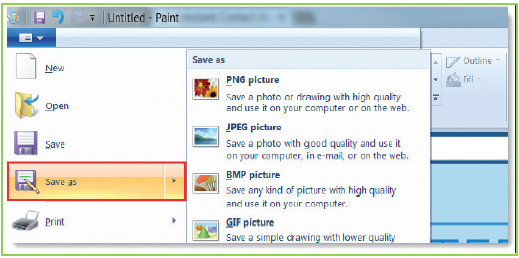
Figure 3. 15. Different image file formats
3. In the next window type the file name, choose file format then click on save button.
3.5.2. Paint tools
The paint program has got many tools which help its user manipulate images
and do any activity Paint is supposed to do. Some of the Paint tools are shown in the image below:
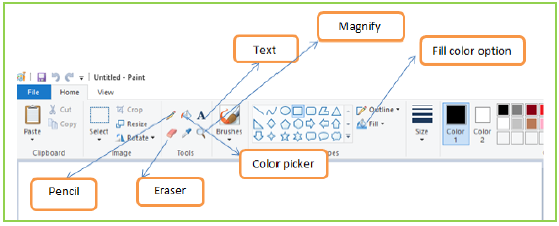
Figure 3. 16. Different paint tools
1. Text tool: The tool allows text to be typed onto the current layer using the primary color.
The text controls in the Toll Bar can be used to change the font, the size of the font, formatting…
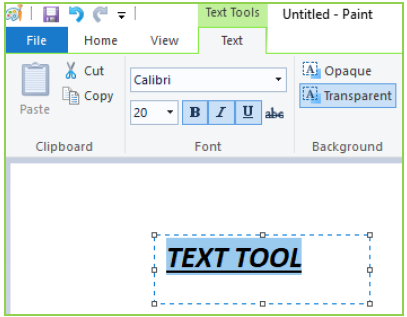
Figure 3. 17. Text tool in Paint
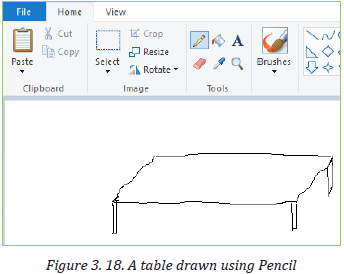
2. The pencil tool: is a freehand drawing tool, much like an actual pencil.
The width of the line can be adjusted by clicking the Size menu and selecting a different line width.
To draw, simply press the mouse button as you move the mouse on the canvas.
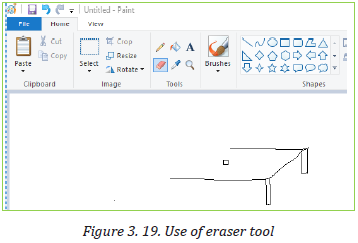
3. Eraser tool: This tool is used to remove parts of the active layer or selection like in the image below
4. Fill color tool: Is used to fill an area of similar color with another color.
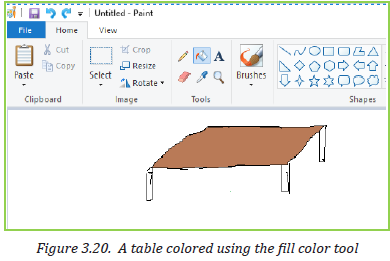
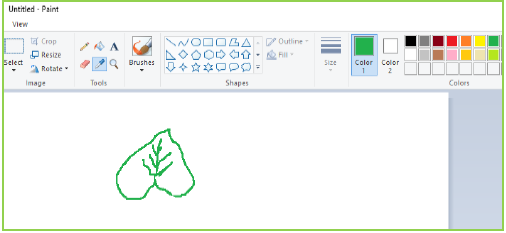
Figure 3. 21. A drawing in which color picker has been used
5. Magnifier: next to the “Pick color” button is the “Magnifier” button,
which looks like a magnifying glass. Selecting this tool will allow the user to zoom in and out of an image.
3.5.3. Insertion of shapes
A shape is a geometric figure such as square, triangle or rectangle.
Using illustrator’s shape to draw can be an effective way to create smooth paths and predictable results.
Below are different shapes in Paint:
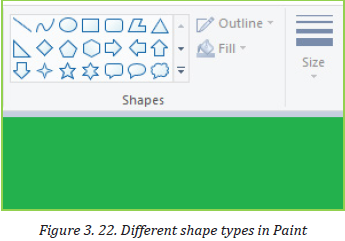
Select any shape from the toolbar to draw that shape. Once you’ve chosen a shape, you’ll notice some options for
the shape’s appearance.
- Click the “Outline” and “Fill” menus to view your options.
- Select your preferred outline and fill options,
- Then, click the canvas where you’d like to place your shape.
- Hold down the mouse button as you drag the cursor to enlarge the shape.
- Let go of the mouse button when reach the desired shape size.
After choosing a shape with an outline, the color of the outline will be the current foreground color.
If the shape has a solid filling, the fill color will be the background color.
3.5.4. Select, cut, copy, paste and crop
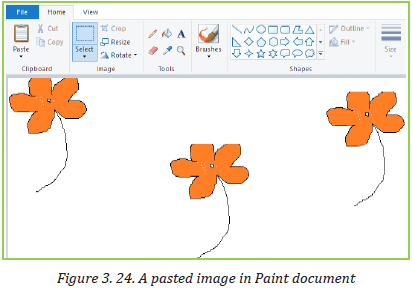
i. Copy and Paste
- Press and hold down the left mouse button inside the selection box and move the picture to relocate the image.
- If you wish to copy the image:
-- Right-click inside the selection box
-- And click “Copy.”
An image can be pasted to another paint document or in another program.

ii. Cut and Paste
a. Click on the area of an image you want removed, click and hold the mouse to drag the box as far down and over
as needed
b. Press and hold “Ctrl” and “X” to cut the selection.
c. Press and hold “Ctrl and “V” to paste the selection, either elsewhere in the same document or in a separate document.
Paste in Ms Office word
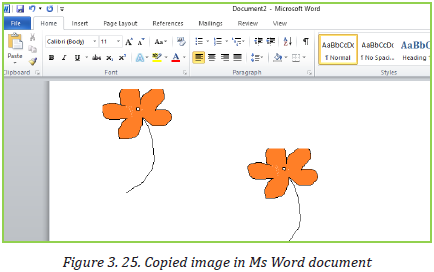
After cutting in Paint
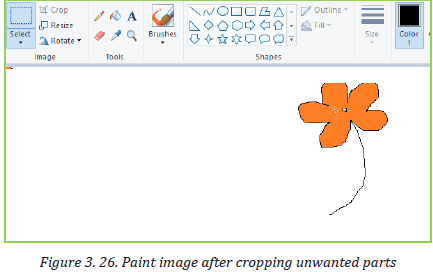
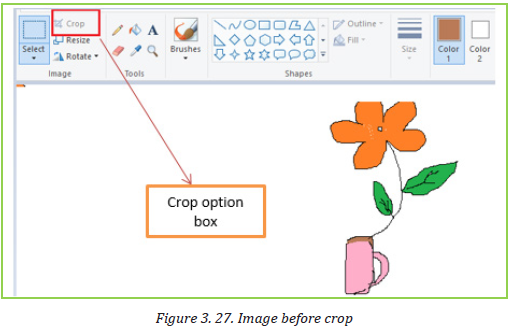
iii. Crop
a. Select the portion of the image you want to crop using the Select tool.
b. Once selected right-click with the mouse anywhere in the image selection and select Crop or go to Crop in tools bar.

APPLICATION ACTIVITY 3.5
1. Differentiate computer graphics to Paint
2. What is the importance of Ms Paint in computer graphics?
3. Discuss the use of Ms Paint and its importance in advertisement
4. Differentiate the use of Fill Color and Pick Color tools.
5. Draw a red flower in Paint and save it on desktop
6. As a student teacher who is going to teach the parts of the human body draw a human on a paper,
scan the image and put labels on it using the Insert, Shapes options available in word Paint and Word
END UNIT ASSESSMENT
1. Define the following terms: Pixel, snipe, Morphing, Paint and Aperture
2. Explain the following abbreviations: i) JPEG ii)CMOS iii) PNG
3. Discuss the importance of computer graphics in decoration services
4. Based on information on figure below, you are requesting to calculate the image file size and to convert it in MB and GB
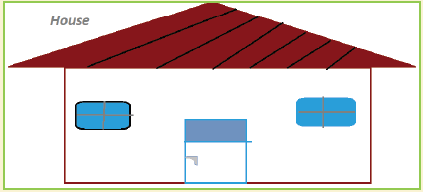
5. Using Ms Paint, draw the following picture and put labels on it to show its different parts (roof, door, window)
6. Use any available photo on your computer change its color, copy and paste it in Ms word.