General
- ICT Y3 SB File Uploaded 1/11/21, 17:08
- ICT Y3 TG File Uploaded 1/11/21, 17:02
UNIT 2: INTRODUCTION TO WEB DESIGNING
Key Unit Competence:
Create a static website using HTML
Introductory activity
Read the following scenario and answer the related questions.
At UMURAVA secondary school, the parents’ committee advised the school administration to have a school website on the Internet so that school information and social protection can be accessed via Internet browsers.
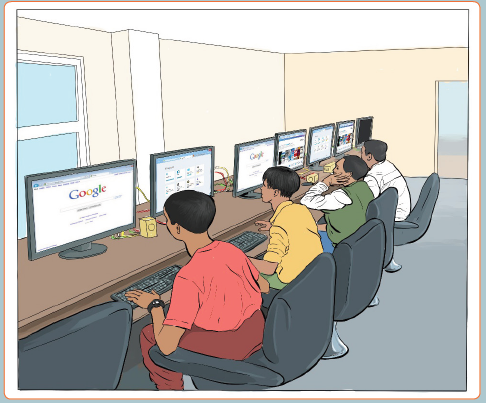
1. Observe the picture above and give the reasons why those people are so concentrated
2. Suppose you have the option to choose the name of the Umurava high school website. What is the specific name, you would give to the website?
3. Can you change or delete an information from a website? Explain your answer.
4. Discuss the 3 advantages and disadvantages of a website
5. Visit “www.igihe.com” website and identify at least five elements to web design?
2.1. Introduction to web designing
Today, large corporations, medium-sized, small -scale business organizations and individual are using websites to communicate company information and manage their projects. People are now reconnecting with their friends and family members on social media such as Facebook, Twitter, Instagram, YouTube etc. In this unit, we discuss basic concepts relating to web designing such as website, web page, web application, static web page and dynamic web page. The step by step process of developing a website is also discussed here.
2.1.1. Understanding of basic concepts
Activity 2.1
With a research using the internet, answer the following questions:
1. What do you understand by the terms below?
- Website
- Web page
- Web application
2. Discuss the difference between Static web page and Dynamic web page
3. Discuss the advantages of a static web page and dynamic web page
2.1.1.1. Key terms
i) Website
A website is a collection of several web pages with information on a subject that are connected together. Websites Can be easily searched using search engines like Google.
The World Wide Web is made of many websites and each is made of many webpages.
Advantages of a website
Websites present the following advantages:
- It is an effective method to showcase products and services
- Developing a site helps in creating a social proof of existence
- Helps in branding a business and achieving business goals
- Allows to reach out to customers for support
Disadvantages of a website
- A website may crash and when this happen people who were accustomed to reaching an organization through its website seem to have lost contact with it
- Contact form published on a website may invite lots of unwanted spam e-mails.
- The information on any website might be unreliable if it is not updated regularly.
ii) Web page
Each single resource on the web is called a web page. A web page is a document commonly written in HTML (Hypertext Markup Language) containing more specific information that is accessible through the internet or other networks using an internet browser. A web page is hypertext document that incorporates content such as text, images, sound, video and so on.
iii) Web application
A Web application (Web app) is an application program that is stored on a
remote server and delivered over the internet through a browser interface. A web
application is a software or program which is accessible using any web browser.
Advantages of web Applications
Web applications are more popular because of the following reasons:
- Compared to desktop applications, web applications are easier to maintain as they use the same code in the entire applications.
- Web applications can be used on any platform: Windows, Linux, Mac… as they all support modern browsers
- Released any time and in any form. No need to remind users to update their applications.
- They can be accessed 24 hours of the day and 365 days the year from any computer.
- A computer or a mobile device can be used to access the required data.
Disadvantages of web Applications
- Security is not guaranteed, so it is vulnerable for unauthorized access
- The web app may not support multiple browsers with equal precedence
The web application is built explicitly for a certain operating system, so it is difficult to discover from the app store.
- Limited scope to access the device’s features.
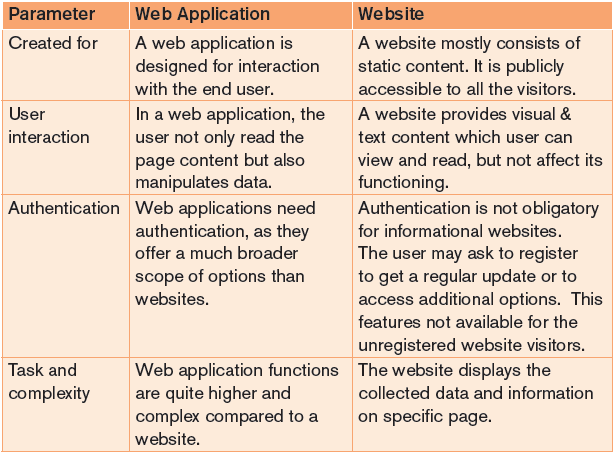
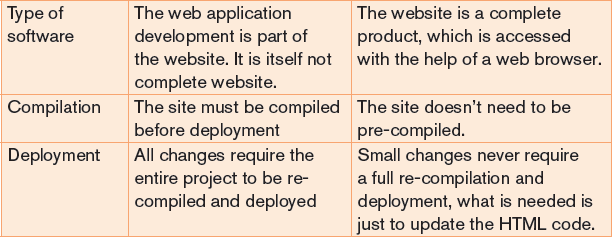
Below are the prime difference between web application and website:
iv) Static web page
A static webpage is one whose contents do not change, or at least do not change quickly. A static page is one that is usually written in plain HTML and what is in the code of the page is what is displayed to the user. These are webpages that contain information that does not need to be updated. They are always the same unless the content is changed physically on the server’s hard disk. That is the reason these web pages are known as static web pages.
Static web pages are simple and stored in a web server. Whenever server receives a request regarding a web page, it sends a response along with the requested web page to the client without performing any additional processing.
It just locates that page on its hard disk and add HTTP headers and reply back an HTTP response.
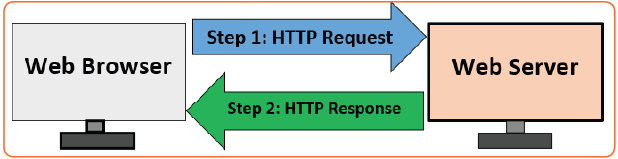
Figure 2.1: Web Browser Web Server interaction for Static Web Page
The particular thing in a static web page is that the content in these types of the web page does not change depending on the request.
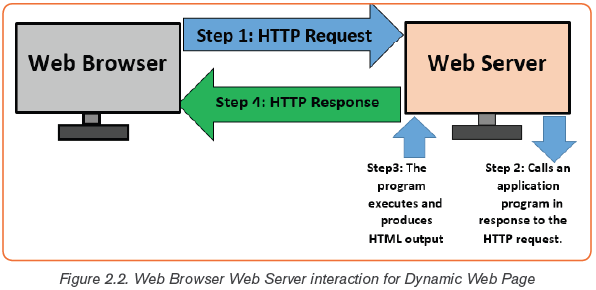
v) A dynamic webpage
A dynamic webpage is one whose contents do change, and generally change very quickly.
For example: The website for a newspaper changes constantly because the news changes constantly.
If the information were never updated, users would stop visiting the sites.
Therefore, dynamic web pages provide a solution for the static web pages. The dynamic web page content can vary depending on the number of parameters.
As it is discussed above that dissimilar to static web age, it not just simply sends HTML page in response.
The web server calls a program located on the hard disk which can access a database, perform transaction procedure. If the application program produces HTML output, which is used to construct an HTTP response by the web server. The web server sends the HTTP response thus created, back to the web browser.
The dynamic web pages are employed where the information changes very often such as stock prices, weather information, news and sports updates. Let’s assume a person has to physically change the Web page every 10 seconds to
show the latest update of the stock prices which is impractical to physically alter the HTML pages very often, so in this case, a dynamic web page can be used.
There are several tools used for the creation of dynamic web pages. For example, PHP (Personal Home Page), CGI (Common Gateway Interface), ASP (Active Server Pages), JSP (Java Server Pages), AJAX (Asynchronous JavaScript and XML), etc.
Key differences between static and dynamic web pages

Table 2.2: Static web pages and Dynamic web pages comparison
Conclusion
There is no involvement of application program in the static web page whereas dynamic web page involves an application program which can perform the various operations. Although, static and dynamic web pages have to return
HTML contents to the web browser with the use of HTTP protocol, in order to interpret and display them on the browser.
2.1.1.2. Importance of using both static and dynamic web pages
A. Advantages of static websites
- Faster speed: Being a static file when a user visits a page, all the web server has to do is return a file. No server-side code is executed. Differently with dynamic websites there is extra processing time required to deliver HTML pages.
- More secure: Since there is no back-end server-side processing, there is less surface area for attacks and there is no database available to be compromised.
- Lower cost: As they don’t have a database, static websites require less maintenance and are cheap to host.
- Easier to scale: When a website is hosted on the Cloud it is ready to be scaled at any time. Although similar techniques can be applied with dynamic websites, it will be more complex as database scaling might be required.
- Backups/Full editorial history: It is possible to see who changed which content and when if version control tools such as GIT are used.
B. Advantages of dynamic websites
- Easier to update content: Using a CMS (Content Management System) web interface for managing content will allow to make changes easily.
- More flexible: When creating a dynamic website, the programmer have full control of the wheel to create whatever interactive feature needed.
Application activity 2.1
1. Discuss different characteristics of a website and web application?
2. Define a web application and give two examples of web application?
3. Among web application and web site, what is the advantageous? Explain your answer.
4. With comparison table, differentiate static web page to dynamic web page
5. Discuss reason why it is easier to update dynamic web site compared to static website.
6. Is it very cheap to host static website in comparison with dynamic website? Explain.
2.2. Introduction and evolution of HTML
Activity 2.2
Using internet, find the answers to the following questions:
1. Write in full the abbreviated terms bellows:
a) WWW
b) HTML
2. Explain what it is WWW
3. Discuss the importance of HTML
4. Discuss and write an essay on how Hypertext Markup Language (HTML) had evolved from 1991 to the current trends seen today.
2.2.1 Introduction to HTML
The World Wide Web is an Internet-based system or platform that allows hypertext documents to be interconnected by hyperlinks. A hyperlink is a word or phrase a user can click to move from one website or webpage to another.
Hypertext enables you to read and navigate text and visual information in a nonlinear way based on what you want to read next. The idea behind hypertext is that instead of reading text in a linear structure like in a book, you can easily jump from one point to another based on interests.
Hypertext Markup Language (HTML) refers to a language used to structure hypertext (web) documents for presentation on the World Wide Web. HTML is not a programming language but can be thought of as a presentation language used to instruct the browser on how to present text and multimedia content on the Web.
HTML is the standard markup language for creating Web pages.
2.2.2 Evolution of HTML
The HTML was invented by Tim-Berners Lee, the founder of World Wide Web.
Lee’s original HTML version was based on a more complicated document processing language known as Standard Generalized Markup Language (SGML). Soon, Lee released different versions of HTML causing incompatibilities between different developers using different versions. For this reason the following was done:
- A consortium known as World Wide Web Consortium (W3C) was established to standardize HTML.
- The first standard version of HTML that was developed and maintained by W3C was HTML 2.0 released in 1995. It specifies a set of tags that must be supported by all browsers.
In 1996, release of HTML 3.2 standard then later HTML 4.0 in 1997.
- Most web browsers today support variation of HTML known as Extensible
Hypertext Markup Language (XHTML) that support mobile web application too.
- Today, there is HTML5 which many browsers and developers are using to develop web applications.
Application activity 2.2
1. HTML is not a programming language but can be thought of as a presentation language. Explain.
2. What is the difference between Hypertext and Hyperlink?
3. What are the particularities of XHTML over HTML 4.01?
4. Discuss the advantages of HTML 5 comparing to the previous HTML versions.
2.3. HTML tags and syntax
Activity 2.3
1. What is a HTML tag?
2. Give the syntax of a HTML tag
3. What is the role of an attribute of a HTML tag?
HTML tags are element names surrounded by angle brackets or Less Than and Greater Than symbols (< >).
Syntax: <tag_name>content goes here...</tag_name>
Example: <title> login page<title>
- HTML tags normally come in pairs like <p> and </p>
- The first tag in a pair is the start tag, the second tag is the end tag
- The end tag is written like the start tag, but with a forward slash inserted before the tag name.
Note: The start tag is also called the opening tag, and the end tag the closing tag.
For example, to instruct a browser to present text as a paragraph, use the <p> opening and </p> closing tags as follows:
<p> This is a new paragraph separated from others by a blank line</p>
An attribute is used to define the property or characteristics of an element inside the element’s opening tag. All attributes are made up of two parts: name and value. For example, a paragraph may be right aligned using align attribute as follows:
<p align=” left “This is left aligned</p>
Application activity 2.3
1. Discuss the syntax of an HTML tag
2. Define an attribute
3. You are given the HTML statement below: <font color=” green “> Hello Rwanda </font>
What is the function of
a) Color
b) Green
2.3.1 HTML Syntax and HTML Page Structure
Activity 2.4
Open notepad on your computer and type the below code.
<! DOCTYPE html>
<html>
<head>
<Title>My First Page</title>
</head>
<body>
<h1> This is my first web page </h1>
</body>
</html>
1. Save the above program as “myfirstpage.html”
2. Open the myfirstpage.html using any browser.
HTML tags are used to define a set of common web page features such as titles, paragraphs, and lists, tables, forms, images and multimedia.
Below is a visualization of a HTML page structure:
<html>
<head>
Document header related tags
</head>
<body>
Document body related tags
</body>
</Html>
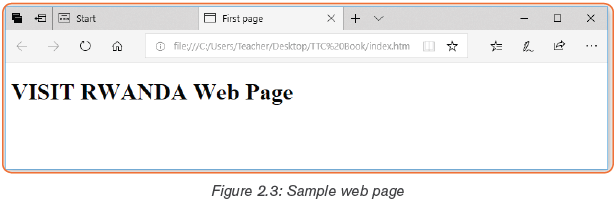
Example: the following sample HTML code creates a web page that displays
“VISIT RWANDA Web Page”:
<! DOCTYPE html>
<html>
<head>
<title>Page Title</title>
</head>
<body>
<h1>VISIT RWANDA Web Page</h1>
</body>
</html>
Explanation of above sample HTML code:
- The <DOCTYPE html> declaration defines the document type to be HTML5; there are many other declaration types which can be used in HTML document depending on which versions of HTML that are being used.
- The <html> element is the root element of a HTML page
- The <head> element contains meta information about the document
- The <title> element specifies a title for the document
- The <body> element contains the visible page content
- The <h1> element defines a large heading
- The <p> element defines a paragraph
Application activity 2.4
1. Why does <DOCTYPE html> start every web page in HTML?
2. Give HTML tags found between <head>……</head> tags
3. Create a web page that displays your name and the name of your school?
2.4 Design a static web page using html tags and hyperlinks
Activity 2.5
Using Notepad, Type the below html code and execute them.
<html>
<head>
<title>Republic of Rwanda </title>
</head>
<body>
Visit the official Website of the Republic of Rwanda using the link below
<br>
<a href=”http://www.gov.rw/home/”> The official Website of the Republic
of Rwanda </a>
</body>
</html>
Do the followings:
1. Save the program as “linkage.html”
2. Check if there is a linkage between your Webpage and the official website of the Republic of RWANDA.
The editor that is going to be used for designing web pages is Notepad. This
editor is preferred in that it requires writing from scratch every html code and
does not provide suggestions, error correction, etc and this is good for a learner
as it ensures mastery of all the used codes.
Step 1: To open Notepad in Windows 10
Click on the Start and type Notepad in the start search box
Step 2: Write HTML into Notepad. The text below is to create a HTML page
<! DOCTYPE html>
<html>
<head>
<title>First page</title>
</head>
<body>
<h1>VISIT RWANDA Web Page</h1>
</body>
</html>
Step 3: Save the HTML Page
Select File tab then Save or Save as in the Notepad menu.
Name the file “index.htm” or any other name ending with htm.
You can use either .htm or .html as file extension as these two extensions are the same.
Step 4: View HTML Page in a web browser (Mozilla Firefox, internet explorer, Google chrome.)
HTML Links - Hyperlinks
HTML links are hyperlinks. You can click on a link and jump to another document.
When you move the mouse over a link, the mouse arrow will turn into a little hand.
- Note: A link does not have to be text. It can be an image or any other HTML element.
HTML Links - Syntax
Hyperlinks are defined with the HTML <a> tag:
<a href=”url”>link text</a>
Example:
<a href=”https://www.rra.gov.rw”>Visit Official Rwanda Revenue website </a>
Application activity 2.5
Open the notepad software, Write an HTML page that displays your name and save it as “exercise.html” on desktop of your computer and then run the file using any browser you want.
2.4.1. Tags that identify and name documents
Activity 2.6
Using Notepad text editor, write the following HTML code and save the file as mypage.html, then run the file in a browser you want.
<! DOCTYPE html>
<html>
<head>
<title>Identifying elements</title>
</head>
<body>
<strong>Rwanda is known as a country of thousand hills! </strong> <br>
<mark>The development of Rwanda is based on its people</mark><br>
<del>strong and mark are HTML tags that organize web page contents</
del><br>
</body>
</html>
Study carefully the output of the above HTML code and answer the following
questions:
1. What is the function of:
- <strong> tag
- <mark> tag
- <del>tag
2. Give HTML tags for changing text color and for inserting a picture HTML language specification defines the markup that can be used to create a webpage, the webpage author decides which elements they will use to markup content.
For example,
a) The appearance (formatting) tags
A document heading may be created by making text larger, bold and with a different color. Presentational markup for such a heading may look like this:
<p>
< font size=”36” color=”red” > <b>ICT is a key of development </b>
</font> </p>
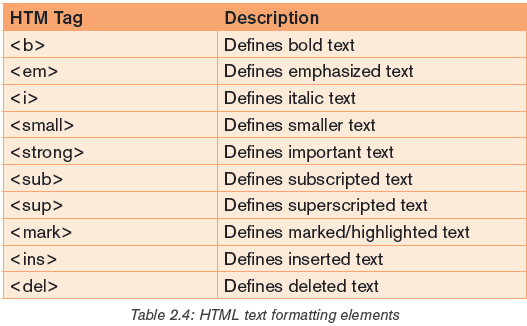
Formatting elements were designed to display special types of text:
The table below shows html text formatting elements:
Example: The HTML document below shows how to use formatting HTML elements
<!DOCTYPE html>
<html>
<head>
<title>Formatting elements</title>
</head>
<body>
<mark><b>Rwanda has 4 provinces and Kigali City</b></mark> <br>
<strong>Kigali City has 3 districts</strong><sup> which ones?</sup><br>
<del>Kigali Convention Center is in Nyarugenge district</del><br>
<ins>Thank you! </ins>
</body>
</html>
The web page below is displayed by the above HTML document:

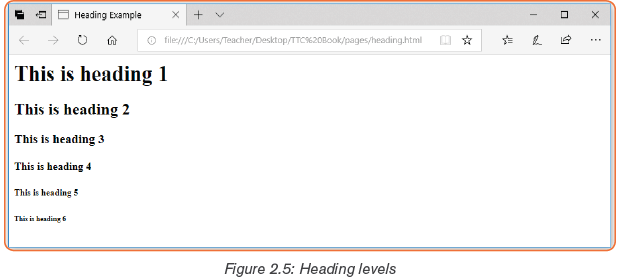
b) Heading tags
Heading tags are used in the body section to define section
headings that stand out from the rest of the text. HTML provided six levels of section headings: <h1>, <h2>, <h3>, <h4>, <h5>, and <h6>.
Note that the size of the heading reduces progressively with h1 being the largest while h6 is the smallest.
The general syntax of heading element is:
<headlevel> text</heading level>
Example:
The following HTML document displays the six heading levels (h1 to h6)
<!DOCTYPE html>
<html>
<head>
<title>Heading Example</title>
</head>
<body>
<h1>This is heading 1</h1>
<h2>This is heading 2</h2>
<h3>This is heading 3</h3>
<h4>This is heading 4</h4>
<h5>This is heading 5</h5>
<h6>This is heading 6</h6>
</body>
</html>
The figure below shows how the headings appear when displayed on a browser
such as chrome or Mozilla Firefox.
c) HTML images
One of the most compelling features of latest HTML standard is the ability to embed images that make a website more attractive. The three types of images supported by HTML4 are GIF (Graphics Interchange Format), JPEG (Joint
Photographic Experts Group) and PNG (Portable Network Graphics). To insert an image onto a web page, use the <img> tag; img is an abbreviation of the word image. The <img> is an empty tag does not require a corresponding closing tag. The general syntax for inserting a graphical object or image is:
<img src=”Image URL” ... attributes-list/>
The src in the img tag is an important attribute that specifies the location (source)
or URL of the image to insert onto the page.
For example, The following HTML code displays an image called Volcano:
<!DOCTYPE html>
<html>
<head>
<title> Visit Rwanda </title>
</head>
<body>
<p><Strong><font color=”red” size=48>
Visit Volcanoes National Park</font></strong></p>
<center><img src=”volcano.png”alt=”Gorilla in Rwanda” />
</center>
</body>
</html>
The HTML document above produces the following output:
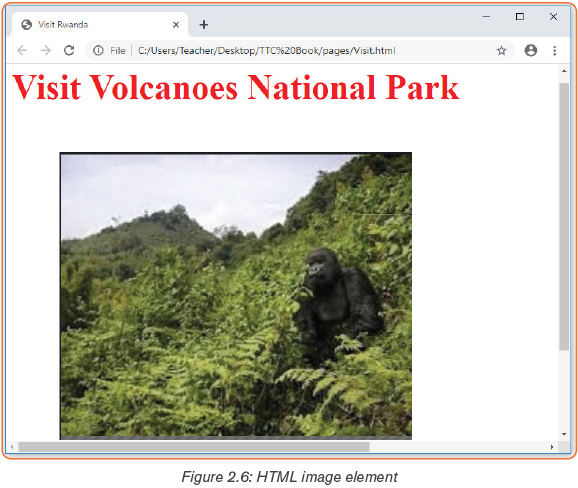
NB: use of the alt attribute is a good practice to specify alternate text for an image, if the browser cannot display or locate the image.
- Setting Image size
It is possible to specify the size using width and height attributes. The two attributes set width and height of the image in terms of pixels or percentage of its actual size. For example, to set the size of the volcano.png to occupy quarter of the screen, use:
<img src=”volcano.png” width = “ 80%” height=”90%”alt=”Gorilla in Rwanda” />
- Image Alignment
The <img> tag uses the align attribute to align an image on top, bottom, left or right of the browser window. For example, to align the volcano.png on top of the page, use align attribute as follows:
<img src=”volcano.png” align=” top”alt=”Gorilla in Rwanda” />
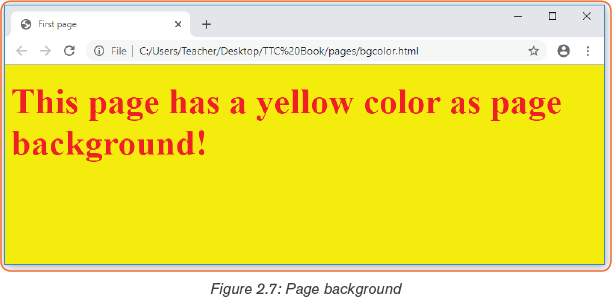
Notice: with HTML it is possible to set page background color; bgcolor attribute is used within body element.
For example, the following html code explains how bgcolor attribute is used
while setting yellow color as the page background.
<! DOCTYPE html>
<html>
<head>
<title>First page</title>
</head>
<body bgcolor=”yellow”>
<h1><font color=”red” size=”72”>This page has a yellow color as page
background! </h1>
</body>
</html>
The above html document displays the following web page in a browser:
Application activity 2.6
1. Using heading, paragraph, font and image elements create a page that briefly describes a topic that you would like to cover in your small website
known as a blog. The website should contain information such as :
a) Description about yourself,
b) academic profile,
c) Career aspirations in separate paragraphs
d) Insert your own photo.
2. Discuss the function of the following attributes in <font> tag:
a) Color attribute
b) Size attribute
3. Explain the role of src, alt, and align attributes within <img>tag
2.4.2. Tags that organize web page contents
In this section, we discuss some HTML elements that describe the structure and organize web contents.
A. HTML lists: Ordered and Unordered list
Activity 2.7
1. Type and execute the HTML code below, observe the output and explain the way page content is organized.
<! DOCTYPE html>
<html>
<head>
<title>list</title>
</head>
<body bgcolor=”yellow”>
<p><Strong> Districts of KIGALI City</strong></p>
<ol >
<li>Gasabo</li>
<li>Nyarugenge </li>
<li>Kicukiro</li>
</ol>
</body>
</html>
The information can be displayed in numbered or bulleted list. HTML supports
three types of lists namely ordered list, unordered list, and definition list.
- Ordered <ol> list is a container for enumerated items ordered using numbers such as 1, 2, 3.
- Unordered list <ul> is a collection of related items that have no special order or sequence.
- Definition list <dl> is used for definitions such as glossaries that pair each label with some kind of description.
- Creating ordered list
To create an ordered list, use the <ol>...</ol> tags within which to include one or more <li>...</li> (list item) tags.
Example:
<!DOCTYPE html>
<html>
<head>
<title>Numbered List</title>
</head>
<body>
<p><Strong><font color=”red” size=72>
Easter African Community(EAC) has 6 Partner States:</font></strong></p>
<ol >
<li>Rwanda</li>
<li>Uganda</li>
<li>Burundi </li>
<li>Kenya</li>
<li>Tanzania</li>
<li>South Sudan</li>
</ol>
</body>
</html>
The figure below shows the ordered list of 6 <li> countries after displaying the page on a browser

It is possible to customize the numbering style of an ordered list using the type
attributes as follows:
<ol type = “counter-type”>....</ol>
Examples
<ol type = “a”> ...</ol>
<ol type = “i”> ...</ol>
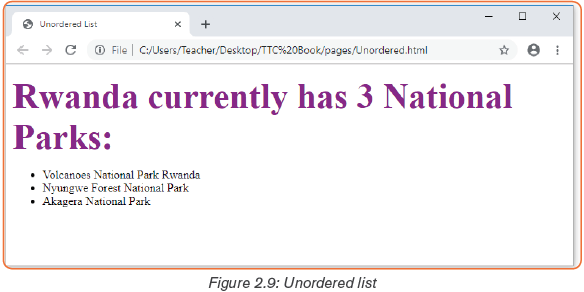
- Creating unordered list
Unordered list is similar to ordered list only that the items are listed using
bullets. To create unordered list, use <ul>...</ul> instead of <ol>..</ol> element
Example:
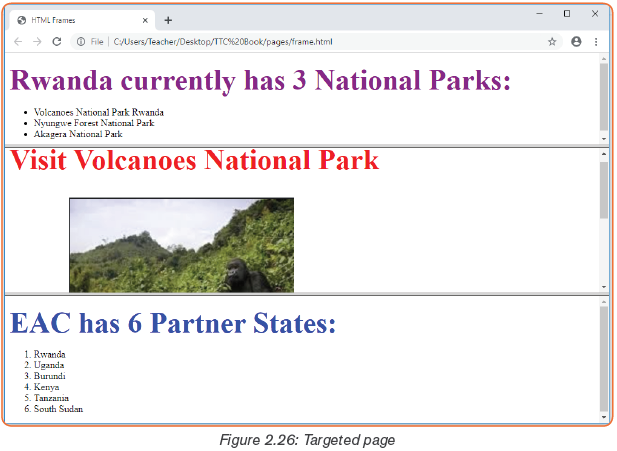
<!DOCTYPE html>
<html>
<head>
<title>Unordered List</title>
</head>
<body>
<p><Strong><font color=”purple” size=72>
Rwanda currently has 3 National Parks:</font></strong></p>
<ul >
<li>Volcanoes National Park Rwanda</li>
<li>Nyungwe Forest National Park</li>
<li>Akagera National Park </li>
</ul>
</body>
</html>
The Figure below shows the unordered list of 3 Rwanda National Parks when the page is opened using a web browser:
It is possible to customize unordered lists using type attribute and values that denote bullet types such as disc, square, or circle. For example, to change the bullets displayed in above figure from round to square, use the following syntax:
<ul type = “bullet-type”>....</ul>
For example, to display unordered list shown in figure above as a square, bullets, use the style attribute as follows:
<ul type = “square”> ..</ul>
Application activity 2.7
Study the following HTML document and answer related questions:
<! DOCTYPE html>
<html>
<head>
<title>list</title>
</head>
<body bgcolor=”yellow”>
<p><Strong> ICT Contents of Year one:</strong></p>
<ul >
<li>Unit 1: introduction to XO laptop </li>
<li>Unit 2: Computer maintenance </li>
<li>Unit 3: Advanced word processing </li>
<li>Unit 4: Advanced Spreadsheet I </li>
<li>Unit5: Searching the internet I </li>
</ul>
</body>
</html>
1. Write and execute the above html code then specify the type of a list
2. Write the same html code and change it into unordered list using square bullet types.
B. HTML lists: Definition and Nested lists
Activity 2.8
1. How do you call a list which is written inside another list?
2. Using HTML code , write the above list
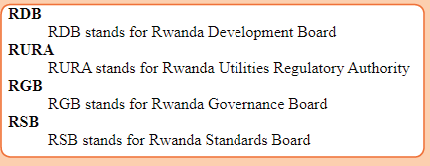
i) Creating definition list
A definition list is used to present a glossary of terms, or other definition lists like
Dictionary and encyclopedia. To create a definition list, use <dl> ...</dl>
element in which you place <dt> ... </dt> to mark up the term and <dd> ... </ dd> to mark up the definition part.
Therefore a definition list consists of the following parts:
- <dl> - Defines the start of the list
- <dt> - A term
- <dd> - Term definition
- </dl> - Defines the end of the list
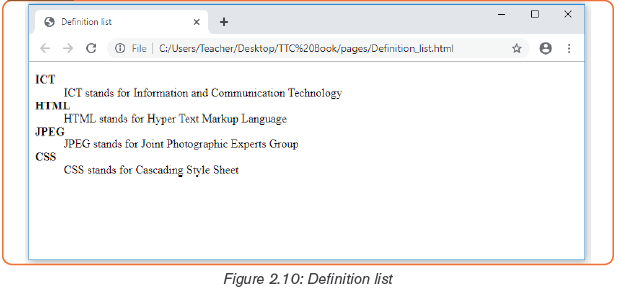
For example, the following HTML document shows a definition list of four terms:
<!DOCTYPE html>
<html>
<head>
<title>Definition list </title>
</head>
<body>
<dl>
<dt><b>ICT </b></dt>
<dd>ICT stands for Information and Communication Technology</dd>
<dt><b>HTML</b></dt>
<dd> HTML stands for Hyper Text Markup Language</dd>
<dt><b>JPEG</b></dt>
<dd>JPEG stands for Joint Photographic Experts Group</dd>
<dt><b>CSS</b></dt>
<dd>CSS stands for Cascading Style Sheet</dd>
</dl>
</body>
</html>
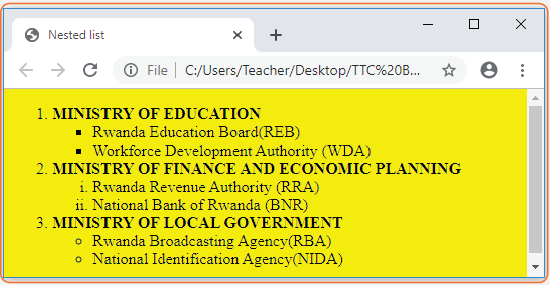
ii) Creating nested lists
To create a nested list, put the entire list structure inside another list
Example:
<!DOCTYPE html>
<html>
<head>
<title>sample Nested List </title>
</head>
<body>
<p><Strong><font color=”blue” size=48>
ICT content for TTC year 2 and 3:</font></strong></p>
<ol type=”i”>
<li> Advanced Spreadsheet II </li>
<li> Advanced power point presentation </li>
<li> Computer Graphics tools </li>
<li> E commerce, social media and online services </li>
<li> Database creation and manipulation </li>
<ul type=”circle”>
<li>Key terms used in Database </li>
<li> Data type </li>
<li>Opening, saving and closing a database </li>
<li>Create a blank database </li>
</ul>
</li>
<li>Introduction to web designing </li>
<ol type=”a”>
<li>Introduction to web designing </li>
<li> Introduction to HTML </li>
<li>Importance of using both static web page and dynamic web page </li>
<li>Design a static web page using html tags and hyperlinks </li>
<li> Creation of links </li>
<li> Website creation project </li>
</ol>
</ol>
</body>
</html>

Application activity 2.8
1. Give a clear difference between:
i) Definition and Nested list
ii) <dt>…</dt> and <dd>…</dd> tags
2. Study the following web page and then write its HTML code which displays it into browser.
C. HTML Frame and Table tags
Activity 2.9
1. A web page or a web browser can be divided into different parts so that each part can display content independent of its container. How can you name that part?
2. Write HTML code that display the below table

- HTML Frame Tags
In the context of a web browser, a frame is a part of a web page or browser window which displays content independent of its container, with the ability to load content independently. The HTML or media elements that go in a frame may or may not come from the same web site as the other elements of content on display.
Frameset:
In HTML, a frameset is a group of named frames to which web pages and media can be directed.
The attributes rows and cols on the opening frameset tag define the dimensions of a grid of frames using comma-separated lists of sizes, specified in either pixels or percentages. Within the frameset, a series of frame elements describe the initial source documents for each frame in the frameset, as well as assigning them names for use as the target of links.
Note that a HTML document would normally contain a head and a body may instead contain a head and a frameset (but not both a body and a frameset).
Example: the HTML document below, is creating three horizontal frames:
<! DOCTYPE html>
<html>
<head>
<title>Frames</title>
</head>
<frameset rows=”25%,40%,35%”>
<frame name=”top” src=”Unordered.html” />
<frame name=”main” src=”Visit.html” />
<frame name=”bottom” src=”Easter_Africa.html” />
</frameset>
</html>
The above html code will produce the following result:
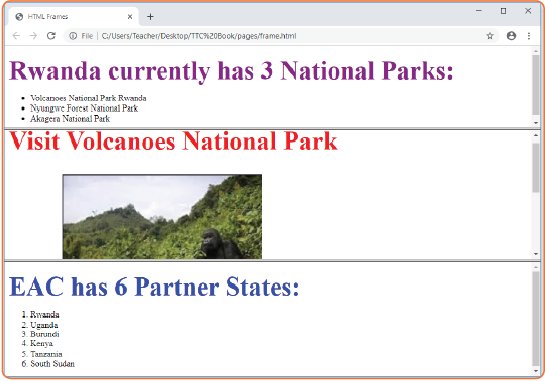
Figure 2.12: HTML Frames
- HTML Table tags
Tables are used to organize data such as numbers, text, links and images into rows and columns. An intersection of a row and a column forms data cell in which table data is held
The HTML tables are created using the <table> tag which is a container for <tr> (table row) tag used to create rows and <td> (table data) tag used to create data cells.
Before creating a table, consider the following table-features:
- Caption: indicates the type of data presented in the table
- Table headings: the row that indicate the data displayed in each column
- Table cells intersection of rows and columns in which we insert data
- Table data is the data or values in the table
To create a table, we use the <table>…</table> element within which the following elements are nested:
- <caption>…</caption> used to create the table caption
- <th> ...</th> tag is used to create the table heading
- <tr>...</tr> tag is used to create table rows
- <td>...</td> tag is used to create data cells
Notice that the table starts with a <table> tag followed by border, cell padding and cell spacing attributes and ends with the closing </table> tag.
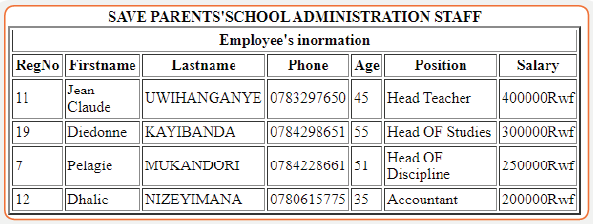
For example: the following HTML code produces the table
<!DOCTYPE html>
<html>
<head>
<title>Table </title>
</head>
<body>
<table border=”2” cellpadding=”3” cellspacing=”3”>
<Caption><b> UMUCYO HOTEL EMPLOYEE’S DATA</b></caption>
<tr>
<th>Employee Name</th>
<th>Department</th>
<th>Salary</th>
</tr>
<tr>
<td>Paul KAMANA</td>
<td>Finance </td>
<td>250000</td>
</tr>
<tr>
<td>Dhalie NIZEYIMANA</td>
<td>Marketing</td>
<td>200000</td>
</tr>
<tr>
<td>Jean Claude UWIHANGANYE</td>
<td>Information Technology </td>
<td>400000</td>
</tr>
</table>
</body>
</html>
The HTML document above produces the following table:
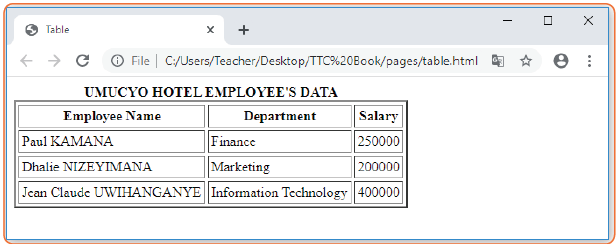
Figure 2.13: Sample HTML table
The following are basic attributes used to define or format a HTML table:
a) Border Attribute
The border attribute takes numeric values that specify thickness of the border that surrounds all the table cells. If 0 is used, the border is invisible while. In our example above, the statement below creates a border of 2-pixel thickness.
<table border=”2” >
b) Height and Width attributes
To set the size of the table, use width and height attributes. The height and width attributes take width or height values in terms of pixels or percentage of the screen. For example, the statement below sets the table size to width of 400 pixels and height of 150 pixels.
<table border=”2” width=”400” height=”150”>
c) Cellpadding Attribute
The cellpadding attribute specifies the space, in pixels, between the cell wall and the cell content.
Note: Do not confuse this with the cellspacing attribute, which specifies the space between cells.
Syntax: <table cellpadding=”pixels”>
d) Cellspacing Attribute
The cellspacing attribute specifies the space, in pixels, between cells.
Syntax: <table cellspacing=”pixels”>
Note: The cellspacing attribute of <table> is not supported in HTML5.
Pixels are the space between cells.
e) Table Caption
The caption tag will serve as a title or explanation for the table and it shows up at the top of the table. However, it is important to note that the caption tag is deprecated in newer versions of HTML.
f) Colspan attribute
The colspan attribute in HTML specifies the number of columns a cell should span. It allows the single table cell to span the width of more than one cell or
column. It provides the same functionality as “merge cell” in the spreadsheet program like Excel.
Usage: It can be used with <td> and <th> element while creating a HTML table.
<td>: The colspan attribute when used with <td> tag
determines the number of standard cells it should span.
Syntax:
- <td colspan =”value”> table content...</td>
- <th>: The colspan attribute when used with <th> tag
determines the number of header cells it should span.
Syntax:
- <th cospan =”value”> table content...</th>
- The value specifies the number of columns that the cell fills. The value must be an integer
g) Rowspan attribute
The rowspan attribute in HTML specifies the number of rows a cell should span.
That is if a row spans two rows, it means it will take up the space of two rows in that table. It allows the single table cell to span the height of more than one cell or row. It provides the same functionality as “merge cell” in the spreadsheet program like Excel.
Usage: It can be used with <td> and <th> element in a HTML table.
•• <td>: The rowspan attribute when used with <td> tag
determines the number of standard cells it should span.
Syntax:
•• <td rowspan = “value”> table content...</td>
•• The value specifies the number of rows that the cell fills. The value must
be an integer.
- <th>:The rowspan attribute when used with <th> tag
determines the number of header cells it should span.
Syntax:
- <th rowspan = “value”>table content...</th>
- The value specifies the number of rows that the cell fills. The value must be a integer.
Example: The following HTML code explains how to use HTML table attribute discussed above:
<!DOCTYPE html>
<html>
<head>
<title>Table attributes </title>
</head>
<body>
<table border=”4” cellpadding=”3” cellspacing=”3”
width=”400”height=”200”>
<Caption><b> ECOLE SECONDAIRE DE MUHAMBARA</b></caption>
<tr>
<th colspan=6> Number of studens in E.S.M</th>
</tr>
<tr>
<th colspan=2> O’level</th>
<th colspan=2> A’level</th>
<th colspan=2> Total number</th>
</tr>
<tr>
<th>Boys</th>
<th>Girls</th>
<th>Boys</th>
<th>Girls</th>
<th rowspan=”2”>605</th>
</tr>
<tr>
<td>120</td>
<td>200</td>
<td>130</td>
<td>155</td>
</tr>
</table>
</body>
</html>
The above HTML code produces the output below:

Figure 2.14: HTML table attributes
Application activity 2.9
1. Discuss the use of the following tags and attributes:
a) <Frameset> tag
b) <Caption> tag
c) Colspan attribute
d) <Th> tag
2. Create an html document which create a web page with three frames named: “Top_Frames “,”Main_Frames “,and “Bottom_Frame”.
3. Using HTML tags , create a web page that display the below table

D. HTML Forms
Activity 2.10
A website is developed with different pages using HTML language. Observe it and answer related questions.
1. What do you understand a HTML form?
2. What is the use of HTML form?
3. Use HTML code to produce the above page
A person may need to gather information such as student’s details and store such information in the server. The most common method for gathering such information is by using a form.
When users fill forms and clicks the submit button, the data keyed into the form is sent (posted) to the web server for processing or storage into a database.
To create HTML forms, we use the <form> ... <form> element as follows:
<form action=”Script URL”method=”GET|POST”>
form elements like input, textarea etc.
</form>
HTML forms contain form elements (form controls). There are different types of form controls that can be used to facilitate data collection information using HTML form. The most common controls include: text, textarea, select, radio buttons, checkboxes, file select, command button and reset buttons.
Let see the use of every form element and basic form attributes
a) Form Action Attribute
The <form> tag takes several attributes key among them the action and method attributes used to accomplish the following:
The action attribute is used to specify the file on the server that receives data from the form for processing. For example, the action attribute in the form tag below specifies a file named register.php that receives registration details after the user clicks the submit button:
<form action=“register.php”> </form>
b) Form Method Attribute
The Method attribute specifies how the data is to be sent to the web server.
The method attribute specifies the HTTP method (GET or POST) to be used when submitting the forms:
Get Method: If a “GET” method is used, the data supplied in the form is appended at the end of the URL.
Note that using Get method in login form is not recommended because unauthorized users may see actual username and password.
Post Method:
Unlike the GET method, post method does not display submitted form data on URL because the parameters are passed as body of a HTTP request.
Use POST if the form is updating data, or includes sensitive information (password). POST offers better security because the submitted data is not visible in the page address.
The <input> Element
The <input> element is the most important form element.
The <input> element has many variations, depending on the type attribute.
c) Text input
Input control is used to capture alphanumeric data such as text.
<input type=”text”> defines a one-line input field for text input. For example,
the following statement defines text input for capturing First name:
First name: <input type=“text” name=“first” size = “20” />
This is how the HTML code above will be displayed in a browser:

d) Hidden input
Sometimes it is important to conceal the identity of information entered in the
form using the input type. This is achieved by use of hidden input type. To create
hidden input, set the input type to hidden as shown below:
<input type=“hidden” name=“userid” value=“321”/>
e) Password input
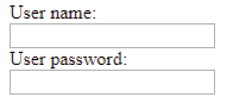
<input type=”password”> defines a password field:
Example:
<form>
User name:<br>
<input type=”text” name=”username”> <br>
User password:<br>
<input type=”password” name=”psw”>
</form>
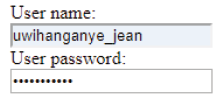
The HTML code above will display the following:
After typing a user name and pass word, input boxes will look like the following:
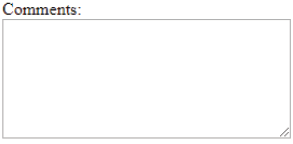
f) Text area
Text area control is a multi-line text input used when the user is required to give details that may be longer than a single sentence.
The attributes used with textarea tag are: name, rows, and cols.
For example, the following statement defines textarea named comment that has
6 rows and 10 columns:
<form >
Comments: <br > <textarea rows=”7”cols=”25”name=”comment”></
textarea>
</form>
This is how the HTML code above will be displayed in a browser:
g) Checkbox
Checkbox controls are input type used when more than one option is required
to be selected from a list of check boxes. However, the input type attribute must
be set to checkbox value as shown by the following statements:
<! DOCTYPE html>
<html>
<head><title>checkbox</title>
</head>
<body>
<P><Strong><font color=”orange” size=36>Choose your favorite games</
font></strong></p>
<form>
<p><input type=”checkbox” name=”game” checked=”checked”> Football </
p>
<p><input type=”checkbox” name=”game” > Basketball <p>
<p><input type=”checkbox” name=”game” > Volley Ball<p>
<p><input type=”checkbox” name=”game” > Net Ball<p>
</form>
</body>
</html>

Figure 2.15: HTML Checkbox input type
h) Radio button
Radio buttons let a user select ONLY ONE of a limited number of choices.
<input type=”radio”> defines a radio button.
Example:
<!DOCTYPE html>
<html>
<head><title>radio buttons</title>
</head>
<body>
<p><strong><font color=”orange” size=36>select your sex</font></
strong></p>
<form>
<input type=”radio”name=”sex” value=”male”checked=”checked” > male </
br>
<input type=”radio”name=”sex” value=”female””>female </br>
</form>
</body>
</html>
The HTML code above will be displayed in a browser as follows:
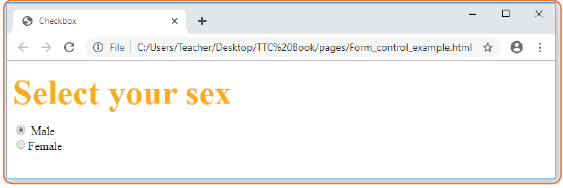
Figure 2.16: HTML Radio input type
i) Select or (Drop-Down List)
The select control also known as dropdown box provides the user with various
options in form of drop down list, from which a user can select one or more
options. For example, the following select defines a dropdown for selecting only one option:
<! DOCTYPE html>
<html>
<head><title>dropdown list</title>
</head>
<body>
<p><strong><font color=”pink” size=36>
Select your residence province:</font></strong></p>
<form>
<select name=”dropdown”>
<option value=”Kigali” selected>Kigali City</option>
<option value=”South”>South Province</option>
<option value=”North”>North Province</option>
<option value=”Easter”>East Province</option>
<option value=”West”>West Province</option>
</select>
</form>
</body>
</html>
The HTML document above produces the following webpage:
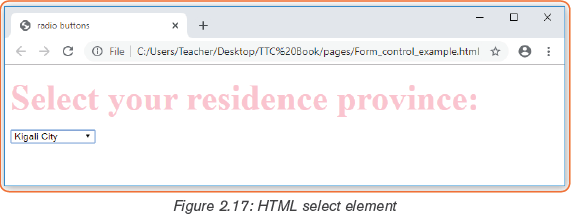
When you click on drop down arrow of a box, it will be as follows:
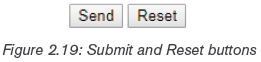
j) Submit and Reset Button
Submit input type used to create a button that automatically submits form data to web server. On the other hand, reset is used to refresh (reset)form controls to their default values. The following statements creates submit and reset buttons with values set to Send and Reset respectively:
<form>
<input type=”submit”name=”submit” value=”Send” />
<input type=”reset” name=”reset” value=”Reset” />
</form>
This is how the HTML code above will be displayed in a browser:
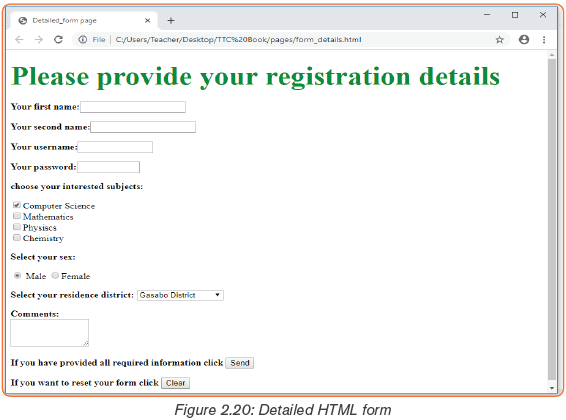
The following is a HTML document that implements input text box, input password box, checkbox, radio buttons, select, text area and action buttons
(Submit and Reset)
<!DOCTYPE html>
<html>
<head><title>Detailed Form Page</title>
</head>
<body>
<h2><Font color=”green” size=36>Please provide your registration details
</font></h2>
<form action=”register.php”method=”post”>
<p><b>Your first name:</b><input type=”text” name=”first”size=20></p>
<p><b>Your second name:</b><input type=”text”
name=”second”size=20></p>
<p><b>Your username:</b><input type=”text” name=”mail”size=13></p>
<p><b>Your password:</b><input type=”password” name=”pass”size=10
></p>
<p></u><b>choose your interested subjects:</b></u></p>
<input type=”checkbox” name=”check”checked=”checked”>Computer Science<br>
<input type=”checkbox” name=”check”>Mathematics<br>
<input type=”checkbox” name=”check”>Physiscs<br>
<input type=”checkbox” name=”check”>Chemistry<br>
<p></u><b>Select your sex:</b></u></p>
<input type=”radio”name=”sex” value=”male”checked=”checked” > Male
<input type=”radio”name=”sex” value=”female””>Female
<p></u><b>Select your residence district:</b></u>
<select name=”dropdown”>
<option value=”Gasabo” selected>Gasabo District</option>
<option value=”Nyarugenge”>Nyarugenge District</option>
<option value=”Kicukiro”>Kicukiro District</option>
</select></p>
<p><b>Comments:</b><br>
<textarea rows=”3”cols=”15”name=”comment”></textarea>
</p>
<p><b>If you have provided all required information click
<input type=”submit”name=”submit” value=”Send” /></p>
<p><b>If you want to reset your form click
<input type=”reset”name=”reset” value=”Clear” /></p>
</form>
</body>
</html>
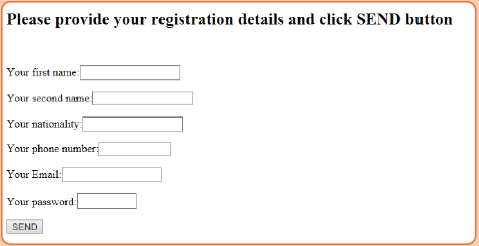
The above HTML document produces the following web page:
Notice:
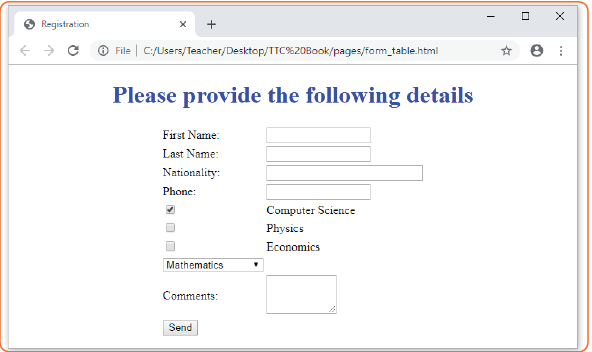
a) It is possible to organize the HTML form elements using a table so that they can be well arranged.
For example, the HTML document below explains how to insert a HTML form in a table:
<! DOCTYPE html>
<html>
<head>
<title> Registration</title>
</head>
<body>
<center>
<h1> <font color=”blue”>Please provide the following details</font></h1>
<table><form Action= “register.php” Method= “get” >
<tr><td>First Name:</td> <td><input type= “text” name= “FName”
size=”15”></td></tr>
<tr><td>Last Name:</td> <td><input type= “text” name=
“lname”size=”15”></td></tr>
<tr><td>Nationality:</td> <td> <input type=”text”name= “country”
size=”25”></td></tr>
<tr><td>Phone:</td> <td> <input type= “text” name= “phone”
size=”15”></td></tr>
<tr><td><input type=”checkbox” name=”subjects” checked=”checked”></
td> <td> Computer Science</td></tr>
<tr><td><input type=”checkbox” name=”subjects” ></td> <td> Physics</
td></tr>
<tr><td><input type=”checkbox” name=”subjects” ></td> <td>
Economics</td></tr>
<tr><td><select name=”dropdown”> <option value=”maths”
selected>Mathematics</option>
<option value=”computer”>Computer Science</option> </select> </td></
tr>
<tr><td>Comments:</td> <td> <textarea
rows=”3”cols=”10”name=”comment”> </textarea></td></tr>
<tr><td><input type=”submit” name=”submit” value=”Send”></td></tr>
</form></table>
</center>
</body>
</html>
The HTML code above displays the following page in a browser:
Application activity 2.10
1. Explain the following HTML tag and attributes :
a) Action attribute
b) Method attribute
c) Text area tag
2. Write the syntax of select HTML tag
3. Write the HTML code that displays the form below:

b) Particularities of HTML5
Activity 2.11
1. According to the knowledge you have about previous HTML versions, what do you think HTML5 came to solve?
2. Discuss reasons why HTML5 has taken over other HTML versions
3. Give examples of new input types of HTML5
HTML5 is the fifth revised and newest version of HTML standard offering new features that support multimedia content more effectively than the previous versions.
To be supported by majority of browsers, HTML5 has been developed in collaboration with browser makers. This explains why most browsers are supporting the new HTML5 specification.
HTML5 provides new elements and attributes that allow for backward compatible with current and older browsers.
HTML5 Doctype
DOCTYPEs in previous HTML versions were longer because HTML4 and XHTML required a reference to SGML-based DTD. HTML5 standard is a radical departure from SGML restrictions to new features based on cascading style
sheet (CSS) and Javascript. This is why doctype is a short statement written as:
<! DOCTYPE html>
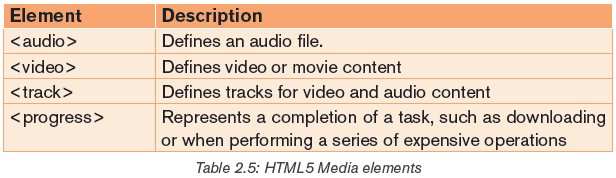
New HTML5 Elements
- Media elements: Due to high demand of multimedia content on the web, WC3 introduced new set of media elements in HTML5 to handle different media types without need for additional plugins such as Adobe flash. New media elements include:
- Input elements: New input types were introduced to address specific form input and formatting requirements for user input such as dates, numbers, and telephone numbers. Examples of new input types include:
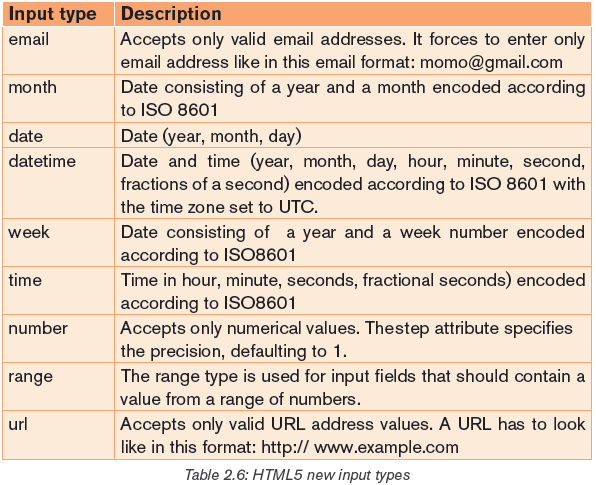
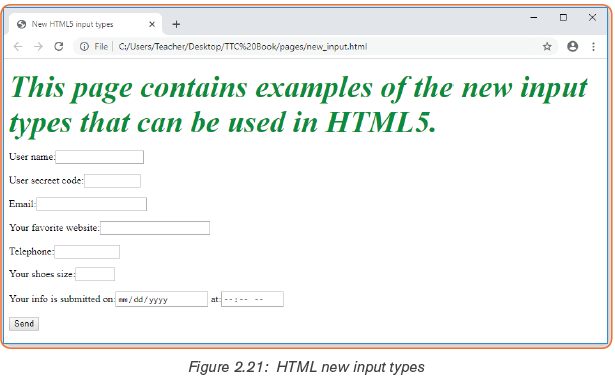
To demonstrate how the new input types and attributes are used, below is sample HTML5 document used to get text, telephone, e-mail, date, time and numbers.
<!DOCTYPE html>
<html>
<head>
<title> New HTML5 input types</title>
</head>
<body>
<p><em><strong><font size=36 color=”green”>This page contains
examples of the new input types that can be used in HTML5.
</font></strong></em></p>
<form action=”new_input.php” method =”post”>
<p> User name:<input type=”text”name=”user”size=15></p>
<p> User secreet code:<input type=”password”name=”psw”size=8></p>
<p> Email:<input type=”email”name=”mail”size=20></p>
<p> Your favorite website:<input type=”url”name=”site”size=20></p>
<p> Telephone:<input type=”tel”name=”phone”size=10></p>
<p> Your shoes size:<input type=”number”name=”num”min=5 max= 15 ></p>
<p> Your info is submitted on:<input type=”date”name=”date”> at:<input
type=”time”name=”time”></p>
<input type=”submit”value=”Send”name=”button”><br/>
</form>
</body>
</html>
The above Html code displays the following in a web browser:
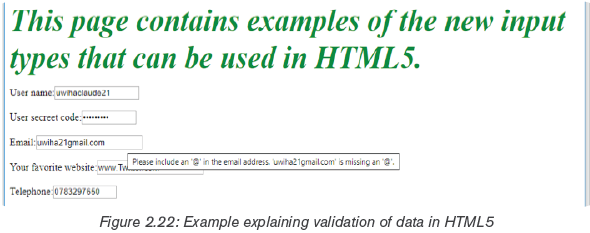
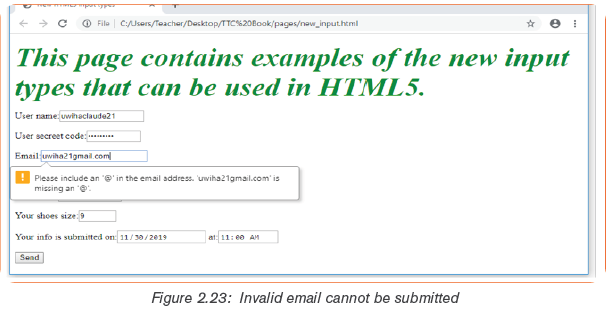
Note that HTML5 implements validation of data. For example, if upon an attempt to submit a wrong email or url, the browser will look for patterns to ensure a valid e-mail and url address have been entered, if it finds that wrong data was entered, the browser goes as far as presenting the user with an error. An illustration of this can be seen in the image below where a screen shows how it looks when leaving the email box with wrong data:
This short screen shows how it looks when clicking on Send button:
Application activity 2.11
1. Give a DOCTYPE declaration of HTML5
2. Explain how HTML5 implements validation of data?
3. Discuss about new types bellow:
a) Email
b) url
c) datetime
4. Debate this argument by support it or giving justification why migrating from HTML4 to HTML5 is a brave decision that should not be held back due to few people who are resistant to change!
5. Write a HTML code that creates a form that has input types below:
- Text
- Month
- Number
2.4.3 Creation of links
Activity 2.12
1. A website is a collection of several web pages with information on a subject that are connected (linked) together. What do you understand by a link?
2. What is difference between internal and external link?
A hyperlink is a text, phrase or image that is clicked on in order to go to another web page or a section within the current page or to another website. In most browsers, hyperlinks are often in blue and underlined.
HTML Links – Syntax
To create a hyperlink, use the anchor element: <a>...</a>. The <a> tag is called an anchor tag because it is used to create anchors for hyperlinks.
<a href=”url”>link text</a>
Example:
<a href=”http://www.irembo.gov.rw”>Irembo Official Website</a>
The href (Hypertext Reference) attribute specifies the destination address (http://www.irembo.gov.rw”). The link text is the visible part (Irembo Official Website).
Clicking on the link text, will send the page visitor to the specified address.
Note: The link text does not have to be text. It can be a HTML image or any other HTML element.
Local Links
The example above used an absolute URL (A full web address).
A local (internal) link (link to the same web site) is specified with a relative URL (without http://www....).
The following code shows how to add text-based hyperlink into a HTML page:
<!DOCTYPE html>
<html>
<head>
<title>Hyperlink page</title>
</head>
<body>
<p><font color=”orange” size=”20”> For getting more information Click
following link:
</font></p>
<a href=”http://www.tutorpoint.edu”>Visit Tutorial Site</a>
</body>
</html>
The figure below shows how the link is displayed on the browser.
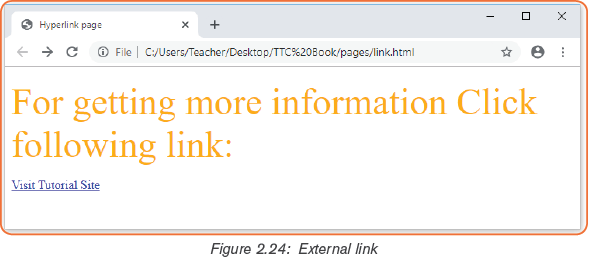
In most browsers, a hyperlink is an underlined text and blue in color. In our case, once the visitor clicks on the link, he or she is taken to the web page of the tutorial site as long as it is a valid URL.
Example 2:
<! DOCTYPE html>
<html>
<head>
<title>Hyperlink page</title>
</head>
<body>
<p><font color=”purple” size=”20”> Click following link for more information:
</font></p>
<a href=”frame.html”>click here</a>
</body>
</html>
Output of above html code:
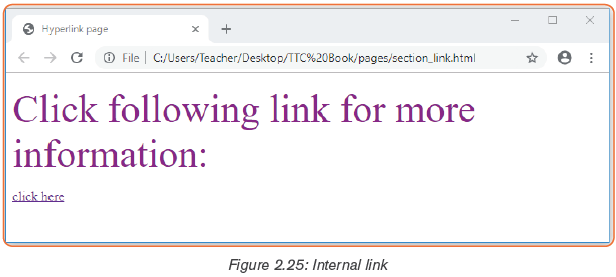
The click here hyperlink fall on the following frame.html page:
Application activity 2.12
1. Define the following terms:
a) Hyperlink
b) Hypertext
c) href attribute
2. What do you understand by a local link?
3. Explain this statement: <a href=”photo.html”> image link</a>
4. Create two static web pages and hyperlink called “next” which links them.
2.5 Website Creation Project
Activity 2.13
With research on internet, find and discuss different steps (phase) involved in the web site design and development process.
There are numerous steps in web site design and development process from gathering initial information, to the creation of a web site, and finally to maintenance to keep it up to date and current.
The exact process will vary slightly from designer to designer, but the basics are the same.
1. Information Gathering
2. Planning
3. Design
4. Development
5. Testing and Delivery
6. Maintenance
For example, to understand actions taken into account in every phase, let have a sample and simple static website creation project for a Hotel.
2.5.1. Phase one: Information gathering from the custom
The first step in designing a successful web site is to gather information.
Many things need to be taken into consideration before creating a website.
This first step is actually the most important one, as it involves a solid understanding of the company it is created for.
It is important that a web designer start off by asking questions to him/her understand the business process and the needs for the website to be created.
This phase is the main focus of the project managers and stake holders.
Meetings with managers, stake holders and users are held in order to determine the requirements like:
a) Who is going to use the system?
b) How will they use the system?
c) What data should be input into the system?
d) What data should be output by the system?
e) These are general questions that get answered during a requirements gathering phase.
Certain things to consider are:
- Purpose: What is the purpose of the site? To provide information, promote a service, sell a product…?
- Goals: What to accomplish by building the web site? Two of the more common goals are either to make money or share information.
- Target Audience:
– Is there a specific group of people that will help in reaching the goals?
– It is helpful to picture the “ideal” people that will visit the new web site?
– Consider their age, sex or interests – this will later help determine the best design style for the new site.
- Content: What kind of information will the target audience be looking for on your site? Are they looking for specific information, a particular product or service, online ordering…?
With considered example, as web designer, ask a hotel owner and manager the following questions in order to get needed information:
1. What is the name of your Hotel?
2. Why do you want a website for your Hotel?
3. What do you want as the name of your website?
4. What does the new web site serve to your customers?
5. Is there a specific group of people that will help in reaching your goals?
6. What kind of information will the target audience be looking for on your web site?
2.5.2. Phase Two: Planning
After requirement gathering these requirements are analyzed for their validity and the possibility of incorporating the requirements in the system to be development is also studied.
Using the information gathered from phase one, it is time to put together a plan for the web site. This is the point where a site map (Requirement Specification document) is developed. The site map is a list of all main topic areas of the site, as well as subtopics, if applicable. This serves as a guide as to what content will be on the site, and is essential to developing a consistent, easy to understand navigational system. The end-user of the web site must be kept in mind when designing a web site. These are, after all, the people who will be learning about your service or buying your product. A good user interface creates an easy to navigate web site, and is the basis for this.
During the planning phase, the web designer will also help in deciding which technologies should be implemented.
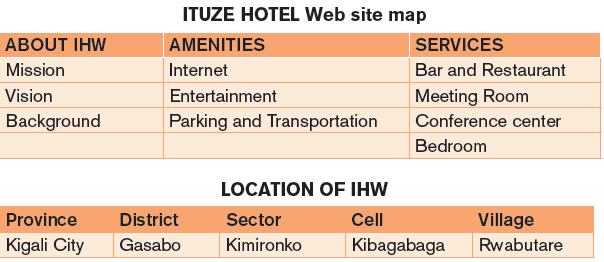
ITUZE HOTEL is nearby:
- Stade Amahoro 4 min drive
- Kimironko Market 10 min walk
- Kigali International Airport 6 min drive
- Kibagabaga Adventist English Church 5 min walk
- Kibagabaga Hospital 10 min walk
TECHNOLOGY: SOFTWARE AND HARDWARE
1. Software: HTML and Notepad text editor
2. Hardware: personal computer, digital camera, USB connector
2.5.3. Phase Three: Design
Drawing from the information gathered up to this point, it’s time to determine the look and feel of your site. Target audience is one of the key factors taken into consideration. A site aimed at teenagers, for example, will look much different than one meant for a financial institution. As part of the design phase, it is also important to incorporate elements such as the company logo or colors to help strengthen the identity of your company on the web site. Your designer should allow you to view your project throughout the design and development stages.
The most important reason for this is that it gives you the opportunity to express your likes and dislikes on the site design.
In this phase, communication between both you and your designer is crucial to ensure that the final web site will match your needs and taste. It is important that you work closely with your designer, exchanging ideas, until you arrive at the final design for your web site. Then development can begin.
Control flow of ITUZE HOTEL Web site (IHW)

2.5.4. Phase Four: Development
The developmental stage is the point where the web site itself is created. On receiving system design documents, the work is divided in modules/units and actual coding is started. Since, in this phase the code is produced so it is the main focus for the developer. This is typically done by first developing the home page, followed by a “shell” for the interior pages.
The shell contains the main navigational structure for the web site. The developer should continue to make you in-progress web site available to you for viewing, so that you can suggest any additional changes or corrections you would like to have done.
This is the longest phase of the website/software development life cycle
Here below are HTML codes and screen shorts of main webpages of IHW: Home Page
Home page is created by HTML code belows:
<! DOCTYPE html>
<html>
<head>
<title>HTML Frames</title>
</head>
<frameset rows=”25%,75%”>
<frame name=”top” src=”top_frame.html” />
<frame name=”main” src=”Main.html” />
<noframes>
<body>
Your browser does not support frames. </body>
</noframes>
</frameset>
</html>
Above HTML code produces the following webpage: