Topic outline
General
- Physical Education Sports File Uploaded 25/01/22, 15:22
PART I. GENERAL INTRODUCTION
I.0. About the teacher’s guide
This book is a teacher’s guide for Physical Education and Sports senior three. It is
designed to help teachers in the implementation of competence based curriculum.
As the name says, it is a guide that teachers can refer to when preparing their lessons.
Teachers may prefer to adopt provided activities/games/exercises and related guidance
but they are also expected to be more creative and consider their specific classes’
contexts and prepare accordingly.
I.1. Structure of the guide
This section presents the overall structure of this guide, the unit and lesson structure
to help teachers to understand the different sections of this guide and what they will
find in each section.
I.1.1. Overall structure
The whole guide has three main parts as follows:
• General Introduction.
This part provides general guidance on how to develop the generic competences,
how to integrate cross cutting issues, how to cater for learners with special
educational needs, active methods and techniques of teaching Physical Education
and Sports and guidance on assessment.
• Sample lesson plan
This part provides a sample lesson plan, developed and designed to help the
teacher develop their own lesson plans.
• Unit development
This is the core part of the guide. Each unit is developed following the structure below.
The guide ends with references.
Note that this teacher’s guide has some changes considering the pre-developed number
of units in the syllabus. The first three units of the syllabus (Unit 1: Motor control, Unit 2:
Body control and balance, Unit 3: Gymnastics) were fused to make the First unit called
Physical Conditioning and will be taught in 3 periods. Then, the unit 9 (Goal ball) and
the unit 10 (Sitting volleyball) were merged to make unit 7 called Adaptive Sport and
will be taught in 3 periods. Another change is in the number of periods for unit 5 (Basket
ball) which become 3 instead of 4 as set in syllabus. Every teacher of Physical Education
and Sport is recommended to consider these changes while preparing their scheme of
work.
I.1.2. Structure of a unit
Each unit is made of the following sections:
Unit title: from the syllabus
Key unit competence: from the syllabusPrerequisites (knowledge, skills, attitudes and values)
This section indicates knowledge, skills and attitudes required for the success of the
unit. The competence-based approach calls for connections between units/topics
within a subject and interconnections between different subjects. The teacher will find
an indication of those prerequisites and guidance on how to establish connections.
Cross-cutting issues to be addressed
This section suggests cross cutting issues that can be integrated depending on the unit
content. It provides guidance on how to come up with the integration of the issue.
Note that the issue indicated is a suggestion; teachers are free to take another crosscutting issue taking into consideration the learning environment.
List of lessons/sub-heading
This section presents in a table suggestion on the list of lessons, lesson objectives copied
or adapted from the syllabus and duration for each lesson. Each lesson /subheading is
then developed.
End unit assessment
This part provides guidance on how to conduct the end unit assessment in a practical
way. It suggests activities/ games as well as guidance on criteria to be considered such
as:
• Cognitive skills(e.g.: level of concentration, memory, capacity of anticipation,
problem solving);
• Technical competences (e.g.: to throw the ball, to catch it, to dribble it, to pass it
to others etc);
• Strong emotional points such as self-confidence and feeling secure;
• Social competences such as cooperation and solidarity;
• Attitudes and values: e.g.: optimism, confidence, respect and impartiality.
Additional activities
This section provides additional games/exercises for the teacher to have a wide range
I.1.3. Structure of each lesson
Each lesson/sub-heading is made of the following sections:
Lesson title 1: ……………………………..
Introduction:This section gives a clear instruction to teacher on how to start the lesson
Teaching resources
This section suggests the teaching aids or other resources needed in line with the
activities to achieve the learning objectives. Teachers are encouraged to replace the
suggested teaching aids by the available ones in their respective schools and based on
learning environment.
Steps of the lesson
This section provides activities/games/exercises and guidance step by step: introduction;
lesson development and assessment.
I.2. Importance of PES subject
Physical Education and Sport enables learner global development:
• Physically, PES subject facilitates biological maturation (muscle development,
widening of heart cavity, better pulmonary ventilation, coordination and motion
speed). It also helps to prevent and correct the morphological and physiological
defects;
• Intellectually, the learner acquires knowledge and ability of concentration: he/
she observes, recalls, performs experiments, uses strategies, evolves and makes
decisions;
• Emotionally, the learner is deeply involved: he/she discovers his/her own
potentials; develops self-confidence, gets enthusiasm and happiness;
• Socially, the learner makes friends through playing and develops attitude and
competence of communicating, cooperating and building positive relations with
others.
• Game and sport provide learners with an excellent context of learning how
to develop and protect their health and welfare. Through the game, a learner
discovers that he/she has to take care of him/herself and of others;
• PES is a powerful way of building personality because it promotes self-confidence
and competition skills. It develops knowledge and self-monitoring, respect of the
law, will, attention, courage, and communication with others;
• This subject enables early detection and enhancement of sport talents for young
learners;
• When games are carefully planned taking into account learner’s age, they
enable learners to acquire practical competences such as respect, honesty,
comprehension, communication, empathy, problem solving, comprehension of
rules foundation and the way of complying with them;
• Success in play and sport activities is a source of self-confidence which contributes
to the improvement of performance in other subjects even for students with low
academic performance;
• Games contribute to bridge psychological gaps which usually exist between
learners and teachers: when teachers regularly play with their learners, the mood
becomes much more cordial and learners become more open;
• Recreational and sport activities provide learners with a real relaxation after
hours of intensive concentration.
I.3. Methodological guidance
I.3.1. Developing competencesSince 2015 Rwanda shifted from a knowledge based to a competency based curriculum
for pre-primary, primary and general secondary education. This called for changing
the way of learning by shifting from teacher centered to a learner centered approach.
Teachers are not only responsible for knowledge transfer but also for fostering student’s
learning achievement, and creating safe and supportive learning environment. It implies
also that a learner has to demonstrate what he/she is able to do using the knowledge,
skills, values and attitude acquired in a new or different or given situation.
The competence-based curriculum uses an approach of teaching and learning based on
discrete skills rather than dwelling on only knowledge or the cognitive domain of learning.
It focuses on what learner can do rather than what learners know. Learners develop
basic competences through specific subject unit competences with specific learning
objectives broken down into knowledge, skills and attitudes. These competences are
developed through learning activities disseminated in learner-centred rather than the
traditional didactic approach. The student is evaluated against set standards to achieve
before moving on.
In addition to specific subject competences, learners also develop generic competences
which are transferable throughout a range of learning areas and situations in life. Below
are examples of how generic competences can be developed in Physical Education and
Sports:


I.3.2. Addressing cross-cutting issues
Among the changes in the competence based curriculum is the integration of cross
cutting issues as an integral part of the teaching learning process-as they relate to and
must be considered within all subjects to be appropriately addressed. The eight cross
cutting issues identified in the national curriculum framework are: Genocide Studies,
Environment and Sustainability, Gender Education, Comprehensive Sexuality Education
(CSE), Peace and Values Education, Financial Education, Standardization Culture and
Inclusive Education.
Some cross cutting issues may seem specific to particular learning areas or subjects but
the teacher need to address all of them whenever an opportunity arises. In addition,
learners should always be given an opportunity during the learning process to address
these cross cutting issues both within and out of the classroom so as to progressively
develop related attitudes and values.
Below are examples on how crosscutting issues can be addressed in PES:


I.3.3. Special educational needs
Learners or people with disabilities did not always have equal opportunities in society.
As far as games and sports are concerned, these learners are often relegated to
the passive role of spectators rather than players. Currently we are convinced that
games and sports are very beneficial to people with physical, mental, emotional and
psychological disabilities.
What attitude to adopt?
To promote the integration of learners with disabilities during recreational and sports
activities, the following tips may help teachers / educators in the training of these
learners:
• Adopt an approach of sport and game which is based on skills, you focus on what
learners are capable of doing. In this respect, you can introduce small changes in
games and activities for learners with disabilities;
• Be relaxed and natural when you are with people with disabilities. Do not treat them as if they need your pity or your charity. Do not think they necessarily need
help. Let them do and say things themselves;
• Avoid keeping learners living with disabilities out of the game: in a regular class,
let them participate in other’s games. However, avoid being too demanding
about the level of their performance.
What can we modify?
Within the framework of integration of learners in games, according to the nature and
the gravity of impairment, learners can, in some cases, participate in games designed
for all learners. In other cases, the teacher or educator should think about changes
he/she can make to meet the special needs of learners he/she has in the group. He/
she should also think about adaptation of the game, the playground, equipment and
duration of the game.
Below are some examples of adaptation to initiate:
Adapt roles and rules
• Make the game easier or harder by changing some rules;
• Let learners play different roles and in different positions;
• Allow players to play in different ways, for example, sitting instead of standing;
• Simplify expectations of the game;
• Simplify instructions.
Adapt the playground
• Change the size of the playground. Enlarge or reduce the playground ;
• Change the distance: for example, put a target closer;
• Change the height of a target;
• Allow more or less space between players;
• Let learners move from different spaces.
Adapt the materials
• Reduce the size or weight of materials;
• Choose balls of various textures, bright colours or balls which make noise.
Adapt the duration of the activity
Reduce or extend the time allotted to the activity.
Aspects to consider when you want to modify an activity.
Ask yourself the following questions:
• Does the modification damage the activity? This should not be the case;
• Does the modification correspond to the ability and duration of learners’
attention?
• Will the learner with disability be able to play with others?
• Is the activity proportional to ages of participants?
• Does the activity respond to the needs of all participants?
Strategies to help learners with physical disabilities or mobility
difficulties:• Adapt activities so that students who use wheelchairs or other mobility aids, or
other students, who have difficulty moving, can participate.
• Ask for adaptation of furniture – e.g. the height of a table may need to be changed
to make it easier for a student to reach it or fit their legs or wheelchair under.
• Encourage peer support between students.
• Get advice from parents or a health professional about assistive devices.
Strategies to help learners with hearing disabilities or communication
difficulties• Always get the student’s attention before you begin to speak.
• Encourage the student to look at your face.
• Use gestures, body language and facial expressions.
• Use pictures and objects as much as possible.
• Ask the parents/caregivers to show you the signs they use at home for
communication – use the same signs yourself and encourage other students to
also use them.
• Keep background noise to a minimum.
Strategies to help learners with visual disabilities
• Help students to use their other senses (hearing, touch, smell and taste) to play
and carry out activities that will promote their learning and development.
• Use simple, clear and consistent language.
• Use tactile objects to help explain a concept.
• If the student has some sight, ask them what they can see. Get information from
parents/caregivers on how the student manages their remaining sight at home.
• Make sure the student has a group of friends who are helpful and who allow the
student to be as independent as possible.
• Plan activities so that students work in pairs or groups whenever possible.
I.3.4. Guidance on assessment
Assessment in PE must be a continuing process that arises out of interaction during
teaching and learning process. It includes lesson evaluation during R-C-A after each
session and end of unit assessment. This formative assessment should play a big role
in teaching and learning process. The teacher should encourage individual, peer and
group evaluation of the activity done.
In this step the teacher sets exercises to assess abilities, skills, knowledge and attitudes
of individual learner basing on unit or lesson objectives. During assessment activity,
learners perform exercises individually or work in teams. The teacher avoids intervening
directly. In fact, results from this assessment inform the teacher on next steps for the
whole class and individuals. In some cases the teacher can end up with giving remedial
and extra activities.
I.3.5. Teaching methods and techniques
A. Suitable Methods / techniques to teach PESPhysical Education and Sports is taught in the class rooms (e.g. using a projector and
videos to teach steps of performing a technique, a system of game play, using a chalk
board to teach rules of the game… ), in the play fields/courts ,in the gymnasiums, in the
tracks and fields and in the swimming pools.
Teaching methods include:
• Demonstration method: A teacher makes him/herself a demonstration or asks a
learner to do a demonstration. It is advised not to do a demonstration if you are
not sure to do it better than every individual learner.
• Verbal Explanation: A teacher describes/explains activities he/she want learners
to perform.
• Practice session: Learners are given time to practice exercises intended to develop the desired skills.
• Supervision: During a PE lesson the teacher plays a role of supervision where he/
she must move around in field and make corrections for individual learner during
exercises.
• Correction: Corrections are done starting by group correction to individual
correction. Corrections for inaccuracy in performing given techniques are done
immediately.
• Evaluation: Let learners do their own evaluation for each other, then help them
by giving some advice using encouraging words. Evaluation is a continued activity
throughout the physical exercises.
• Discussion: Discussions are used before and after teaching and learning activities
in open talks to motivate and develop attitude and values in learners
• Application: Use of learnt physical education and sport skills in different situations
to solve a given problem.
• Videos and Pictures: Use of videos, show clearly a given tasks.
Physical education in small schools or schools with limited facilities
• Where schools have specific problems related to a lack of indoor and outdoor
space, consideration might be given to:
• The use of the classrooms, corridors and school grounds for orienteering exercises
• The provision of markings on the playground for athletic activities and smallsided games
• The use of local facilities, e.g. community centers, parish halls, youth clubs,
colleges, higher learning institutions etc.
• Co-operation with other primary or secondary schools in sharing facilities
• Allocating more time to physical education in good weather
• Visiting an outdoor education centre providing facilities for many worthwhile
activities.
B. Steps of a Physical Education lesson
A physical education and sports lesson using play-based approach follows these steps:
Opening discussions; warm-up activities; main activity or game itself; cool down and
final discussions focusing on reflect, connect and apply
Introduction
Step 1: Opening discussions
The opening discussions prepare learners for the learning experience. Discussions
encourage them to think about the learning objective of the play. Opening discussions
include 1 to 2 quick questions to stimulate learners’ curiosity and engagement.
Strategies for good discussions:
• Set appropriate arrangement for good discussions: e.g. semi-circle, circle,
U-shape
• Set ground rules which create a safe atmosphere for learners
• Prepare learners for discussions
• Ensure interactive and inclusive discussions
• Acknowledge each learner’s contribution
• Ensure classroom management and control
Step 2: Warm-up activities
A warm-up is performed before a game/play. It helps the body activation and prepare
itself for a physical exercise and reduces the chance of injury. The warm-up should be a
combination of rhythmic exercise which begins to raise the heart rate and raise muscle
temperature, and static stretching through a full range of motion.
Lesson Development
This has two steps(step3,4) as follow:
Step 3: Main activity or game itself
A game/play is chosen according to the age of learners and skills you want to develop.
Adapt the games to the differences among learners.
Step 4: Cool down
A cool down activity is an easy exercise that allows the body to gradually transition to
a resting or near-resting state.
Assessment
Assessment in PE lesson is done when learners are performing exercises/activities/
games. At this level, through the R-C-A discussions the teacher allows learners to do
their self evaluation and provide the feed-back.
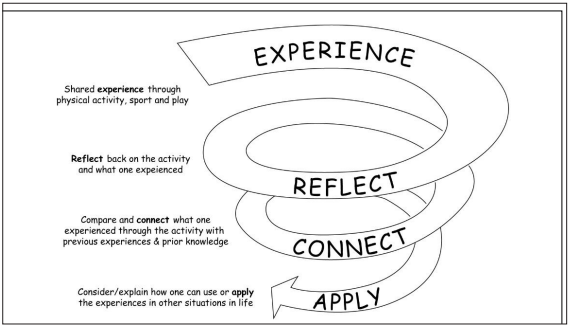
Step 5: R-C-A discussions Reflect-Connect-Apply is a teaching and learning
strategy that leads learners through a 3-step discussion about their experience:
• Reflect on the game/play. The teacher asks questions about their experience and
feelings during the game. Examples: What was interesting? What was easy? What
was challenging? What strategies have you used to win? How did you feel in case
of success or failure?
• Connect to life experiences and lesson content. The teacher asks questions like:
How does this game connect to what you already know, believe or feel? Does it
reinforce or expand your view? The teacher also asks questions that connect the
game to lesson content
• Apply acquired experience to another situation. The teacher asks questions like,
“How could you use what you have learned from this experience? How could you
use your new learning to benefit yourself, others, your community?” Learning is
transferred and applied.
RCA is based on the work of educationalists such as Freire, Brown, Piaget, Brantford
and others who support the concept of an educational process that is active, relevant,
reflective, collaborative and applied, and has its roots in experiential learning theory
(Kolb, 1984).
Play-based learning technique is closely linked to the Experiential Learning Cycle. It
starts with a game or play-based activity and ends with a closing Reflect, Connect and
Apply (RCA) discussion linked to the subject matter.
PART II. SAMPLE LESSON PLAN


 File: 1
UNIT 1: PHYSICAL CONDITIONING
1.1 Key unit competence
Perform muscular exercises and gymnastic movement with agility and flexibility.
1.2. Prerequisite knowledge and skills
Learners of senior three will learn better physical conditioning if they can perform
muscular and different gymnastic exercises with agility and flexibility.
1.3. Cross- cutting issues to be addressed
Gender Education
In teaching and learning process, the teacher must prepare and provide physical
activities that engage both girls and boys equally to exploit their full potential and
talents without any discrimination or prejudice.
Inclusive education
The teacher as a facilitator must consider different special education needs and select
activities to adapt his teaching approaches to learners. This creates a positive attitude
and helps all learners to participate actively and develop their competence levels.
Financial education
The teacher should integrate Financial Education into his teaching/learning activity by
providing the local and no cost teaching material where possible. He must encourage
learners to make their own materials that can help them to develop competences not
only in sport but also in their life.
Standardization culture
The teacher must select the standardized materials to use in his teaching/learning
process. It is necessary to provide appropriate materials required to the levels of
learners and help them to develop culture of checking the quality of sport materials
before their use to prevent injuries and other accident.
Environment and sustainability
The teacher should provide materials and deliver the lesson by encouraging learners
to protect the environment and proper use of materials. The teacher helps them to
develop fair play avoiding violence in the game.
Peace and values education
The teacher helps learners to develop fair play and avoiding violence and conflict in the
game by setting clear and relevant instructions. He should provide the activities that
help learners to develop their competence peacefully.
Comprehensive sexuality education
A teacher provides physical activities and sets instructions that prevent sexual
harassment, any kind of gender based violence like sexual abuse and “bad touches”.
1.4. List of lessons and assessment
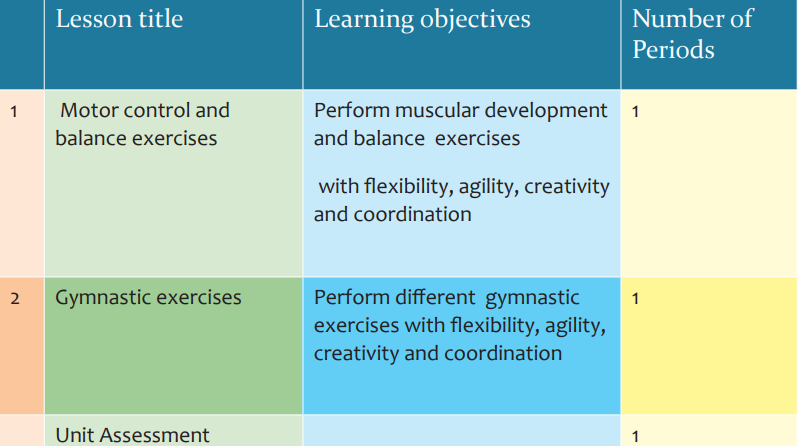
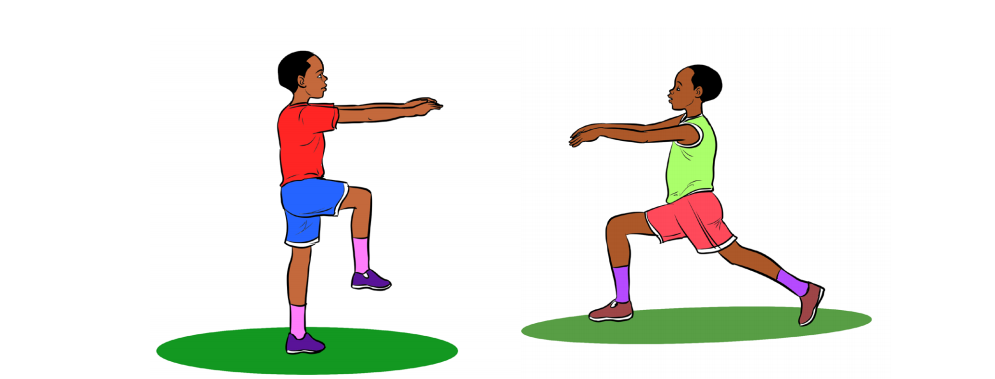
Lesson 1: Motor control and balance exercises
a. Prerequisites
Learners of senior three will learn better motor control and balance exercises if they
can execute muscular development exercises, create physical exercises and explain the
importance of physical exercises to the body.
b. Teaching resources
Playground, whistle, rope, stick, mat
c. Introduction
Opening discussions
Ask questions related to physical and muscular development exercises based on motor
control and balance.
Example of questions
What sports do you like to practice?
What is the importance of motor exercises?
Why is it necessary to do body balance exercises?
What are other reasons of motor development?
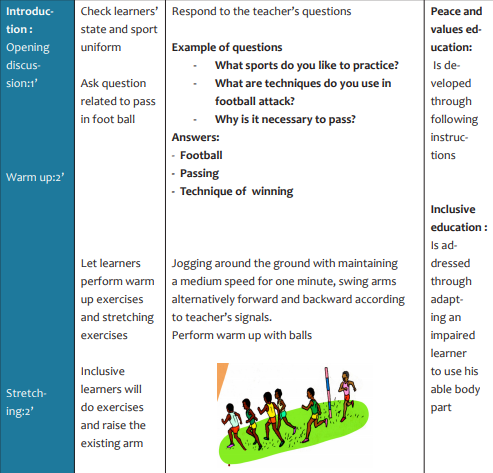
Warm-up activities
Organizing learners and telling them to perform exercises of activating the body by
jogging around the ground with different speed, jump, swing the arms alternatively
forward and backward, clap hands, roll and throw with or without the ball, specifically
according to the lesson and teacher’s instructions. Let one of learners to lead stretching
exercise systematically according to the target.

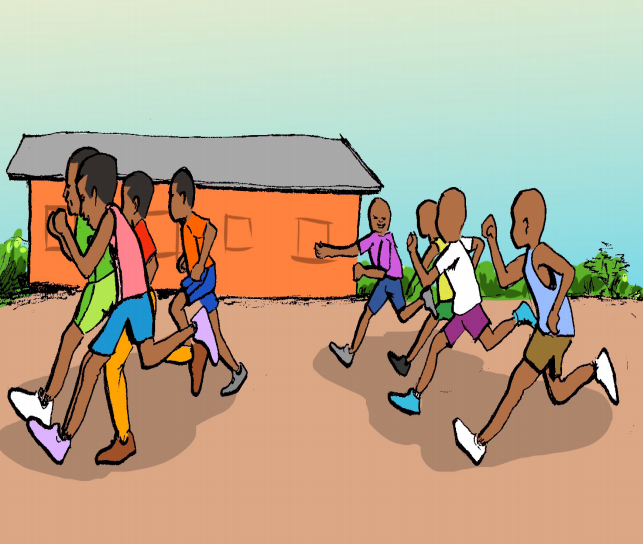
Learners are performing warm up exercises
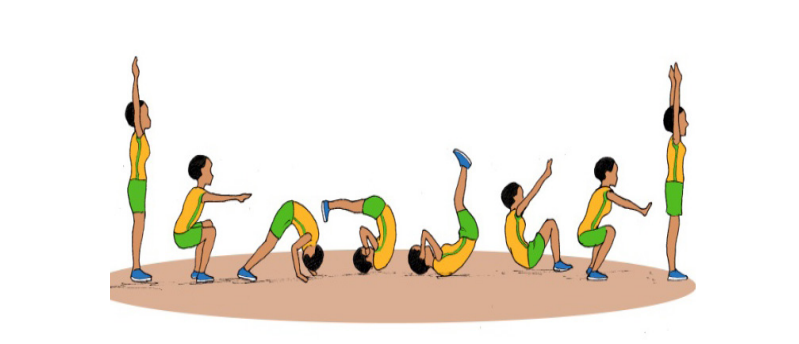
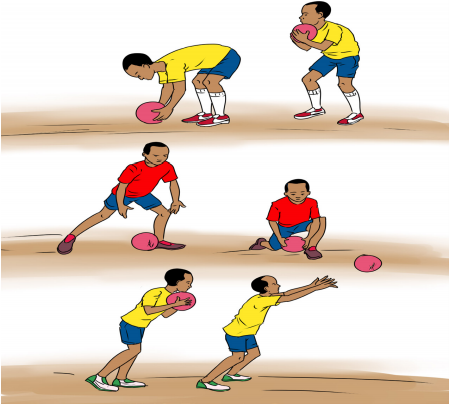
d. Lesson development
Motor control and balance exercises include balance techniques, jumping rope, push
up, suppleness and dancing techniques.
For each technique :
• Show learners how to execute the basic skills
• Let learners to practice based on instructions, materials and provide necessary
support
Balance technique
• Standing on one leg while arms are opened at 90 degrees
• Changing the leg after 10 seconds
• Stand in bending position while arms are joined straightly in front direction
• Keep free leg straightly in backward position.
• Stand on one leg while arms are joined upward
• Keep the free leg in front direction makes 90 degrees
• Changing the leg after 10 seconds.

Jumping rope technique
• Organizing learners in rows with ropes
• Moving forward while jumping the ropes passed over the head
• Increase speed according to teacher’s signals on a distance of 50 meters and turn

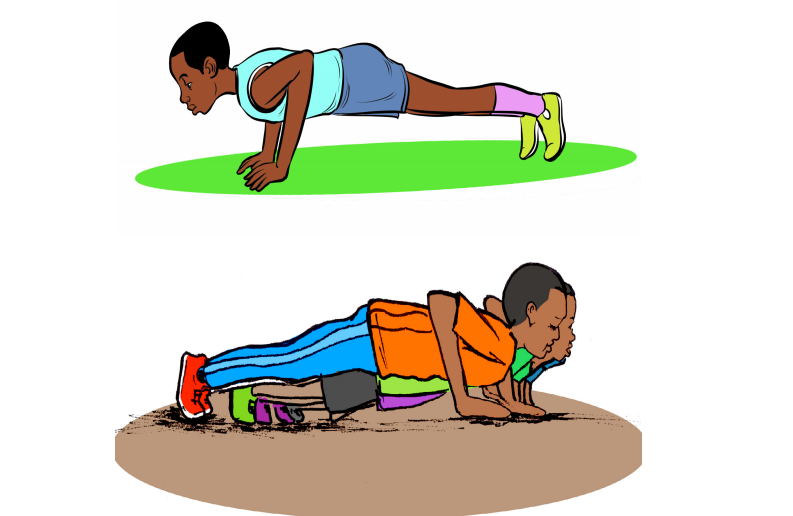
Push up technique
• Organizing learners in distant rows
• Lie on ventral position
• Put palms on the flow
• Maintain the position while arms are straight and lift their body and balance on
palms
• Bend the elbows and lowering the entire body until upper arms are parallel to
the floor
• Push back-up
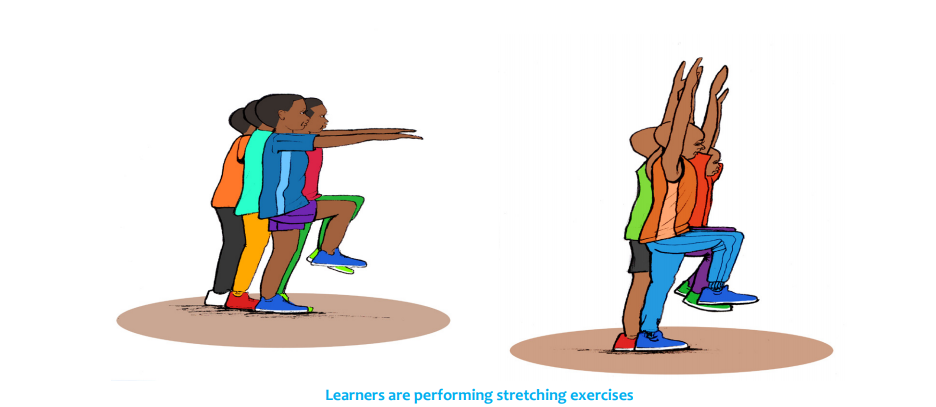
Suppleness technique
• Tell learners to perform stretching exercises focusing on different parts of the
body. Cervical, pelvic, scapular, thoracic areas, abdomen, upper and lower limbs
to develop suppleness.
• Tell learners to perform exercises of balancing by standing on one leg while arms
are opened at 90 degrees and change the leg after 10 seconds.
• Tell learners to perform exercises of balancing by extending legs while arms are
opened at 90 degrees and keeping head up.
• Tell learners to make flexion of legs and decrease angles’ size according to
teacher’s signals.
• Tell learners to make flexion of left leg while the right one is opened straightly
and change the side according to teacher’s signals.
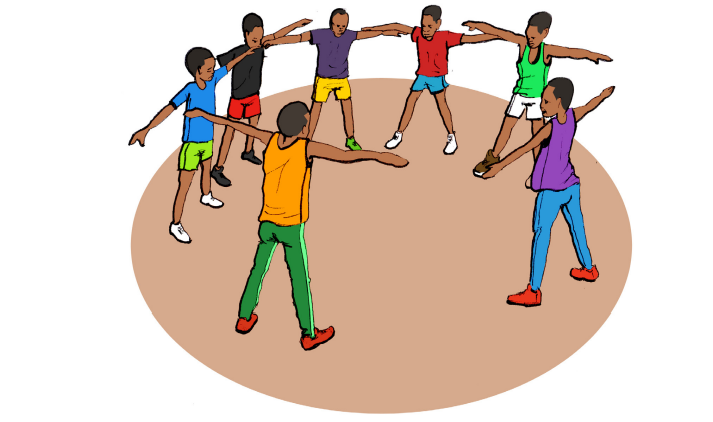
Dancing technique
• Organizing learners in rows
• Tell learners to listen to traditional and modern dances using selected music
using radio
• Tell learners to make movement following the rhythm of the song
• Tell learners to perform traditional and modern dances using selected music and
make more repetitions
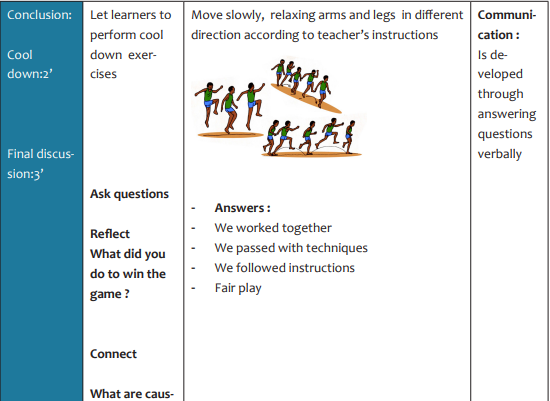
Cool-down activities
March on the ground while arms are relaxing and moving in different directions,
swing the arms forward and backward, clap hands, jog, stretch, jump change activity
according to teacher’s signals.
E. Assessment
Final discussionReflect
• What are challenges/ advantages to perform motor control and balance exercises?
• How did you proceed to achieve physical and muscular development exercises?
Connect
• What are other conditions do you need physical and muscular work?
• What are other conditions do you need suppleness and balance?
Apply
• How will you use suppleness and balance in your daily life?
• How will you perform physical and muscular activity in your daily life?
Lesson 2: Gymnastic exercises
a. Prerequisites
Learners of senior three will learn better gymnastic exercises if they can carry out
different gymnastic exercises on ground and with apparatus, demonstrate the best
way of making gymnastic movements, identify gymnastic exercises and describe their
movement’s actions.
b. Teaching resource
Playground, whistle, tree, balls, circle, clubs, ribbon, mats, parallel and horizontal bars,
gymnasium.
c. Introduction
Opening discussions
Ask questions related to gymnastic exercises and their importance to the body
Example of questions
What sport do you like to practice?
What is the importance of gymnastic exercises?
Why is it necessary to perform gymnastic exercises?
What are other reasons of using gymnastic exercises?
Warm-up activities
Let learners perform warm up exercises and stretch their body parts specifically refer
to stretching of lesson one
d. Lesson development
Gymnastic exercises comprise rolling forward and backwards techniques.
For each technique:
• Show learners how to execute the basic skills.
• Let learners to practice based on instructions, materials and provide necessary
support.
Technique 1: Rolling backward
1. Stand: stand up with legs and back straight, hands at your sides
2. Crouch: crouch down onto your knees
3. Begin to roll. Roll backward onto your back
4. Gather your legs. Put your hands just below your hips t hold your legs up into the
air.
5. Flop your legs down
6. Stand up
Increasing the number of repetitions one after another,

Technique 2: Rolling forward
1. Stand: stand up with legs and back straight, hands at your sides
2. Crouch: crouch down onto your knees
3. Begin to roll. Roll forward onto your back
4. Gather your legs. Put your hands just below your hips to hold your legs up into
the air.
5. Flop your legs down
6. Stand up
Increasing the number of repetitions one after another
Cool-down activities
Tell learners to march on the ground while arms are relaxing and moving in different
directions of the ground and clap twice according to teacher’s signals.
e. Assessment
Final discussion
Reflect• What are challenges/ advantages to perform gymnastic exercises?
• How did you proceed to achieve rolling exercises?
Connect
• What are other conditions do you need to roll?
Apply
• What is the usefulness of rolling in your daily life?
• How will you use rolling in your daily life?
1.5. Additional information for teachers
Provide and select all needed materials to facilitate learners to improve their
competence’s level
Check the use of those materials and experiment before being presented to learners
Make a serious research to provide a quality and relevant physical exercise in the safe
environment
Let learners perform exercises systematically from simple to complex and use materials
where it is necessary according to the specific lesson needs.
Organize learners to perform adequate static /dynamic stretching exercises.
1.6. End unit assessment
Perform muscular and gymnastic exercises of balance, jumping, push up, dancing,
suppleness and rolling technically with flexibility and agility.
1.7. Additional activities
• Frequent physical conditioning exercises of balance, jumping, push up, dancing,
suppleness and rolling technically.
• Regular practices in groups to help each other’s performance.
UNIT 3: FOOTBALL
3.1. Key unit competence
After this unit, learners will be able to refine defensive and offensive strategies and
techniques used in football and adhere to rules of the game.
3.2. Prerequisite knowledge and skills
Learners of senior three will learn better football if they can apply various defensive
and offensive strategies and techniques during a football game, express the role of
playing as a team member and apply rules of the game.
3.3. Cross- cutting issues to be addressed
Gender educationIn teaching and learning process, prepare and provide physical activities that engage
both girls and boys equally to exploit their full potential and talents without any
discrimination or prejudice.
Inclusive education
Consider different special education needs and select activities to adapt teaching
approaches to learners. This creates a positive attitude and helps all learners to
participate actively and develop their competence levels.
Financial education
Provide local and no cost teaching material where possible. Encourage learners to make
their own materials that can help them to develop competences not only in sports but
also in their life.
Standardization culture
Choose standardized materials to be used in teaching/learning process. It is necessary
to provide appropriate materials required to the levels of learners and help them to
develop culture of checking quality of sport materials before their use to prevent
injuries and other accident.
Environment and sustainability
Encourage learners to protect the environment and well use of materials. Help them to
develop fair play and avoid violence in their games
Peace and values education
Help learners to avoid conflicts in their games by setting clear and relevant instructions
Provide activities that help learners to develop their competence peacefully
Comprehensive sexuality education
Provide physical activities by setting instructions that prevent sexual harassment and
any kind of gender based violence like sexual abuse and “bad touches”
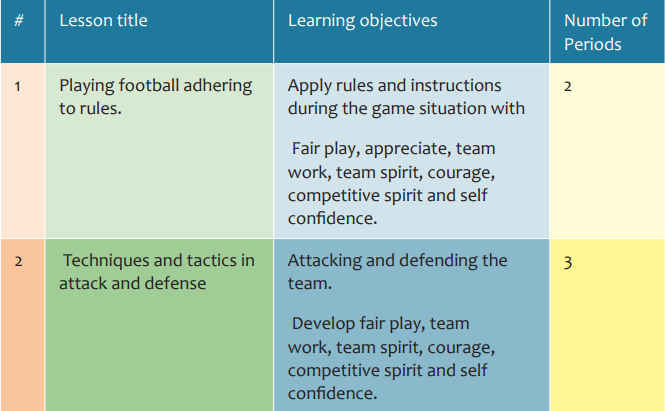
3.4.List of lessons and assessment

Lesson 1: Playing football adhering to rules
a. Prerequisites
Learners of senior three will learn better playing football if they can interpret rules of
the game.
b. Teaching resources
Playground, balls, whistle, cones, equipment, chasubles, goalposts.
c. Introduction
Opening discussions
The teacher asks questions related to football game and its rules explain their
importance to the body and to society.
Warm-up activities
Tell learners to make four lines and perform exercises of activating the body by jogging
around the ground with maintaining a medium speed.
Warming up with a ball in groups. Ask one of them to lead stretching exercises.
d. Lesson development
This lesson of playing football adhering to rules comprises the reminding to rules and
football techniques in a game situation
For each technique:
• Show learners how to execute the basic skills
• Let learners to practice based on instructions, materials and provide necessary
support.
• Control how learners perform the playing techniques adhering to rules.
Reminding football rules
• Explain rules of football that can be followed during a game situation by describing
different sizes of the ball based on age of players.
• Describe the measurement of the playing field and the number of players
• Discuss the duration of the match and the number of football game officials.
• Describe the fouls and infractions that can be committed in the game and their
relative punishments or sanctions.
• Discuss on how the goal is scoring.
The game situation
Let learners play football with the adherence to rules. The teacher facilitates the game
by sharing responsibilities where two teams are playing while outfield teams judge the
progress by identifying different fouls and their penalties during the game (offside,
penalty, simulation, free kick, referees positions, assistant referees movements, how to
conduct or rise the flag). The teams exchange responsibilities accordingly.
Cool-down activities
Tell learners to march on the ground, relaxing arms and legs with moving in different
direction together and raise hands twice according to teacher’s signals.
E. Assessment
Final discussion
Reflect
What did you do to win the match exercises?
Connect
What are other conditions that engage you to respect rules or instructions?
Apply
How will you use rules in your daily life?
Lesson 2: Techniques and tactics in attack and defense
a. PrerequisitesLearners of senior three will learn better techniques and tactics in attack and defense if
they can play football game
b. Teaching resources
Playground, balls, whistle, cones, equipment, chasubles, goalposts
c. Introduction
Opening discussions
Ask questions related to techniques and tactics of playing football and explain their
importance in the game.
Warm-up activities
Tell learners to make four lines and perform exercises of activating the body by jogging
around the ground with maintaining a medium speed. Warming up with balls in groups.
Ask one of them to lead stretching exercises.
d. Lesson development
This lesson comprises techniques and tactics in attack and defense.
For each technique and tactic:
• Show learners how to execute the basic skills;
• Let learners to practice based on instructions, materials and provide necessary
support;
• Control how learners perform attack and defense with techniques;
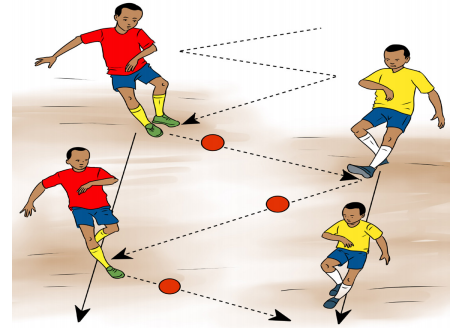
Techniques of attack
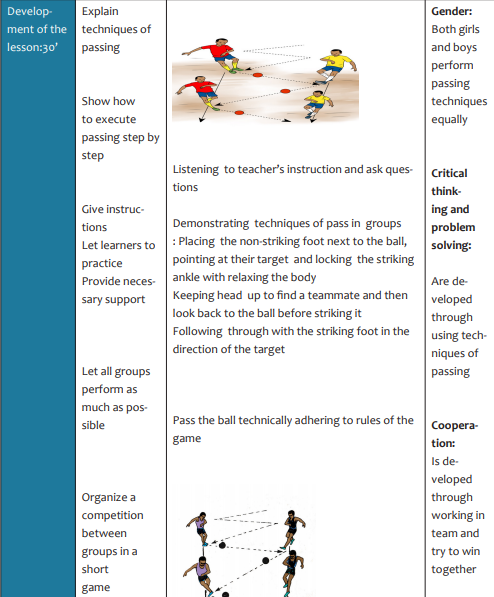
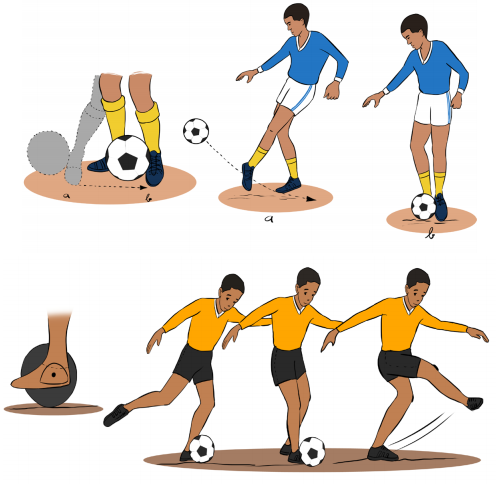
1. Passing techniques
• Placing the non-striking foot next to the ball, pointing at their target and locking
the striking ankle with relaxing the body;
• Keeping head up to find a teammate and then look back to the ball before
striking it;
• Following through with the striking foot in the direction of the target;

2. Techniques of controlling the ball
• Keeping the head relaxed and watch the ball carefully to judge its speed and
height.
• Moving both feet quickly while the body is in front of the ball regularly.
• Deciding early the body part that will control the ball and relax it.
• Cushioning the ball by withdrawing the body part controlling the ball and keep
it close to the body after controlling.

3. Shooting techniques
• Keep eyes on the ball and head up to focus the target then look back to the ball
before shooting.
• Approach the ball slightly from the side and place the non-striking foot directly
to the side of the ball.
• Strike the centre of the ball for rising it too high and keep the upper body still
and strike through the ball.
4.Heading techniques
• Taking position by placing both feet in a balanced position, with knees bent and
weight centered.
• Keeping the eyes open and focus until the contact of the ball
• Keeping the upper body straight, neck and back muscles braced and close the
mouth
• Moving the head back slightly to reach forward with the hands at chest height.
• Releasing the stored power into the ball and pull the hands back to the chest as
in a quick rowing movement with thrusting the head forward.
• Striking the ball with the forehead, between eyebrows and hair line.
• Following through toward the target.

5. Dribbling techniques
• Taking short steps to drive the ball with the inside, outside or instep of the foot
• Alternating feet and keep the ball close to the body.
• Making the awareness with the ball, the space on the field and any defender

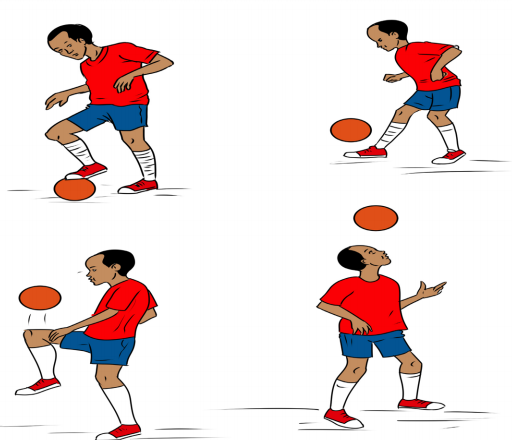
Controlling and dribbling the ball with different body parts
Techniques of defense
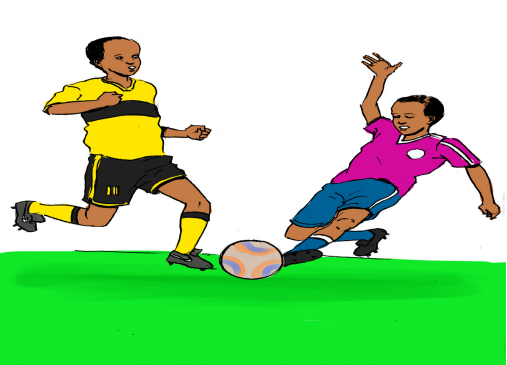
1. Tackling techniques
• Place the non-striking foot directly next to the ball and lock the ankle joint of the
tackling foot.
• Bend the knees slightly to take the force of tackling and lean the head and body over the ball.
• Tighten the upper body by clenching hands and contact the centre of the ball
with the inside of the foot before the opponent contact
• Win the duel on the midfield and pressuring the opponents to make mistakes
• Intercept the ball towards the opponent according to its speed
• Tackle the ball based on game rules and regulations
• Kick the ball using the regular body parts to defend the goal
2. Goal keeping techniques
• Defending the opponent’s high cross and stopping shots
• Defending the one on one in the game situation
• Keeping eyes on the opponent penalties’ shooter to discover the direction of the
ball headed
• Manifesting developed reflexes and agility in the game

Different ways of catching and controlling the ball
Tactics
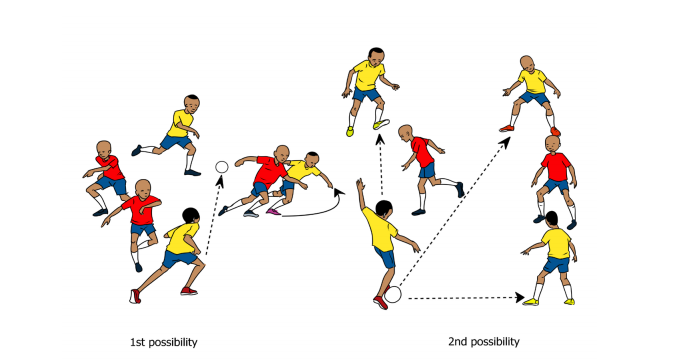
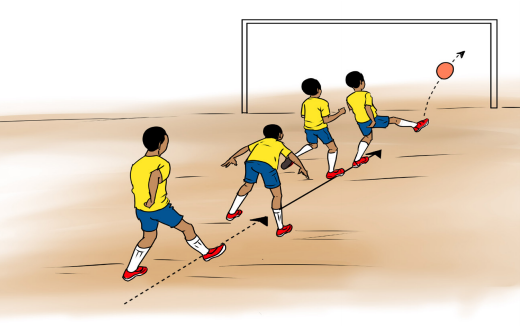
1. Counter - attack technique• Quickly running with the ball for unbalancing the opponent’s defense.
• Executing a long and deep pass to the front attacker.
• Timing the reception and control the ball to ensure the quick game .
• Shooting on finishing to score the goal

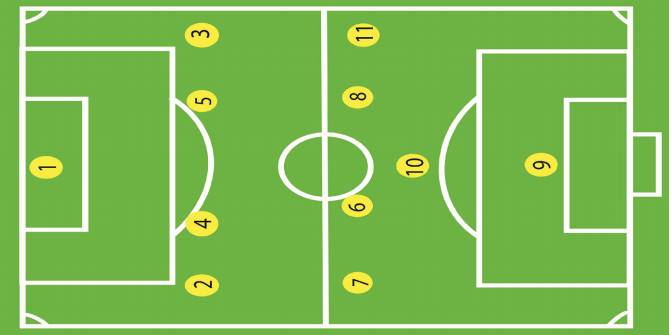
2. The team formations
Introducing the attacking or defensive style they wish to play for winning the game
Describing the 4-4-2 positions of players on the field
The 4-4-2 formation is the most famous and widely used in Football. It gives a team
the most balance. It means that a team has four defenders, four midfielders and two
attackers. It is a very solid formation. The defenders are protecting the goalkeeper and
supporting the rest of the team. The midfielders are supporting the defenders and
attackers. It can easily be adapted into a 4-3-3, 3-5-2 or 5-3-2 formation.
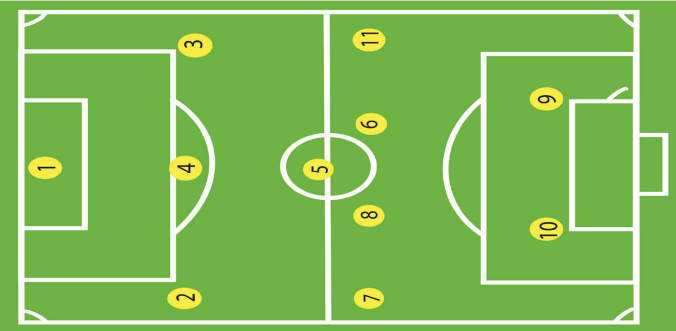
Describing the 4-3-3 positions of players on the field
The attacking formation 4-3-3 allows a team to have three attackers while still having
a strong midfield and defense. The midfielders must work harder. But it gives a team
the opportunity to pass the ball wide instead of going through the centre. One or two
attackers usually play just behind the main forward to help support the midfield and collect the ball. The 4-3-3 can easily switch back to a 4-4-2 formation.

Describing the 4-4-1-1 positions of players on the field
Similar to the 4-4-2, the second attacker plays just behind the main forward and links up
with the midfield. This variation causes problems for the opposing defense. The second
attacker is harder to mark because she/he is free to move anywhere on the field in an
attacking position. This player is usually the most creative on a team.
Describing the 4-5-1 positions of players on the field
The 4-5-1 formation is becoming more popular in world football. It is a solid defensive
strategy because at times 10 players will be behind the ball. It is used by teams against
very strong opponents to reduce scoring chances. It is a good formation for keeping
possession and breaking down an attack. But it is not good for creating goal-scoring
opportunities because the single attacker is alone and unsupported.
Describing the 3-4-3 positions of players on the field
The 3-4-3 is a strong attacking formation. A third attacking midfielder plays just behind
the two forwards and links up with the midfield. A more defensive midfielder will play in
front of the defenders to support them when the team does not have the ball.
Describing the 4-3-2-1 positions of players on the field
The 4-3-2-1, or Christmas tree formation, is similar to the popular 4-4-2 and 4-5-1
formations. A single forward is supported by two attackers who link up with the
midfield. It is a strong attacking formation. It is used by teams who have good, creative
players and hard working midfielders.
Cool-down activities
Telling learners to march on the ground relaxing arms and legs with moving in different
direction together and raise hands according to teacher’s signals.
e. Assessment
Final discussion
Reflect:
What did you do to achieve attacking and defending techniques?
Connect
What are other conditions that engage you to use techniques?
What are other conditions in that you need referees?
Apply
How will you serve the society as referee?
How will you use techniques in your daily life?
Lesson 3: Fouls and their sanctions during the game
a. PrerequisitesLearners of senior three will learn better fouls and their penalties if they can play
football game and identify fouls and penalties.
b. Teaching resources
Play ground, balls, whistle, cones, equipment, chasubles (pinny), goals, yellow card, red
card, FIFA rule book.
c. Introduction
Opening discussions
Asks questions related to fouls and their penalties sanctions that can be committed by
football players in a game.
Warm-up activities
Let learners make two rows and perform exercises of activating the body by jogging
around the ground with maintaining a medium speed. Warm up with balls in groups.
Ask one of them to lead stretching exercises.
d. Lesson development
This lesson comprises football fouls and their penalties
For each foul
Explain learners how it can be committed and its relative sanction.
Fouls and their sanctions during a football game
1. Fouls that merit direct free kick
• charges;
• jumps at ;
• kicks or attempts to kick;
• pushes ;
• strikes or attempts to strike (including head-butt) ;
• tackles or challenges;
• trips or attempts to trip
If an offence involves contact it is penalized by a direct free kick or penalty kick;
Careless is when a player shows a lack of attention or consideration when making a
challenge or acts without precaution. No disciplinary sanction is needed;
Reckless is when a player acts with disregard to the danger to, or consequences for, an
opponent and must be cautioned;
Using excessive force is when a player exceeds the necessary use.
A direct free kick is awarded if a player commits any of the following offences:
• handles the ball deliberately (except for the goalkeeper within their penalty
area);
• holds an opponent;
• impedes an opponent;
• spits an opponent.
2. Fouls that merit indirect free kick
(A yellow card is shown by the referee to indicate that a player has been officially
cautioned)
a. When a goalkeeper, inside his own penalty area:
• Controlling the ball with his hands for more than six seconds before releasing it
from his possession;
• Touching the ball again with his hands after he has released it from his possession
and before it has touched another player;
• Touching the ball with his hands after it has been deliberately kicked to him by a
teammate, or thrown to him from a throw-in (the back-pass rule).
b. When any player in the opinion of the referee:
• Playing in a dangerous manner;
• Impeding the progress of an opponent when the ball is not within playing distance
of either player;
• Preventing the goalkeeper from releasing the ball from his hands;
• Committing any other offence, not previously mentioned in Law 12, for which
play is stopped to caution or send off a player;
• Some technical breaches of the rules, such as the offside offence, result in play
being restarted with an indirect free kick, though these are not considered fouls
and will never be punished by a caution or dismissal..
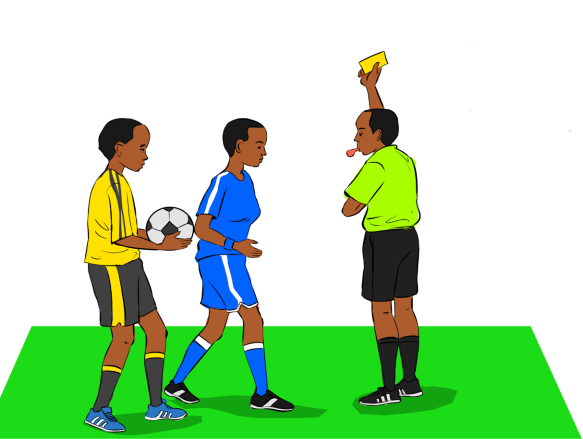
Misconduct that merits a yellow card (caution)
A player is cautioned and shown a yellow card in case of:
• Unsporting behavior;
• Dissenting by word or action;
• Persistent infringement of the Laws of the Game;
• Delaying the restart of play;
• Failing to respect the required distance (9.15m) when play is restarted with a
corner kick, throw-in or free kick;
• Entering or re-entering the field of play without the referee’s permission;
• Deliberately leaving the field of play without the referee’s permission.
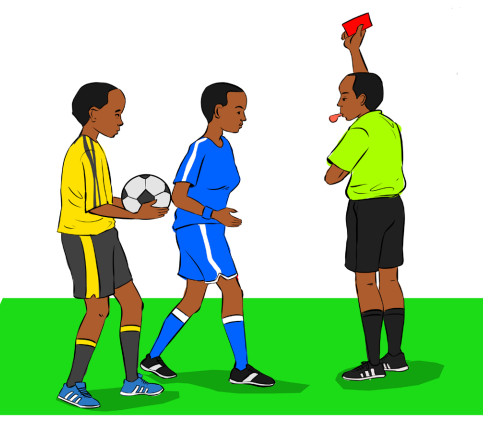
3. Fouls that merit red card (removal)
The misconduct for which a player may be sent off are:
• Serious foul play and violent conduct;
• Spitting at an opponent or any other person;
• Denying the opposing team a goal or an obvious goal scoring opportunity by
deliberately handling the ball (this does not apply to a goalkeeper within his own
penalty area);
• Denying an obvious goal scoring opportunity to an opponent moving towards
the player’s goal by an offence punishable by a free kick or a penalty kick (in 2016
it was changed to caution as long as it is not violent in nature);
• Using offensive, insulting or abusive language and/or gestures;
• Receiving a second caution in the same match.
Cool-down activities
Tell learners to march on the ground relaxing, arms and legs with moving in different
directions together and raise hands according to teacher’s signals.
e. Assessment
Final discussion
Ask questions corresponding to the lesson for developing values in learners.
Reflect:
What do you do to play a fair game?
Connect
What are other conditions that you merit sanctions/punishment?
What are other conditions in that you need referees?
Apply
How will you correct fouls and misconduct in your daily life?
How will you serve the society as referee?
3.5. Additional information for teachers
1. Referees position on the field of playThe Referee can go anywhere on the football field with keeping close to the ball for
making a quick decisions and correctly. He has two assistant referees where each one
is responsible for one end of the field. One patrols from the halfway line to one goal
line on one side of the field while the other patrols from the halfway line to the other
goal line on the opposite side of the field. The assistant referees raise a flag and decide
on corner kicks, throw-ins, the ball goes out of play, when there is an offside, a foul has
been committed that the referee has not seen.

If a player commits a direct free kick offence within his own penalty area, a penalty kick
is awarded irrespective of the position of the ball, provided the ball is in play.
2. Other offences
Not all infractions of the Laws are fouls.
Non-foul infractions may be dealt with as technical infractions (e.g. as breaching the
rules governing the restarts of play) or misconduct (these are punishable by a caution
or sending-off). Note that persistent infringement of the Laws is an offence for which
the player may be cautioned.
What constitutes caution able unsporting behavior is generally at the referee’s
discretion, though the interpretation and guidelines which accompany the Laws list
a number of examples. These include simulation intended to deceive the referee, or
attempting to score by handling the ball. Fouls which are committed recklessly or
fouls which are committed with the intention of breaking up a promising attack are
also considered unsporting behavior and punishable with a yellow card. Fouls which
are committed with excessive force, however, or which deny an obvious goal scoring
opportunity for the player fouled (i.e. a professional foul), are punishable by a red card.
A player is shown a red card to indicate his dismissal from the game. Law 12 of the Laws
of the Game lists the categories of misconduct for which a player may be sent off.
3.6 . End unit assessment
Defend and attack using strategies and techniques of football while adhering to rules
in the game situation.
Assess how learners perform techniques of attack and defense adhering to rules.
3.7. Additional activities
• Distribute balls to learners for regular familiarization with the ball;
• Competition between small groups and choose their own referees and assistant
referees ;
• Competition between classes and forming school teams and participate in
interschool competitions.
UNIT 4: VOLLEYBALL
4.2. Prerequisite knowledge and skills
Learners of senior three will learn better volleyball if they can use different defensive
and offensive volleyball techniques in various game situations, apply basic rule, state
and explain different offensive and defensive techniques and strategies.
4.3. Cross- cutting issues to be addressed
Gender education
In teaching and learning process, the teacher must prepare and provide physical
activities that engage both girls and boys to exploit their full potential and talents
without any discrimination or prejudice.
Inclusive education
The teacher as a facilitator, he/she must consider different special education needs and
select activities to adapt his teaching approaches to learners. This creates a positive
attitude and helps all learners to participate actively and develop their competence
levels.
Financial education
The teacher should integrate Financial Education into his teaching/learning activity by
providing the local and no cost teaching material where possible. He must encourage
learners to make their own materials that can help them to develop competences not
only in sport but also in their life.
Standardization culture
The teacher must choose and select the standardized materials to use in his teaching/
learning process .It is necessary to provide appropriate materials required to the levels
of learners and help them to develop culture of checking the quality of sport materials
before their use to prevent injuries and other accident.
Environment and sustainability
The teacher should provide materials and deliver the lesson with encouraging learners
to protect the environment and well use of materials.
Peace and values education
Help learners to develop fair play and avoid violence and conflict in the game by setting
clear and relevant instructions. Provide the activities that help learners to develop
their competence peacefully. The teacher helps them to develop fair play and avoiding
violence in the game.
Comprehensive sexuality education
Provide physical activities and set instructions that prevent sexual harassment, any kind
of gender based violence like sexual abuse and “bad touches.”
4.4. List of lessons and assessment
Lesson 1: Volleyball techniques and tactics in attack
a. Prerequisites
Learners of senior three will learn better volleyball techniques and tactics in attack if
they can play volley ball.
b. Teaching resources
Playground, balls, whistle, cones, equipment, chasuble (pinny), net, rope and trees.
c. Introduction
Opening discussions
Ask questions related to volleyball techniques and tactics in attack and their importance.
Warm-up activities
Let learners to make two rows and perform exercises of activating the body by jogging
around the ground with maintaining a medium speed. Warming up specifically with
balls in groups. Ask one of learners to lead systematic stretching exercises.
d. Lesson development
This lesson comprises techniques and tactics of attack in volleyball.
For each technique and tactic:
• Show learners how to execute the basic skills;
• Let learners to practice based on instructions, materials and provide necessary
support;
• Control how learners perform attack with techniques.
Techniques of attack in position 4
• Attacking with precise of line attack according to the long pass ;
• Attacking with correct diagonal attack according to the long pass;
• Attacking with precise end line attack according to the long pass.

Techniques of attack in position 3
• Attacking with precise of line attack according to the short pass;
• Attacking with correct diagonal attack according to the short pass ;
• Attacking with precise of end line attack according to the short pass.
Techniques of attack in position 2
• Attacking with precise of line attack according to the medium pass
• Attacking with correct diagonal attack according to the medium pass
• Attacking with precise of end line attack according to the medium pass

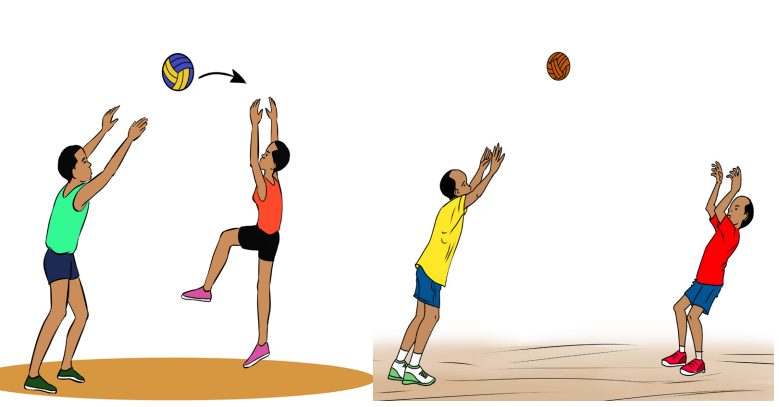
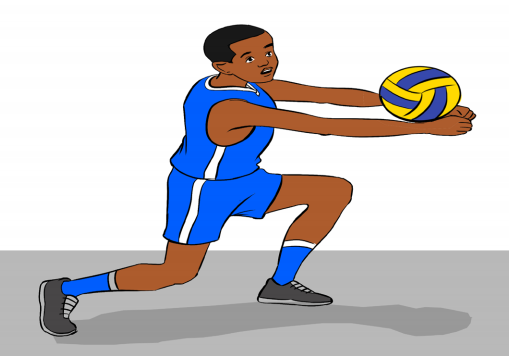
Techniques of passing the ball
1. Overhead pass
• Positioning legs on court according the teammate positions;
• Positioning hands and shoulders according to the height of the ball;
• Passing the ball according to the desired direction and distance ;
• Following through and holding position according to the target .
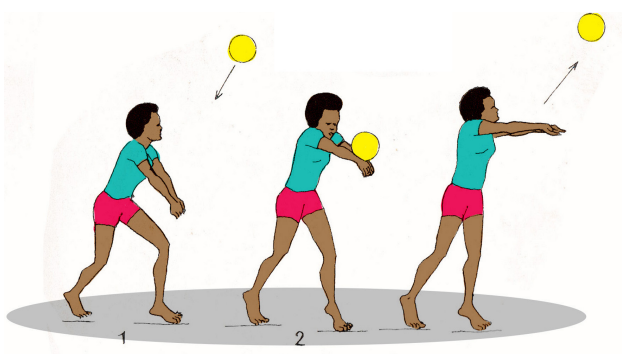
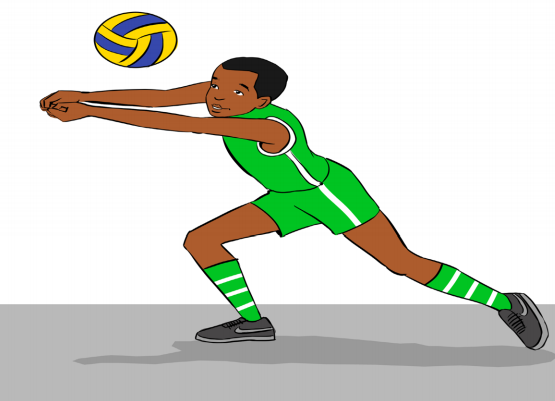
2. Forearm pass
• Positioning legs according to the ball trajectory and desired direction ;
• Positioning arms and shoulders according to the ball trajectory and desired
direction;
• Passing the ball according to the blocking and attacking side ;
• Following through the ball according to the target.
3. Set pass
• Positioning the body on court according to the net set up;
• Orientating the ball according to the attacker position ;
• Contacting the ball according volley ball rules and regulations .
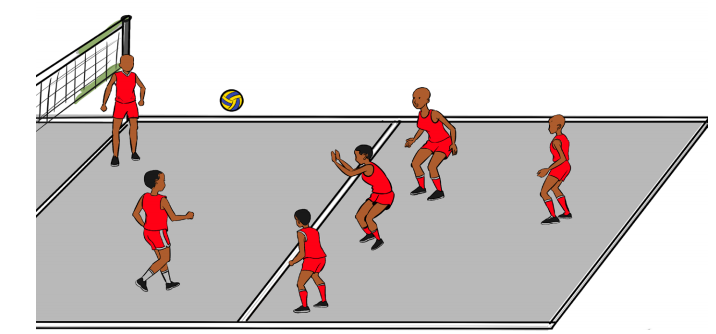
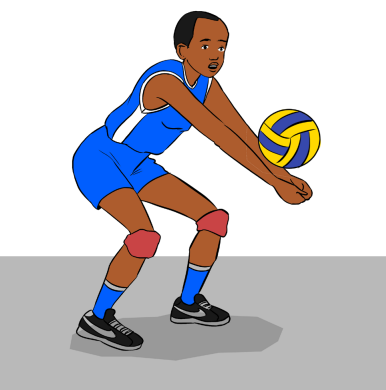
Tactics of receiving the ball
1. Receiving the ball with forearm right side
• Receiving the ball with forearm right side according to the attack situation;
• Receiving the ball systematically with forearm right side according to the service;
• Receiving the ball correctly with right forearm according to the ball orientation .
2. Receiving the ball with forearm left side
• Receiving the ball with forearm left side according to the attack situation ;
• Receiving the ball systematically with forearm left side according to the service;
• Receiving the ball correctly with left forearm according to the ball orientation .
3. Receiving the ball with forearm front forward
• Receiving the ball with forearm front side according to the attack situation;
• Receiving the ball with systematically with forearm front side according to the
service;
• Receiving the ball correctly with front forearm according to the ball orientation.
Techniques of simple underhand service
• Positioning feet together;
• Step the left foot forward to begin;
• Shift body weight from front leg to back leg;
• Hold ball in left hand, out in front of striking hand;
• Bend slightly at the elbow and waist;
• Hold striking hand in a fist position forearm turned upward or to the side;
• Bring the striking hand back and then quickly forward to serve the ball;
• Follow through but the striking arm does not cross in front of body.

Technique of simple floater serve
• Positioning the body for ball set up according the requirements of the floater
serve techniques;
• Tossing and contacting the ball with the serving arm according to the height limit
of the floater serve;
• Orientating the ball according to the opponent’s side and defense’s formation.
Technique of simple overhead topspin serve
• Tossing the ball in the air according to the height of the server;
• Jumping movement according to the serving zone limits;
• Contacting the ball with the serving arm according to the timing of the server;
• Orientating the ball according to the opponent’s side and defense’s formation.
Volleyball tactics
1. Digging tactics
• Moving according to the court and playing position;
• Organizing the defensive patterns according to the ball trajectory;
• Taking a ready posture in anticipation according to the physical condition of
player.
2. Blocking tactics
• Blocking carefully according to the pass and attacker techniques;
• Blocking with preservation of net according to the fitness of the blocker ;
• Blocking according to the prescribed defense system with back line players

3. Setting tactics
• Passing with precision according to the strategic demands.
• Passing carefully to deliver the pass according to the qualities of attacker.
• Passing to the convenient attacker according to the blocking side and points .
4. Receiving tactics
• Moving and taking position according to the opponent server’s position.
• Taking position according to the teammates placement.
• Receiving and directing the ball to the setter according to his/her position on
court .
5. Serving tactics
• Serving strategically according to the weakness of opponent player’s position.
• Positioning the forward players according to the opponent receiving strategy .
• Executing service according to the setter position .
6. Spiking tactics
• Moving according to the type of setting .
• Contacting the ball according to its height .
• Orienting the ball according to the opponent defending system and strategy.
 When a team regains the serve, all the players move one position clockwise. This means
that all players have to play both in front court and in the back court.
Cool-down activities
Let learners to march on the ground relaxing, arms and legs with moving in different
direction together and raise hands according to teacher’s signals.
e. Assessment
Final discussion
Reflect:
What do you do to play a fair game?
Connect
What are other conditions that need techniques and tactics?
Apply
How will you use learnt techniques and tactics in your life to serve the society.
Lesson2: Volleyball techniques and tactics in defense with rules
a. PrerequisitesLearners of senior three will learn better this lesson if they can play volley ball.
b. Teaching resources
Playground, balls, whistle, cones, equipment, chasuble, net, rope and trees.
c. Introduction
Opening discussions
Ask questions related to volleyball techniques and tactics in defense.
Warm-up activities
Let learners make two rows and perform exercises of activating the body by jogging
around the ground with maintaining a medium speed. Warm up specifically with balls in
groups. Ask one of them to lead systematic stretching exercises.
d. Lesson development
This lesson comprises techniques and tactics of defense in volleyball and rules.
For each technique and tactic
• Show learners how to execute the basic skills.
• Let learners to practice based on instructions, materials and provide necessary
support.
• Let learners discuss on rules and you provide correct explanations.
• Control how learners perform volleyball defense with techniques.
Volleyball defensive position
1. Middle hitter defense
• Develop an oriented movement according to the opponent pass .
• Making arms and legs position on the court according to the height and ball
trajectory .
2. Right side hitter defense
• Move to the right side of the court for the front players.
• Place the right side defender according to the ball trajectory.
• Place the back player to cover the rest of the court according to the ball direction.
3. Left hitter defense
• Deciding moves and gestures of the left side players according to the ball height
and direction .
• Placing left hitter defender according to the point contact of the ball.
• Placing the back players according to the ball trajectory.
Volleyball blocking techniques
• Handling the ball according to the height of the setting.
• Moving feet according to the attack zone and movements.
• Taking position of the feet and body balance according to the position of the
attacker.
• Timing the attack and react according to the movement of the attacker.
• Taking the blocking Taking the blocking position according to the timin.
• Jumping and arm/hand positioning adequately according to the attack height.
• Opening hands and spread fingers according to the attacker’s power .
• Orienting the ball according to the direction of the attack.
• Landing on both feet carefully according to the core body balance
Volley ball rules
• Describe volleyball court;
• Describe net and posts;
• Describe the ball;
• Identify participants;
• Describe points, set and match winner;
• Describe preparation of the match and structure of play;
• Describe playing action;
• Identify game interruptions, delay and intervals;
• Describe libero player;
• Identify participants’ conducts;
• Identify referees, their responsibilities’ and officials signals.
4.5. Additional information for teachers
Describe volleyball rules and leadership skills as team captain.
Volleyball court
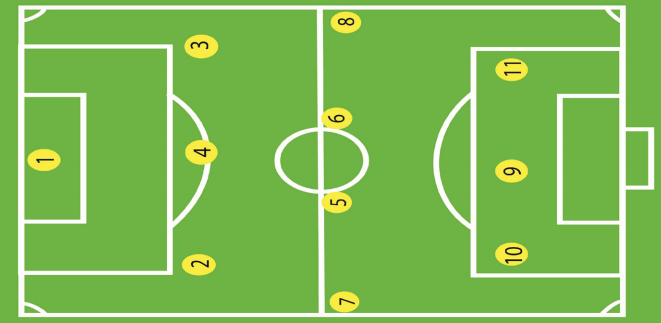
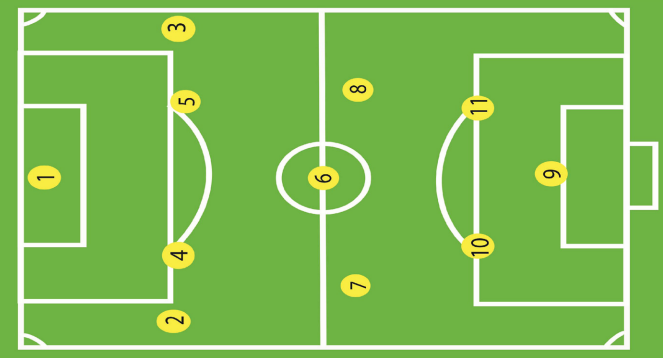
1. Volleyball court

The field must be rectangular and symmetrical. The court length is 18m and 9m wide
and be surrounded by a free area of at least 3 m wide on all sides. Lines are 5cm wide
and must be light in color different from the court.
In each camp there is a line of attack, the outer edge is drawn in 3 meters from the axis
of the center line and which marks the front area (players cannot take back pulse in the
that front area to attack once they are in back area .
The height of the net is 2.43m high for men, 2.24m high for women and 2.13 m or lower
for children aged 12 years or younger for high young player
2. The ball
It is spherical, flexible, light-colored synthetic leather cover. Smaller and lighter than
a basketball, the volleyball is 63.5 to 68.6 cm in circumference and weighs 255 to 283,
internal pressure: 0.30 to 0.325 kg/cm3.
3. Team and how to play
• A six-person volleyball team includes three front-row players, who stand near the
net (4-3-2) from left to right position and three back-row players (5-6-1) from left
to right position.
• When a team gains possession of the serve, its players rotate their positions,
moving clockwise. For example, the player who was in the right-front position
moves into the right-back, or serving, position.
• The server starting the game stands anywhere behind the end line. Only one
attempt is allowed on the serve.
• By hitting the ball back and forth over the net, with the hands, forearms, head, or any part of the body, play is continued until one team fails to keep the ball in play
(in the air) or until a rule violation is committed.
• The ball must be returned by a team over the net after no more than three hits,
and no player may hit the ball twice in succession.
• The return over the net must be done without catching, holding, or carrying the
ball, without a player touching the net, and without entering the opponents’
area.
• A player keeps serving as long as his or her team continues to win points. The
serve must rotate to a new player each time a team wins back the service.
4. Scoring system.
Officially, a volleyball match is won by the team that wins the best of five sets or (3
wined sets). All sets are rally scored. In the rally score system, a point is awarded on
each service or side out. This means that a receiving team’s error or penalty results in a
point. Likewise, a serving team’s error or penalty results in a point and the ball for the
receiving team to serve. It isn’t necessary for the winning team to be serving when the
winning point is scored.
A set is won by the team which first scores 25 points with a minimum lead of two points.
In the case of a 24-24 tie, play is continued until a two point lead is achieved.
The deciding set of any match (3rd or 5th game) is played to 15 points. The winner is
the first team to achieve 15 points with a minimum lead of two points. Play is continued
until a two point lead is achieved.
A default game results if a team cannot field six players or fails to begin play after the
referee request. Default games are scored either 25-0 or 15-0 depending on the set
being played. In a set to 25 points, if a default is due to injury, the losing team keeps its
points and the winning team is credited with at least 25 points or up to 27 if necessary
to provide a two point victory.
5. Officials
In competitive volleyball include a referee, scorer, umpire, and line judges.
1st Referee
The first Referee is in full control of the match including settling all questions of rules
and those things not covered by rules. The first Referee has the right to overrule all
other officials. The first Referee also has the power to impose sanctions on players. The
first Referee is positioned at one end of the net; with her/his head above the net. After
blowing a whistle to stop play, the first Referee uses hand signals to indicate who won
the point, the fault committed, or replay.
2nd Referee
The second Referee is concerned with such matters as service order of each team,
keeping time, assisting in making calls, supervision of substitutions, signaling the end
of play, and replacing the first Referee, if necessary. The second Referee is positioned
on the floor at the opposite end of the net from the first referee
Scorekeeper:
The scorekeeper sits on the side of the court opposite the 1st Referee and records
all scores, makes sure the serving order and rotation are correct, keeps track of
substitutions and time outs, and keeps track of protests. The scorekeeper also indicates
when a team has scored an 8th point in a deciding game so that sides can be switched.
6. Rights and Responsibilities of the Participants
Only the playing captain or coach may ask for a time-out or substitution and only when
the ball is not in play. Only the playing captain may speak to the referees. And the
team captain is responsible for the conduct and discipline of his team. It is the only one
allowed to speak to the referees when the ball is offside for an explanation.
7. Players Equipment
Uniforms must be similar; each player wears a jersey, shorts and socks of the same
color. The Libero, if used, will wear uniform of contrasting color.
8. Misconduct
Individual sanctions may be assessed against a player or coach for a variety of
unsportsman like actions during or between games including: shouting at an opponent;
addressing officials about their decisions; trying to distract an opponent; or coaching in
a disruptive manner.
a. Yellow or Warning Card
This is given for minor unsporting offenses. A second yellow card to an individual will
result in an automatic red card. It goes together with 1 point for other team.
b. Red or Penalty Card
This is given for serious offenses. If a team is serving and receives a red card, they will
lose the serve. If the team receiving serve get a red card, their opponent will receive a
point.
c. Expulsion
This is given for extremely offensive behavior. The player is out for the rest of the game.
No additional penalty is given.
d. Disqualification:
This is called when a player receives a second expulsion during a match or when physical
aggression is shown toward an official, another player, or a spectator. The player is
ordered from the playing area for the balance of the match. No other penalty is given.


4.6 . End unit assessment
Organize volleyball matches competition between teams and assess learners’ abilities
to apply volleyball techniques and tactics such as: service, dig, pass, spike, set, and
block. Let them refereeing the match and observe the respect of volleyball rules and
the leadership skills of the team captain.
4.7. Additional activities
• Reduce rules for slow learners and allow them to play the ball regularly.
• Organize competitions between small groups and choose their own
referees and assistant referees
• Competition between classes and forming school teams and participate
in interschool competitions and refereeing matches
UNIT 5:BASKETBALL
5.1. Key unit competence
After this unit, learners will be able to refine defensive and offensive basketball
techniques in various game situations and adhere to rules of the game.
5.2. Prerequisite knowledge and skills
Learners of senior three will learn better basketball if they can use different defensive
and offensive basketball techniques in various game situations, apply basic rule, state
and explain different offensive and defensive techniques and strategies.
5.3. Cross - cutting issues to be addressed
Gender education
In teaching and learning process, prepare and provide physical activities that engage
both girls and boys to exploit their full potential and talents without any discrimination
or prejudice.
Inclusive education
Consider different special education needs and select activities to adapt teaching
approaches to all learners. This creates a positive attitude and helps all learners to
participate actively and develop their competence levels.
Financial education
Integrate Financial Education into teaching/learning activity by providing the local
and no cost teaching material where possible. Encourage learners to make their own
materials that can help them to develop competences not only in sport but also in their
daily life.
Standardization culture
Choose and select the standardized materials to use in teaching/learning process .It is
necessary to provide appropriate materials required to the levels of learners and help
them to develop culture of checking the quality of sport materials before their use to
prevent injuries and other accident.
Environment and sustainability
Provide materials and deliver the lesson with encouraging learners to protect the
environment and well use of materials. Help them to develop fair play and avoiding
violence in the game.
Peace and values education
Help learners to develop fair play and avoiding violence and conflict in the game by
setting clear and relevant instructions. Provide activities that help learners to develop
their competence peacefully.
Comprehensive sexuality education
Provides physical activities and sets instructions that prevent sexual harassment, any
kind of gender based violence like sexual abuse and “bad touches”.
5.4. List of lessons and assessment

Lesson 1: Basketball tactics and techniques in attack
a. PrerequisitesLearners of senior three will learn better basketball techniques and tactics in attack if
they can perform basketball skills adhering to rules.
b. Teaching resources
Playground, basketballs, whistles, cones, equipment, chasubles (pinny), trees, rim.
c. Introduction
Opening discussions
Ask questions related to basketball techniques and tactics in attack and their importance
to player
Warm-up activities
Let learners to make two rows and perform exercises of activating the body by jogging
around the ground with maintaining a medium speed. Warming up specifically with
balls in group.
Ask one of them to lead systematic stretching exercises.
d. Lesson development
This lesson comprises techniques and tactics of attack in basketball.
For each technique and tactic:
• Show learners how to execute the basic skills
• Let learners to practice based on instructions, materials and provide necessary
support
• Control how learners perform attack with tactics and techniques.
Techniques of passing and receiving the ball
• Pushing the ball according to the receiver’s position
• Catching the ball according to the height and speed
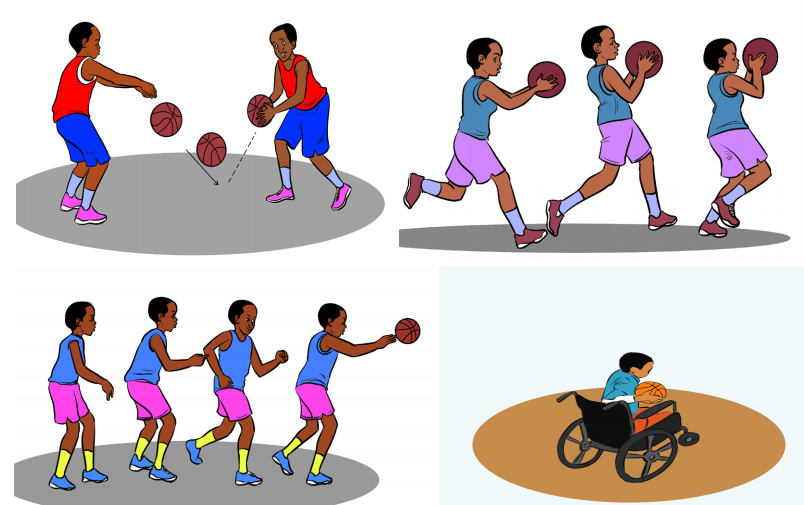
Techniques of dribbling the ball
• Maintain standing position with wide stance of feet
• Bounce the ball in regular distance of the body
• Keep your head up and eyes forward
• Manipulate the ball with left or right hand

Picture of dribble in movement, zigzag
Techniques of shooting a ball
• Keep position and maintain body balance
• Hold the ball in the correct way
• Keep eyes on the target
• Release the ball according to the target


Individual tactics in attack
• Taking and maintain triple treat position ready to pass, shoot or dribble
• Using player’s body gestures
• Keep head up and eyes on opponent and teammates
• Move on respective position accordingly
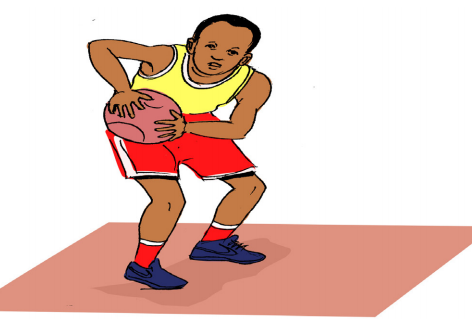
Teaching triple treat position
• Feet spacing
• Bend the knees
• Heap up
• Use correct pivot feet
Collective tactics in attack
• Move on the court to create free space
• Cooperate with teammates in offensive strategies
• Change direction according to offensive system
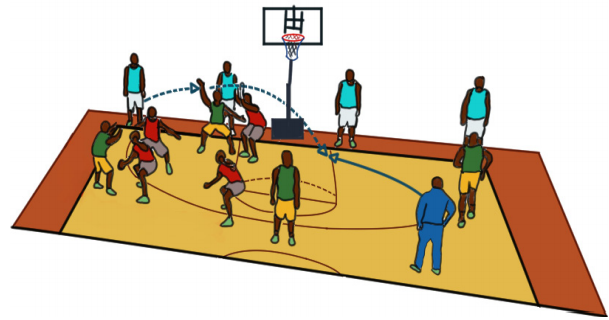
Cool-down activities
Let learners to march on the ground relaxing , arms and legs with moving in different
direction together and swing the arms alternatively forward and backward according
to teacher’s signals.
e. Assessment
Final discussion
Reflect
What do you do to play a fair game?
Connect
What are other conditions that need techniques and tactics?
Apply
How will you use learnt techniques and tactics in your life to serve the society
Lesson 2: Basketball tactics and techniques in defense
a. PrerequisitesLearners of senior three will learn better this lesson if they can perform basketball skills
adhering to rules.
b. Teaching resources
Playground, basketballs, whistles, cones, equipment, chasubles (pinny), trees, rim.
c. Introduction
Opening discussions
Ask questions related to basketball techniques and tactics in defense
Warm-up activities
Let learners make two rows and perform exercises of activating the body by jogging
around the ground with maintaining a medium speed. Warm up specifically with balls in
groups. Ask one of them to lead systematic stretching exercises.
d. Lesson development
This lesson comprises techniques and tactics of defense in basketball and rules
For each technique and tactic
• Show learners how to execute the basic skills
• Let learners to practice based on instructions, materials and provide necessary
support
• Let learners discuss on rules and you provide correct explanations
• Control how learners perform basketball defense with techniques and tactics
Techniques of defending the opponent with the ball
• Take the position according to opponent with the ball
• Target the ball and maintain the body balance
• Defend between the ball and the basket wide
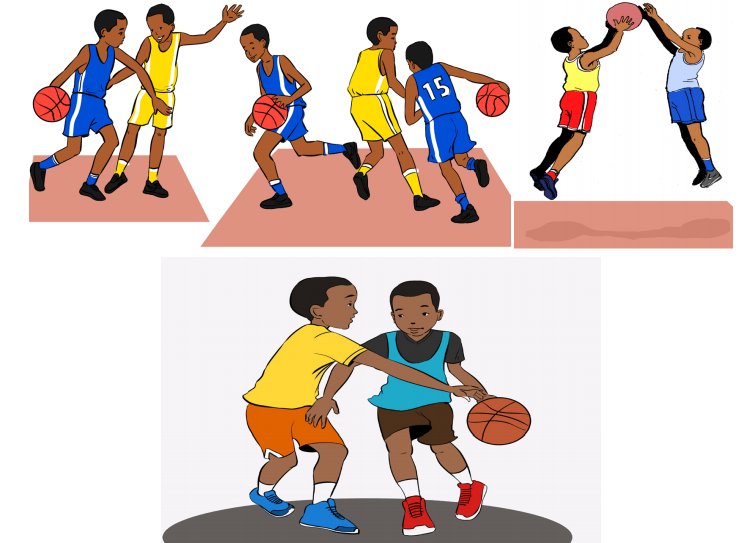
Tactics of defending the opponent without the ball
• Orient one hand toward the ball and other hand toward the opponent
• Prevent the opponent to receive or have the ball
• Keep eyes on the opponent to the outside, toward the sideline and keeping him
away from the lane

Techniques of moving in defense
• Make steps when sliding in defensive movement
• Move according to the opponent action
• Execute defensive rebound
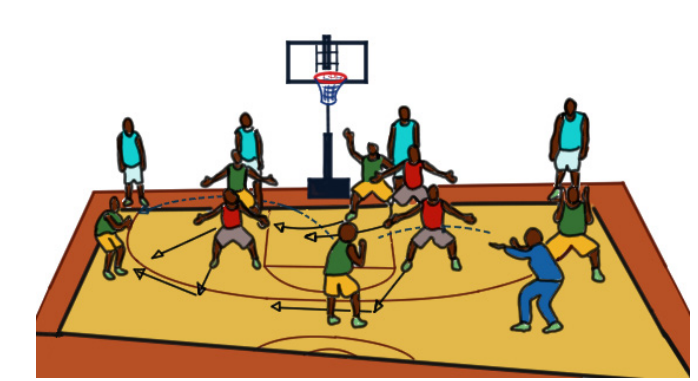
5.5. Additional information for teachers
BASKET BALL BASIC RULES1. To shoot the basketball through the hoop as often as possible
• Each time this happens 2 points will be added to your team’s score.
• 3 Points will be awarded if the basketball is shot from outside the three-point line.
• 1 point will be awarded if the basket is shot from the free-throw line.
2. Each team has a maximum of 5 players on the court at any time. Substitutes are made
by the Coach to replace players on the court. They are substituted or subbed-off.
This can only be done at certain times in the game and the referee will let you know
when it is ok. This can take place as often as the coach likes.
3. The team who has control of the basketball is on offence. The team without the ball
is on defense. Both parts of the game are equally important. Teams on defense are
trying to stop the offence from shooting a hoop. The defense should always try to
stay between the basket and the players they are guarding.
4. There are two ways for the ball to be moved up the court on offence , by dribbling
the ball, which is by bouncing the ball with one hand only on it, or by passing it to
another of your team members. Passing is a lot faster and ensures all team members
enjoy the fun of the game.
5. While stationary (not passing or dribbling) the player holding the ball must always
keep one of their feet on the floor, this is called the pivot foot. Players can only lift
their foot if they wish to dribble, pass or shoot the ball. The pivot foot can twist but
must remain in contact with the floor and in the same place. If players move their
foot / feet without dribbling, passing or shooting they are penalized and the ball
given to the other team, this is called travel.
6. The ball must stay within the court of play (inside sidelines and baselines); otherwise
it goes to the other team.
7. No player may contact an opposition team member; this is called a foul. If a foul
takes place while a player is shooting for a basket, the shooter is given free shots
from the free-throw line.
• If the basket (while being fouled) is scored, 2 points are awarded and 1 free-throw
is taken.
• If the basket misses. 2 free-throws are given.
• If a player receives 5 fouls during a game they must leave the court and can take
no more part in the game
8. Duration: Generally in junior and senior competition a game is made up of four
quarters of ten minutes each.
9. Timeouts: A time-out is an interruption of the game requested by the coach or
assistant coach to talk to their players; When a timeout is called players must hurry
to the sideline to talk with their coach. Each time-out shall last 1 minute.
Each team may be granted:
• •2 time-outs during the first half,
• •3 time-outs during the second half with a maximum of 2 of these time-outs in
the last 2 minutes of the second half,
• •1 time-out during each extra period.
Note: Unused time-outs may not be carried over to the next half or extra period.
10.Rebounding: Players should assume that every basket shot will miss. Getting
possession of the ball after a missed shot is called a rebound. When 2 players get
possession of the ball at the same time this is called a jump ball. A jump ball starts
the beginning of a game and after half time.
FOULS AND VIOLATIONS IN BASKETBALL
1. Personal fouls: Personal fouls include any type of illegal physical contact.
Hitting, Pushing , Slapping , Holding
Illegal pick/screen: when an offensive player is moving. When an offensive player
sticks out a limb and makes physical contact with a defender in an attempt to block
the path of the defender.
2. Personal foul penalties: If a player is shooting while a being fouled, then he gets two
free throws if his shot doesn’t go in, but only one free throw if his shot does go in.
Three free throws are awarded if the player is fouled while shooting for a threepoint goal and they miss their shot. If a player is fouled while shooting a three-point
shot and makes it anyway, he is awarded one free throw. Thus, he could score four
points on the play.
3. Inbounds: If fouled while not shooting, the ball is given to the team the foul was
committed upon. They get the ball at the nearest side or baseline, out of bounds,
and have 5 seconds to pass the ball onto the court.
4. One and one: If the team committing the foul has seven or more fouls in the game,
then the player who was fouled is awarded one free throw. If he makes his first shot,
then he is awarded another free throw.
5. Ten or more fouls: If the team committing the foul has ten or more fouls, then the
fouled player receives two free throws.
6. Charging: An offensive foul that is committed when a player pushes or runs over a
defensive player. The ball is given to the team that the foul was committed upon.
7. Blocking: Blocking is illegal personal contact resulting from a defender not
establishing position in time to prevent an opponent’s drive to the basket.
8. Flagrant foul: Violent contact with an opponent. This includes hitting, kicking,
and punching. This type of foul results in free throws plus the offense retaining
possession of the ball after the free throws.
9. Intentional foul: When a player makes physical contact with another player with no
reasonable effort to steal the ball. It is a judgment call for the officials.
10.Technical foul: A player or a coach can commit this type of foul. It does not
involve player contact or the ball but is instead about the manners of the game.
Foul language, obscenity, obscene gestures, and even arguing can be considered
a technical foul, as can technical details regarding filling in the scorebook
improperly or dunking during warm-ups.
Violations
1. Walking/Traveling: Taking more than a step and a half without dribbling the ball is
traveling. Moving your pivot foot once you’ve stopped dribbling is traveling.
2. Carrying/palming: When a player dribbles the ball with his hand too far to the side of
or, sometimes, even under the ball.
3. Double Dribble: Dribbling the ball with both hands on the ball at the same time or
picking up the dribble and then dribbling again is a double dribble.
4. Held ball: Occasionally, two or more opposing players will gain possession of the ball
at the same time. In order to avoid a prolonged and/or violent tussle, the referee
stops the action and awards the ball to one team or the other on a rotating basis.
5. Goaltending: If a defensive player interferes with a shot while it is on the way down
toward the basket, while it is on the way up toward the basket after having touched
the backboard, or while it’s in the cylinder above the rim, it is goaltending and the
shot counts. If committed by an offensive player, it is a violation and the ball is
awarded to the opposing team for a throw-in.
6. Backcourt violation: Once the offense has brought the ball across the mid-court line,
they cannot go back across the line during possession. If they do, the ball is awarded
to the other team to pass inbounds.
7. Time restrictions: A player passing the ball inbounds has five seconds to pass the ball.
If he does not, then the ball is awarded to the other team. Other time restrictions
include the rule that a player cannot have the ball for more than five seconds when
being closely guarded and, in some states and levels, shot-clock restrictions requiring
a team to attempt a shot within a given time frame.
5.6. End unit assessment
• Organize basketball competition between teams and assess learners’ abilities to
apply basketball techniques and tactics such as pass, receive, shoot, moves, body
gestures and team collaboration.
• Let them refereeing the match and observe the respect of basketball rules
5.7. Additional activities
• Reduce rules for slow learners and allow them to play the ball regularly
• Organize competitions between small groups and choose their own referees
• Organize competition between classes and forming school teams and participate
in interschool competitions and refereeing matches.
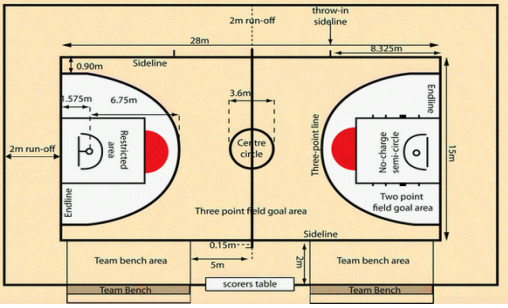
UNIT 6: HAND BALL
6.1. Key unit competence
After this unit, learners will be able to refine defensive and offensive handball techniques
in various game situations and adhere to rules of the game.
6.2. Prerequisite
Learners of senior three will learn better handball if they can use different defensive
and offensive handball techniques in various game situations and interpret rules of the
game.
6.3. Cross- cutting issues to be addressed
Gender Education
In teaching and learning process, prepare and provide physical activities that engage
both girls and boys to exploit their full potential and talents without any discrimination
or prejudice.
Inclusive education
Consider different special education needs and select activities to adapt teaching
approaches to all learners. This creates a positive attitude and helps all learners to
participate actively and develop their competence levels.
Financial education
Integrate Financial Education into teaching/learning activity by providing the local
and no cost teaching material where possible. Encourage learners to make their own
materials that can help them to develop competences not only in sport but also in their
daily life.
Standardization culture
Choose and select the standardized materials to use in teaching/learning process .It is
necessary to provide appropriate materials required to the levels of learners and help
them to develop culture of checking the quality of sport materials before their use to
prevent injuries and other accident.
Environment and sustainability
Provide materials and deliver the lesson with encouraging learners to protect the
environment and well use of materials. Help them to develop fair play and avoiding
violence in the game.
Peace and values education
Help learners to develop fair play and avoiding violence and conflict in the game by
setting clear and relevant instructions. Provide activities that help learners to develop
their competence peacefully.
Comprehensive sexuality education
Provides physical activities and sets instructions that prevent sexual harassment, any
kind of gender based violence like sexual abuse and “bad touches”.
6.4 . List of lessons and assessment
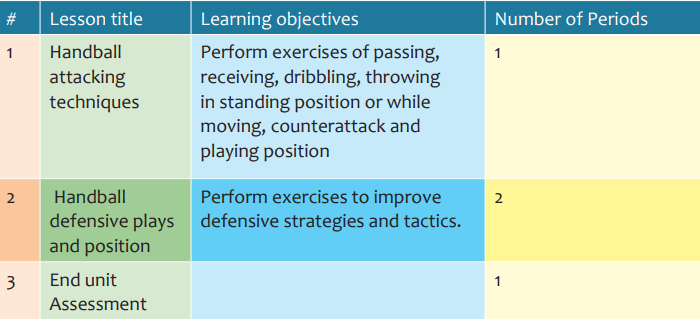
Lesson 1: Handball attacking techniques
a. Prerequisites
Learners of senior three will learn better handball attacking techniques if they can
perform playing skills adhering to rules
b. Teaching resources
Playground, balls, whistle, cones, equipment, chasuble (pinny), trees, goals posts, nets.
c. Introduction
Opening discussions
Ask questions related to handball techniques of attack and their importance to players.
Warm-up activities
Let learners to make two rows and perform exercises of activating the body by jogging
around the ground with maintaining a medium speed. Warm up specifically with balls in
group. Ask one of them to lead systematic stretching exercises.
d. Lesson development
This lesson comprises techniques of attack in handball and tactics
For each technique and tactic:
• Show learners how to execute the basic skills
• Let learners to practice based on instructions, materials and provide necessary
support
• Control how learners perform attack with technique
Techniques of chest pass
• Hold the ball with in right way
• Position legs according to the passing arm
• Orient passing arm according to the teammate’s position
• Release the ball and orient the receiver’s chest
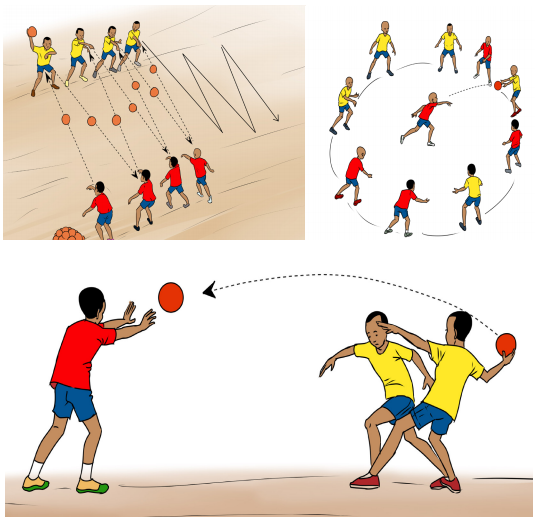
Techniques of bounce pass
• Hold the ball in right way
• Position legs according to the passing arm
• Delimitate distance where to bounce the ball according to the receiver’s position
• Bounce the ball considering the receiver’s distance
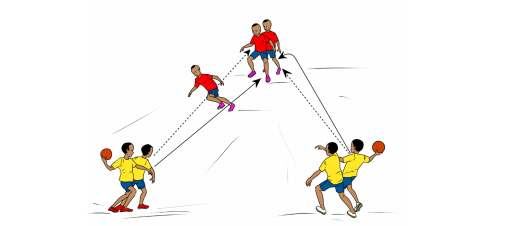
Techniques of jump pass
• Hold the ball in the right way
• Maintain the eye contact
• Execute run up according to the receiver’s position
• Take off considering the opponent’s position
• Release the ball according to the receiver’s position
• Maintain balance before landing according to the level of jumping
Techniques of dribbling the ball
• Hold the ball in right way
• Position legs according to the dribbling arm
• Keep head up and eyes forward the target/ direction
• Precise area of dribbling with controlling the ball

Techniques of shooting the ball
Techniques of jump shot
• Hold the ball in the regular way
• Make run up covering to the distance of target
• Make alternate steps following hand ball rules.
• Jump in the air while raising shooting arm up toward the target.
• Execute the strong shoot to the target.

Techniques of running shot
• Hold the ball in the right way
• Make run up along the distance of target
• Make steps following hand ball rules
• Execute the strong shoot to the targeted angles

Techniques of diving shot
• Hold the ball in the right way
• Increase running speed and investigate the position of the goalkeeper
• Take body diving position following types of shots
• Execute shot of the ball focusing the target.

Techniques of standing shot(stem shot)
• Increasing running speed and investigate the position of the goalkeeper
• Taking standing position following types of shots
• Shooting the ball with maximum power to the target

Handball tactics
Tactic of transition attack• Move on wing player’s position to win the opponent’s defense
• Move on back player’s position to win the opponent’s defense
• Move on pivot player’s to win the opponent’s defense

Tactic of crossing attack
• Perform crossing of wing and half player to win the opponent’s defending system
• Execute crossing of half and center player to win the opponent’s defending
system
• Develop crossing of center and wing player to win the opponent’s defending
system -Perform crossing of back court players to win the opponent’s defending
system

Tactic of combination attack
• Attacking in collaboration between right side players, pivot and the center
player to win the opponent’s defending system
• Attacking in collaboration between left side players, pivot and the center player
to win the opponent’s defending system
• Attacking in collaboration between back court players with the pivot player to
win the opponent’s defending system

Tactic of fast breaks
• Running to the wingers or pivot position for first wave depending on goalkeeper’s
throw
• Developing movement of halves/pivot/wingers for the second wave depending
on goalkeeper’s throw
• Attacking for third wave refer to the opponent team defenders position.

Cool-down activities
Let learners march on the ground relaxing , arms and legs with moving in different
directions together and raise hands according to teacher’s signals.
e. Assessment
Final discussionReflect
What do you do to play a fair game?
Connect
What are other conditions that need techniques and tactics?
Apply
How will you use techniques of handball in your life to serve the society?
Lesson 2: Handball defensive plays and position
a. PrerequisitesLearners of senior three will learn better this lesson if they can perform handball playing
skills adhering to rules
b. Teaching resources
Playground, balls, whistle, cones, equipment, chasuble (pinny), trees, goals posts, nets.
c. Introduction
Opening discussions
Ask questions related to Handball defensive plays and position
Warm-up activities
Let learners make two rows and perform exercises of activating the body by jogging
around the ground with maintaining a medium speed. Warming up specifically with
balls in groups. Ask one of them to lead systematic stretching exercises.
d. Lesson development
This lesson comprises techniques of handball defensive plays and position
For each technique:
• Show learners how to execute the basic skills
• Let learners to practice based on instructions, materials and provide necessary
support
• Let learners discuss on rules and you provide correct explanations
• Control how learners perform handball defensive plays and taking position
Techniques of defending with block
• Take handball defensive position
• Keep eyes on the attacker with the ball
• Jump depending on the opponent with high or long jump shots
• Time jumps toward the direction of the shots
• Direct hands to the shooting opponent’s hand
• Block the shot accordingly
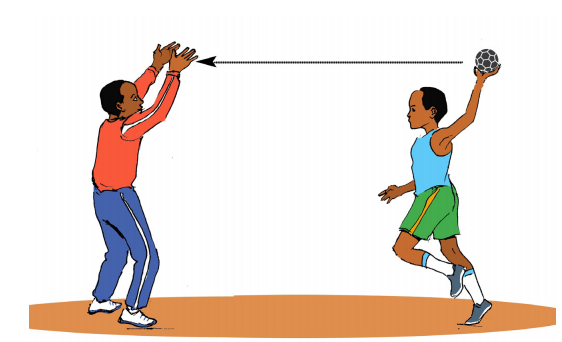
Picture showing hand ball block of high shot, long shot, jump shot
Techniques of goal keeping
• Face the shooter
• Reduce the angle of vision of the shooter by extending arms with palms wide
open
• Lock down eyes on the ball
• Maintain positioning depending on the opponent pivot, wing, back player with
the ball and various throws and shots
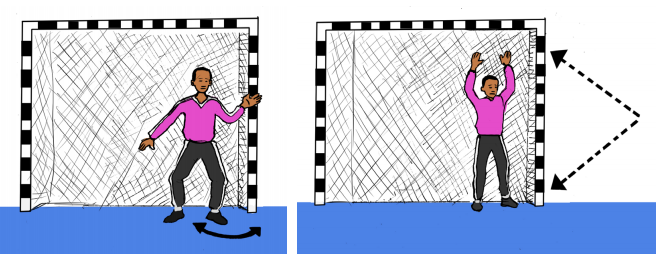
• Position on toes for saves nine meter ones to increase flexibility rate
• Move arms, legs or trunk according to the direction of the shots

• Jump forward for saving the ball according to the height, level of the shots and
the defensive situation to reduce the shooter’s angle
• Perform throw off and throw in considering the teammate’s position

Tactics of handball defense
• Making zone defense with 6-0, 5-1, 4-2 and 3-2-1 formation depending on the
opponent’s attacking system.
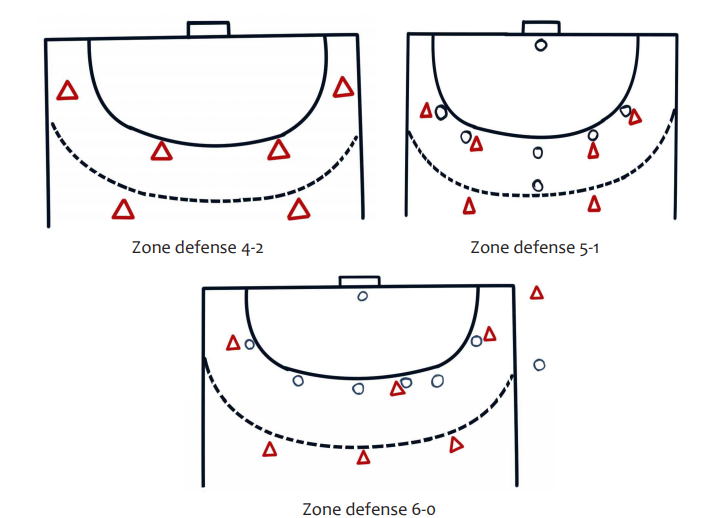
Defending with man to man marking depending on the opponent’s attacking system,
the remaining playing time and the inferiority number of the opponent’s team
Combining defense of 5-0 +1, 4-0 +2 and 3-0 +3 formation depending on the opponent’s
attacking system
6.5. Additional information for teachers
Rules & Regulations of Team Handball
• The field of play must have two goals in the center of each end and a ball. Handball
court rules determine the pitch dimensions. It should measure 40 meters by 20
meters (131 by 66 feet).
• The goal line at each end (6 meter line) divides an area between the goalkeeper
and the rest of the outfield players.
• Each defending goalkeeper is the only player allowed to stand on the floor in the
goal zone.

Handball Basic Rules of Equipment
• A semi-circle area gets marked off outside each goal area (often called the crease
or the zone).
• A semi-circle with dashed markings is the free throw line (9 meters from goal).
• The ball must be a size which fits inside players’ hands. Handball balls are usually
made from leather or synthetic material. The full handball equipment list includes
three regulation sizes of balls.
Note: One of these ball specifications gets used during the basic rules in handball:
• A ball for 8 years children and over (circumference of 50-52 cm).
• Balls for women and males aged 12 to 16 years (circumference of 54-56cm).
• Balls for males aged 16 years and over (circumference of 58-60cm).
Handball Players Rules
The standard handball game rules feature two teams with seven (7) players on each
side. There can be 7 ‘rolling substitutes’ per team. That means there is no need to
consult the referee when making substitutions.
The rules and regulations of handball player positions allow six outfielders and one
goalkeeper. Team members should wear uniforms for official games and tournament
competitions.
General Handball Regulations
According to the basic handball rules and regulations list a game lasts for 60 minutes.
It gets divided into two periods of 30 minutes each (reduced to 20 minutes for younger
players).
There should be a maximum of 15 minute interval between the two halves. Within each
period, each team is allowed to take a time out of one (1) minute.
Handball rules allow outfield players to touch the ball with any part of their body (above
the knee).
Kicking is not allowed in handball because players cannot legally kick the ball.
Players can pass, hold possession, dribble, or shoot once they are in possession of the
ball.
Handball dribbling rules allow a player to dribble the ball. They can also take three steps
for up to three seconds without dribbling.
Taking more than 3 steps, or longer than 3 seconds, is one of the handball terms called
‘walking’. In this case the player would lose possession of the ball.
Double dribble is against the rules and regulations in handball. It means a player cannot
receive the ball, bounce it, and then hold the ball and bounce it again.
The goalkeeper is the only player permitted to come into contact with the floor inside
the 6 meter zone (goal area).
Exceptions occur when a player jumps into the area and shoots the ball before landing
in the goal area. This might take place while having a shot on goal.
Goalkeepers can go outside of the goal area. But they must not keep possession of the
ball while they are outside the goal area.
The fast-flowing game permits some body contact. In most cases it occurs when
defenders try to stop attackers approaching to the goal area.
Handball fouls include:
1) Tripping, 2) Pushing, 3) Hitting, 4) Clinching, 5) Charging and 6) Holding
Free-throws get awarded for slight infringements of the rules and regulations of
handball. All defenders must stay 3 meters (9.84 feet) away from the person taking
the free-throw.
Penalty-throws get awarded for any rules’ infringement that denies a clear scoring
opportunity.
Throw-ins get awarded after the ball crosses a side line. They get taken by the handball
team which did not touch it last.
Corners get taken by the attacking side when a defender knocks the ball over the goal
line, unless it goes in the goal net to score a point. The player puts one foot on the
corner of the side line and the goal line, and then passes the ball back in to play.
Goal-throws occur when the ball comes off a goalkeeper and crosses the goal line. In
this case the goalkeeper takes the throw from within their own area.
Scoring in Handball
You score a goal by throwing the ball from outside the zone into the goal (or while
‘jumping’). As a rule, a lot of goals get scored. Handball teams often score between 20
and 35 goals each.
Handball Umpires and Officials
Handball rules and regulations get officiated by referees. They can award players
with either a yellow card (warning), suspension (2 minutes sitting out), or a red card
(dismissal). It depends on the seriousness of the infringement or offense committed.
Winning a Game of Handball
Winning a game in the rules of handball means you have scored more goals than your
opponent. Extra periods of overtime will get played if the game ends in a draw (a
maximum of two 5 minute periods).
Note: A shoot-out gets used to determine the result of the game if the scores are still
level after extra time.
6.6. End unit assessment
Organize handball competition between teams and assess learners’ abilities to apply
handball techniques and tactics such as pass, receive, shoot, moves, individual and
collective tactics of attack and defense. Let them refereeing the match and observe
the respect of handball rules.
6.7. Additional activities
Reduce rules for slow learners and allow them to play the ball regularly
Organize competitions between small groups and choose their own referees
Competition between classes and forming school teams and participate in interschool
competitions and refereeing matches
UNIT 7: ADAPTIVE SPORTS
7.1. Key unit competence
After this unit, learners will be able to apply techniques and tactics of adaptive sports
and adhere to rules of the game.
7 .2. Prerequisite knowledge and skills
Learners of senior three will learn adaptive sports if they can use their able body parts
to perform different techniques in various game situations apply basic rules, state and
explain their importance to the society.
7 .3. Cross- cutting issues to be addressed
Gender education
In teaching and learning process, prepare and provide physical activities that engage
both girls and boys to exploit their full potential and talents without any discrimination
or prejudice.
Inclusive education
Consider different special education needs and select activities to adapt teaching
approaches to all learners. This creates a positive attitude and helps all learners to
participate actively and develop their competence levels.
Financial education
Integrate financial education into teaching/learning activity by providing the local
and no cost teaching material where possible. Encourage learners to make their own
materials that can help them to develop competences not only in sport but also in their
daily life.
Standardization culture
Choose and select the standardized materials to use in teaching/learning process .It is
necessary to provide appropriate materials required to the levels of learners and help them to develop culture of checking the quality of sport materials before their use to
prevent injuries and other accident.
Environment and sustainability
Provide materials and deliver the lesson with encouraging learners to protect the
environment and well use of materials. Help them to develop fair play and avoiding
violence in the game.
Peace and values education
Help learners to develop fair play and avoiding violence and conflict in the game by
setting clear and relevant instructions. Provide activities that help learners to develop
their competence peacefully.
Comprehensive sexuality education
Provides physical activities and sets instructions that prevent sexual harassment, any
kind of gender based violence like sexual abuse and “bad touches”.
7.4. List of lessons and assessment

Lesson 1: Goal ball techniques
a. PrerequisitesLearners of senior three will learn better goal ball techniques if they can perform skills
adhering to rules accordingly.
b. Teaching resources
Playground, rooms, whistles, stop watch, blindfolds, goal posts, bell balls.
c. Introduction
Opening discussions
Ask questions related to goal ball techniques their importance to player and the society.
Warm-up activities
Let learners make two rows and perform exercises of body activation by jogging on
place with maintaining a medium speed and change exercise according to teacher’s
instructions.
Warming up specifically with bell balls in group. Help them to lead systematic stretching
exercises.
d. Lesson development
This lesson comprises techniques of goal ball in attack and defense
For each technique:
• Tell and show learners how to execute the basic skills
• Let learners to practice based on instructions, materials and provide necessary
support
• Control how learners perform techniques adhering to rules
Techniques of throwing /rolling the ball
• Take standing position
• Keep head up and forward in throwing direction
• Hold the ball in throwing hand and support it
• Step forward
• Take the ball backward
• Bring the ball forward powerfully
• Release the ball and throwing through
Techniques of defense
• Take the knee position facing the attacking direction
• Crouch and dive to stop the ball according to it direction
• Block the ball in a lying position according to it direction
• Catch the ball
RULES OF THE GOALBALL GAME
1. IntroductionGoal ball is an extremely simple game to learn, but can take years to master. It allows
you to use senses that you don’t normally rely on such as hand/eye coordination, which
allows one to develop different styles of playing and strategies. It provides a high level
of intrigue, as well as a physical demanding game.
2. History
Goal ball was invented in 1946 by an Austrian Hanz Lorencezen and a German, Sett
Reindle. It was used for sport and rehabilitation for the post WW II blind veterans. The
game of goal ball developed over the years, gaining international acceptances and
became a paralympics Sport in 1980.
3. Equipment
To play goal ball you will need a goal ball, 76cm in diameter, and 1.250g in weight, tactile
tape (duct tape), and pair of blacked out ski goggles (blind folds), which are to be used
as eyeshades. You may also want to acquire some knee and elbow pads to protect
against burses and floor burns.
4. The Court
The court is a standard gymnasium volleyball court, which measures (9m wide x 18m
long). There are two team areas at either end of the court, which measure (3m wide x
9mlong). Inside the team areas, there are player orientation marks consisting of two
1.5m wing lines and one 0.50m centre line.
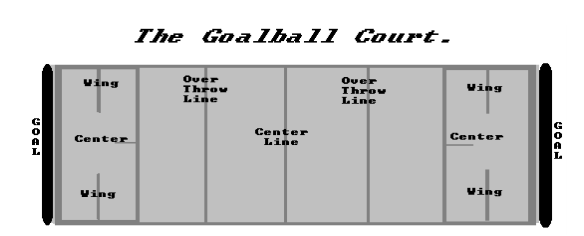
5. Preparing the Court
In preparing the court you will want to use standard duct tape. It is general practice to
make the court two layers thick, that being one on top of the other, giving the court a
superior tactile feel allowing players to easily find their positions.
6. Importance
You may want to use a non-stick tape underneath the duct tape to prevent it from
ripping up any varnish or painted lines on the floor. Lines to be taped, are the entire
team areas with the players orientation lines. The over throw lines, centre line, and
the out side lines of the neutral area only have to be taped if they don’t exist on your
volleyball court. These lines only have to be one layer thick because they are used
primarily by the referees.
7. The Objective
The object of the game is to simply roll the ball on the floor, in a bowling motion and
have the ball completely cross over the opposing team’s goal line, scoring a point.
8. Basic Rules
Game Time - A regular Goal ball game is 20 minutes, consisting of two 10 minute halves.
There is a 3 minute half time, in order for the teams to switch ends.
First Ball - A coin toss determines which team will receive the first ball, with the opposing
team receiving the ball after half time. Each team is allowed three, 45 seconds, time
outs in a game.
Eyeshades - In order to maintain an equal advantage, all team members, must wear
eyeshades at all times, during the game. After the game has started, a player may only
adjust his or her eyeshades, by raising your arm up in the air, and calling eyeshades.
Only then, after the referee tells the person to turn around, may the person adjust their
eyeshades.
Time limits - Upon receiving control of the ball, a team has only 10 seconds to throw the
ball back at the opposing team. If not, it is considered a team penalty.
Throwing - The ball must be rolled on the floor. When throwing the ball, it must touch
the floor before the over throw line or it is considered to be a high ball. This would
constitute a penalty and nullifies any goal scored from that throw. So keep in mind, that
the ball must be bowled or rolled along the floor rather then thrown.
Defending - Players must stay with in the team area when defending. When stopping
the ball, some part of the players body must be touching the team area or it is called:
Illegal defense and constitutes a penalty.
Play - The audible command “play” must be called by the referee to start or restart
the game. After any official stoppage in the game, “play” must be called to restart the
game. For example: the start of the game, after an out of bounds ball, a blocked out
ball, a penalty situation, or a Goal.
Losing Possession of the Ball - There are 3 ways to lose possession of the ball. This
means your team will lose the ball and the opposing team gets to throw. The 3 ways
are:
1. Premature Throw: This is when a player, throws the ball before he/she is allowed to
or before “play” has been called.
2. Pass Out: If a player passes the ball to another team mate and the pass is missed, with
the ball going over the outside lines, this is called a “Pass Out”.
3. Ball Over: This takes place, when a defending player stops the ball, and it bounces off
that player and rolls over the centre line.
Goal - A goal counts when the ball passes completely over the 9m back (goal) line of
either team area. It is a goal no matter, how it crosses the line, if it was thrown by the
opposing team, and or thrown or carried over by your own team members.
9. Penalties
Penalty situations are for the more competitive players. The rules above outline what
justifies a penalty. Basically there are two kinds of penalties:
Team Penalties:
- Ten seconds, - Team delay of game , - Team unsportsmanlike conduct
- Illegal coaching
Personal Penalties:
- High ball, - Three throws, - Eyeshades,
- Personal unsportsmanlike conduct
- Personal delay of game, - Long ball , - Illegal defense
In a penalty situation, only one player will remain on the court, defending the entire
goal by himself/herself for one penalty shot. This person who stays on is determined by
the penalty called. If it is a personal penalty, then it is the one that incurred the penalty
that remains on the court. However, if it is a Team Penalty that has been called, then, it
is the last person that shot, who remains on the court to defend the goal.
10. Players Positions
In Goal ball there are two types of positions on a team, there is one Centre and two
Wingers.
11. Defensively
The wingers’ main responsibility is to cover the wing line. That is, the 1.5m lines on
either end of the team area and parallel to the goal line. His second responsibility is to
back up his centre player.
The defending winger should stand with his feet at the end of the wing line in a
crouched or a squatting position. When he hears the oncoming ball and has determined
it’s course, he should line down in the direction of the oncoming ball, either going left
or right, always remembering to lie down in line with the wing line, that is parallel to
the goal line.
The player must always remember, to stretch out fully with arms and legs straight,
becoming almost an extension of the wing line, covering as much of the goal line as
possible. The players arms, should be straight, but in front of the players face, with the
head tilted back, protecting the players face from any contact with the ball.
The Centre defends the same as a winger, always diving onto the floor, fully stretched
out, covering as much of the court as possible. The Centre player will play on the front
line of the team area, orientating himself with the 0.15m centre line.
This marking tells the centre, that he is at the middle of the front line. The centre either
dives left or right, along the front line in the direction of the oncoming ball, always
keeping, some part of his body in the team area.
12. Throwing
When throwing the ball back at the defending team, one must always, feel the floor
marking first, so that they are squared off and facing, the direction in which they wish
to throw. Once they are aware of their position, they are ready to throw the ball. They
can take a step or two, and bowl, or roll the ball, along the floor, in the direction of the
opposing team. Remember, you have only have eight seconds after stopping the ball, to throw it back.
13. Strategies
There are many strategies to the game of Goal ball. You can throw the ball hard and
fast, or soft and slow. You can throw the ball cross court form corner to corner, or
even curve it by placing a spin on the ball before releasing it. These techniques all have
advantages and disadvantages which always leave new things to master the game and
makes it both interesting and fun to play.
14. Refereeing
The main job of the referee is to inform the players of what is transpiring and to keep
control of the game in doing so. The calls the referees make must be loud and clear, so
that all the players understand the calls and so that there is no confusion. Some of the
calls that a referee must know are:
Play - This is the audible command that will start or restart the game after any official
stoppages in play.
Dead Ball - Is when the ball has stopped moving and the players are unaware of
it’s location, usually in the teams own area The ball is then returned to the closes
player, usually the winger.
Out - This to inform the players, that the ball was thrown out of bounds. When the
ball is given back to the players, the referee must sat “Play” before the team throws
to restart the game.
Block out - This is when one of the defending team players stops the ball, but knocks
it out of bounds while trying to stop it. Again “Play” must be used to restart the
game.
Ball Over - Is called when the ball has gone over the goal cross bar, which is 1.5
meters above the goal line.
Pass out - Is created when a player passes the ball to a fellow team mate, and the
pass is missed, with the ball going out of bounds. Then the opposing team gets the
ball. Note: If the ball rolls into the goal, it is considered a goal, and then the same
team gets the ball.
Eyeshades - That is when a player takes off his eyeshades or adjusts them, with out
the permission from the referee.
High ball - Is when a player throws the ball and it does not touch the floor within the
three meters in front of the team area.
Ten Seconds - This is when a team takes longer then 10 seconds to throw the ball,
after having had control of the ball. It’s considered a team penalty.
Three Throws - Is when a single player has thrown the ball three consecutive times
in a row. This is deemed as a personal penalty.
Goal - This is of course, when a goal is scored and the scoring team, receives a point.
Half - This lets the players know it is half time. (3 minute rest)
Game - Informing the teams that the game is over.
Time out - Allows the team that called “Time Out” to have a 45 second time out.
Substitution - Stoppage in the game, to switch team members, with new ones
coming in. This can only be done when your team has control of the ball or there an
“Official” stoppage in play.
Cool-down activities
Let learners march on places relaxing arms and legs in different directions, swing the
arm alternatively according to teacher’s signals.
e. Assessment
Final discussion
Reflect
• How did you feel playing? What was most difficult action to do?
Connect
• What are the differences between goal ball and other sports?
• Is it easy to become an elite goal ball player?
Apply
• What skills and abilities must one gain to become an elite goal ball player?
• What difficulties might these players face in daily living situations?
• How might they overcome those difficulties?
• Stretch that arm forward at the level of pelvis
• Launch the ball high and hit it from bottom with right hand to make it “flying”.
Techniques of overhand Serve
• Take seated /sitting position
• Throw the ball high and hits it but without fold hand completely
Techniques of blocking
• Take up seated /sitting position
• Keep eyes on the attacker
• Keep arms high, palms facing the net
• Keep a half arm’s length away from the net
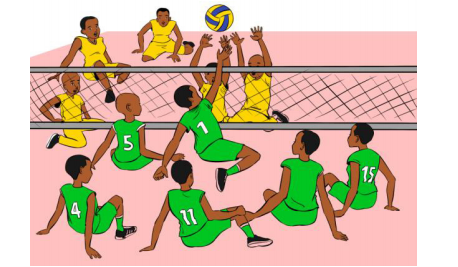
Techniques of passing the ball
• Bring hands together above the head.
• Face palms toward the ceiling with fingertips touching.
• Form a triangle with thumbs and index fingers, opening up the rest of hands.
• Separate hands so that volleyball would fit nicely in the pocket.
• Relax hands as the ball drops into them.
• Extend arms and wrists, pushing the ball up immediately after the ball contacts
fingertips.
• Follow through with a complete arm extension as the ball is released
• Pass with precision according to the strategic demands
• Pass carefully to deliver the pass according to the qualities of attacker
• Pass to the convenient attacker according to the blocking side and points

When the receiving team has gained the right to serve, the players rotate one position
clockwise
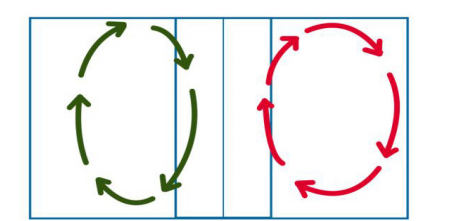
Basic tactics (exchange and penetration)
System: 3-3 (b)This system is similar to 3-3 (a) & (b) which was outlined in Level 2, but here the 3
identified setters set from positions 1 and 6, penetrating both times from back court
into front court. Of course you can start with 3-3 (a) or (b), and then progress to this in
a rally when an easy ball is played over by the opponent.
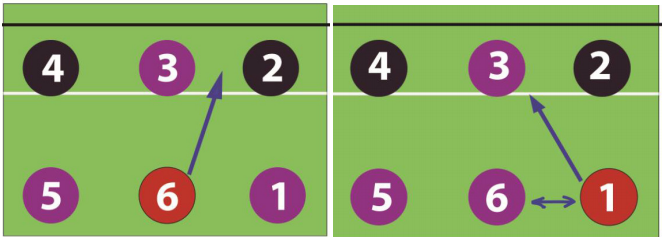
System: 4-2 (b)
This system is used by most of the world’s leading teams. It has 2 setters, who between
them set on all rotations, and 4 attackers. As with 4-2 (a), these two players need to be
placed opposite each other in the line-up.
From this framework the setters can then switch/penetrate from either of their
positions to enable them to set from the teams preferred position.
What is common is that the would set from position 3, position 2 and then penetrate
from position 1 as is shown by the graphic below:
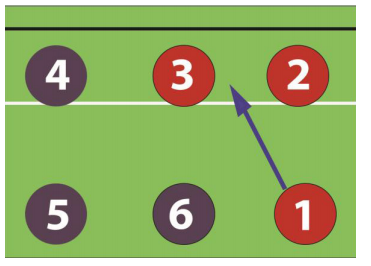
System: 5-1
A 5-1 system will create a more consistent set for a team’s offense since only one
player will be doing the setting whether he/she is in the front or back row. Aside from
creating consistency with the serve for a team’s hitters, a 5-1 system also creates more
consistency in leadership on the court. With one primary setter, one player is controlling
the offense.
This system can be done setting from the position that the setter is in, or by adding
switching/penetration so that the setter sets from any position. The most difficult
rotations are usually from position 4 and position 5, so it is always good to have a back
up option for when the setter is in these two positions.
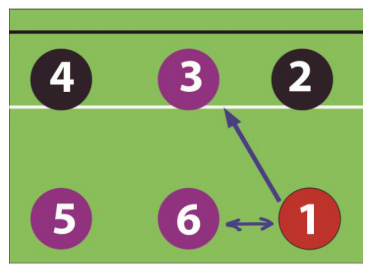
E. Assessment
Final discussion
Reflect
How did you feel playing? What was most difficult action to do?
Connect
• What are the differences between sitting and standing volleyball?
• Is it easy to become an elite sitting volleyball player?
Apply
• What skills and abilities must one gain to become an elite Sitting Volleyball player?
• What difficulties might these players face in daily living situations?
• How might they overcome those difficulties?
7.5 . Additional information for teachers
Basic sitting volleyball rules
Court:
The court is separated into two equal parts divided by a centre line, each side measuring
5m x 6m.
The height of the net
Placed vertically over the centre line there is a net whose top is set at the height of 1.15
m for men and 1.05 m for women.
To win a set
A set (except the deciding, 5th set) is won by the team which first scores 25 points with
a minimum lead of two points. In the case of a 24–24 tie, play is continued until a twopoint lead is achieved (26–24; 27–25; …).
Players
There are only six players allowed on the court at one time. Teams may have up to 12
athletes.
How to play
Compared with the standing volleyball, it is permitted to block an opponent’s service.
Contact of the feet or the legs with the opposing team’s side of the court are allowed,
on condition that the play of the opposing team is not obstructed. Contact with the
hands is allowed with the condition that one part of the hand is either in contact with
the central line or exactly above it.
Upon performing an attacking hit, the pelvis of the front zone’s player must touch the
ground.
A defense player can take attacking action which means to send or spike the ball from
whatever height behind the attacking zone, as long as the pelvis does not touch or pass
over the attacking line. After the hit, the player can touch the attacking zone.
Throughout the game, the players who are involved in a defensive effort must have
contact with the ground with some part of the body between the pelvis and the
shoulders.
In certain cases of defensive action at the back end of the court, for example while
“saving the ball”, the players are allowed to lose contact with the ground for a short
time.
But they are not allowed to stand up, lift up their body or take steps.
Sitting Volleyball can be played by people both with and without a disability, of all ages
and gender in any combination.
7.6. End unit assessment
Organize netball competitions between teams and assess learners’ abilities to apply
techniques Let them refereeing the match and observe the respect of netball rules.
7.7. Additional activities
• Reduce rules for slow learners and allow them to play the ball regularly
• Organize competitions between small groups and choose their own referees
• Organize competition between classes, forming school teams and participate in
interschool competitions and refereeing matches.
UNIT 8: NETBALL
8.1. Key unit competence
After this unit, learners will be able to refine techniques and tactics of netball and
adhere to rules of the game.
8.2. Prerequisite knowledge and skills
Learners of senior three will learn better netball if they can use different defensive
and offensive netball techniques in various game situations, apply basic rule, state and
explain different offensive and defensive techniques.
8.3. Cross- cutting issues to be addressed
Gender educationIn teaching and learning process, prepare and provide physical activities that engage
both girls and boys to exploit their full potential and talents without any discrimination
or prejudice.
Inclusive education
Consider different special education needs and select activities to adapt teaching
approaches to all learners. This creates a positive attitude and helps all learners to
participate actively and develop their competence levels.
Financial education
Integrate Financial Education into teaching/learning activity by providing the local
and no cost teaching material where possible. Encourage learners to make their own
materials that can help them to develop competences not only in sport but also in their
daily life.
Standardization culture
Choose and select the standardized materials to use in teaching/learning process .It is
necessary to provide appropriate materials required to the levels of learners and help them to develop culture of checking the quality of sport materials before their use to
prevent injuries and other accident.
Environment and sustainability
Provide materials and deliver the lesson with encouraging learners to protect the
environment and well use of materials. Help them to develop fair play and avoiding
violence in the game.
Peace and values education
Help learners to develop fair play and avoiding violence and conflict in the game by
setting clear and relevant instructions. Provide activities that help learners to develop
their competence peacefully.
Comprehensive sexuality education
Provides physical activities and sets instructions that prevent sexual harassment, any
kind of gender based violence like sexual abuse and “bad touches”.
8.4 . List of lessons and assessment
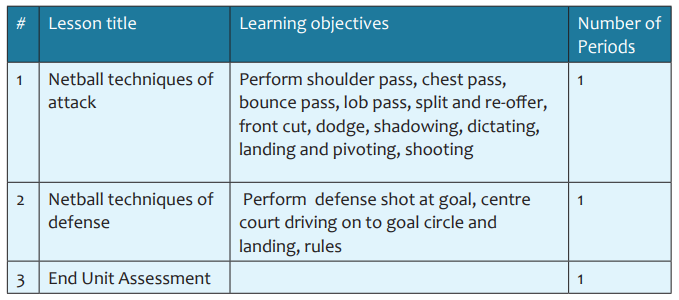
Lesson 1: Netball techniques of attack
a. PrerequisitesLearners of senior three will learn better netball techniques of attack if they can perform
netball skills adhering to rules
b. Teaching resources
Playground, teaching room, whistles, stop watch, balls, cones, chasubles, ring
c. Introduction
Opening discussionsAsk questions related to netball techniques of attack and their importance to player
Warm-up activities
Let learners make two rows and perform exercises of body activation by jogging around
the ground with maintaining a medium speed. Warming up specifically with balls in
group. Ask one of them to lead systematic stretching exercises.
d. Lesson development
This lesson comprises techniques of attack in netball
For each technique:
• Show learners how to execute the basic skills
• Let learners to practice based on instructions, materials and provide necessary
support
• Control how learners perform netball attack with techniques
Techniques of shoulder pass
• Position feet staggered one foot ahead of the other
• Hold the ball in one hand at the shoulder
• Extend arm with the ball behind the shoulder
• Push the ball weight transferred to the forward foot
• Throw the ball with a final snap of fingers and wrists
• Turn the body forward as the throwing arm swings across the body

Techniques of chest pass
• Place one foot in front of the other and slightly apart
• Face the direction of the throw
• Hold the ball at the chest level
• Focus eyes on target where you want to throw
• Hold the ball close to the chest
• Push from both hands on to the target
• Follow through with the rest of the body forward
• Forward the hind leg to maintain balance
• Transfer the weight of the body to the foot opposite to the throwing arm

Techniques of bounce pass
• Position feet staggered one foot ahead of the other
• Hold the ball in both hands with fingers spread over as it is a chest pass
• Keep eyes on the receiver
• Push arms forward and down wards
• Release the ball to strike the ground near the receiver to be received at the hips
level
• Move the hind foot forward to maintain balance
• Extend the hands and fingers in the direction of the ball
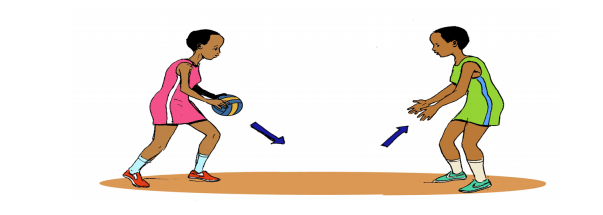
Techniques of lob pass / overhead pass
• Balance on feet
• Place the weak foot in front of other in the direction of the throw
• Keep body weight on the hind foot
• Hold the ball in both hands with fingers behind and thumbs under
• Extend arms from behind and over the head
• Flexing hands and fingers as the ball is released
• Transfer the weight of the body to the forward leg
• Extend the arms fully and relax fingers
• Move behind foot forward in the throwing direction
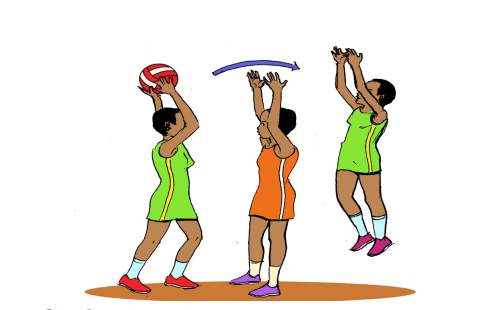
Techniques of under arm pass
• Execute standing position with weak foot in front
• Take both arms back with elbow straight as the knees bend
• Crouch the body and the weight taken on the back foot
• Push the ball in forward direction
• Transfer the weight of the body forward
• Release the ball as the arms past he side of the leg
Techniques of shooting
• Stand with foot opposite the hand in front
• Hold the ball so that it rests on fingers
• Spread fingers underneath the ball, thumbs under the ball
• Lock wrists to maintain shooting position
• Hold the ball above the head in order to see the ring
• Keep eyes on the ring until the ball is released
• Bend the elbows to bring the ball to the head level
• Bend the knees and push the ball upwards with arms
• Remain body weight over feet until the ball is released
• Use an up and over action with arm, wrists and fingers
• Picture of learners perform shooting in two, threes, fours

Techniques of landing on one foot
• Receive the ball and step with the other foot in any direction
• Pass the ball before being re grounded
• Pivot on the landing foot any number of times side ways
• Lifting the pivot but pass the ball before re ground it
• Jump from the landing foot on to the other and jump again and pass the ball
before being re grounded
• Step with the other foot and jump with releasing the ball before being re grounded
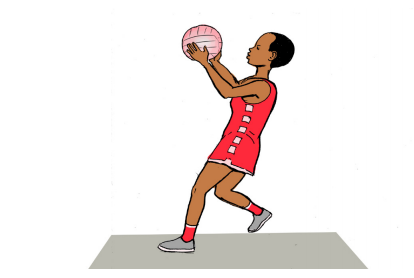
Techniques of landing on both feet
• Receive the ball and land with either foot in any direction any number of times
• Step with either foot in any direction lift the other foot and throw or pass before
being re grounded
• Pass the ball before re grounding the other foot
• Jump from both feet on to either foot and throw the ball before re grounding any
• Step with either foot and jump. It is necessary to pass or shoot before re
grounding either foot

Cool-down activities
Let learners to march on the ground relaxing , arms and legs with moving in different
direction together and raise hands according to teacher’s signals
e. Assessment
Final discussion
Reflect
What do you do to play a fair game?
Connect
What are other conditions that need techniques?
Apply
How will you use learnt techniques and in your life to serve the society
Lesson 2: Netball techniques of defense
a. Prerequisites
Learners will learn better this lesson if they can perform netball skills adhering to basic
rules of attack.
b. Teaching resources
Playground, teaching room, whistles, stop watch, balls, cones, chasubles, ring
c. Introduction
Opening discussionsAsk questions related to netball techniques of defense
Warm-up activities
Let learners make two rows and perform exercises of activating the body by jogging
around the ground with maintaining a medium speed. Warming up specifically with
balls in groups. Ask one of them to lead systematic stretching exercises.
d. Lesson development
This lesson comprises netball techniques of defense
For each technique:
• Show learners how to execute the basic skills
• Let learners to practice based on instructions, materials and provide necessary
support
• Let learners discuss on rules and you provide correct explanations
• Control how learners perform netball techniques of defense in a game situation
adhering to rules.
Basic techniques in defense
• Turning half with right foot forward-defender’s back towards the attacker
• Intercept the ball with half foot forward defenders faces the attacker
• Defending facing the attacker
• Timing the jump while elbow is lowered and jump before the ball is pushed
Basic techniques of intercepting the ball
• Watching the ball closely from the time it leaves the thrower’s hands
• Paying attention to the opponent and reach out for the ball
• Trust out arms and make interception
Techniques of close marking
• Take position between the ball and the opponent
• Monitor the opponent’s movement and the ball
• Maintain body weight on the balls of the feet- not flat footed
• Make knees slightly flexed
• Make short quick steps according to the opponent movements
• Look at the ball and at the opponent
• Extend hands in the ball direction without body contact
• Take up position one meter away from landing foot of the opponent
• Investigate the shooter’s direction of passing and intercept the ball
Techniques of close marking and interception
• Make a mark close on the opponent
• Stand between the ball and opponent with preventing contact
• Stand with a half turned to face across the opponent the left shoulder cover the
right
• Face in the opposite direction with right shoulder covering the left
• Stand with front foot nearer the opponent, the hind turns slightly away from her/
him
• Keep the weight on the ball of the foot and bending knees ready to move or jump
in an direction
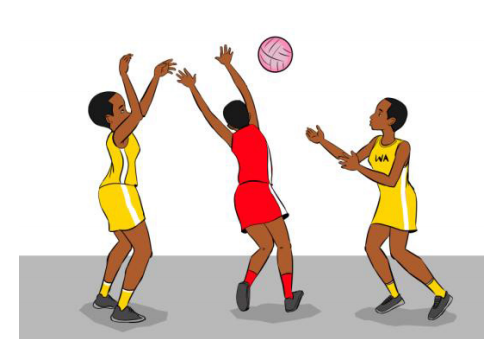
8.5. Additional information for teachers
Netball RulesThe following is an overview of the rules of the game of netball as outlined in the Official
Netball Rules, published by the International Federation of Netball Associations (IFNA).
The aim is to provide you with a basic understanding of the rules to be able to play the
game safely and enjoyably.
Please use this section as a reference to answer any questions you may have about
umpiring decisions. If you’re still not sure, please ask one of our umpires on your match
night.
The team
Teams shall consist of 7 players. There must be at least 5 players, one of whom must
play centre, to enable the fixture to go ahead.
Substitutions
Substitutions can only be made at half time or when a player is injured. There is no limit
to the number of substitutions that a team can make.
If you start a match with 5 or 6 players but more members of your team arrive after the
game has started, they must wait until the next centre pass before being allowed to
join the game.
Playing positions and their roles on the court
There are seven playing positions in a team. Each has an important role to play for their
team:
Goal Shooter (GS): To score goals and to work in and around the circle with the GA
Goal Attack (GA): To feed and work with GS and to score goals
Wing Attack (WA): To feed the circle players giving them shooting opportunities
Centre (C): To take the centre pass and to link the defense and the attack
Wing Defense (WD): To look for interceptions and prevent the WA from feeding the
circle
Goal Defense (GD): To win the ball and reduce the effectiveness of the GA
Goal Keeper (GK) : To work with the GD and to prevent the GA/GS from scoring goals

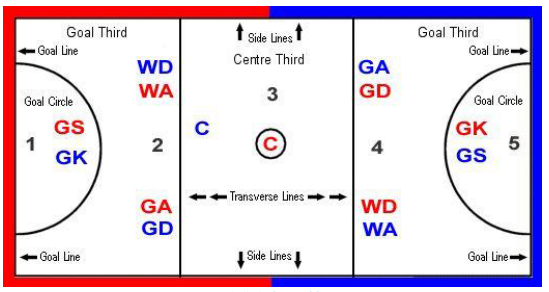
Netball playing position
Starting the game – centre pass
The first centre pass is decided between the two captains by the toss of a coin. The
centre passes then alternate between the teams, regardless of which team has scored.
Before the whistle, all players must start in the goal thirds except the two centers.
The centre with the ball must be wholly within the centre circle and must obey the
footwork rule after the whistle has been blown. The opposing centre stands anywhere
within the centre third and is free to move.
After the whistle the centre pass must be caught or touched by a player standing in or
landing wholly within the centre third.
A player must not break at the centre pass, which is moving into the centre third before
the whistle is blown for the centre pass.
A free pass would be awarded to the opposing team in any of these instances above.
Players must get onside quickly at the centre pass. The centre with the ball must hurry
back to the centre circle and step straight in. If she waits for her players to get back
onside, this is called “delaying play”.
This would result in the Centre receiving a caution, a penalty being given and advanced
up the court.
Footwork in the centre circle
The footwork rule still applies in the centre circle. As soon as the centre steps into the
circle, their leading leg becomes their landing foot and the footwork rule then applies.
That is, if they lift or move their landing foot and place it back down again, a free pass
will be awarded to the opposing team due to footwork.
The umpire will blow the whistle to start play once the centre has placed one foot
wholly in the circle.
Offside rule
A player with or without the ball cannot move into an area of the court that is not
designated for their position.
This will result in a free pass being awarded to the opposing team.
Footwork
A player can receive the ball:
• with both feet grounded or jump to catch the ball and land on two feet
simultaneously. You may then take a step in any direction with one foot (but not
both) and pivot on the spot with the other foot. Once one foot is moved, the
other is considered to be the landing foot.
• with one foot grounded or jump to catch the ball and land on one foot. The
landing foot cannot be moved, other than to pivot on the spot, while the other
foot can be moved in any direction. Once the landing foot is lifted, it must not be
re-grounded until the ball is released. Hopping or dragging the landing foot is not
allowed.
If you break the footwork rule, a free pass will be awarded to the opposing team.
Obstruction
A player attempting to intercept or defend the ball must be at least 0.9m (3feets) away
from the player with the ball. This distance is measured from the landing foot of the
player in possession of the ball. The defender may jump to intercept or defend the ball
from this 0.9m (3feets) feet distance but you must ensure if you do jump to defend
a ball, you don’t land any nearer that 3ft or this is obstruction (i.e. shortening your
distance).
A penalty pass will be awarded if you obstruct a player as described above.
Obstruction of a player not in possession of the ball
Your arms can be outstretched when you are marking your player off the ball if you are
trying to:
• To catch, deflect or intercept a pass
• To obtain a rebound from an unsuccessful shot at goal
• Momentarily signal for a pass or indicate the intended direction of movement
These instances are not classed as obstruction but you will be penalized if you mark a
player with your arms out or potentially if you stand under the post with your arms up
while waiting for a rebound (although the umpire may choose to play advantage if the
opposition aren’t being impeded).
Contact and Contest
‘When attacking, defending or playing the ball, opposing players may come into physical
contact with each other. Provided the players do not interfere with each other’s play
or use their bodies to gain an unfair advantage over their opponent, it is deemed to be
‘contest’ and play continues. ‘Contact’ occurs when a player’s actions interfere with an
opponent’s play whether these are accidental or deliberate.
Interference may occur in the following ways:
• Physical contact using any part of the body to limit an opponent’s ability to move
freely (this includes, but is not limited to, pushing, tripping, holding or leaning on
an opponent).
• Knocking or hitting a player including when shooting for goal
• Placing hand/s on the ball held by an opponent
• Hitting the ball held by an opponent or removing it from an opponent’s possession
• While holding the ball, pushing it into an opponent
A player causes contact by:
• Landing in a place already occupied by an opponent before the movement began
• Moving into the path of an opponent who’s committed to a particular landing
space
Generally, an attacker is moving into a space to receive the ball and a defender is drawn
into causing contact when trying to intercept. If the attacker was in that space first, the
decision goes their way and against the defender. A defender must be able to intercept
the ball cleanly.
However, no contact is allowed off the ball. This includes attackers pushing off, backing
into or pushing through a defender to get into space to receive the ball. If the defender
was in that space first, then the decision goes their way and against the attacker.
Inevitable contact is described as:
• Player/s, whether moving or stationary, may not position so closely to an opponent that this player is unable to move without contacting.
Simultaneous contact is described as:
• If two opposing players contact simultaneously a toss up is taken between the
two players concerned.
The umpire’s role is to watch the game and determine what is ‘contact’ and what is
‘contest’ . It may not always seem obvious to you as a player why a particular decision
has been made or why advantage has been played but please respect the decisions that
they make.
If interference occurs, the umpire will state:
• which player the penalty is against;
• that a penalty pass has been awarded to the opposition.
The umpire should stand at the position at the side of the court where they want the
penalty to be taken from. If you’re ever unsure where to take the penalty from, you
need to look at the positioning of the umpire for guidance.
Failure to set the penalty correctly in this way will result in a reversal of the penalty and
a free pass to the opposing team.
A lot of contact disrupts the flow of the game. It also puts your team at a tactical
disadvantage because when a player is taken out of play on a penalty, they are not able
to contribute to the team’s defense. It’s far better to pull out of a challenge if you think
you’re going to contact the player and concentrate on defending the next pass instead.
Penalties against a player
The infringer must stand out of play. This means the infringer must:
• Move quickly to the position indicated;
• Stand beside but away from the player taking the penalty so as not to impede
that player;
• Remain in this position and not move or take any part in play (including verbal
comments) until the ball has been released.
Once the player taking the penalty pass is in the correct position, the player may choose
either to play the ball immediately or to wait for the infringer to stand out of play. If the
player chooses to play the ball immediately:
• The infringer may not take part in play until the ball has been released or make
any attempt to intercept the penalty pass;
• The penalty pass will be retaken if the infringer interferes with it.
Please observe the above rule if a penalty is given against you!
Taking free passes and penalties
You have 3 seconds from setting the free pass/penalty in which to take it. If you decide
that another player would be better taking it, you must place the ball back on the floor.
Do not walk towards the other player to pass it to them (footwork) or hand it to them
(short pass).
Any player allowed in that area may take the free pass/penalty.
Shooting
Only the GS and GA are able to score goals for your team. They must be wholly inside
the goal circle to shoot.
Throw in
The ball is thrown back into play from the point where it went off the court. It is out of
court when it contacts anything outside the court area (except the goalpost).
When taking a throw in, a player places her foot up to but not on the sideline or backline
of the court. The lines are part of the court. If any part of your foot is touching the line
or you step into the court in the process of taking the throw in, this is deemed to be a
foul throw. At least one foot must be within 15cm of the line though.
This includes walking on the court to pass the ball to another player if you decide that
they should take the throw in. In this instance, you should leave the ball on the floor
outside the court for the player to then pick up.
You have 3 seconds from when you take up your position at the side of the court in
which to throw the ball.
You must also wait until all players are back on the court before taking the throw in.
If any of the above occurs, a throw in to the opposing team will be awarded.
Over a third
The ball cannot be thrown over a complete third of the court without being
touched or caught by a player (i.e. it cannot cross two transverse lines).
A free pass shall be taken from the area where the ball crossed the second transverse
line (i.e. where the ball shouldn’t have been).
Replayed ball
A player may not replay the ball. Specifically you can’t:
• Lose control of the ball and pick it up again if it has not been touched by another
player;
• Catch a rebound from a shot on goal if the ball has not touched the post or
another player;
• Toss the ball into the air and catch it again without it being touched by another
player.
Jewellery
Players must remove all jewellery before the start of a match to avoid injury to you as a
player and your opposition. This rule includes all ear piercings, including piercings high
on the ear lobe. Covering piercings up with a plaster is not adequate!
The only exception is a wedding band or a medical alert bracelet which can be worn but
must be taped up.
Failure to remove jewellery will result in a player not being allowed on court.
Nails
Nails must be kept short. As a guideline, nails should be no longer than 1mm long and
should not be seen from the underside of the finger. This is to protect other players
from injury.
This is not a popular rule but it will be strictly enforced to avoid any unnecessary injuries
occurring to players taking part in the league.
Players will not be allowed to start a match with long nails.
Guidelines on enforcing the rules
Although we’re all out to have some fun playing netball, unfortunately there are rules
of the game that we need to stick to.!
For the first week or two, the umpires may be lenient and give you a second chance
to correct a technical fault (such as stepping onto the court as you take a throw in),
instead of giving the free pass to the opposing team. Umpires will also explain any
decisions that you don’t understand if you ask them politely, although they may ask
you to wait until half or full time to allow them to concentrate fully on the game being
played.
The rules will be followed more closely as the league progresses and as you all progress
as players. The exception to this are rules which affect players’ safety, such as contact
and obstruction, which will be enforced from the start of the league.
8.6 . End unit assessment
• Organize netball competitions between teams and assess learners’ abilities to
apply techniques Let them refereeing the match and observe the respect of
netball rules.
8.7. Additional activities
• Reduce rules for slow learners and allow them to play the ball regular
• Organize competitions between small groups and choose their own referees
• Organize competition between classes, forming school teams and participate in
interschool competitions and refereeing matches.