UNIT 2 :WORD PROCESSING
Introductory activity
1. The head teacher of your school buys a new computer which has
no software in it. He/she needs to prepare a report which to be
send to the District. What are the system software and application
software that the head teacher will need to achieve his purpose.
2. You are asked by your head teacher to prepare a document
presenting the features of your school specifically its historical
background, Vision and mission, performance, statistics about
students and officers.
iii) Give steps used to launch application software that will be used to
perform this task
iv) The document to be created must comply with the following:
v) It has titles and has highlights of words to which more attention
is needed. (The highlighted word can be made as: Bold, italic,
underlined depending on the preferences)
vi) It has attractive colors depending on school preferences
vii) It contains a table to present the school statistics information.
viii) It has a school image as the first page
ix) It contains the hierarchy of officers in the school which is created
using smart chart
x) Has a header “My beautiful School” and footer as “Cantered page
number”.
xi) Create a table of content for this document and save it on “My school”as file name.
2.1 Text formatting
Activity 2.1
1. Open the new document of MS word
2. Name each icon commands by make a pointer/curser on each
icon from Font groups in home tab as shown on the below figure: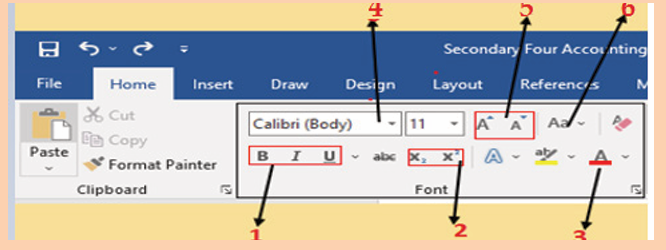
3. Write a function of each command from 1 to 6
Formatting is the process of enhancing the appearance of a document, making
it attractive. Text formatting involves enhancement of the appearance of the text.
Some of the common text formatting features includes font style, font size, fontcolour, underline, change case and among others.
2.1.1.Font Style
By default, the font type of each new document is set to Calibri. HoweZer, Ms
Word provides many other fonts to use in customizing the text. To change text’s
font style/font face go through these steps:
1. Select the text to modify
2. On the Home tab, click the drop-down arrow next to the Font box. A
menu of font styles will appear.
3. Select and click on the font type to apply. Immediately the font stylechanges.
2.1.2 Font color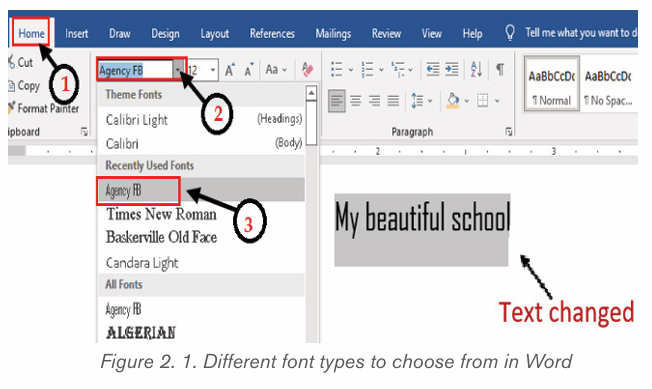
The most common font color for word text is automatic (near black) but there
are other fonts available. To change the font color:
1. Select the text to modify.
2. 2. On the Home tab, click the Font Color drop-down arrow. The Font
Color menu appears.3. 3. Select the font color to use. The font color will change in the document.
The color to choose from are not limited to the drop-down menu that appears.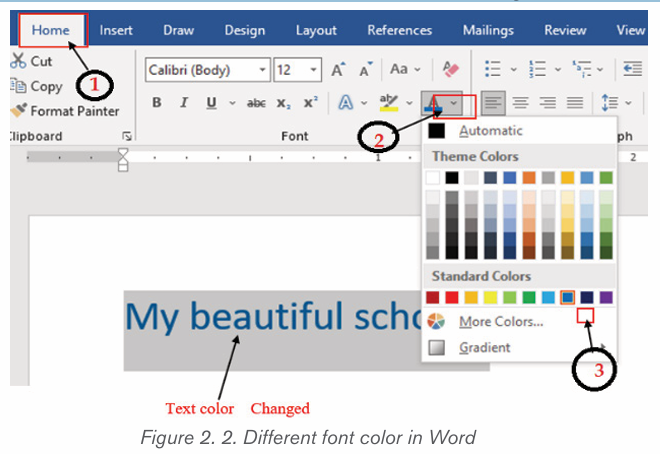
Select More Colors at the bottom of the menu to access the Colors dialog boxand choose one of the colors.
2.1.3 Font size
The most used size of word characters is 12, however character size in Word
varies from 1 to 72 but can be increased even up. To change the font size go
through the following steps:
1. Select the text for which the size is going to be changed. For example
type and select the text “My beautiful School”.
2. Click on the Home tab and click the Font size command from the Font
group then choose the desired size like 36. In the figure below the fontsize of the text is now changed to 36.
Note: It is possible to change the font size using the Increase Font Size and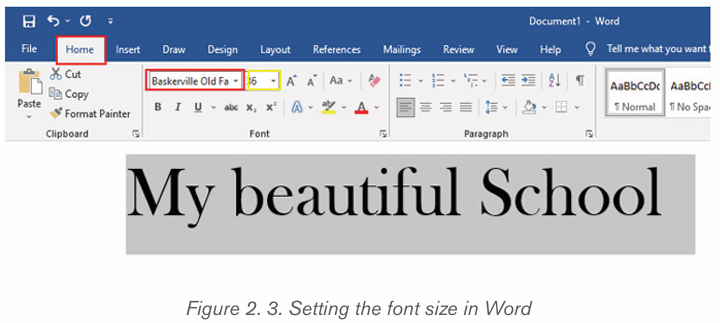
Decrease Font Size commands
2.1.4Changing text case
The text case is about the presentation of characters in words. The available
cases are: Sentence case, Lower case, Upper case, Toggle case and Capitalize
each Word. To change the case:
1. Select the text for which to change the case.
2. On the Home tab, click the Change Case command in the Font group.
3. A drop-down menu will appear. Select the desired case option from themenu
• Sentence case: It capitalizes the first letter of each sentence.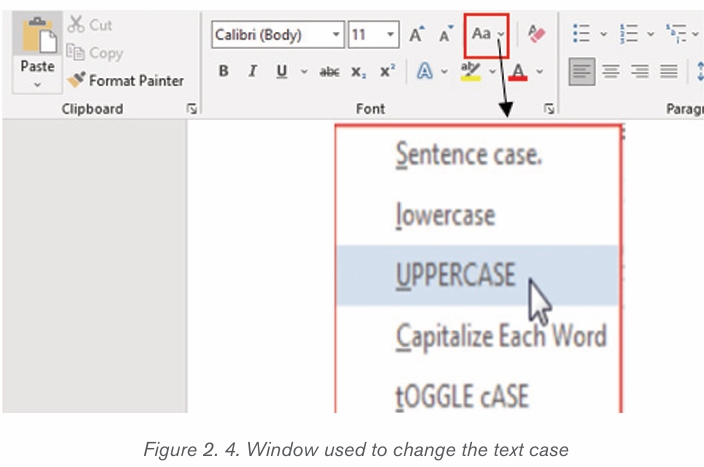
• Uppercase: It capitalizes all the all letters of your text.
• Capitalize Each Word: It capitalizes the first letter of each word.
• Toggle Case: It allows you to shift between two case views, e.g. toshift between Capitalize Each Word and cAPITALIZE eACH wORD .
2.1.5 Making text Bold, Italic, and Underlined
The Bold, Italic, and Underline commands are used to help draw attention toimportant words or phrases. To make text have these attributes do the following:
1. Select the text to modify.
2. On the Home tab, click the Bold (B), Italic (I), or Underline (U) commands
in the Font group
3. The selected text will be modified and made bold, italic and underlined
as in the next image if all the corresponding icons were clicked on as shown below.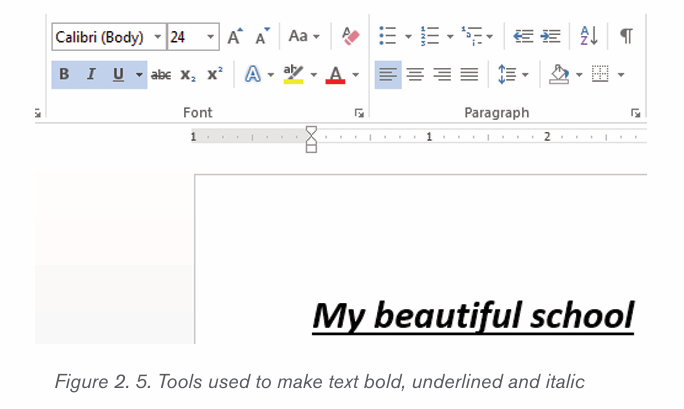
The functions of the used commands are given below:
• Bold: It allows to make the text bold
• Italic: It allows to italicize the text• Underline: It allows to underline the text
Application activity 2.1
1. What is the function of the following command in a
Word document?
b) (a) Font size, (b) Font color, (c) Font style, (d) Bold,
(e) italic, (f) Change case
3. 2. Write at least four lines of text which describes
“Your education background “and do the following:
iv) Change font type of the first and second sentences to
“Poor Richard”, font size to “14”, font color to “Blue”
and make the sentences italic.
v) Change the third and fourth sentence to the font type”
Tahoma”, font size “12”, font color “Red” and underlinethose sentences.
2.2 Paragraph formatting
A Paragraph format contains one or more lines with a combination of words,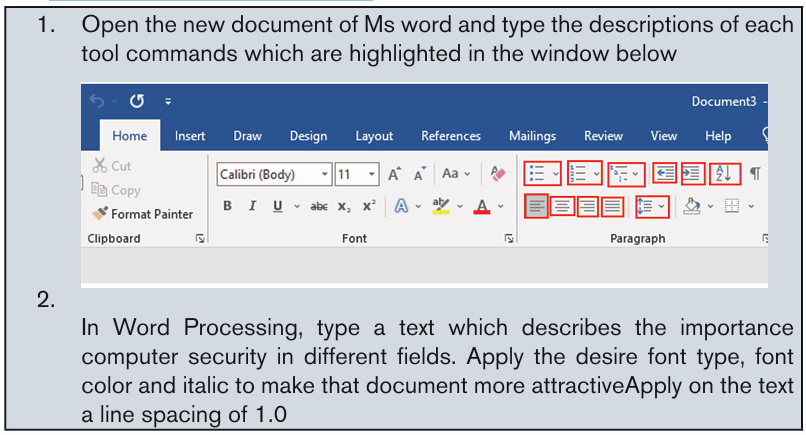
numbers and other characters. They are features used to improve the appearance
of an entire paragraph. They include among others Text Alignments, Bullets,
Numbering, Multi-Level list, Paragraph Indents, Sorting Text, Line Spacing and
many others.
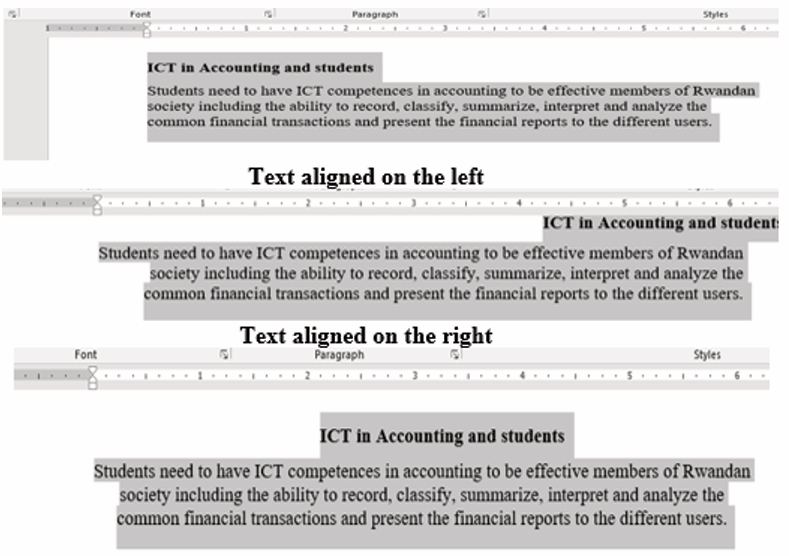
2.2.1. Text Alignment
It refers to the arrangement of text relative to the left or right margin of a page.
There are four types of alignments namely: Left, Right, Centre and Justifiedalignments.
Steps: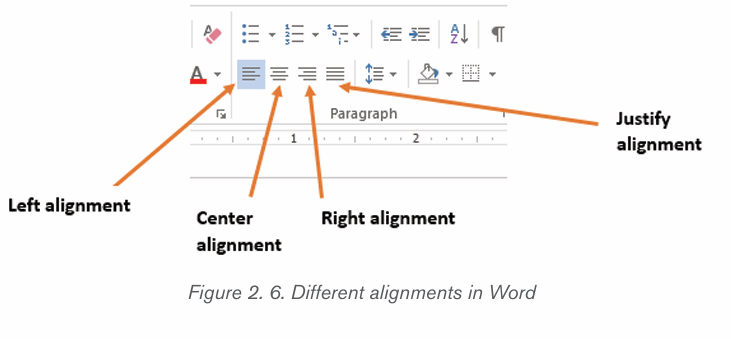
1. Select the text that needs to be aligned
2. On the Home tab, in the Paragraph group click either Align Left , AlignRight, Center or Justify command
2.2.2 Line and Paragraph Spacing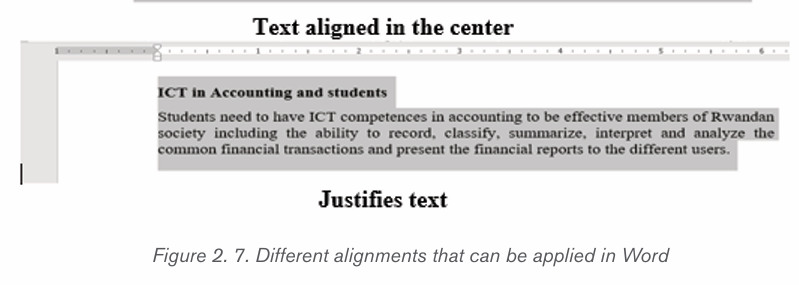
Line spacing determines the amount of vertical space between lines of text.
Microsoft Word uses single line spacing by default. The selected line spacing
will affect all lines of text in the selected paragraph or in the paragraph that
contains the insertion point.
To set a paragraph spacing follow these steps:
• Select all of the paragraphs for which the spacing is to be changed (or place
the insertion point anywhere in a single paragraph that needs to
be changed).
• On the Home tab, click the “Line and Paragraph Spacing”
command.• Choose the line spacing among the different options
The line spacing is shown in multiples. “2.0” is double spacing, “3.0” is triple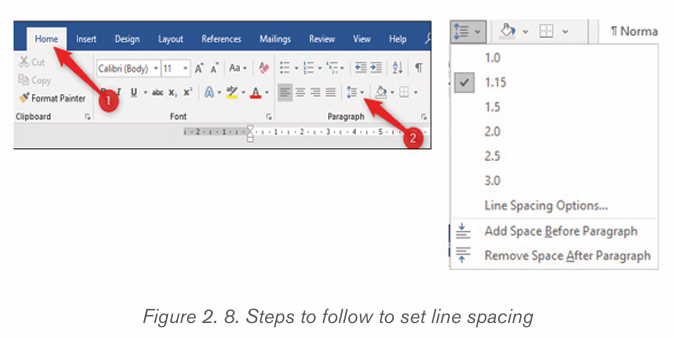
spacing, and so on. Select the line spacing needed and Word applies it to theselected paragraphs.
There is a way to choose another spacing, or revert to the original spacing,
click the “Line and Paragraph Spacing” option again and select a different linespacing.
2.2.3. Indentation
It is the process of moving text away from the right or left margins by a given
interval. There are four different types of indents that can be applied to aparagraph which are detailed in the table below:
i) To Create a Left Line Indent follow the following steps: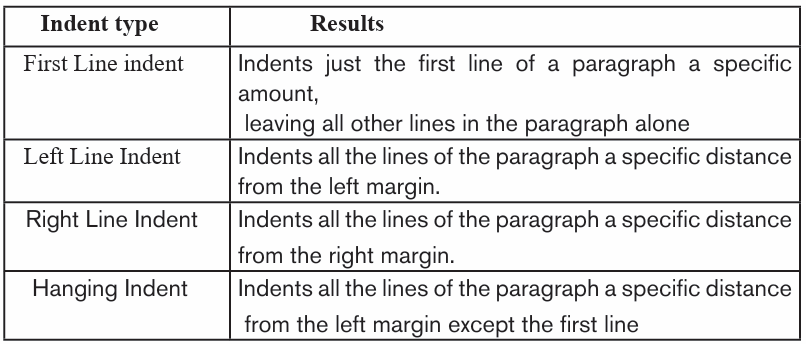
1) Position the cursor anywhere in the first paragraph of the document
2) In the Home tab, click on the icon on the right bottom corner of the
Paragraph group (Paragraph Settings)
3) In the dialog box that appears next to Alignment option, click on the
drop down arrow and choose Left. The other options available when thedrop down arrow is clicked are Right, Centered and Justified
4) In the Indentation options, increase the Left Indentation to 1 inch by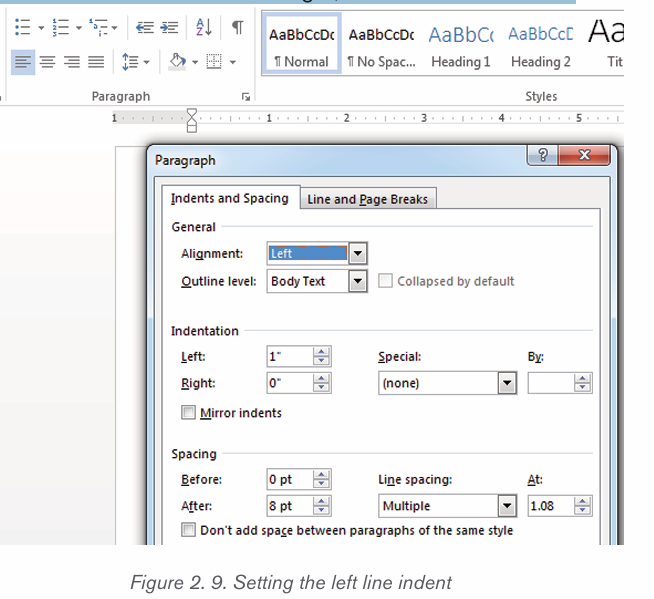
clicking the Up-scroll arrow
5) In the Spacing options, select the spacing to apply
6) To apply the new changes click OK
Note that all the lines from the left side of the first paragraph moved over 1 inch.
ii) To Create a Right Line Indent follow these steps
1) Position the cursor anywhere in the first paragraph of the document
2) In the Home tab, click on the Paragraph Settings icon from Paragraph group
3) In the new dialog box, next to Alignment options click on the drop down
arrow and choose Right.
4) Increase the indentation to the size needed
5) Click OK to apply the new changes.2.2.3 Bullets and Numbering
Bullets or numbering are used for a list. It is possible to apply automaticallysimple bullets and numbering to lists in the document as it is being written.
i) To create a bulleted list in Microsoft Word, follow the stepsbelow:
1. Position the cursor where the bulleted list will be inserted.
2. On the Home tab, click the Bullets tool. A bullet should appear.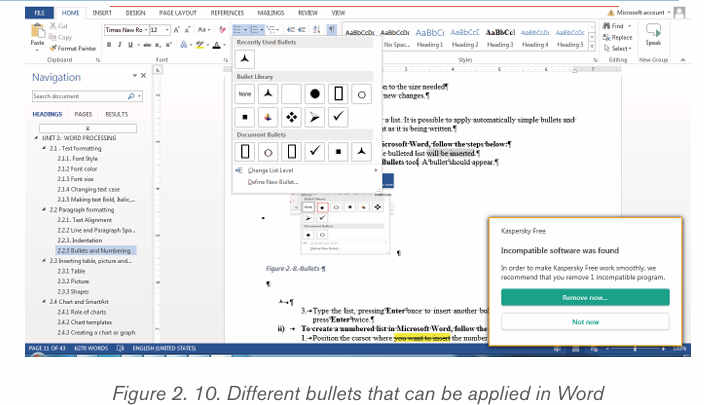
3. Type the list, pressing Enter once to insert another bullet. When finished,
simply press Enter twice.ii) To create a numbered list in Microsoft Word, follow the steps
below.1. Position the cursor where the numbered list will be inserted.
2. In the Home tab, click the Numbering tool. A number One shouldiii) Multilevel numberingappear.

Multilevel numbering creates a numberings in which some numbers areembedded among others therefore creating a logical hierarchy.
• How to set up multilevel numberingBefore applying multilevel numbering to a document, firstly apply heading style
to the heading text.
1. Select the text on which the numbering is to be applied
2. In the Home tab, click the Multilevel numbering icon inthe Paragraph group.
3. There is an option to select an existing layout from the list to use as a starting point
, or create a new numbering system from scratch. As you
hover over each thumbnail image, Word provides a larger image of the
numbering system.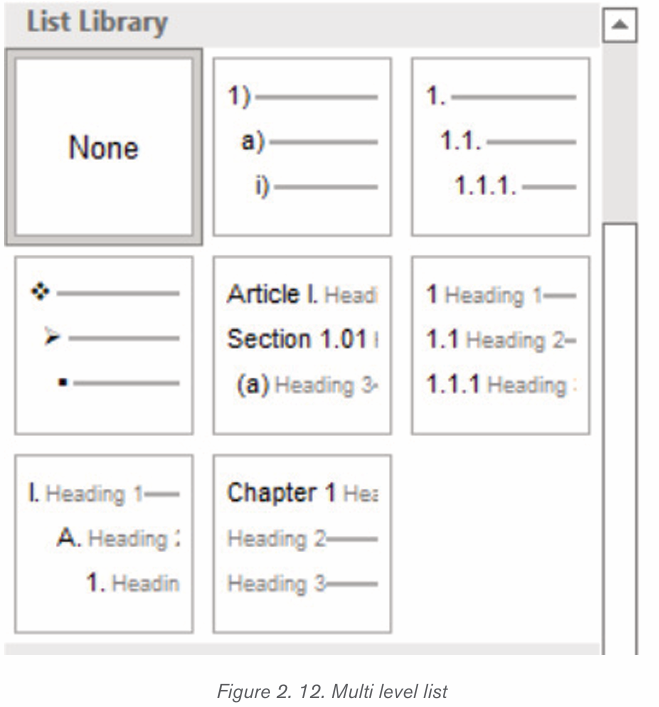
Application activity 2.2
1. Type text in word processing software which describe your school.
The first paragraph talks about school background, the second about
school Vision and weekly school schedule Save it as “Education”
and do the following
b) Apply on the text a line spacing of 1.0
c) Apply Right indent to the left on your first paragraph (school
background)
d) Apply left indent to the Right on your Second paragraph
(school Vision)
e) Apply the numbered list for weekly school schedule
paragraph
f) With bulleted list, retype the name of commands labeled
by numbers in activity 2.1
1. Select your school background then do the following:
a) Indent the first sentence,
b) Change the font type to “Time New Roman “, size =”12”,
line spacing =”2.0c) Change alignment from Left to Justified alignment
2.3.Inserting table, picture and Shapes
Activity 2.3
By doing a research, discuss the tools used in Word shown in the screenshot below:
MS Word allows for the insertion of many objects like Tables, Pictures, Shapes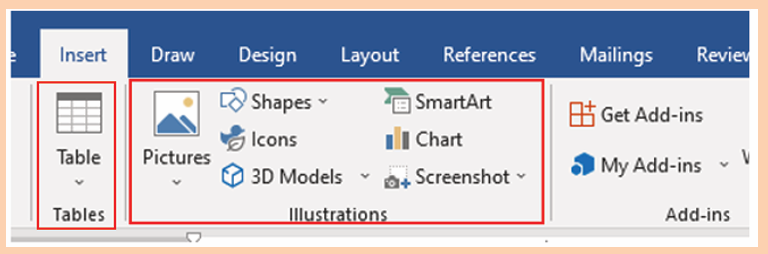
equations, Symbols, Word Art. These objects make a document more beautiful
and easy to understand. Those different objects are inserted in a document byusing the Insert tab.
2.3.1Table
A table is a feature that is used to present information in an organized layout
consisting of rows and columns which intersect to make a Cell. To create a
table, first determine how many columns and rows that it will have. In Word, thetool to make a table will look like the one shown below:
i) Inserting a table in document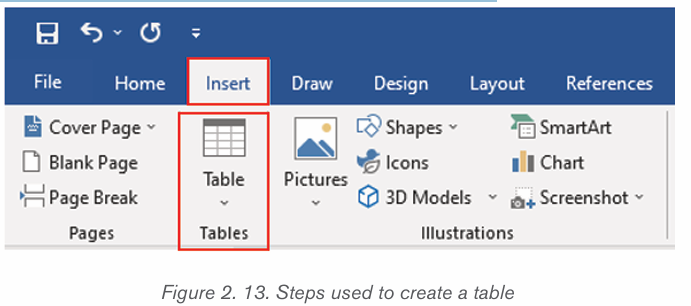
There are two ways of creating a table namely: Using the Graphic Grid andUsing the Insert Table feature.
a) Using the Graphic Grid
1. Position the cursor where the table is to be inserted.
2. Click on the Insert tab,
3. Click the Table tool and select the number of rows and columns that
are needed.
4. Use the grid to select how many columns and rows are needed. Choose
the number of columns and rows by dragging the mouse across the gridand then clicking the left mouse button on the lowest right square.
b) Using the Insert Table feature
– On the Insert tab, click the Table tool
– Click on Insert Table option
– In the dialog box that appears write the number of rows and columnsand click OK.
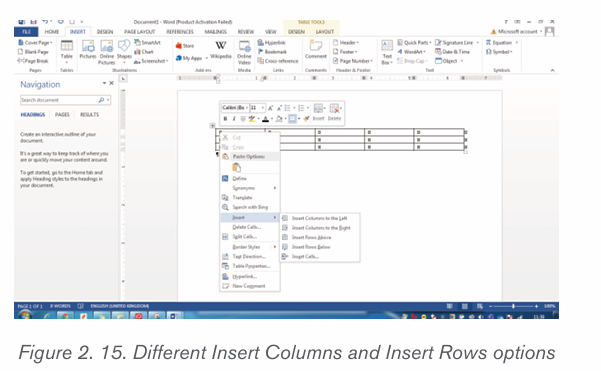
ii Add a Row or Column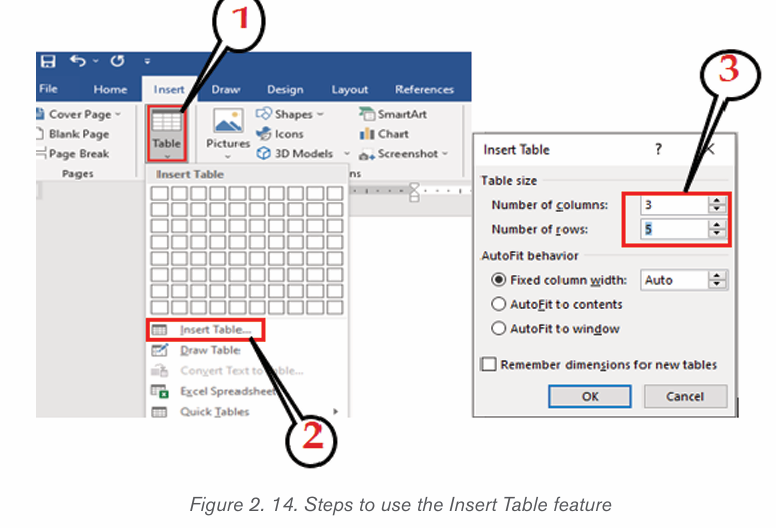
To add a new column or row in an already created table do the following:
Place the cursor in any cell within the column or the cell next to which the new
1. Place the cursor in any cell within the column or the cell next to which thenew column or row will be created and do a Right Click.
2. In the options that will appear click on Insert
3. Next to Insert option click on one of the insert options like Insert Columns
to the Left. The Insert column/row options are shown in the windowbelow:
iii.Delete a table Row or Column
There is an option of deleting a row or a column which is not needed in thecreated table. To do it follow these steps:
To delete a row:
1. Select the row to delete2. Do a Right Click and click on Delete Rows
To delete a column:
1. Select the column to delete2. Do a Right Click and click on Delete Columns
Formatting a table
Formatting a table is to give specific properties to a table, cell, row or columnsdepending on what the user wants.
a) Merging Cells and Splitting Cells.
Merge Cells command is used to combine more than one cells to
appear as one large cell while Split cells command is used to divide acell into more than one cells to make it appear as many different cells.
The following is the procedure for merging cells:
1. Select the cells to be merged.
2. Do a Right Click and choose Merge Cells.
For splitting cells, do the following:
a) Position the cursor in the cell to be split.b) Do a Right Click and choose Split Cells.
2.3.2.Picture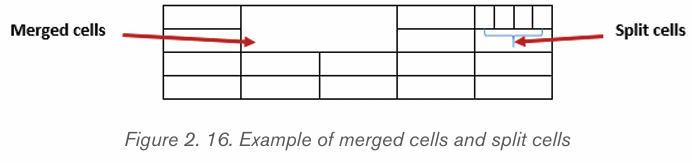
Images of picture that are generated by a computer are called computer graphics.
Examples are photographs, drawings, line art, mathematical graphs, line graphs,
charts, diagrams, typography, numbers, symbols, geometric designs, maps,
engineering drawings, or other images. Graphics often combine text, illustration,and color. A picture can be inserted from the Internet or from an existing file.
a) Inserting pictures from the Internet
1) Position the insertion point where the picture is to be inserted.
2) Click Insert tab from the menu bar in the Illustrations group and clickOnline Pictures icon.
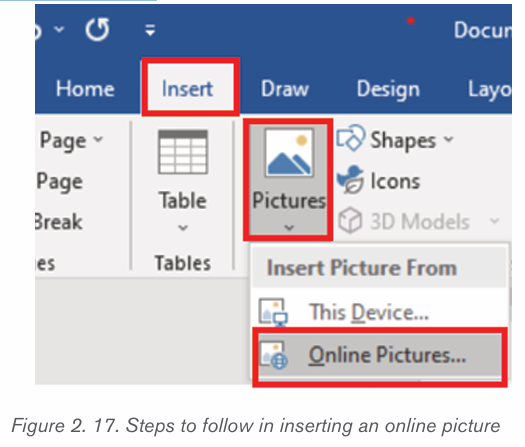
3) If there is Internet connection, a dialog box is displayed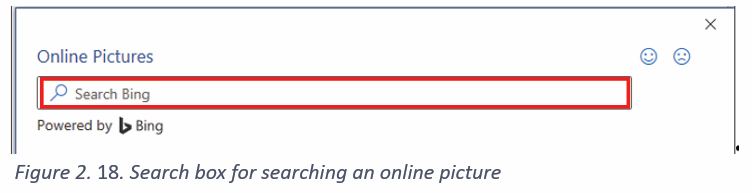
4) Type the name of the image to be located in the box provided.
5) Click on Go button to display the result on the window6) Click on the desired image then select Insert button
b) Inserting pictures from an existing file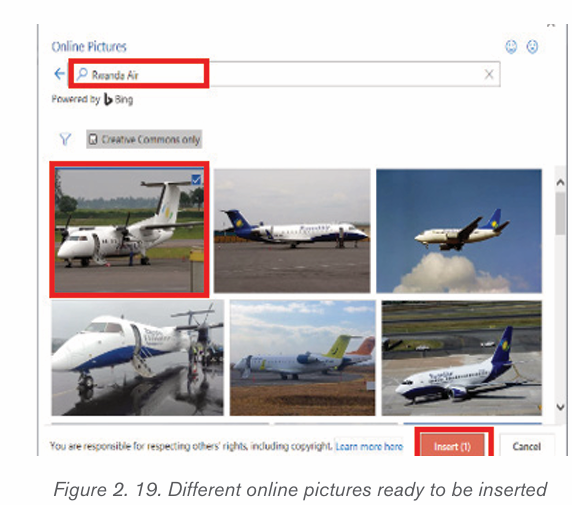
To insert a picture from an existing file is done by following these steps:
• In the Insert tab click on Pictures
• Browse in the computer folders the images to insert and click on Insertbutton
b) Cropping a picture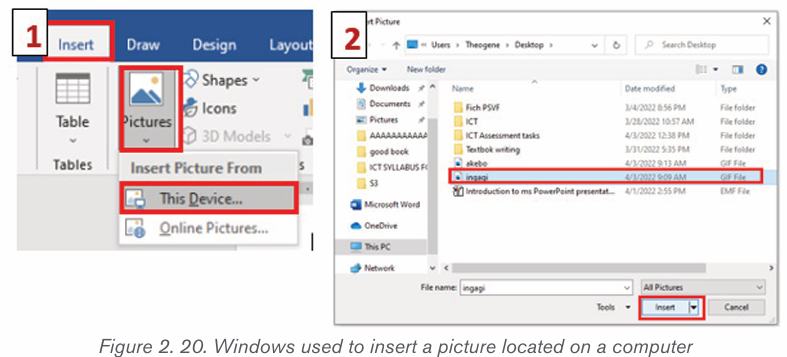
Cropping a picture is to reduce the size of that picture by removing undesirable
or unnecessary elements.
Cropping an image is done in the following way:
i) Select the picture by clicking it
ii) Click the Format tab in the Picture Tools ribbon group.iii) Click the Crop tool.
i) Crop handles appear on the sides and corners of the image. Hold down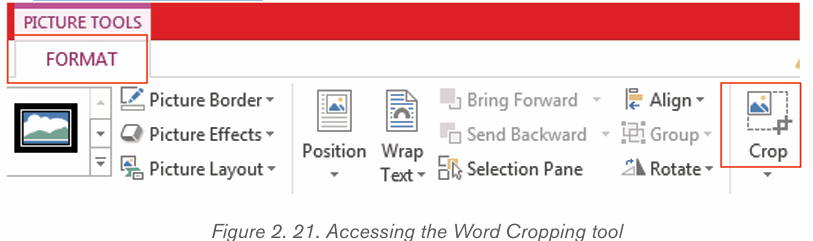
the left button of the mouse and displace the mouse depending on how
you want to crop the image
ii) Click and drag the crop handles where you want to crop.
iii) To crop all four sides of a picture or graphic at once while maintaining the
graphic’s proportions, press and hold down Ctrl as you drag the handles.iv) Click the Crop button again when you’re finished setting the crop area
2.3.3. Shapes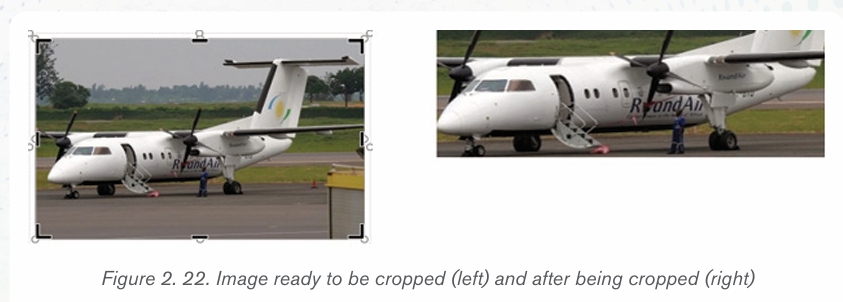
A shape or figure is a graphical representation of an object or its external boundary,
outline, or external surface, as opposed to other properties such as color, texture, ormaterial type.

i) Adding shapes
Various shapes can be added in a Word document then formatted as requiredby the user. Follow these steps to insert shapes
1. Click on Insert tab from the menu bar,
2. Click Shapes icon from Illustration group. Different types of shapes
 appear as shown in the figure below
3. Click on the desired shape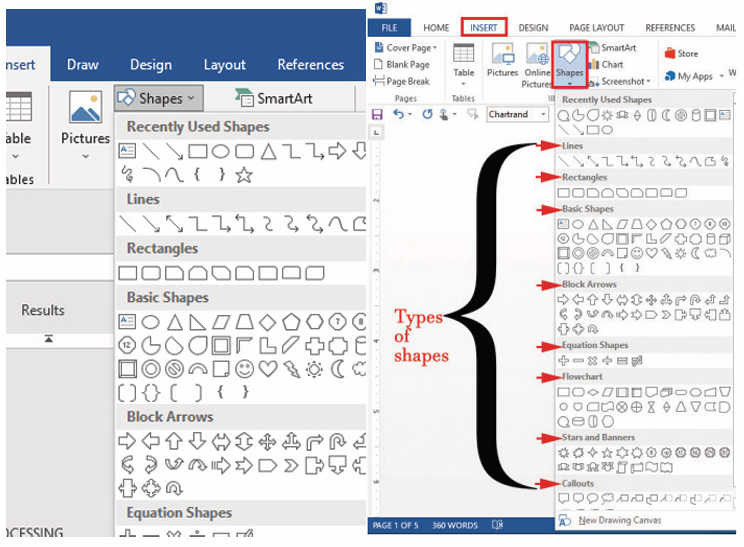
4. Position the pointer at the desired area of the document and drag it in the
desired direction to draw the shape by using the pointer which has now
changed to a plus sign.
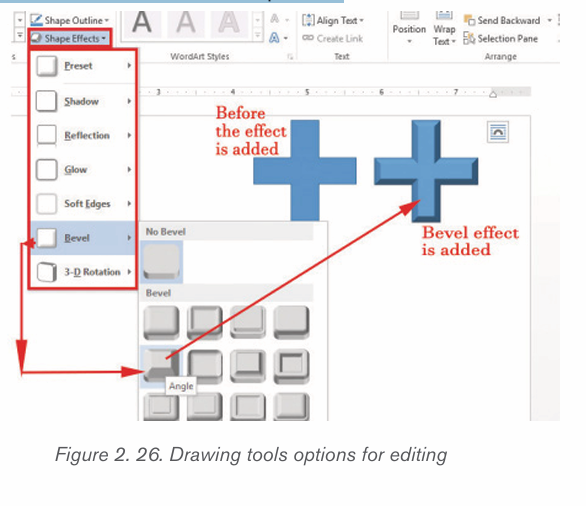
ii) Formatting Shapes
To format in this case means to arrange it in the desired way. Some formatting
styles that can be applied on a shape include the following: changing the shape;
rotating the shape to an angle; and grouping a number of shapes into one image.
1. Click the Shape Fill button from Shape styles in shape format
and select a color to change the shape’s fill color.
2. Click the Shape Outline button and select a color and weight for the
 shape’s outline, as well as dash and arrow styles.
Click the Shape Effects
 button and select a shape effect, such
as shadow, glow, or bevel.
1. Select a shape style preset from the Shape Styles gallery.
Click the gallery’s More button to see more presets
Application activity 2.3
1. Use the Graphic Grid create the following table and save it as table 1
a) Insert three columns to the right of the column containing house.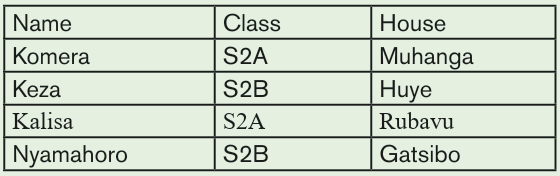
b) Add two rows after the row containing Nyamahoro details.
c) Add another row on top and include the title “Examination Analysis”
d) Save it as Table 2.
e) Delete Nyamahoro’s details.
f) Add the following details in the three columns added: Column
1(History, 67, 89, 98), Column 2 (Business, 77, 56, 34) and
column 3 (English, 74, 87, 65)
g) Merge the cells containing the title.
h) Split the cell containing the name Habimana into two.i) Save it as MyTable.
Activity 2.4
In the table below there is the price of a certain goods which increased from
2005 to 2022 as shown in the table below:How the above information could be interpreted without using table?
2.4 Chart and SmartArt
Smart charts are the charts by which we can show numerical facts
in visual form. It shows the relationship between two or more numbers or
quantities. It generally uses a tabular form, bar charts, line charts, pie charts, or
pictographs to display data
The Role of charts is: the following
• Charts are used to summarize and display information in an easy manner
to understand.
• Charts act as useful tools for conveying financial information.
• They are used to make patterns and trends in numerical order much
easier to see.
• Charts facilitate data analysis.
2.4.1. Chart templates
a) Bar Chart (Bar graph)
A bar chart is a graphic representation of data with horizontal bars or objects.
Bar charts usually display horizontal bars or objects going across the chartvertically, with the values displayed at the bottom of the chart.
b) Column Chart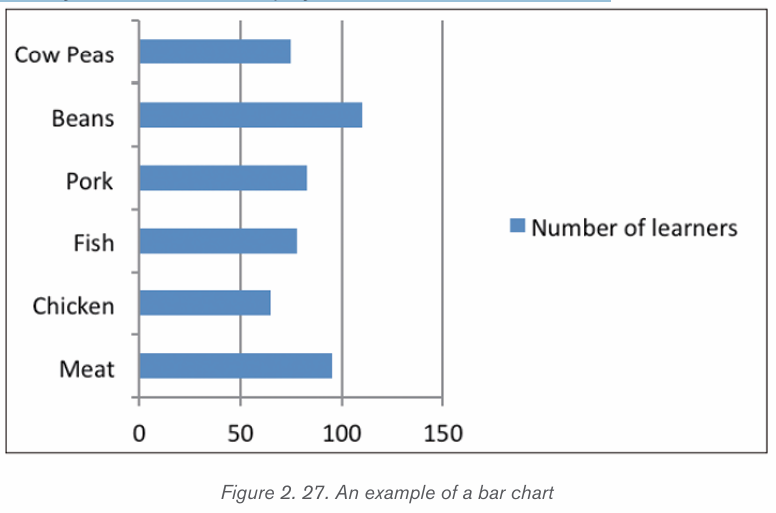
A column chart is a graphic representation of data with vertical bars or
objects. Column charts display vertical bars (categories) going across the
chart horizontally (along the horizontal axis), with the values organized along thevertical axis (on the left side of the chart).
c) Line Chart (Line Graph)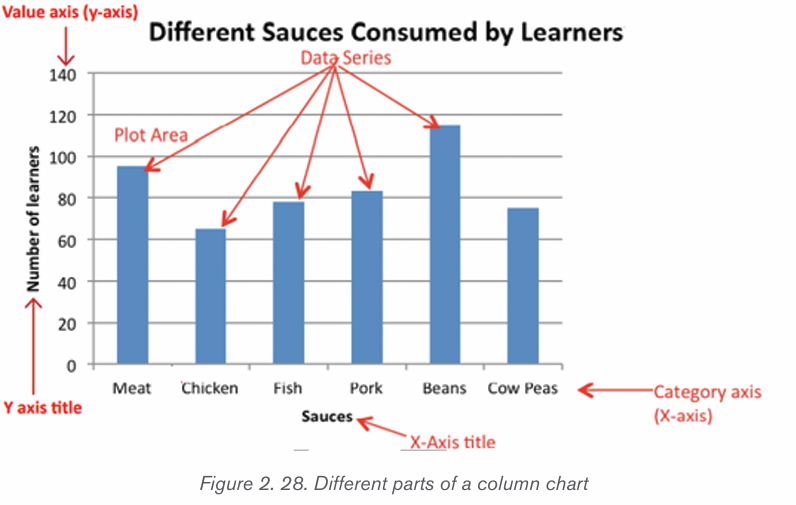
A line chart is a graphic representation of data plotted using a series of lines.
Line charts display lines going across the chart horizontally, with the values axisbeing displayed on the vertical axis (left side of the chart).
d) Pie chart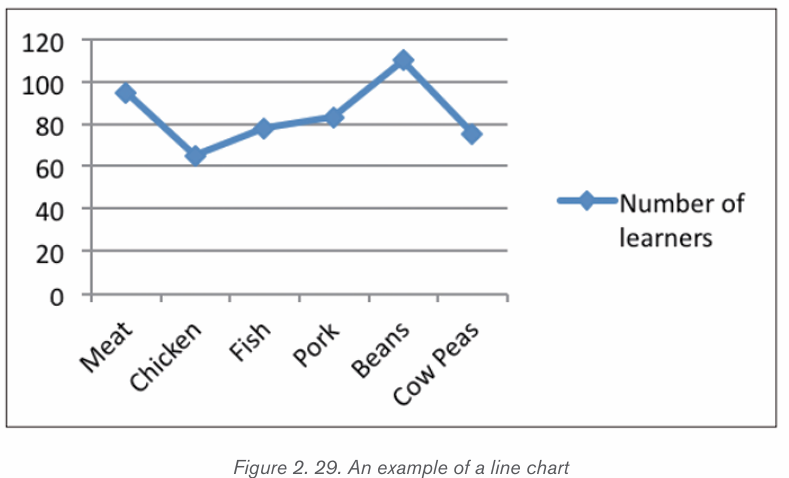
This is a circular chart sliced into sections; each section represents a percentage ofthe whole. Pie charts do not display horizontal and vertical axes as other charts.
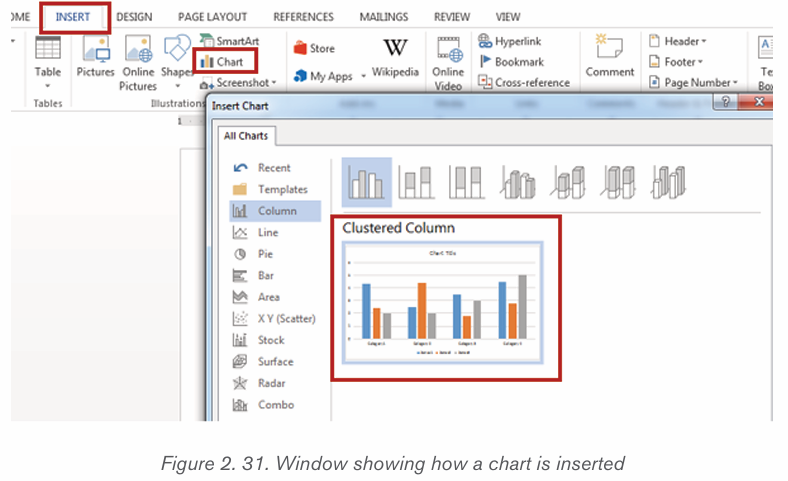
2.4.2.Creating a chart or graph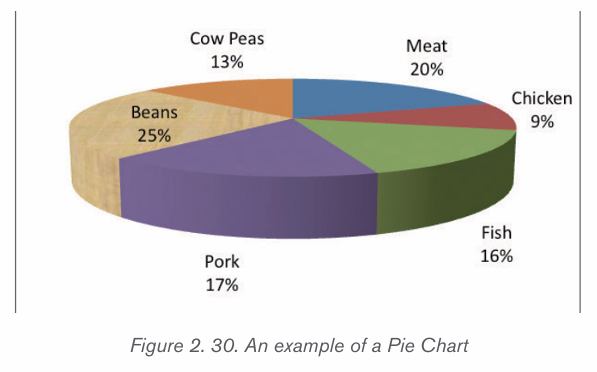
1. Prepare the data that is going to be used in making the chart
2. In Word, click where the chart will be placed.
3. On the Insert tab, in the Illustrations group click Chart.4. Click on the type of chart to be inserted
1. The inserted chart is a default one. Edit the chart data so as to have theneeded chart
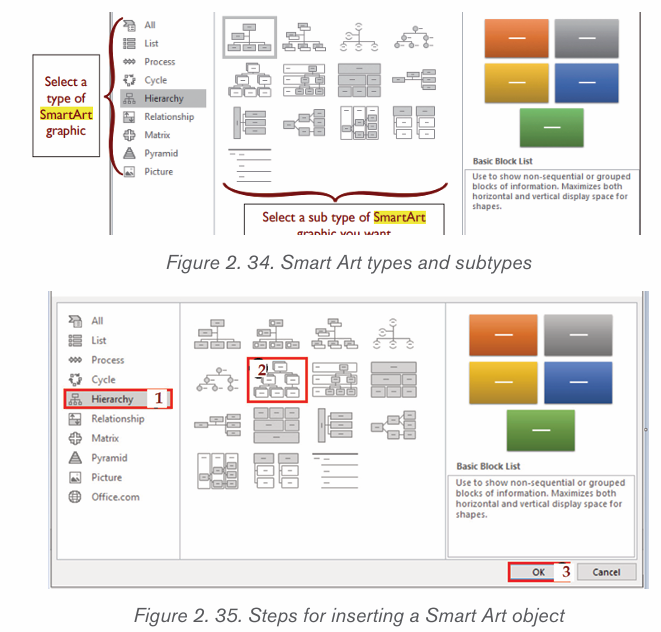
2.4.3. Insert Smart Art Graphics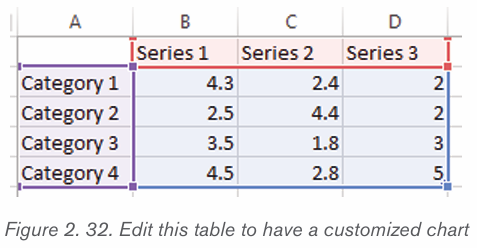
SmartArt is a picture used to communicate information in many different ways.
It is an option that allows the user to create diagrams easily. Inserting Smart
Art Graphics in a document is another way to communicate effectively the a
message. Smart Art Graphics are :a list, process flow, cycle, a relationship or
an organization hierarchy, Matrix Pyramid and chart. The steps to insert smart art
graphics are outlined below:
1. Place the insertion point in the document where the SmartArt graphic
will appear.
2. From the Insert tab, select the SmartArt command inthe Illustrations group.
3. A dialog box will appear. Select a category on the left, choose the desired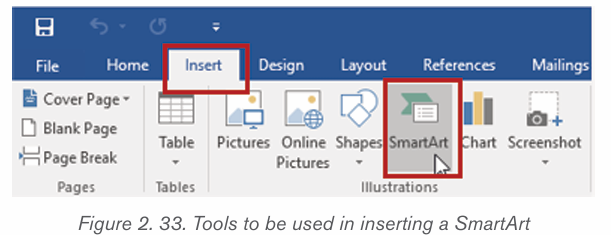
SmartArt graphic, then click OK.
5 Select the SmartArt graphic. The text pane should appear on the left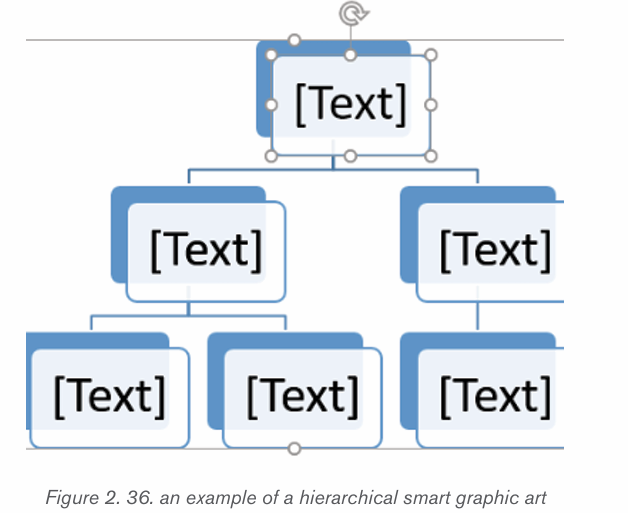
side. If it doesn’t appear, click the small arrow on the left edge of the graphic.
6. Enter text next to each bullet in the text pane. The text will appear in
the corresponding shape. It will be resized automatically to fit inside theshape.
Application activity 2.4
1. S4 Accounting class has a total of 120 students. The
class teacher carried out a data survey to find out how
many students regularly eat meat, pork, chicken or fish athome. The data below in the below table was collected
a) Use the data given in the table above to create a clustered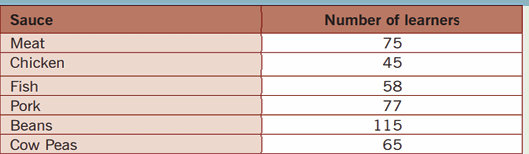
bar chart
b) On the chart created change the chart titles and Axis titles to
make them reflect the king of data they show.
2) Below are the data of old persons in 10 Rwanda Districts as
published on igihe.com in its article of 7th December 2018.Represent those data using Pie chart.
Activity 2.5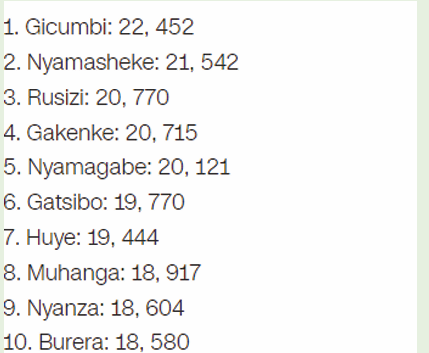
3) Observe the screenshot below taken from Word
a) What among those the options shown on that screen is used to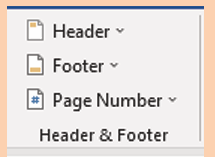
insert headers in a Word documentb) Differentiate the terms Header and Footer as used in a Word do-
cument
c) What is the importance of headers and footers in a document
A header is a section of the document that appears in the top margin, while
the footer is a section of the document that appears in the bottom margin.
Headers and footers generally contain additional information such as page
numbers, dates, an author’s name, and footnotes, which can help keep
longer documents organized and make them easier to read. Text entered in the
header or footer will appear on each page of the document.
2.5.1 Insert header and footer
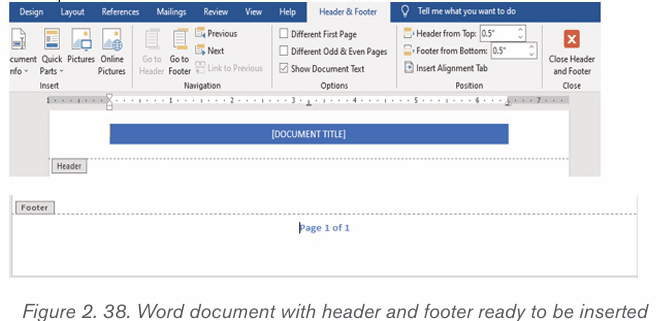
To insert a header and footer in Ms word follow steps given below:
1. Click on the Insert tab at the top of the Ribbon
2. Click on either Header or Footer drop-down menu in the Header &Footer section.
3. A Header or Footer drop-down menu will display on the screen with a
list of built-in Header or Footer options. Select your desired option fromthe Built-in list.
4. A Design tab with Header & Footer option will appear at the top of thedocument (on the Ribbon), as shown in the screenshot below.
2.5.2 Delete Header and Footer from Word document
Position the cursor within the header or footer and press the Delete button onthe keyboard or
1. Go to the Insert tab on the Ribbon and click on the Header & Footer option.
2. A Header or Footer dialog will appear on the screen. Click on the RemoveHeader or Remove Footer option.
2.5.3 Add page numbers to a document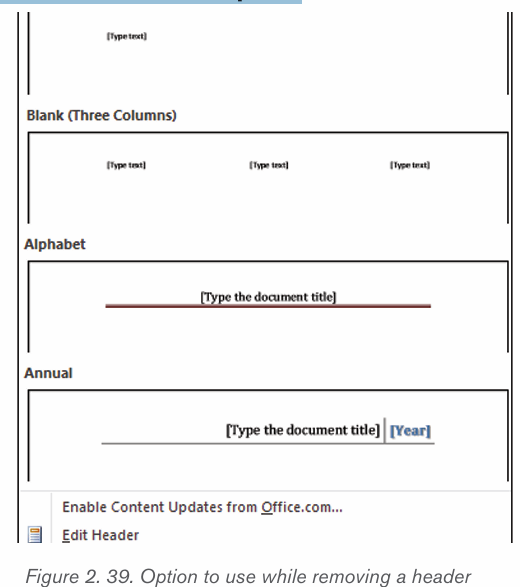
Follow the following steps to add page numbers to a Word document:
1. Click on Insert tab then on Page Numbering.
2. Select Current Position.3. Choose a page number style
Note: It is possible to have different formats of page numbers in one document.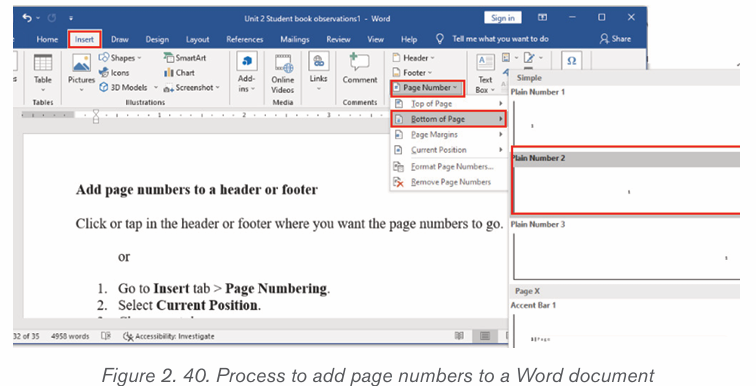
For example the first part of a document can have letter page numbers while
other pages are numbers. Inserting such page numbers is done by insertingsections from the place where the page number format changes.
Application activity 2.5
You have a document of at least 5 pages whose content is about your
everyday lessons
a) In that document insert a footer text “Lessons for Senior 4”
b) Insert page header text “Studying is the key in life”
c) By doing a research insert page numbers (in letters) i and ii in thefirst two pages and numbers from those pages
6.1Table of content
Activity 2.6
Using internet or other available resources Search and prepare a Word
document which describe computer hardware and software and save it
as “Information and Communication Technology”. Make sure the document
has at least 4 pages. Do the following with the created document:
1. Do the following with the created document:
2. Change the Font Type to “Book Antiqua”.
3. Change the Font Size to 12 and Line Spacing =”2.0”4. Change Heading 1 to “Arial Black” and Font-size =”14”
2.6.1. Steps to create a table of content
A table of content is a list titles which are inside a document with
the page number where they can those titles can be found. To create
a table of content when the document is done in two steps namelycreating headings and inserting the table of content.
• Creating headings
In a Word document, headings are titles of different weight which
have text under them. Word provides different levels of headings
starting from heading one which is the highest level in a document.
The created heading texts are the ones that will appear in the table of
content. Follow these steps to create a heading:
• Select the text and click on the Home tab• In the Style group Click on Heading 1 (or any other heading)
The heading is different in appearance to other text and to other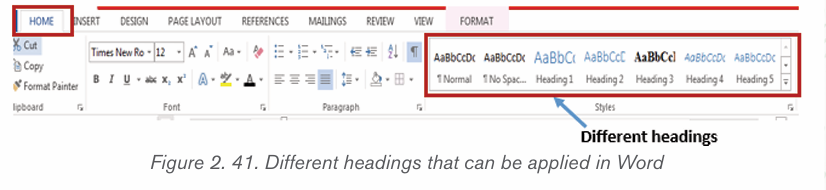
headings which are not at its level. The font that a heading will have
can be changed by:
• Do a right click on the heading to modify and click on Modify
• In the dialog box that appears, choose the new formatting to
apply on the heading.
• Inserting a table of content
When all the titles that need to appear in the table of content have
been changed into headings, a table of content can now be inserted
by following these steps:
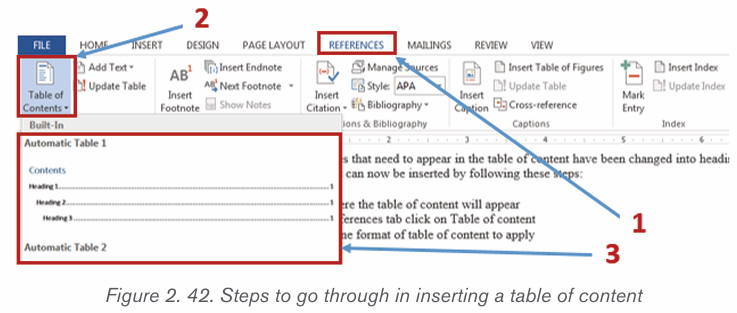
• Click where the table of content will appear
• In the References tab click on Table of content• Choose one format of table of content to apply
2.6.2 Updating the table of Content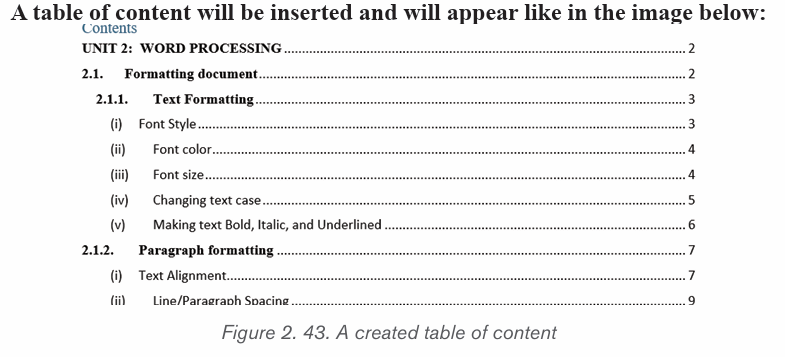
When some headings or titles were added or modified in a document, an update
of the table of content is needed.
Below are the steps to follow for making an update of table of contents.
Step 1: On the References tab, in the Table of Contents group, click Update
Table. Click “Update Table” button in the selected Table of Contents
Step 2: In the Update Table of Contents dialog box that displays, select “Updateentire table”. The new updated table of contents displays
2.6.3.Creating a list of tables and list of figures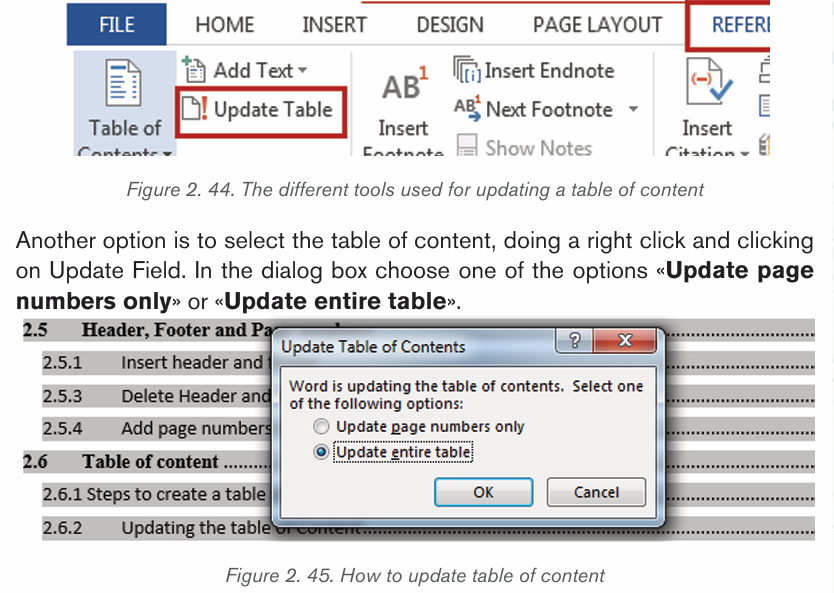
When creating a table of figures in a document, Microsoft Word searches for
the captions, sorts them by number, and displays them in that document.
Creating captions which will generate a table of figures is done in this way:
Step1: Add Captions to every Table in the document using procedure given
below:
1. First select a Table on which a caption is needed.2. Click “Insert Caption” command on References tab.
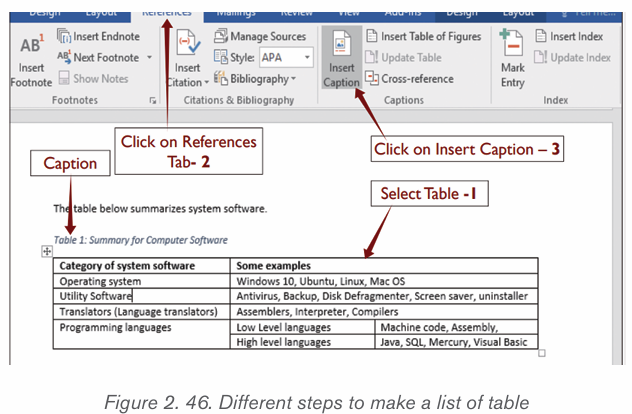
4. Repeat the procedure for all the tables in the document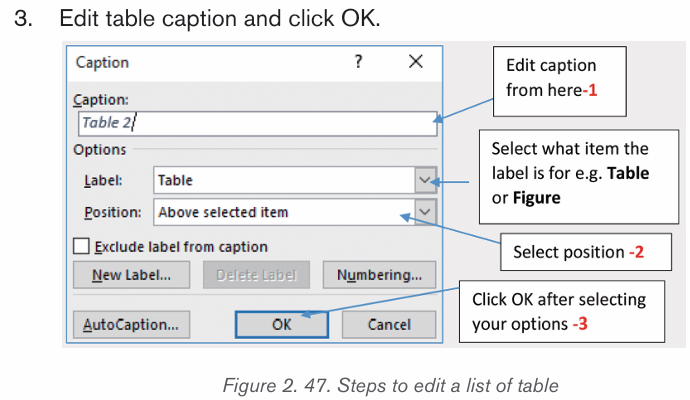
Step 2: Click where the Table of Figures will be inserted
Step 3: On References Tab in the Captions group, click on Insert Table of
Figures to build the table
A Table of figures dialog box will be displayed as shown in the picture belowand will automatically be inserted when the OK button is clicked.
Below are optional steps to take before clicking OK: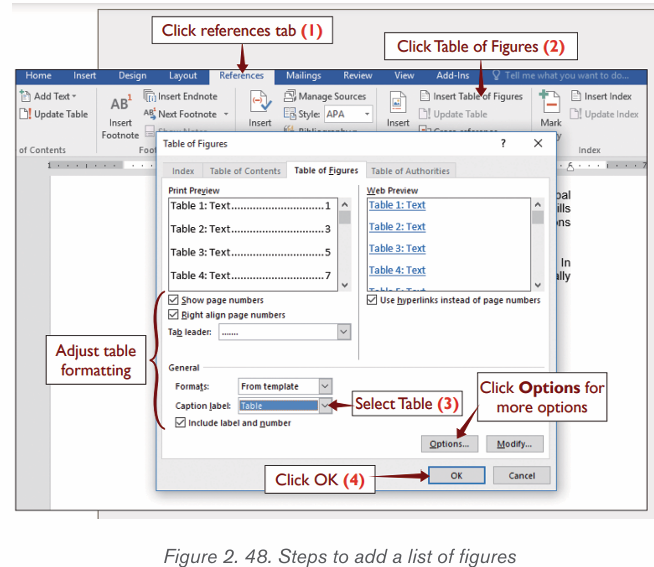
• Adjust Table’s formatting such as setting whether to show page
numbers or changing the style of tab leader. Use a preset style from
“Formats” drop down menu. In case you want to customize the style,
leave it set to “From Template”.
• Click “Modify” and click again “Modify” in the style dialog box to
customize the style of the table. You can change the table’s font, sizeand other settings in the two dialog boxes. Then c
Application activity 2.5
1. Create a document on ICT which has the following
headings:
Computer Hardware (Heading 1). Develop the content on
computer hardware by including the following these titles
which will be at the level of Heading 2:
• Input Hardware
• Output hardware
• Processing hardware
• Storage hardware
2. Create additional headings in Heading 2 where possible.
Those headings will be Heading and Heading 4
3. Add a new title “SOFTWARE” in the document. Make
that title a heading appropriately and in it create other
headings. Update your table of content.
4. Insert a table of content in your document basing on theheadings you have created
Skills Lab 1
Using Microsoft Word write a document about the profile of your school.
That profile should include the school’s background, current situation and
the plan for the future. Where possible include the pictures.
End of unit assessment 2
1. Use Microsoft Word, type the following document and save it as
‘Certificate of Appreciation form’. This document is a certificate andshould have a page border as shown below.
b) a) Use 1.5 line spacing for your work and no space after each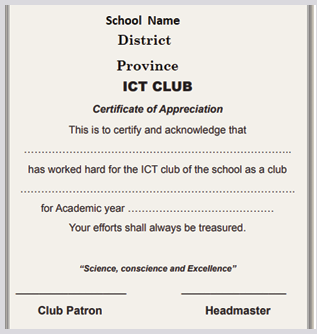
paragraph.
c) b) Make the following changes to the title:
iv) Change the font of the name of the school to Stencil bold font face,
font size 26 and dark blue colour.
v) Change the second line to font size 16 and bold
vi) Change the third line to font size 14 and bold.
a) Leave enough space between “Province Name” and ICT Club to
accommodate a suitable graphic (good image) that will work like
your school badge
b) Underline the heading, “Certificate of Appreciation” change it to
size 20 and color dark red.
c) Use blue font color for signatories in font size 15.
d) Apply dark red color to page border.
7. 2) When a new student of senior one come to GS Karama, the
below stages must be applied:
• Take a picture(Passport photo)
• Present the bank sleep to school accountant• Get registration number(Reg Num)
End of unit assessment 2
According to the above mentioned information, present that process using
Smart Art object
– Take school uniforms
– Go to classroom(S1) where the taken Reg Num is belong
– According to the Reg Num, search and find the correspondence seat
in dining hall and bed in dorm.
1. Use Microsoft Word, type the following document and save it as
‘Certificate of Appreciation form’. This document is a certificate andshould have a page border as shown below.
b) a) Use 1.5 line spacing for your work and no space after each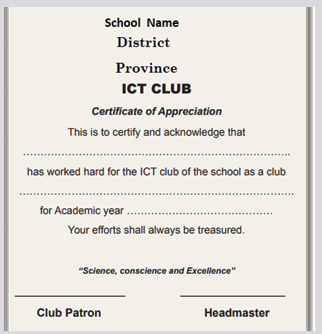
paragraph.
c) b) Make the following changes to the title:
iv) Change the font of the name of the school to Stencil bold font face, font
size 26 and dark blue colour.
v) Change the second line to font size 16 and bold
vi) Change the third line to font size 14 and bold.
a) Leave enough space between “Province Name” and ICT Club to
accommodate a suitable graphic (good image) that will work like your
school badge
b) Underline the heading, “Certificate of Appreciation” change it to size
20 and color dark red.
c) Use blue font color for signatories in font size 15.d) Apply dark red color to page border.
End of unit assessment 2
1. 2) When a new student of senior one come to GS Karama, the
below stages must be applied:
• Take a picture(Passport photo)
• Present the bank sleep to school accountant
• Get registration number(Reg Num)
According to the above mentioned information, present that process using
Smart Art objects-
Take school uniforms- -
Go to classroom(S1) where the taken Reg Num is belong
According to the Reg Num, search and find the correspondence seatin dining hall and bed in dorm.