Topic outline
UNIT 1:ATHLETICS
Key unit competence: Perform throwing exercises in athletics1.1. Prerequisite (knowledge, skills, attitudes and values)Student teachers of year 3 will learn better throwing exercises in athletics if theyhave developed basic techniques of throws in Ordinary Level and have performedbasic physical exercises.1.2. Cross-cutting issues to be addressed• GenderIn teaching and learning process, the tutor must prepare and provide Athleticsactivities that engage both girls and boys equally in exploiting their full potentialand talents in without any discrimination or prejudice.• Inclusive educationThe tutor as a facilitator he/she must consider different special educationneeds and select activities to adapt his teaching approaches to studentteachers. This creates a positive attitude and helps all student teachers toparticipate actively and develop their competence levels.• Financial educationThe tutor should integrate Financial Education into his Athletics teaching/learning activities by providing the local and no cost teaching materials whereis possible. He/she must encourage student teachers to make their ownmaterials that can help them to develop competences not only in sport atschool but also in their life.• Standardization cultureThe tutor must choose and select the standardized materials to use in his/herteaching/learning process of Athletics. It is necessary to provide appropriatematerials required to the levels of student teachers and help them to developculture of checking and using the quality of sport materials for the competitionsbefore using them in order to prevent injuries and other cases of accident.• Environment and sustainabilityThe tutor should provide materials and deliver the lesson by encouragingstudent teachers to protect the environment and well use of materials. Thetutor helps them to develop the spirit of keeping safe the environment theyuse.• Peace and values educationThe tutor helps student teachers to develop fair play and social values byavoiding violence and conflict in the Athletics activities and by setting clearand relevant instructions. He/she should provide the activities that helpstudent teachers to develop their competence peacefully.• Comprehensive sexuality educationThe tutor provides Athletics activities and sets instructions that preventsexual harassment, any kind of gender-based violence like sexual abuse andphysical contacts oriented to the sexuality intention.• Genocide studiesWhile conducting Athletics exercises a tutor should take a time to explainstudent teachers how sports should be used to fight against Genocideideology and how to prevent it. For example, to organize Genocide memorialtournaments at school and give the message related to the Genocide1.3. Guidance on introductory activityBefore introducing the lesson one of this unit, you must introduce the whole unit.The tutor as a guide, facilitator and expert, asks questions and provides activitiesrelated to throwing exercises in athletics in order to help them to predict what tobe learned in the whole unit.1.4. List of lessons/sub-heading Lesson 1: Techniques of throwing javelina) Learning objectiveExplain and perform techniques of throwing javelinb) Teaching resourcesField/playground/throwing area, watch, whistle, decametre, javelin (for menand women).c) Prerequisites/Revision/IntroductionStudent teachers of year 3 will learn better techniques of throwing javelin inathletics if they have developed basic techniques of javelin throws in OrdinaryLevel and have performed basic physical exercises.d) Learning activitiesOpening discussions• Ask questions related to techniques of throwing javelin learned in ordinarylevel.• Let student teachers answer questions, support them where is necessaryand introduce the new lesson.• Invite student teachers to start warm up exercises.Warm up exercises and cool down description• Let student teachers perform general warm up exercises and specificwarm up based on the most used body’s parts to be used while performingtechniques of javelin throwing and stretch their muscles properly. Onestudent teacher leads warm up and stretching exercises.e) Lesson developmentTutor starts the lesson by explaining student teachers that throwing javelinconsist of the following phases:• The grip phaseExplain student teachers that there are three types of grips in throwing javelinsuch as:i) The American grip:The thumb and the first two joints of the index finger are behind the cord.
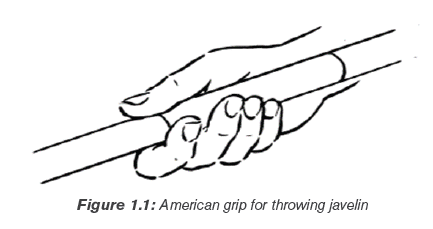 ii) The Finnish grip:The thumb and the index finger are behind the cord, while the index fingersupports the shaft. The extended finger assists the rotation of the javelinduring delivery.
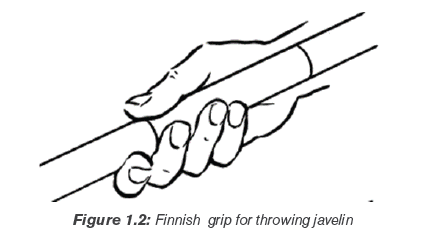 iii) The V grip:The javelin is held between the index and middle fingers behind the cord.The position of the fingers assists the throwing arm in staying at shoulderheight during the approach.
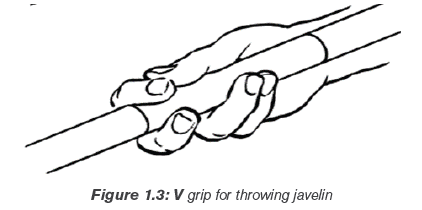 Individually, let student teachers apply how to grip javelin by using three gripmethods.During the approach run up phase, remind student teachers measure theirstrides as follow:
 To carry javelin at head height with their arms bent, their elbow pointing forward.–– That their palm of hand must face upwards to facilitate the wrist andshoulder to relax, and have an easy running movement.–– To keep their shoulder parallel to the run up.–– To keep their hip high with body weight carried on the ball of the foot.–– To have the javelin lined up approximatively parallel to the ground.–– To increase constantly to the maximum controllable speed.Let student teachers perform approach run individually. During practice of run upapproach, remind to:–– Put a clear marker where five steps rhythm start to indicate studentteacher’s the area.–– Tell student teachers continuing to increase constantly to the maximumcontrollable speed by avoiding lengthening the stride.Tell student teachers to do the following during approach run up andcarry:–– Holding the javelin over the shoulder horizontally.–– Maintaining the top of javelin at head height.–– Holding the arm steadily with increasing running speed.–– Accelerating until reaching the optimum speed.
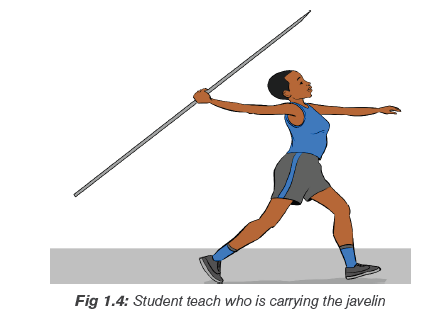 Tell student teachers to do the following during stride rhythm anddelivery:–– Execute the withdrawal action with impulse stride.–– Carry out delivery, transition, power position and final arm movement.–– Maintain the reserved legs.–– Bend the right legs and lowering the upper body.–– Swing the left leg backwards.–– Move the foot of the brace leg to the foul line.
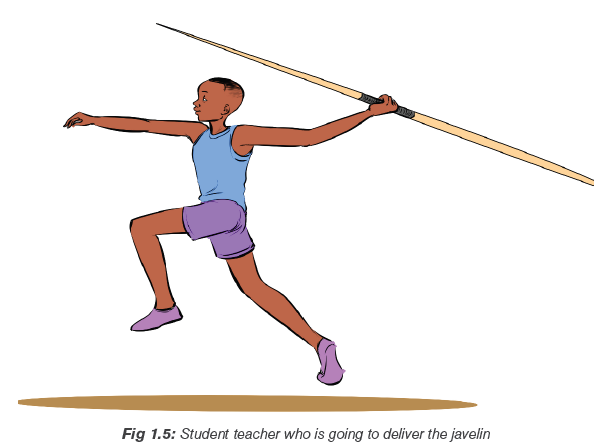 Remind student teachers to remember basics throwing principles forjavelin throw:–– Involve the whole body.–– Achieve a summation of forces.–– Apply force in the direction of the throw.–– Achieve a long range of motion.–– Weight transfer.Let student teachers perform techniques of throwing javelin individually bymaking many trials in order to be familiarized with javelin throw, try to keepsecurity while throwing by giving enough space to the thrower in order to avoidaccidents.
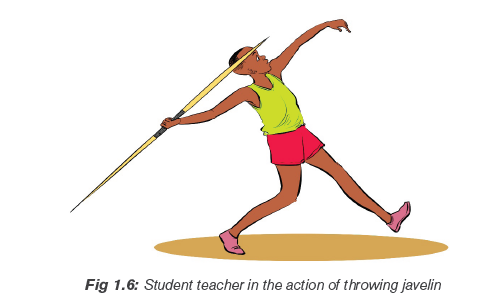 Application activityLet student teachers perform techniques of throwing javelin individually byrespecting different phases and record their performance with evaluating theirown progress. They can do this as a small competition. Remember to giveenough space to the thrower in order to avoid possible accident, which may
occur during throwing.
Cool down exercises–– Let student teachers do light exercises and stretch their group of musclesby insisting on most used parts.–– Randomly, one of student teachers leads cool down exercises.–– Guide them while stretching their muscles systematically.–– Help them/demonstrate/correct where is necessary.Closing discussionReflect–– What are challenges/ advantages did you face while performing exercisesof javelin throw?–– How did you proceed to perform those exercises?Connect–– What are conditions do you need throws like javelin?Apply–– What is the usefulness of javelin throw?–– How will you use skills of javelin throw in your daily life?
Lesson 2: Techniques of throwing discus
a) Learning objective
Explain and perform techniques of throwing discus
b) Teaching resources
Field/playground/throwing area, watch, whistle, decametre, discus (for men
and women).
c) Prerequisites/Revision/Introduction
Student teachers of year 3 will learn better techniques of throwing discus in
athletics if they have developed basic techniques of throwing discus in Ordinary
Level and have performed basic physical exercises.
d) Learning activities
Opening discussions
• Ask questions related to throwing of discus and their techniques learned in
ordinary level.
• Let student teachers present their findings and introduce the new lesson.
• Invite student teachers to start warm up exercises.
Warm up exercises and cool down description
• Let student teachers perform general warm up exercises and specific
warm up based on the most used body’s parts to be used while performing
techniques of javelin throw and stretch their muscles properly.
• One student teacher leads warm up and stretching exercises.
e) Lesson development
Step 1: Gripping the implement
• Make preparation by holding the discus.
• Face back to the throwing direction.
• Bend knees slightly.
• Keep the weight on the balls of the feet.• Keep arms nearly to the shoulder height.
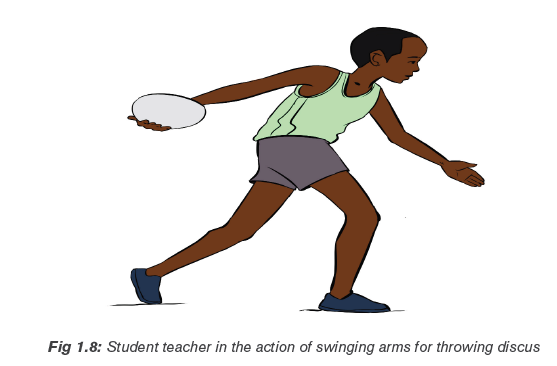
Step 2: Foot placement, power position, release and recovery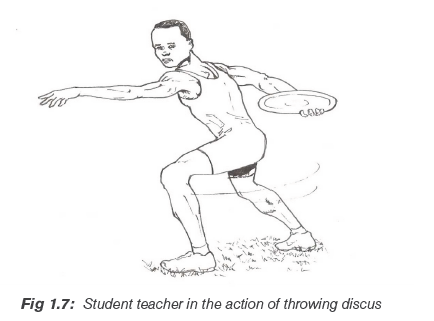
• Make preparations with non-support.
• Provide support and maintain momentum.
• Deliver by the maintenance of power position (the right toe should clear
past the left foot before the athlete starts the sprint to the middle. The left
leg should stay low and fixed, ready to push off toward the front of the circle
the left arm will remain inside the knee and with the shoulders level to help
keep the body on balance) and acceleration.
• Recover with changing legs quickly after the release.
• Bend right leg and lower upper body.• Swing the left leg backwards and keep eyes look down.
Remind student teachers that the influence on discus distance are the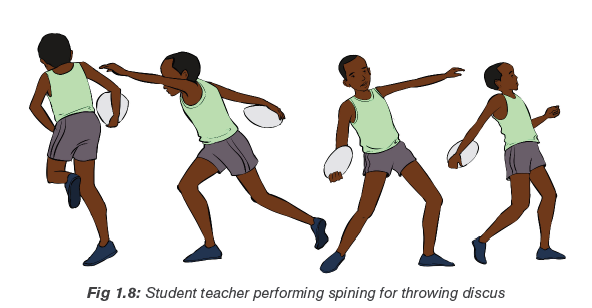
following:
• Velocity of the discuss at release.
• Angle of release.
• Attitude angle or angle of tilt at the release.
• Wind direction and velocity.
Let student teachers perform techniques of throwing discus individually by
making many trials in order to be familiarized with discus throw, try to keep
security while throwing by giving enough space to the thrower in order to avoidaccidents.
Application activity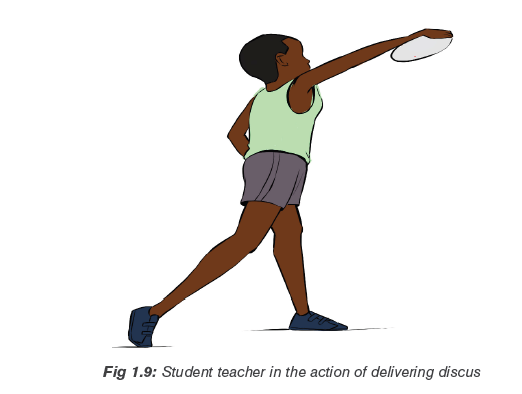
Let student teachers perform techniques of throwing discus individually and
record their performance with evaluating their own progress. They can do this
as a small competition. Remember to give enough space to the thrower inorder to avoid possible accident, which may occur during throwing.
Cool down exercises
–– Let student teachers do light exercises and stretch their group of muscles
by insisting on most used parts.
–– Randomly, one of student teachers leads cool down exercises.
–– Guide them while stretching their muscles systematically.–– Help them/demonstrate/correct where is necessary.
Closing discussion
Reflect
–– What are challenges/benefits did you face while performing exercises of
discus throw?–– How did you proceed to perform those exercises?
Connect–– In which conditions do you need throw like discus?
Apply
–– What is the usefulness of discus throw?–– How will you use skills of discus throw in your daily life?
Lesson 3: Techniques of throwing shot put
a) Learning objective
Explain and perform techniques of shot putting
b) Teaching resources
Field/playground/throwing area, watch, whistle, decametre, shot put (for men
and women).
c) Prerequisites/Revision/Introduction
Student teachers of year 3 will learn better techniques of shot putting in
athletics if they have developed basic techniques of shot putting in Ordinary
Level and have performed basic physical exercises.
d) Learning activities
Opening discussions
• Ask questions related to techniques of shot putting learned in ordinary level.
• Let student teachers present their findings and introduce the new lesson.
• Invite student teachers to start warm up exercises.
Warm up exercises and cool down description
• Let student teachers perform general warm up exercises and specific warm
up based on the most body’s parts to be used while performing techniques
of short putting stretch their muscles properly.
• One student teacher leads warm up and stretching exercises.
e) Lesson development
Explain student teachers that during shot putting the following steps are
respected:
1st step: Holding a shot put
• Applying to grip the shot put.
• Placing parallel fingers and slightly speed.
2nd step: neck placement
• Raise the shot above their head.
• Push the shot into their neck.
• Holding the shot on the front part of the neck.
• Lift elbow parallel to the floor.
• Check to see that their thumb is pointing down towards their clavicle.
• The palm keep pointing towards the throwing direction.
2nd step: Preparation
• Carrying out start upright at the rear of the circle.
• Back to the stop board.
• Bend trunk forward parallel to the ground.
• Supporting the leg bent.
• Make free leg drawn towards the back of the circle.
3rd step: Gliding
• Gliding off the right/left foot to its heel.
• Placing it in the centre.
• Coordinate landing feet simultaneously.
• Land left/right foot on the ball.
• Maintain landing feet on the ground.
4th step: Rotation/deliver/recovery
• Execute preparation with non-support and maintain foot placement.
• Deliver shot put with increasing power position, accelerate and make final
arm movement.
• Make recovery by changing legs quickly after the release by bending right
leg, lowering upper body.
• Swing the left/right leg backwards and keep eyes look down.
Drills for shot putting
• Drills used to teach the delivery
Tell student teachers
–– To stand facing the sector.
–– To start with the shot above their head in their throwing hand.
–– To flip the shot out of their hand.
• Drills to teach throwing from power position
Tell student teachers
–– To face the sector with toes pointed straight.
–– Place shot against the neck.
–– To twist the body to the right and down.
–– To bend the knees.
–– To extend legs and hips then throw.
• Drills used to teach the glide
Tell student teachers
–– To start in an athletic position with their right hand up against their neck
and their left hand extended out in front.
–– To let their hips fall past their heels.
–– To pull their leg back underneath them.
For left leg drive
–– To start in glide position.
–– To drive their left leg towards the toe boards close to the ground.
–– To strengthen their right leg.
–– To have a finished position with their legs in an upside down Y.
• Shot putting styles
There are two styles, which are currently used while shot put competition:
The glide and the spin.
–– The glide.
–– The spin( rotational techniques).
Let student teachers perform techniques of throwing shot put individually by
making many trials in order to be familiarized with shot put throw, try to keep
security while throwing by giving enough space to the thrower in order to avoidaccidents.
Application activity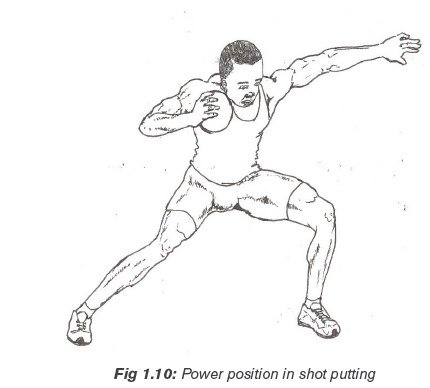
Let student teachers perform techniques of shot putting individually and record
their performance to show and evaluate their own progress. They can do this
activity in a small competition. Remember to give enough space to the throwerin order to avoid possible accident, which may occur during throwing.
Cool down exercises
–– Let student teachers do light exercises and stretch their group of muscles
by insisting on most used parts.
–– Randomly, one of student teachers leads cool down exercises.
–– Guide them while stretching their muscles systematically.–– Help them/demonstrate/correct where is necessary.
Closing discussion
Reflect
–– What are challenges/benefits did you face while performing exercises of
shot putting?–– How did you proceed in order to perform techniques of those throws?
Connect
–– In which conditions do you need throws like shot putting?
Apply
–– What is the usefulness of shot putting?
–– How will you use skills of shot putting in your daily life?
1.5. Summary of the unit
This unit comprises techniques of throwing javelin, discus and shot putting. It
provides different exercises and activities that help student teachers to develop
their competences basing on the explanations, demonstrations and facilitation of
the tutor using the appropriate teaching and learning materials.
1.6. Additional Information for tutors
JAVELIN
Steps of teaching throwing javelin
Step 1 and 2
–– To move throwing arm straight forward on landing on the right foot.
–– To back to the rear, over the right shoulder until the arm is fully stretched
at shoulder height with the palm of the throwing hand facing upwards.
–– Not to rush the withdrawal to avoid sideways to long.
–– To try to accelerate ahead of the javelin, rather than pushing the javelin
back. This way, it will be easier to maintain the approach speed.
–– The shoulders turn to be in line with delivery area, while the hips remain
square with the delivery area, with the feet pointing forward, to maintain
the approach speed, and to produce torsion in the upper body prior to
the throw.
–– The right leg must drive forwards and upwards to assist the hips to
maintain their position, and to assist the left leg in maintaining approach
speed.
–– The javelin must remain pointing in the direction of the throw.
Step 3
As preparation for the subsequent drive step, remind student teachers to:
–– Hold the javelin close to head with the point in line of the eyebrows. It
must remain in this position until the final delivery action.
–– The eyes look straight ahead.
Step 4
–– Flatter drive step of the right leg takes place after pushing off with the
left leg.
–– The trunk starts to lean back because of the long stride and this facilitates
a long, final delivery pull of the throwing arm.
–– The right foot is kept low while the right leg drive forward, across the left
foot (the shortest possible path).
–– The left leg, after completion of the drive, is brought forward, and is in
front of the right leg before the right foot touches the ground.
–– The right foot touches the ground ahead of the hips and shoulders, on
the outside edge, heel first.
–– The right leg is bending to absorb the shock.
–– The right foot is placed on the line of throw to ensure that the eventual
drive is directed through the hips and trunk.
–– As the right foot lands, at the end of the “cross-step”, the heel is quickly
lifted and rotates clockwise until the foot finishes up on the little toe, thus
bringing about an clockwise rotation of the right knee and hip.
–– The angle of the foot in relation to the line of throw should not be more
than 45º, to ensure an active drive through the hips.
–– The shoulders are still in line with the direction of the throw. The left arm
is folded across the chest to keep the chest muscles relaxed.
–– The right arm is stretched, with the wrist closed and the palm up, to
prevent the tip of the javelin to lift. The tip of the javelin must still be in line
with the eyebrows.
Step 5
–– The left leg is brought forward to bring the body in the power position.
–– The right leg drives forward and upwards while waiting for the left foot to
come down.
During power position, tell student teachers that:
–– The body is arched in the “power” position.
–– The head faces the direction of throw.
–– The shoulders and javelin are roughly parallel.
–– The throwing hand is held high, palm facing upwards and the wrist closed.
–– The left leg is well forward, held like a “wooden leg”.
–– The left leg is totally extended.
–– The right leg is slightly bent with the foot on the ground ahead of the hips
and shoulders.
During the throw phase, recommend student teachers that:
–– With both feet on the ground, the right leg drives the right hip forward
over an extended left leg in front.
–– Turn the right hip quickly forward and up to bring it square with the
delivery area. The chest and shoulders must follow in rapid succession.
–– The right elbow will follow by rotating outwards and up, alongside the
head, while the right shoulder is pulled through and the arm is “whipped
over the shoulder” with a vigorous forward and upward extension.
The “whipping” action should be a result of the hip / chest / shoulder
movement, and not an action on its own. The delivery arm must start its
final action when the hand is above the shoulder.
–– Keep the left arm relaxed, next to the body and then remain firm (blocked)
during the final thrust of the right side of the body. It must not be allowed
to sweep too far backwards.
–– The eyes look forward towards the point of the javelin to avoid the
shoulders from turning.
–– The launching takes place above the left foot. The outward rotation of
the elbow along with the release of the fingers on the javelin causes the
javelin to rotate clockwise to create stability during flight.
During recovery phase, recommend student teachers to:
–– Ride over the left leg after delivery, while keeping the left foot on the
ground.
–– Bring the right leg quickly forward, immediately after the release of the
javelin to prevent fouling of the throw.
–– Place the foot on the ground with the leg slightly bend to absorb the
forward momentum.
Delivery angle for throwing javelin
The optimum delivery angle is 30 and 36º. The faster the javelin is thrown, the
lower the trajectory will be. Strong headwinds require a lower delivery angle and
strong tailwinds require an increased delivery angle. Javelins are manufactured
according to distance rating. A thrower who throws 50 m requires a javelin, which
flies optimally at 50 m, etc. The higher the distance rating of the javelin, the lowerthe angle of release.
Rules for throwing javelin
i) ImplementThe weight and length
–– The javelin consists of three parts: a head, a shaft and a cord grip.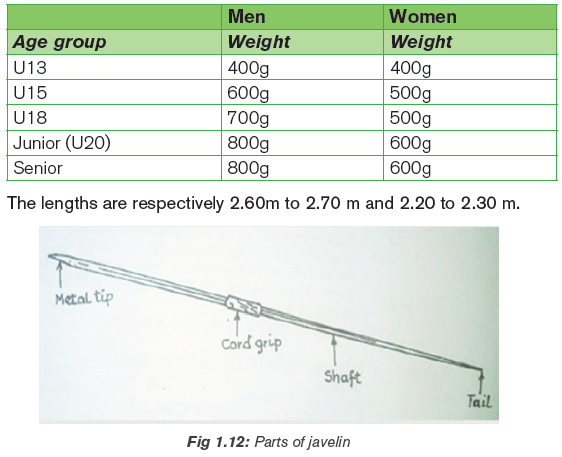
–– The shaft must be constructed of metal and has, fixed to it, a metal head
terminating in a sharp point.
ii) The runway
The length of the runway should not be more than 36.50 m but not less
than 30 m and should be marked by two parallel lines, 50 mm in width and
4 m apart.
iii) The throwing arc
This should consist of a strip made of paint, wood or metal 70 mm in width,
painted white and flush with the ground, and should be an arc of a circle
drawn with a radius of 8 m. Lines, 0.75 m in length, are drawn from the
extremities of the arc at right angles to the parallel lines marking the runway.
iv) Throwing sector/area
This is bounded by the inner edges of two lines, which are drawn from the
centre of the arc through the points at which the arc joins the lines markingthe edge of the runway.
General rules for throwing javelin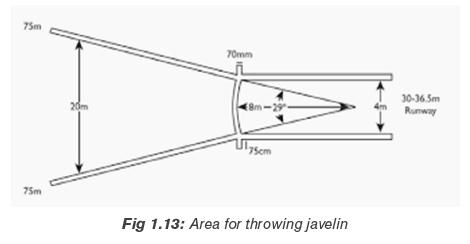
–– The javelin must be held at the grip and the throw must be made over the
shoulder or upper part of the throwing arm.
–– For a throw to be valid, the tip of the metal head must strike the ground
before any other part of the javelin and it must fall completely within the
inner edges of the landing sector.
–– The competitor must make his approach and throw within the lines
demarcating the runway.
–– It is a foul throw if, after starting his throw, he touches the lines or the
ground outside with any part of his body.
–– The athlete must not leave the runway until the javelin has landed and then
his first contact with the parallel lines or the ground outside the runway
must be completely behind the lines, at the ends of the arc at the right
angles to the parallel lines.
–– Once the athlete has started the throw, the athlete must not turn completely
around so that the back is towards the throwing arc.
–– The number of throws allowed is the same as for the shot and discus.
THE SHOT PUT
The shot is a metal ball of 7.26kg for men and 4kg for women. The aim is to put it
as far as possible from a seven-foot diameter (2.135m) circle that has a curved10-centimetre high toe-board at the front.
The following rules are adhered to for a legal throw: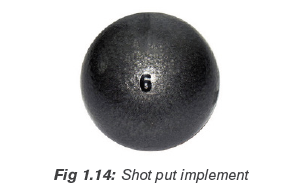
Competitors take their throw from inside a marked circle 2.135m in diameter,
with a stop board approximately 10cm high at the front of the circle. The distance
thrown is measured from the inside of the circumference of the circle to the
nearest mark made in the ground by the falling shot, with distances rounded down
to the nearest centimeter. Place the zero end of the tape at the mark made by the
shot closest to the throwing circle, pull through to the center of the circle (should
be a mark or hole, and read off the measurement where the tape crosses the
inside edge of the circumference of the circle or toe board.
–– Upon calling the athlete’s name, they have sixty seconds to commence the
throwing motion.
–– The athlete must rest the shot close to the neck, and keep it tight to the
neck throughout the motion.
–– The shot must be released above the height of the shoulder, using only
one hand. The ball is to be put (i.e. pushed), not thrown with an overhead
motion. At no time may the shot move behind the plane of the shoulders.
–– The athlete may touch the inside surface of the circle or stop board, but
must not touch the top or outside of the circle or stop board, or the ground
beyond the circle. Limbs may however extend over the lines of the circle
in the air.
–– The shot must land in the legal sector (34.92°) of the throwing area (Inside
of / not including the line.–– The athlete must exit the throwing circle from the back half of the circle.
Foul throws occur when an athlete: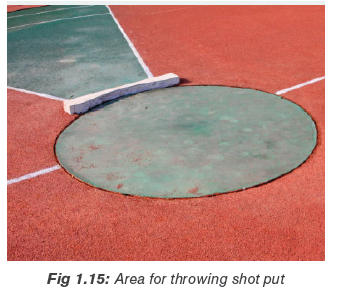
–– Does not pause within the circle before beginning the throwing motion.
–– Does not begin the throwing movement within sixty seconds of having his
or her name called.
–– Allows the shot to drop below his shoulder or outside the vertical plane of
his shoulder during the put.
–– During the throwing motion, touches, with any part of the body (including
shoes): the top or ends of the stop board, the top of the iron ring, anywhere
outside the circle.
–– Throws a shot, which either falls outside the throwing sector or touches a
sector line on the initial impact.
–– Leaves the circle before the shot has landed.
–– Does not exit from the rear half of the circle.
The top eight throwers, once established, will have three more attempts in order
of increasing distance. The final rankings will result from all 6 attempts. The
competitor’s best throw from the allocated number of throws, typically three to
six, is recorded, and the competitor who legally throws the shot the farthest is
declared the winner. Ties are broken by determining which thrower has the longer
second-best throw.
DISCUS THROW
The discus throw is an event in track and field athletics competition, in which an
athlete throws a heavy disc called a discus in an attempt to mark a farther distance
than his or her competitors. The men’s discus is a heavy lenticular disc with a
weight of 2 kilograms and diameter of 22 centimetres, the women’s discus has aweight of 1 kilogram and diameter of 18 centimetres.
–– The discus can be made of any material such as wood but it must have a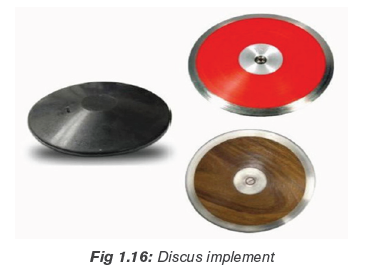
circular edge with a metallic rim.
–– Inner construction can be both solid and hollow.
–– The cross section of the edge should be made in circular manner and it
should have a radius of 6mm.
–– All sides of the discus should be identical. They must be free from any type
of sharp edges or irregularities.
–– Finishing of the discus should be smooth.
–– An athlete can only throw the discus when he or she will stand inside a
circle, which has a diameter of 2.5m.
–– During the course of throw, the athletes are prohibited from touching the
top of the rim. However, they can touch the inner part of the rim.
–– An athlete cannot touch the ground beyond the circle.
–– If the athlete leaves the circle before the landing of the disc on the ground,
then it will be considered as a foul throw.
–– In the Olympic matches, each athlete is given eight chances to display
their talents.
–– There is particular boundary of landing of the disc. If the disc lands outside
that zone then that throw is considered invalid.
1.8. End unit assessment
–– The tutor set series of athletic exercises on javelin, discus and shot put.
–– He/she provides the appropriates materials to the student teachers and
highlight instructions to follow during performing different throws. Student
teachers must perform individually three trials for a) javelin throw b) discus
throw c) shot putting.
–– The tutor observe how student teacher is performing by respecting rules.
The tutor records the performance of each student teacher to evaluate their
performance.
1.8. Additional activities
1.8.1. Remedial activities
Individually, the student teachers revise the techniques of javelin, discus and shot
put.
1.8.2. Consolidation activities
The tutor organize a kind of competition where student teachers compete
individually in throwing javelin, discuss and shot putting. Record their performance
and rank them based on each discipline.
1.8.3. Extended activities
Encourages and facilitates student teachers to participate in different athletics
competitions on javelin, discus and shot put organized by the school, Sector,district, league and National school sports federation.
UNIT 2:FOOTBALL
Key unit competence: Perform football techniques and tactics in thegame situation adhering to laws of the game
2.1. Prerequisite (knowledge, skills, attitudes and values)
Student teachers of year 3 will learn better performance football in techniques and
tactics in the game situation adhering to laws of the game if they have developedbasic techniques and tactics of football learned in Year 1 and Year 2.
2.2. Cross-cutting issues to be addressed
• Gender
In teaching and learning process, the tutor must prepare and provide football
exercises that engage both girls and boys equally in exploiting their full
potential and football talents without any discrimination or prejudice.
• Inclusive education
The tutor as a facilitator he/she must consider different special education
needs and select exercises to adapt his teaching approaches to student
teachers. This creates a positive attitude and helps all student teachers to
participate actively and develop their competence levels.
• Financial education
The tutor should integrate Financial Education into his football teaching/
learning activities by providing the local and no cost teaching material where
is possible. He/she must encourage student teachers to make their own
materials that can help them to develop competences not only in football
game but also in their life.
• Standardization culture
The tutor must choose and select the standardized materials to use in his/her
teaching/learning process of football. It is necessary to provide appropriate
materials required to the levels of student teachers and help them to
develop culture of checking and using the quality of football materials for the
competitions before using them in order to prevent injuries and other cases
of accident.
• Environment and sustainability
The tutor should provide materials and deliver the lesson by encouraging
student teachers to protect the environment and well use of materials. The
tutor helps them to develop the spirit of keeping safe the environment in
which is being used by cleaning it before leaving.
• Peace and values education
The tutor helps student teachers to develop fair play and social values by
avoiding violence and conflict in the football game and by setting clear and
relevant instructions. He/she should provide the activities that help student
teachers to develop their competence peacefully.
• Comprehensive sexuality education
The tutor provides football activities and sets instructions that prevent sexual
harassment, any kind of gender-based violence like sexual abuse and physical
contacts oriented to the sexuality intention.
• Genocide studies
While conducting basic physical exercises a tutor should take a time to
explain student teachers how sports should be used to fight against Genocide
ideology and how to prevent it. For example, to organize Genocide memorial
tournaments at school and give the message related to the Genocide
2.3. Guidance on introductory activity
Before introducing the lesson one of this unit, you must introduce the whole unit.
The tutor as a guide, facilitator and expert, asks questions and provides activities
related to football techniques and tactics in the game situation by following official
laws of the game in order to help them to predict what to be learned in the wholeunit.
2.4. List of lessons/sub-heading
Lesson 1: Recall on techniques and tactics of playing football
Task/Activity 1
a) Learning objective
Review and perform techniques and tactics of playing football game
b) Teaching resources
Balls, whistle, stopwatch/watch, cones, chasubles, markers, cards (yellow &
red), flags.
c) Prerequisites/Revision/Introduction
Student teachers of year 3 will learn better recall on techniques and tactics
used in football game through game situation if they have developed basic
techniques and tactics of playing football learned in Year 1 and Year 2.
d) Learning activities
Opening discussionss
• Ask questions related to techniques and tactics of playing football game.
• Let student teachers present their answers support them where is necessary.
• Introduce the new lesson and invite student teachers to start warm up
exercises.
Warm up exercises and cool down description
• Let student teachers perform general warm up exercises and specific warm
up based on the most body’s parts to be used while performing Football
techniques and tactics and stretch their muscles properly.
• One student teacher can lead warm up and stretching exercises.
e) Lesson development
• Divide football playground into two equal parts.
• Form groups A, B, C and D including boys and girls.
• Avail two balls, one for each part of the playing ground.
Description of the activity
–– Let student teachers play 7 vs 5 in each part of the playground.
–– Use cones two feet away for making goals to score in (for each court
3 goals must be available in different corners).
–– Let groups play in this ways: A (7 players) vs B (5 players), C (7
players) vs D (5 players).
–– Groups that has 7 players will defend two goals and attack in one
goal. The group that has 5 players will defend one goal and attack in
two goals.
–– Groups are requested to play by using learned techniques and tactics.
–– Let all student teachers participate by making substitutions in all
groups.
–– Observe how student teachers are performing techniques and tactics
of playing football.
–– Request players who are not in the court to observe their teammates
and records some fouls which should be committed by the players.
–– After ten minutes stop the game and let student teachers present
fouls they have found.–– Add any additional information where is necessary
Task/Activity 2
A and B play against C and D
Let group play a normal football game by using the whole football playing
ground. The tutor officiates the match by respecting laws of the game for
football game. The winner is the groups, which will get more goals in a
determined period. The tutor should remember to explain the fouls committedby player before sanctioning him/her.
Cool down exercises
–– Let student teachers do light exercises and stretch their group of muscles
by insisting on most used parts.
–– Randomly, one of student teachers leads cool down exercises.
–– Guides them while stretching their muscles systematically.–– Helps them/demonstrate/correct where is necessary.
Closing discussion
Reflect
–– What are challenges/benefits did you face while playing?–– How did you proceed in order to win? What are causes of losing?
Connect
–– What is the importance of combining techniques and tactics in our works
or plays?
Apply
–– What is the usefulness of techniques and tactics in football game situation?
–– How will you use those skills of playing football in your daily life?
Lesson 2: Laws of the game (law 1-law10)
a) Learning objective
Explain and recognize laws of football game
b) Teaching resources
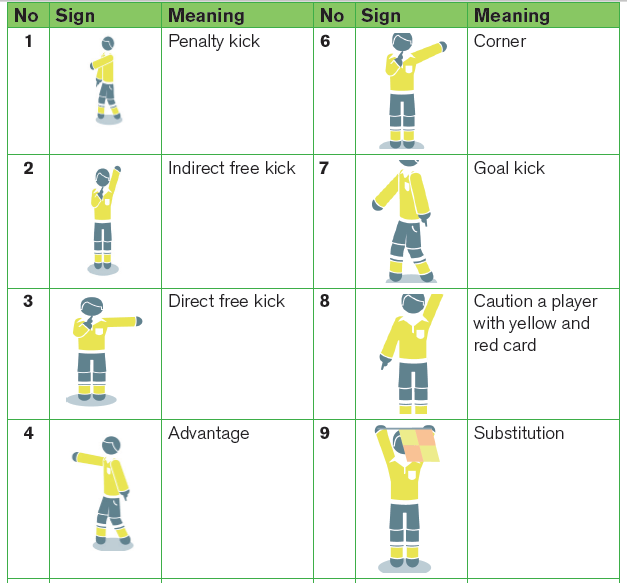
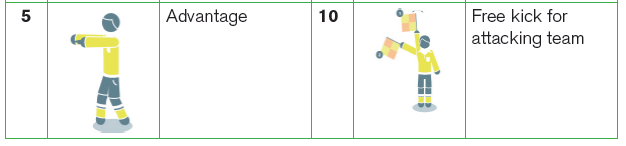
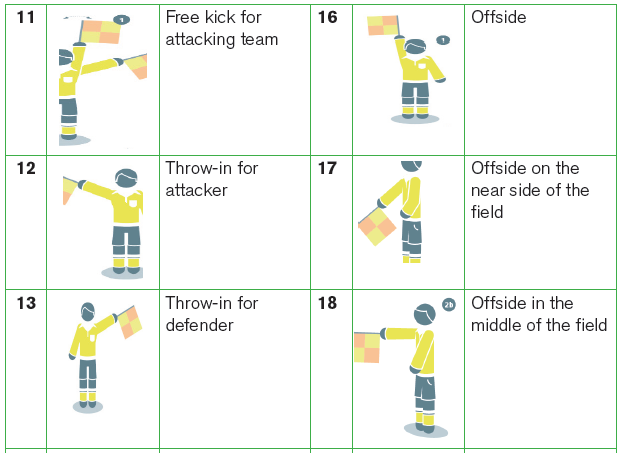
Balls, whistle, stopwatch/watch, cones, chasubles, markers, Laws of the game
for football, projector, computer, charts/diagrams and images of playground/
officials hand signals , videos showing officiating images.
c) Prerequisites/Revision/Introduction
Student teachers of year 3 will learn better laws of the game of football if they
have performed basic techniques and tactics of playing football in year 1 and
year 2.
d) Learning activities
Divide student teachers into 5 groups and distribute to them questions based
on group numbers and let them discuss given questions into their respective
groups. Distribute laws of the game for each group based on questions given
to facilitate student teachers to get resources (if possible, you may use smartclassroom and let them use soft copy of football laws of the game).
• Pass though groups and help them where is necessary. Request student
teachers to choose a secretary to record findings and group representative
who will present their findings.
• Request group representative to present their findings and group members
may support where is necessary.
• After presentation of all groups, use a projector to recap presentations,
show them fouls, and misconduct with the right hand signals to use while
officiating in football.
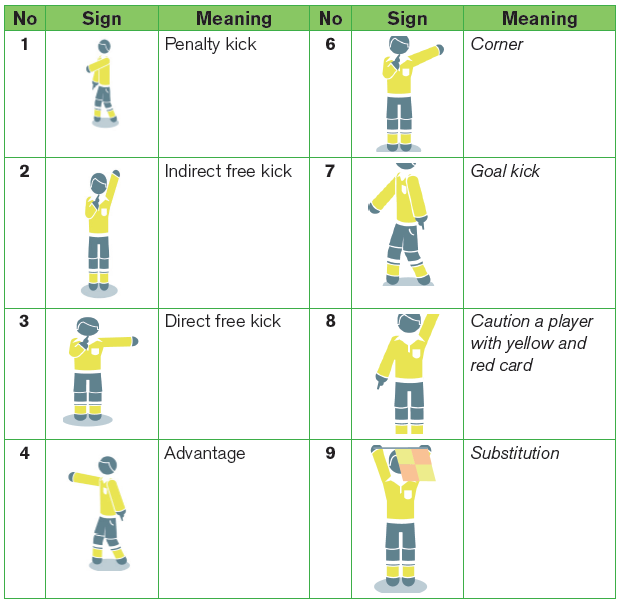
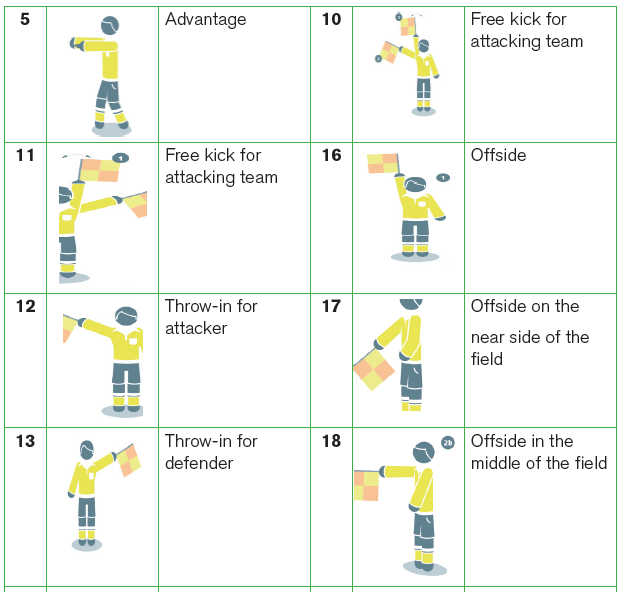
Application activity
In pairs, let student teachers show different hand signals used in football gameand interpret their meaning.
Signs used in officiating football game/match
Lesson 3: Laws of the game (Law 11-law 17)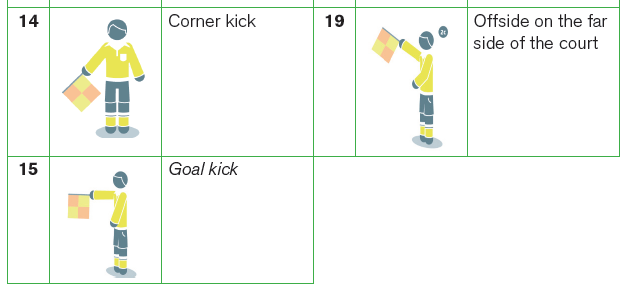
a) Learning objective
Explain and recognize laws of football game
b) Teaching resources
Balls, whistle, stopwatch/watch, cones, chasubles, markers, Laws of the game
for football, projector, computer, charts/diagrams and images of playground/
officials hand signals , videos showing officiating images.
c) Prerequisites/Revision/Introduction
Student teachers of year 3 will learn better laws of the game of football if they
have performed basic techniques and tactics of playing football in year 1 and
year 2.
d) Learning activities
Divide student teachers into four groups and distribute to them questions in
the table based on group numbers and let them discuss given questions into
their respective groups. Distribute football laws of the game for each group
based on questions given to facilitate student teachers to get resources (if
possible, you may use smart classroom and let them use soft copy of footballlaws of the game, videos showing officiating procedures in football etc.).
–– Pass though groups and help them where is necessary. Request student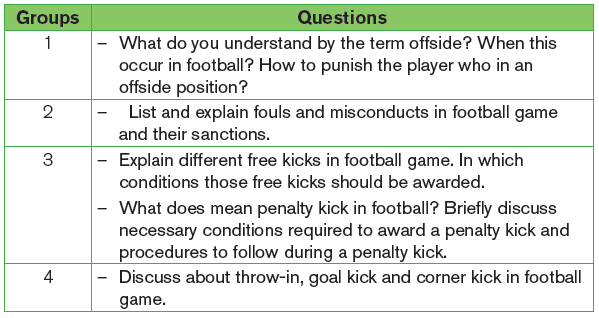
teachers to choose a secretary to record findings and group representative
who will present their findings.
–– Request group representative to present their findings and group members
may support where is necessary.
–– After presentation of all groups, use a projector to recap presentations,
show them fouls, and misconduct with the right hand signals to use whileofficiating in football.
Application activity
IIn pairs, let student teachers show different hand signals used in football gameand interpret their meaning.
Signs used in officiating football game/match
Lesson 4: Playing football game adhering to laws of the game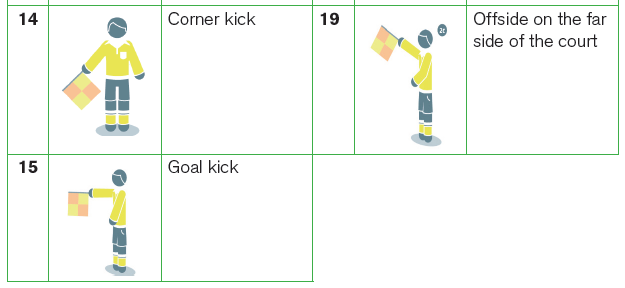
a) Learning objective
Interpret and apply laws of the game of football in a game situation
b) Teaching resources
Balls, playground, whistle, stopwatch/watch, cones, chasubles, hard copy of
laws of the game of football, officials’ cards (yellow and red), assistant officials’flag.
c) Prerequisites/Revision/Introduction
Student teachers of year 3 will interpret and apply laws of the game of football
if they have developed basic techniques and tactics of playing football learnedin year 1 and year 2.
d) Learning activities
Opening discussionss
• Ask questions related to laws of the game learned in lesson 1 and lesson
2 in this unit.
• Let student teachers answer asked questions and support their answers
where is necessary.
• Introduce the new lesson and invite student teachers to start warm up.
Warm up exercises and cool down description
• Let student teachers perform general warm up exercises and specific warm
up based on the most body’s parts to be used while playing football and
stretch their muscles properly.• One student teacher can lead warm up and stretching exercises.
• Choose one student teacher to lead cool down and invite them to start after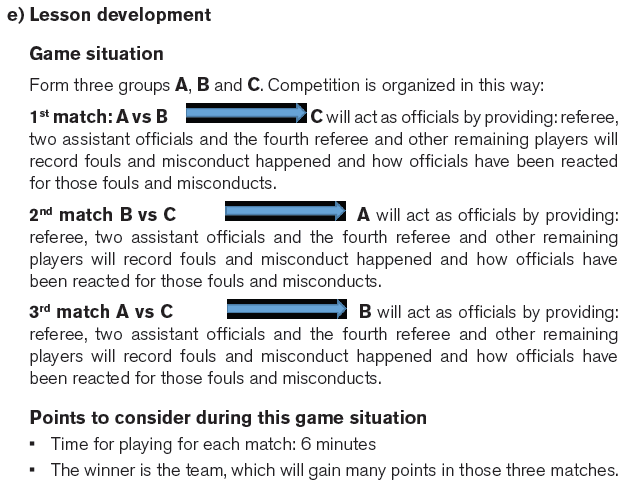
game situation discussion.
• Start by giving time group A, B then C to share what they have recorded
based on laws of the games, decisions taken by officials, effectiveness of
hand signals used, and how officials are taking positions and their movement
during the match. Support them to clarify some rules of the game where is
necessary.
• Close the lesson by asking some questions on what they have beendiscussed.
2.5. Summary of the unit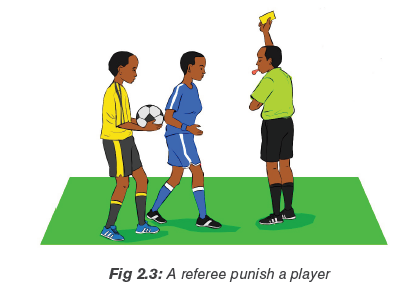
This unit comprises the offensive and defensive techniques and tactics of football
in the game situations It describes the laws of game of football.
It provides time for playing games adhering to football laws of the game and
helping student teachers to develop their knowledge and competences in football
game.
2.6 Additional Information for tutors
REFEREE
The authority of the referee
A referee who has full authority to enforce the Laws of the Game in connectionwith the match controls each match.
Decisions of the referee
The decisions of the referee regarding facts connected with play, including
whether or not a goal is scored and the result of the match, are final. The
decisions of the referee, and all other match officials, must always be respected.
The referee may not change a decision when realizing that it is incorrect or on
the advice of another match official if the game has restarted or if the referee
has already whistle for the end of the first or second half (including extra time)
and left the field of play or abandoned the match.
However, if at the end of the half, the referee leaves the field of play to go to
the referee review area (RRA) or to instruct the players to come back to the
field of play, this does not prevent a decision being changed for an incident,
which occurred before the end of the half.
Powers and duties of the referee
• Enforces the Laws of the Game.
• Controls the match in cooperation with the other match officials.
• Acts as timekeeper, keeps a record of the match and provides the appropriate
authorities with a match report, including information on disciplinary action
and any other incidents that occurred before, during or after the match.
• Supervises and/or indicates the restart of play.
• Duties of assistant officials
• To indicate at which team is entitled to a corner kick, goal kick or throw-in.
• To indicate when a player in an offside position may be penalized.
• At penalty kicks if the goalkeeper moves off the goal line before the ball is
kicked and if the ball crosses the line.
• Monitoring the substitution procedure.
• May enter the field of play to help control the 9.15m distance.
General positioning and movement for referee and assistant
officials
The best position is one from which the referee can make the correct decision.
All recommendations about positioning must be adjusted using specific
information about the teams, the players and events in the match.
Recommendations for officials dispositions and movement
• The play should be between the referee and the lead assistant officials.
• The lead assistant officials should be in the referee’s field of vision so the
referee should usually use a wide diagonal system.
• Staying towards the outside of the play makes it easier to keep play and the
lead assistant officials in the referee’s field of vision.
• The referee should be close enough to see play without interfering with play.
• “What needs to be seen” is not always in the vicinity of the ball. The referee
should also pay attention to:
–– Player confrontations off the ball.
–– Possible offences in the area towards which play is moving.–– Offences occurring after the ball is played away.
The fourth official’s assistance duties and responsibilities are:
• Supervising the substitution procedure.
• Checking a player’s/substitute’s equipment.
• The re-entry of a player following a signal/approval from the referee.
• Supervising the replacement balls.
• Indicating the minimum amount of additional time the referee intends to
play at the end of each half (including extra time).
• Informing the referee of irresponsible behavior by any technical area
occupant.
Additional assistant officials
The additional assistant officials may indicate:
• When the whole of the ball passes over the goal line, including when a goal
is scored.
• To which team is entitled to a corner kick or goal kick.
• Whether, at penalty kicks, the goalkeeper moves off the goal line before theball is kicked and if the ball crosses the line.
Reserve assistant referee
The only duty of a reserve assistant referee is to replace an assistant referee,
Fourth official who is unable to continue.
Video match officials
A video assistant referee (VAR) is a match official who may assist the referee
to make a decision using replay footage only for a ‘clear and obvious error’ or
‘serious missed incident’ relating to a goal/no goal, penalty/no penalty, direct
red card (not a second caution) or a case of mistaken identity when the referee
cautions or sends off the wrong player of the offending team. An assistant
video assistant referee (AVAR) is a match official who helps the VAR primarily
by:
• Watching the television footage while the VAR is busy with a ‘check’ or a
‘review’.
• Keeping a record of VAR-related incidents and any communication or
technology problems.
• Assisting the VAR’s communication with the referee, especially
communicating with the referee when the VAR is undertaking a ‘check’/
‘review’ e.g. to tell the referee to ‘stop play’ or ‘delay the restart’ etc.
• Recording the time ‘lost’ when play is delayed for a ‘check’ or a ‘review’.
• Communicating information about a VAR-related decision to relevant parties.
The start and restart of play
A kick-off starts both halves of a match, both halves of extra time and restarts play
after a goal has been scored. Free kicks (direct or indirect), penalty kicks, throwins,
goal kicks and corner kicks are other restarts of the play.
Ball out of play
The ball is out of play when it has wholly passed over the goal line or touchline on
the ground or in the air.
Ball in play
The ball is in play when:
• It is inside the court and there is no infringement of laws of the game.
• When it touches a match official and when it rebounds off a goalpost,
crossbar or corner flag post and remains on the field of play.
Offside
Offside position
It is not an offence to be in an offside position. A player is in an offside position if:
• Any part of the head, body or feet is in the opponents’ half (excluding
the halfway line) and any part of the head, body or feet is nearer to the
opponents’ goal line than both the ball and the second-last opponent.
• The hands and arms of all players, including the goalkeepers, are not
considered. A player is not in an offside position when is at the level with
the Second-last opponent or the two last opponents.
Offside offence
A player is consider to be in an offside position from the moment the ball
is played or touched by one of the teammate. He is only penalized when
he is involved in active play by interfering with play by playing or touching a
ball passed or touched by a team-mate or interfering with an opponent by
preventing an opponent from playing or being able to play the ball, by clearly
obstructing the opponent’s line of vision or challenging an opponent for the
ball and when he is gaining an advantage for being in an offside position.
No offence
There is no offside offence if a player receives the ball directly from a goal kick,
a throw-in or a corner kick.
Offences and sanction in football game
Fouls that merit direct free kick
A direct free kick is awarded when a player commits any of the following in a
manner considered by the referee to be careless, reckless or using excessive
force:
• Kicking or attempts to kick an opponent.
• Tripping or attempts to trip an opponent.
• Jumping at an opponent.
• Charging an opponent.
• Striking or attempts to strike an opponent.
• Pushing an opponent.
• Tackling an opponent.
• Holding an opponent.
• Impeding the progress of an opponent with contact.
• Spiting at an opponent.
• Handling the ball deliberately except for the goalkeeper within his own
penalty area.
Direct free kick
• If a direct free kick is kicked directly into the opponents’ goal, a goal is
awarded.
• If an indirect free kick is kicked directly into the opponents’ goal, a goal kick
is awarded.
• If a direct or indirect free kick is kicked directly into the team’s own goal, a
corner kick is awarded.
Fouls that merit indirect free kick
When a goalkeeper, inside his own penalty area
• Controlling the ball with his hands for more than six seconds before releasing
it from his possession.
• Touching the ball again with his hands after he has released it from his
possession and before it has touched another player.
• Touching the ball with his hands after it has been deliberately kicked to him
by a teammate, or thrown to him from a throw-in (the back-pass rule).
When any player in the opinion of the referee
• Playing in a dangerous manner.
• Impeding the progress of an opponent when the ball is not within playing
distance of either player.
• Preventing the goalkeeper from releasing the ball from his hands.
• Some technical breaches of the rules, such as the offside offence, result
in play being restarted with an indirect free kick, though these are not
considered fouls and will never be punished by a caution or dismissal.
Indirect free kick signal
The referee indicates an indirect free kick by raising the arm above the head; this
signal is maintained until the kick has been taken and the ball touches another
player, goes out of play or it is clear that a goal cannot be scored directly. An
indirect free kick must be retaken if the referee fails to signal that the kick is
indirect and the ball is kicked directly into the goal.
Misconduct that merits a yellow card (caution)
A player is cautioned and shown a yellow card in case of:
• Dissenting by word or action.
• Persistent infringement of the Laws of the Game.
• Delaying the restart of play.
• Failing to respect the required distance when play is restarted with a corner
kick, throw-in or free kick.
• Entering or re-entering the field of play without the referee’s permission.
• Deliberately leaving the field of play without the referee’s permission.
Fouls that merit red card (send off offense)
A player is sending off and shown a red card in case of:
• Serious foul play and violent conduct.
• Spitting at an opponent or any other person.
• Denying the opposing team a goal or an obvious goal scoring opportunity
by deliberately handling the ball (this does not apply to a goalkeeper within
his own penalty area).
• Using offensive, insulting or abusive language and/or gestures.
• Receiving a second caution in the same match.
The Penalty kick
A penalty kick is awarded if a player commits a direct free kick offence inside
their penalty area or off the field as part of play. A goal may be scored directly
from a penalty kick.
The throw in
A throw-in is awarded to the opponents of the player who last touched the ball
when the whole of the ball passes over the touchline, on the ground or in the air.
A goal cannot be scored directly from a throw-in:
• If the ball enters the opponents’ goal: a goal kick is awarded.
• If the ball enters the thrower’s goal: a corner kick is awarded.
• The goal kick
A goal kick is awarded when the whole of the ball passes over the goal line, on
the ground or in the air, having last touched a player of the attacking team, and a
goal is not scored. A goal may be scored directly from a goal kick, but only against
the opposing team; if the ball directly enters the kicker’s goal, a corner kick is
awarded to the opponents.
The corner kick
A corner kick is awarded when the whole of the ball passes over the goal line, on
the ground or in the air, having last touched a player of the defending team, and
a goal is not scored.
2.7. End unit assessment
Tutor divide student teachers into groups of four including one referee, two
assistant officials and the fourth referee. After dividing student teachers into
their respecting groups, set the order on which groups will lead the game, request
the first group to start the match. Ask other remaining student teachers to form
two teams of 11 players for each one including a goalkeeper. Let the match start,
change groups which is officiating after five minutes. Officials become players to
replace those who are becoming officials.
–– During performing officiating for each group, observe how each student
teacher is accomplishing given tasks and roles.
–– Records their performance in order to give them feedback at the end of
the exercise.
2.8. Additional activities
2.8.1. Remedial activities
Distribute balls to student teachers for regular familiarization with the ball focusing
on techniques of playing football, encourage student teachers to lead matches/
games while other are performing techniques and tactics in the game situation.
2.8.2. Consolidation activities
Participate in competitions between small groups and choose their own officials
to lead the matches and make records.
2.8.3. Extended activities
Organize football competition between classes for forming school teams and
participate in interclasses competitions and friendly matches. Let student teachers
officiate the matches. Encourages student teachers to exploit regularly official
laws of the game of football and be updated on changes about those laws of thegame.
UNIT 3 :VOLLEYBALL
Key unit competence: Perform volleyball techniques and tactics in the
game situation adhering to the rules of the game.
3.1. Prerequisite (knowledge, skills, attitudes and values)
Student teachers of year 3 will learn better rules of the game of volleyball if they
have developed basic techniques and tactics of volleyball learned in year1, year 2.
3.2. Cross-cutting issues to be addressed
• Gender
In teaching and learning process, the tutor must prepare and provide volleyball
activities that engage both girls and boys equally in exploiting their full potential
and volleyball talents without any discrimination or prejudice.
• Inclusive education
The tutor as a facilitator he/she must consider different special education
needs and select activities to adapt his teaching approaches to student
teachers. This creates a positive attitude and helps all student teachers to
participate actively and develop their competence levels.
• Financial education
The tutor should integrate Financial Education into his teaching/learning
activities by providing the local and no cost teaching material where is possible.
He/she must encourage student teachers to make their own materials that
can help them to develop competences not only in volleyball game but also
in their daily life.
• Standardization culture
The tutor must choose and select the standardized materials to use in his/her
teaching/learning process of volleyball. It is necessary to provide appropriate
materials required to the levels of student teachers and help them to develop
culture of checking and using the quality of volleyball materials for the
competitions before using them in order to prevent injuries or other case of
accidents.
• Environment and sustainability
The tutor should provide materials and deliver the lesson by encouraging
student teachers to protect the environment and well use of materials. The
tutor helps them to develop the spirit of keeping safe the environment in
which they use in volleyball activities by avoiding to leave waste on the court
or ground.
• Peace and values education
The tutor helps student teachers to develop fair play and social values by
avoiding violence and conflict in the volleyball game and by setting clear and
relevant instructions. He/she should provide the activities that help student
teachers to develop their competence peacefully.
• Comprehensive sexuality education
The tutor provides volleyball activities and sets instructions that prevent
sexual harassment, any kind of gender-based violence like sexual abuse and
physical contacts oriented to the sexuality intention.
• Genocide studies
While conducting volleyball lesson, a tutor should take a time to explain student
teachers how sports should be used to fight against Genocide ideology and
how to prevent it. For example, to organize Genocide memorial tournaments
at school and give the message related to the fighting against Genocide
3.3. Guidance on introductory activity
Before introducing the lesson of this unit, you must introduce the whole unit.
The tutor as a guide, facilitator and expert, asks questions and provides activities
related to rules of the game of volleyball applied during performing techniques
and tactics in the game situation in order to help them to predict what to be
learned in the whole unit.3.4. List of lessons/sub-heading
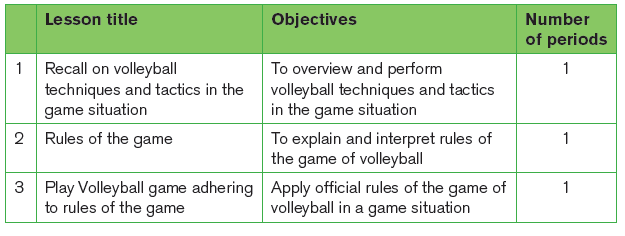
Lesson 1: Recall on volleyball techniques and tactics in the game
situation
a) Learning objective
Distinguish volleyball techniques and tactics and perform them in the game
situation
b) Teaching resources
Balls, playground, whistles, watch, cones, chasubles, score sheet, cards, flags,
net and posts.
c) Prerequisites/Revision/Introduction
Student teachers of year 3 will learn better volleyball techniques and tactics in
the game situation if they have developed basic techniques of playing volley
learned in year1, and year 2.
d) Learning activities
Opening discussions
• Ask questions related to volleyball techniques and tactics in the game
situation learned in previous levels.
• Let student teachers present their findings and introduce the new lesson.
• Invite student teachers to start warm up exercises.
Warm up exercises and cool down description
• Let student teachers perform general warm up exercises and specific warm
up based on the most body’s parts to be used while performing volleyball
techniques and tactics and stretch their muscles properly.
• One student teacher can lead warm up and stretching exercises.
e) Lesson development
Task/Activity
–– Form group of six student teachers and let two groups enter on the
volleyball court. Players on the court take their positions and be ready to
start the game.
–– Student teachers are requested to play a normal volleyball game and are
asked to use learned techniques and tactics of playing volleyball game.
Task/Activity
–– During the game observe how student teachers have taken their positions
on the court, how they are using techniques perfectly and tactics they
are using in order to win.
–– Change groups based on time you have in order to give opportunities to
all student teachers to participate in the game.
–– Ask groups, which are not playing to record fouls, related to used
techniques.
–– Randomly choose one student player to lead cool down, after let them
present their findings from observation made after the game situation.–– During presentation support student teachers where is needed.
Closing discussion
Reflect
–– What are challenges/benefits did you face while playing volleyball by using
learned techniques and tactics?
–– In case you have lost the match, what are causes of that lost?
Connect
–– What are the importance of combining techniques and tactics in our works
or plays?
Apply–– How will you use those skills of playing volleyball in your daily life?
Application activities
Form teams of 2 vs 2, 3 vs 3, 4 vs 4, 5 vs 5 or 6 vs 6. Let student teachers
play volley ball applying techniques and tactics in the game situation, on the
appropriate court according to the number of players and available materials.
The winner is the team which applied more techniques and tactics than others
during one or more sets of the game.
Lesson 2: Rules of the game
a) Learning objective
To explain and interpret rules of the game of volleyball
b) Teaching resources
Balls, playground, whistles, watch, cones, chasubles, score sheet, cards, flags.
c) Prerequisites/Revision/Introduction
Student teachers of year 3 will learn better rules of the game of volleyball
if they have performed basic techniques and tactics of playing volleyball inOrdinary level, year 1 and 2.
d) Learning activities
Task/Activity 1
–– Ask questions related to fouls that they have found during playing game
situation of volleyball in the lesson 1.
–– Let student teachers answer asked questions and support them where
is necessary.
–– Student teachers form six groups and give questions to discuss in eachgroup as seen in the following table.

Pass though groups and help them where is necessary. Request student teachers
to choose a secretary to record findings and group representative who will present
their findings.
–– Request group representative to present their findings and group members
may support where is necessary.
–– After presentation of all groups, use a projector to recap presentations,show them fouls and hand signals to use while officiating in volleyball.
Application activitiy
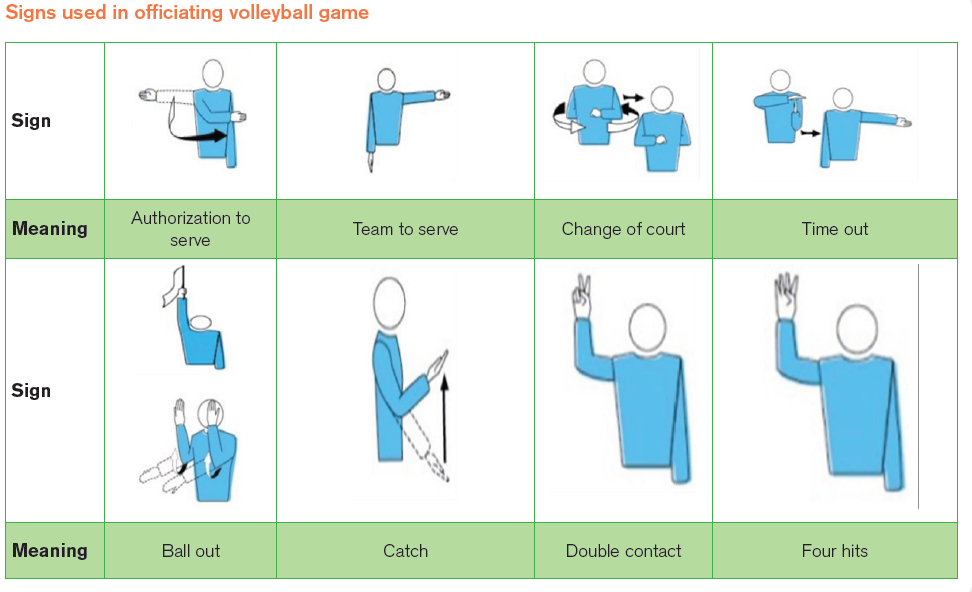
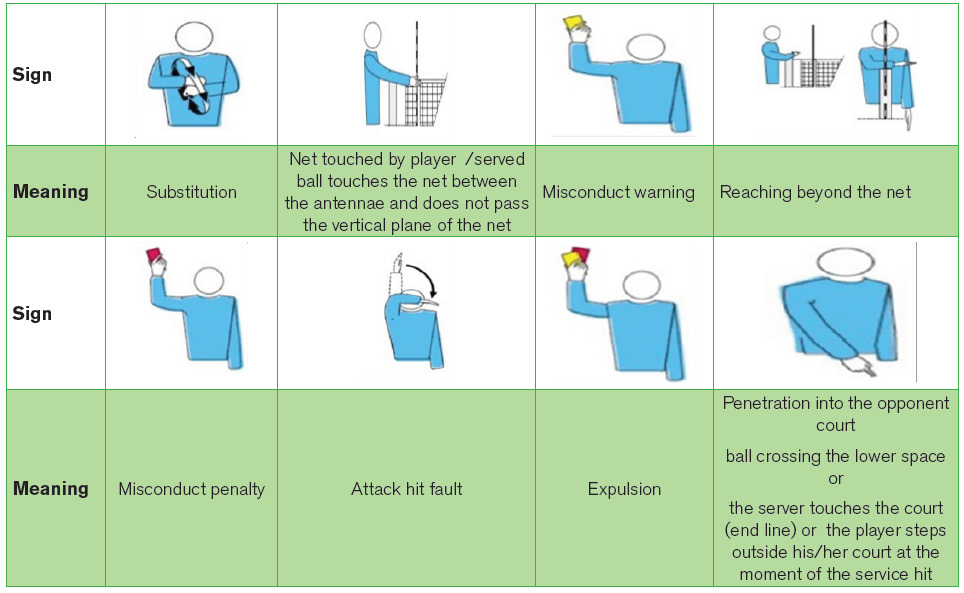
Let student teachers show different hand signals used in volleyball game andinterpret their meaning.
Lesson 3: Play Volleyball game adhering to rules of the game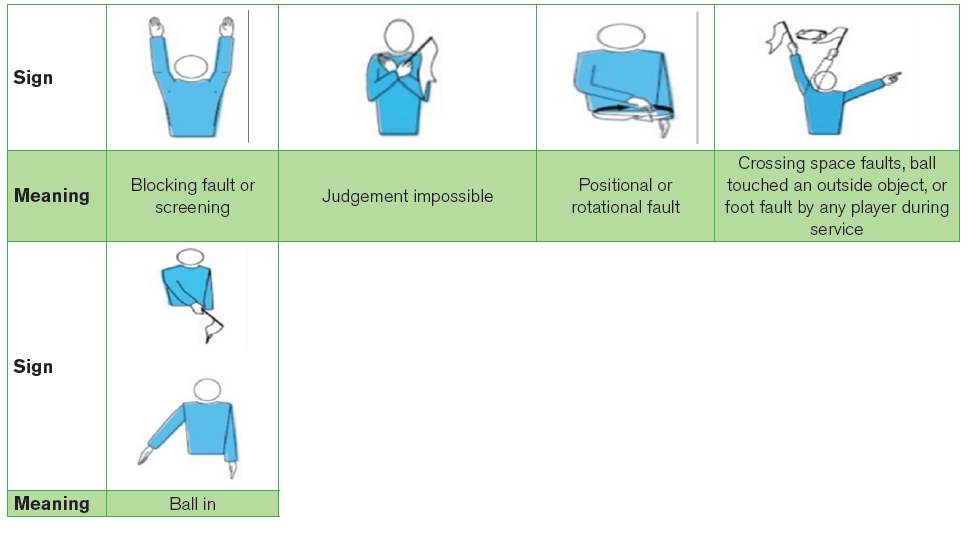
a) Learning objective
Apply rules of the game of volleyball in a game situation
b) Teaching resources
Balls, playground, whistles, watch, cones, chasubles, score sheet, cards, flags.
c) Prerequisites/Revision/Introduction
Student teachers of year 3 will perform better playing volleyball game adhering
to official rules of the game if they have developed basic techniques and tactics
of playing volleyball learned in year 1, and year 2.
d) Learning activities
Opening discussionss
• Ask questions related to volleyball rules in game situations.
• Let student teachers present their findings.
• Introduce the new lesson to the student teachers.
• Invite student teachers to start warm up exercises.
Warm up exercises and cool down description
• Let student teachers perform general warm up exercises and specific warm
up based on the most body’s parts to be used while playing volleyball. Let
student teachers stretch their muscles properly.• One student teacher can lead warm up and stretching exercises.
Points to consider during this game situation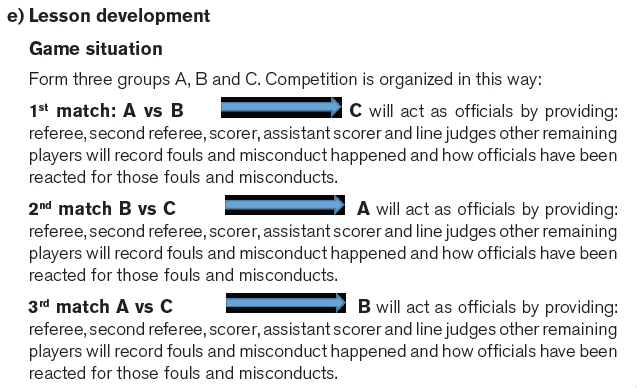
• Time for playing for each match: 6minutes
• The winner is the team, which will gain many points in those three matches.
• Choose one student teacher to lead cool down and invite them to start after
game situation discussion.
• Start by giving time group A, B then C to share what they have recorded
based on rules of the games, decisions taken by officials, effectiveness of
hand signals used, and how officials are taking positions and their movement
during the match. Support them to clarify some rules of the game where is
necessary.
• Close the lesson by asking some questions on what they have beendiscussed.
Application activity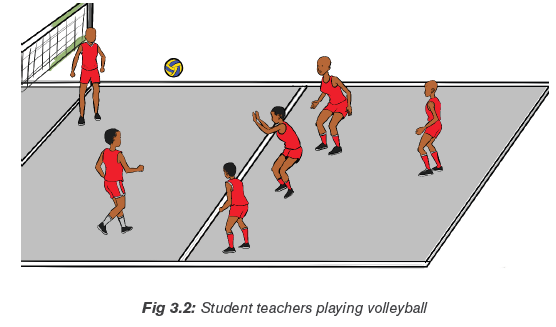
Form teams of 3 vs 3, 4 vs 4, 5 vs 5, 6 vs 6. Let student teachers play
volleyball adhering to rules of the game on the appropriate court . The winner
is the team, which committed less fouls than others in a set of 15 points of thegame.
3.5. Summary of the unit
In this unit, student teachers perform exercises for recalling techniques and
tactics of volleyball. They have also learned rules of volleyball game and how to
apply them during the game. Those rules are summarized as the following:
• Playing area: dimensions, playing surface, line of the court, zones andareas, temperature and lighting.
• Net and posts: height of the net, structure of the net, side bands, antennae,
posts and additional equipment.
• Balls: standards balls, uniformity of balls, five-ball system.
• Teams: team composition, location of the team, equipment, changes of
equipment, forbidden objects.
• Team leaders: captain, coach, assistant coach.
• Scoring a point, winning a set and winning the match.
• Default and incomplete team.
• Structure of the play: the toss, official warm up session, team starting
line-up, positions, positional fault, rotation and rotational fault.
• States of play: ball in play and out of play, ball in and out.
• Playing the ball: team hits, characteristics of the hit, faults in playing the
ball, contact with the court.
• Ball at the net: Ball crossing the net, ball touching the net, ball in the net.
• Player at the net: reaching beyond the net, penetration under the net,
contact with the net, player’s faults at the net.
• Service: first service in a set, service order, authorization of the service,
execution of the service, screening, service faults and positional faults.
• Attack hit: characteristics of attack hit, restrictions of the attack hit, and
faults of the attack hit.
• Block: blocking, block contact, blocking within the opponent’s space. Block
and team hits, blocking the service, blocking faults.
• Regular game interruptions: number of regular interruptions, sequence
of regular game interruptions, requests for regular game interruptions, timeouts
and technical time-outs, substitution (limitation, exceptional substitution,
substitution for expulsion or disqualification, illegal substitution, substitution
procedure and improper requests).
• Game delays: types of game delay and their sanctions.
• Exceptional game interruptions: injury/illness, external interference,
prolonged interruptions.
• Intervals and changes of courts: intervals, change of courts,
• The libero players: designation of the libero, equipment, actions involving
the libero, re-designation of a new libero.
• Requirements of conduct: sportsmanlike conduct, fair play.
• Misconduct and its sanctions: minor misconduct, misconduct leading to
sanctions, sanction scale, application of misconduct sanctions, misconduct
before and between sets and sanction cards.
• Officiating corps and procedures: composition, procedures, first
referee (location, authority and responsibilities), second referee (location,
authority and responsibilities), scorer (location and responsibilities),
assistant scorer (location and responsibilities), and line judges (location and
responsibilities).
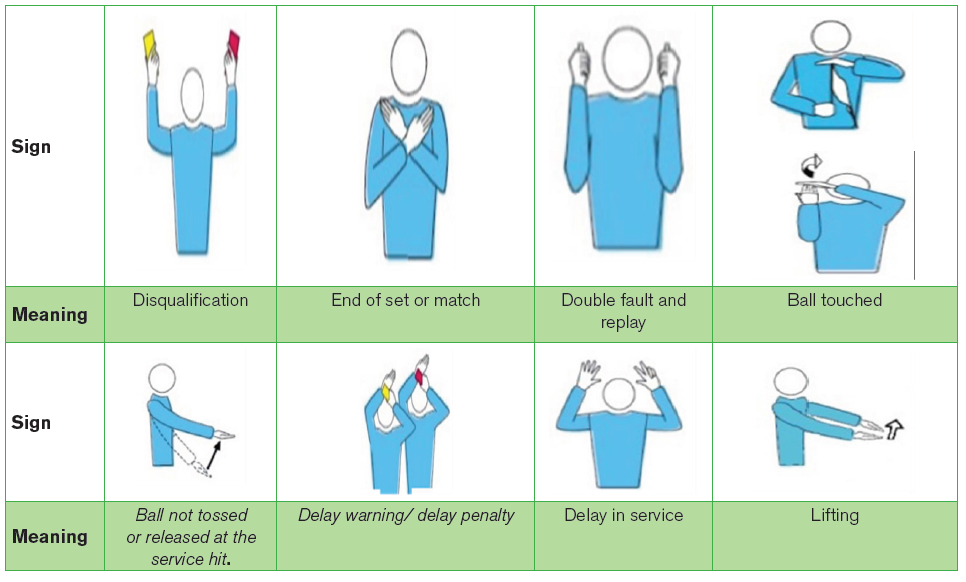
• Official signals: referee’s hand signals, line judges’ hand signals.
Student teachers have given time to put in practice by officiating volleyball gamessituations.
3.6. Additional Information for tutorsVolleyball equipment
i) The Ball
The ball is the single most important piece of equipment in the game. A
good ball will alleviate pain caused by hitting it over the net or between
teammates. If a game is being played indoors, a leather ball will work best.
It cannot be used outside because it may become wet and damaged. Foroutdoor play, a synthetic leather ball is recommended.
ii) Knee Pads
Prevent injuries for players in However, a person should choose pads
according to age and experience. For instance, younger athletes should use
thicker pads, since these players have less experience diving for the ball.
Older athletes with more knowledge may choose thinner kneepads. They
work well to prevent bruising and burns. All knee pads must fit comfortablyaround the leg area.
iii) Proper Footwear
Men and women volleyball shoes are necessary while playing volleyball
game. These shoes are designed to protect the foot during side-to-side
movement. A smart shoe choice will be made of leather and contain a low
heel. This provides top support and helps to prevent sprains as well.Officials and blowing whistles during the game
i) Whistle any violations
It is the first referee’s responsibility to whistle any violations they see. If
possible, the second referee should whistle net violations, centerline
violations, serve receive position faults, and serving order violations. If the
second official does not catch these violations, the first referee has theauthority to make the call.
ii) Whistle player mishandling the ball
Only the first referee has the authority to whistle ball handling (lifts, double
contacts, 4 hits, etc.). If appropriate, the second referee may discretely signal
ball handling to the first referee.
iii) Giving Sanctions
Only the first referee has the authority to issue sanctions to players, coaches,etc.
iv) The second referee
–– Is concerned with matters such as keeping time, assisting the first
referee in making calls, administering substitutions, and verbally
communicating with team coaches.
–– Needs to communicate effectively with the scorekeeper.
–– Should overlook the scorekeeper with recording subs, timeouts, etc.
–– Should help the scorekeeper and libero tracker with any questions or
issues that come up.
–– Should position themselves so they can effectively transition from one
side of the net to the other when the ball is in play.–– Handles substitutions
Scorers
The official scorer keeps track of the score throughout the volleyball game.
Before the game begins, the scorer notes the starting lineup of each team and
notifies the officials if the lineup was received on time. If a dispute or irregularity
arises regarding the score, the scorer uses a buzzer to notify the first and second
officials. Additionally, when a substitution request arises, the scorer notifies theofficials.
Line Judges
At least two, and as many as four, line judges monitor each game. The line judges
stand at the corners of the court watching the lines to indicate whether a ball in
play falls in or out of the court. If a server steps on the line during a serve, the line
judge watching the given line notifies the officials using a flag. When a player
touches an out-of-play ball or if the ball hits an antenna, the designated line judgealso indicates the interference.
Violations
–– Stepping on or over the line on a serve.
–– Fail to serve the ball over the net successfully.
–– Hitting the ball illegally, (Carrying, palming, throwing, etc.
–– Touches of the top of the net only with any part of the body while the ball
is in play. Players may contact the net below the top of the net (the tape)
at any time.
–– If the ball is driven into the net with such force that it causes the net
to contact an opposing player, no foul will be called, and the ball shall
continue to be in play.
–– Reaching over the net, except under these conditions:
• When executing a follow-through.
• When blocking a ball, which is in the opponent court but is being returned
(the blocker must not contact the ball until after the opponent who is
attempting to return the ball makes contact). Except to block the third play.
• Reach under the net (if it interferes with the ball or opposing player).• Failure to serve in the correct order.
Misconduct
Individual sanctions may be assessed against a player or coach for a variety of
unsportsman like actions during or between games including: shouting at an
opponent; addressing officials about their decisions; trying to distract an opponent;
or coaching in a disruptive manner.
Yellow or Warning Card: This is given for minor unsporting offenses. A
second yellow card to an individual will result in an automatic red card. It goes
together with 1 point for other team.
Red or Penalty Card: This is given for serious offenses. If a team is serving
and receives a red card, they will lose the serve. When rally scoring their
opponent also is awarded a point. If the team receiving serve get a red card,
their opponent will receive a point.
Expulsion: This is given for extremely offensive behaviour. The player is out
for the rest of the game. No additional penalty is given.
Disqualification: This is called when a player receives a second expulsion
during a match or when physical aggression is shown toward an official,
another player, or a spectator. The player is ordered from the playing area forthe balance of the match. No other penalty is given.
3.7. End unit assessment
Tutor divide student teachers into groups of five including first referee, second
referee, scorer and two line judges. After dividing student teachers into their
respecting groups, set the order on which groups will lead the game, request the
first group to start the match.
Ask other remaining student teachers to form two teams of six players for each
one. Let the match start, change groups which is officiating after five minutes.
Officials become players to replace those who are becoming officials.
During performing officiating for each group, observe how each student teacher
is accomplishing given tasks and roles.
Records their performance in order to give them feedback at the end of theexercise.
3.8. Additional activities
3.8.1. Remedial activities
Distribute balls to student teachers for regular familiarization with the ball focusing
on techniques of playing volleyball, encourage student teachers to lead matches/games while other are performing techniques and tactics in the game situation.
3.8.2. Consolidation activities
Participate in competitions between small groups and choose their own officialsto lead the matches. Scorers record performance of each group.
3.8.3. Extended activities
Organize volleyball competition between classes for forming school teams and
participate in interschool competitions and friendly matches. Let student teachers
officiate matches. Encourages student teachers to exploit regularly rules of thegame of volleyball and request them to be update about changes of the rules.
UNIT 4: BASKETBALL
Key unit competence: Perform basketball techniques and tactics in thegame situation adhering to rules of the game.
4.1. Prerequisite (knowledge, skills, attitudes and values)
Student teachers of year 3 will learn better techniques and tactics in the
basketball game situation adhering to rules of the game if they have developedbasic techniques and tactics of basketball learned in year 1, year 2.
4.2. Cross-cutting issues to be addressed
• Gender
In teaching and learning process, the tutor must prepare and provide
basketball activities that engage both girls and boys equally in exploiting their
full potential and basketball talents without any discrimination or prejudice.
• Inclusive education
The tutor as a facilitator he/she must consider different special education
needs and select activities to adapt his teaching approaches to student
teachers. This creates a positive attitude and helps all student teachers toparticipate actively and develop their competence levels.
• Financial education
The tutor should integrate Financial Education into his teaching/learning
activities by providing the local and no cost teaching material where is possible.
He/she must encourage student teachers to make their own materials that
can help them to develop competences not only in basketball game but also
in their daily life.
• Standardization culture
The tutor must choose and select the standardized materials to use in his/her
teaching/learning process of basketball. It is necessary to provide appropriate
materials required to the levels of student teachers and help them to develop
culture of checking and using the quality of materials for the competitions
before using them in order to prevent injuries or other case of accidents.
• Environment and sustainability
The tutor should provide materials and deliver the lesson by encouraging
student teachers to protect the environment and well use of materials. The
tutor helps them to develop the spirit of keeping safe the environment in
which they use in sport activities by avoiding leaving waste on it.
• Peace and values education
The tutor helps student teachers to develop fair play and social values by
avoiding violence and conflict in the basketball game and by setting clear and
relevant instructions. He/she should provide the activities that help student
teachers to develop their competence peacefully.
• Comprehensive sexuality education
The tutor provides basketball activities and sets instructions that prevent
sexual harassment, any kind of gender-based violence like sexual abuse and
physical contacts oriented to the sexuality intention.
• Genocide studies
While conducting basketball lesson, a tutor should take a time to explain
student teachers how sports should be used to fight against Genocide
ideology and how to prevent it. For example, to organize Genocide memorial
tournaments at school and give the message related to the fighting against
Genocide
4.3. Guidance on introductory activity
Before introducing the lesson of this unit, you must introduce the whole unit. The
tutor as a guide, facilitator and expert, asks questions and provides activities related
to rules of the game of basketball to be applied during performing techniques and
tactics in the game situation in order to help them to predict what to be learnedin the whole unit.
4.4. List of lessons/sub-heading
Lesson 1: Recall on basketball techniques and tactics in the game
situation
a) Learning objective
Overview and perform techniques and tactics in the game situation.
b) Teaching resources
Balls, playground, whistle, watch, cones, chasubles, rim and posts.
c) Prerequisites/Revision/Introduction
Student teachers of year 3 will recall techniques and tactics used in playing
basketball game if they have developed basic techniques of playing basketball
in year 1 and year 2.
d) Learning activities
Opening discussionss
• Ask questions related to basketball techniques and tactics in the game
situation learned in previous levels.
• Let student teachers present their findings and introduce the new lesson.
• Invite student teachers to start warm up exercises.
Warm up exercises and cool down description
• Let student teachers perform general warm up exercises and specific warm
up based on the most body’s parts to be used while performing basketball
techniques and tactics and stretch their muscles properly.
• One student teacher can lead warm up and stretching exercises
e) Lesson development
Form groups of five student teachers for each one based on the number of
student teachers who are in a class; two groups enter on the court, request
players to take their positions based on tasks to accomplish during performing
game situation, let them play a normal basketball game in 5minutes by using
techniques and tactics used in playing.
Task/Activity 1
Teaching and learning points to consider
• During game situation, the tutor should observe the following:
–– How student teachers are performing techniques learned in Year 1 and
tactics learned in Year 2.
–– How student teachers are performing different movement on the court,
how they are taking right positon on the right time for receiving and
passing the ball.
–– After five minutes tutor should change groups and let other groups,
enter on the court.
–– Student teachers who are not performing on the court should observe
and records some fouls, which are being committed by the players on
the court.
• The tutor should act as a referee and explain to the player who commitsfouls before sanctioning him/her.
Application activities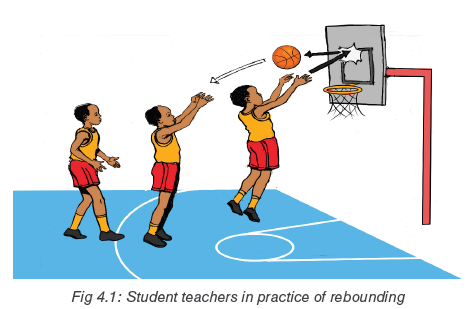
Form teams of 2 vs 2, 3 vs 3, 4 vs 4 or 5 vs 5. Let student teachers play
basketball by applying techniques and tactics in the game situation during
10 minutes, on the appropriate court according to the number of players and
available materials. The winner is the team, which applied more techniques andtactics than other did.
Cool down exercises
• Let student teachers do light exercises and stretch their group of muscles
by insisting on most used parts.
• Randomly, one of student teachers leads cool down exercises.
• Guide them while stretching their muscles systematically.
• Help them/demonstrate/correct where is necessary.
Closing discussion
Reflect
–– What are challenges/benefits did you face while playing basketball?
–– How did you proceed in order to win the match? What are causes of
loosing the game?
Connect
–– What are the importance of combining techniques and tactics in playing
basketball game?
Apply
–– What is the usefulness of techniques and tactics in basketball game
situation?
–– How will you use those skills of playing basketball in your daily life?
Lesson 2: Rules of the game
a) Learning objective
Explain and recognize rules of the game of basketball.
b) Teaching resources
Balls of basketball, hard/soft copy of basketball rules of the game, computer,
projector.
c) Prerequisites/Revision/Introduction
Student teachers of year 3 will learn better rules of the game of basketball if
they have performed basic techniques and tactics of playing basketball in year
1 and year 2.
d) Opening activities
• Ask questions related to fouls that they have found during playing game
situation of basketball in the lesson 1.
• Let student teachers answer asked questions and support them where is
necessary.
• Student teachers form six groups and give questions to discuss in eachgroup as seen in the following table.
• Pass though groups and help them where is necessary. Request student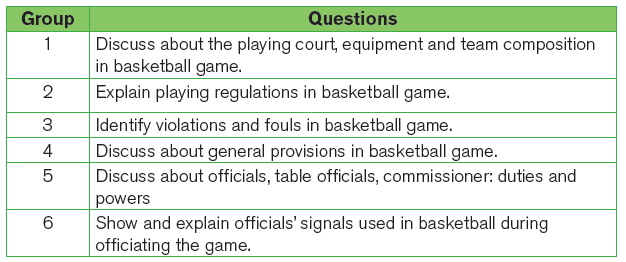
teachers to choose a secretary to record findings and group representative
who will present their findings.
• Request group representative to present their findings. During presentation
group members may intervene where is necessary.
• After presentation of all groups, use a projector to recap presentations,
show them fouls, and misconduct and hand signals to use while officiatingin volleyball.
Application activity
Let student teachers show different hand signals used in basketball game andinterpret their meaning.
Signs used in officiating basketball game
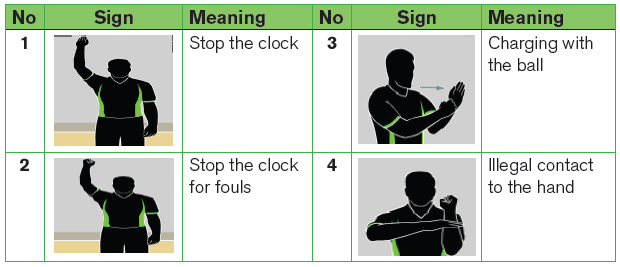
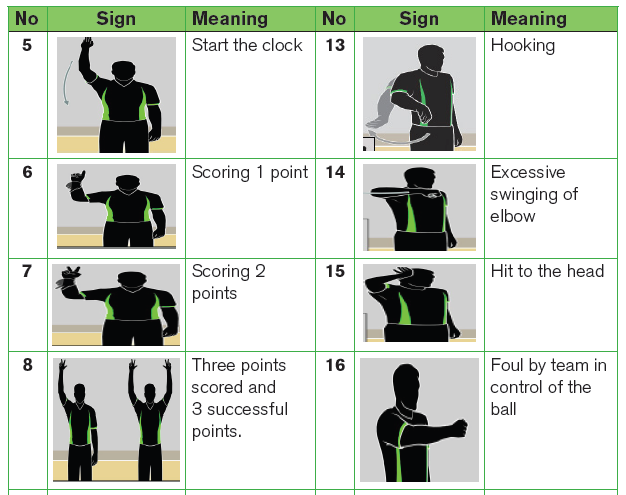
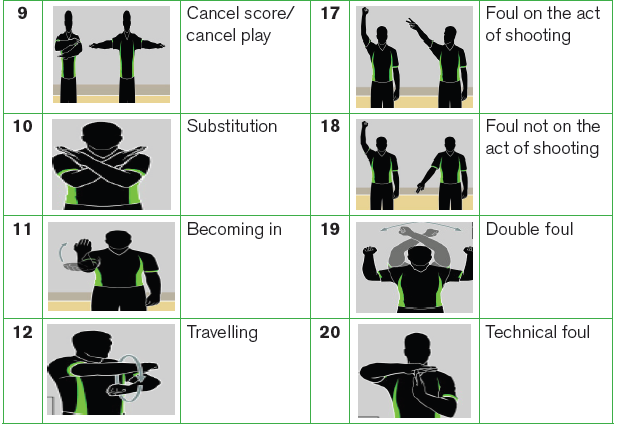

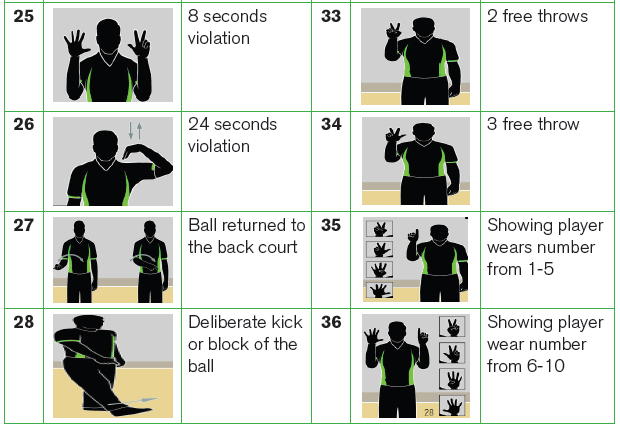
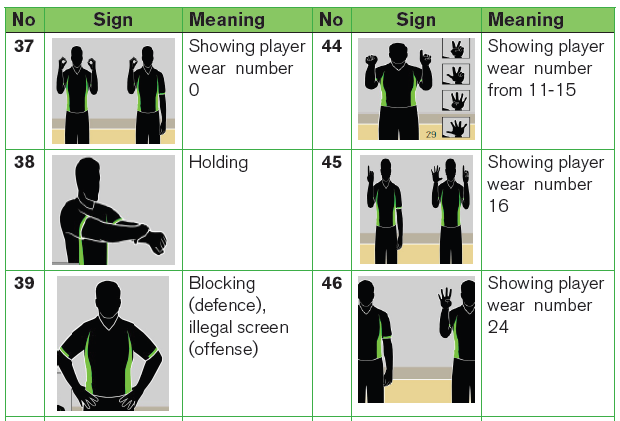
Lesson 3: Playing basketball game adhering to rules of the game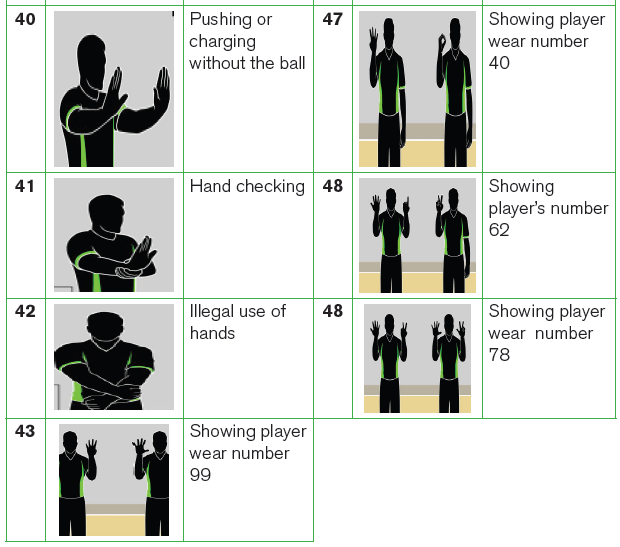
a) Learning objective
Recognize and apply official rules of the game of basketball in the game
situation
b) Teaching resources
Balls used in basketball game, court for basketball, whistle, watch, chasubles,
score sheet, protective equipment (if available), ring (rim) and posts.
c) Prerequisites/Revision/Introduction
Student teachers of year 3 will interpret and apply rules of game of playing
basketball in game situation if they have learned techniques and tactics of
playing basketball game in year 1, and year 2.
d) Learning activities
Opening discussions
• Ask questions related to the application of basketball rules in game
situations.
• Let student teachers present their findings and introduce the new lesson.
• Invite student teachers to start warm up exercises.
Warm up exercises and cool down description
• Let student teachers perform general warm up exercises and specific warm
up based on the most body’s parts to be used while playing basketball and
stretch their muscles properly.• One student teacher can lead warm up and stretching exercises.
e) Lesson development
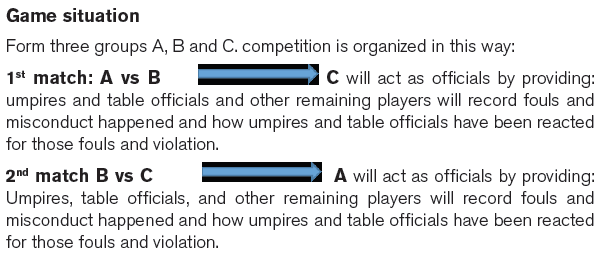
Points to consider during this game situation
• Time for playing for each match: 6minutes
• The winner is the team, which will gain many points in those three matches.
• Choose one student teacher to lead cool down and invite them to start after
game situation discussion.
• Start by giving time group A, B then C to share what they have recorded
based on rules of the games, decisions taken by officials, effectiveness
of hand signals used, and how officials are taking positions and their
movement during the match. Support them to clarify some rules of the
game where is necessary.
• Close the lesson by asking some questions on what they have beendiscussed.
Application activities
Form teams of 2 vs 2, 3 vs 3, 4 vs 4, 5 vs 5. Let student teachers play
basketball adhering to rules of the game on the appropriate court and choose
their own officials to lead the match. The winner is the team that committedless fouls than others commit and gained more points in a given period.
4.5. Summary of the unit
This unit comprises the offensive and defensive techniques and tactics of
basketball in the game situations adhering to rules. It describes the rules of the
game of basketball. It provides time for playing basketball game adhering to rules
and helping student teachers to develop their knowledge and competences inbasketball.
4.6. Additional Information for tutors
Playing court
The playing court shall have a flat, hard surface free from obstructions with
dimensions of 28 m in length by 15 m in width measured from the inner edge of the
boundary line. The centre circle shall be marked in the centre of the playing court
and have a radius of 1.80 m measured to the outer edge of the circumference.
The free-throw semi-circles shall be marked on the playing court with a radius of
1.80 m measured to the outer edge of the circumference and with their centersat the mid-point of the free-throw lines.
Scoring
To shoot the basketball through the hoop as often as possible:
–– Each time this happens, 2 points will be added to your team’s score.
–– 3 Points will be awarded if the basketball is shot from outside the threepoint
line.
–– 1 point will be awarded if the basket is shot from the free-throw line.
Players
Each team has a maximum of five players on the court at any time. Substitutes
are made by the Coach to replace players on the court. They are substituted or
subbed-off. This can only be done at certain times in the game and the refereewill let you know when it is OK. This can take place as often as the coach likes.
The control of the ball
The team who has control of the basketball is on offence. The team without
the ball is on defence. Both parts of the game are equally important. Teams on
defence are trying to stop the offence from shooting a hoop. The defence should
always try to stay between the basket and the players they are guarding. There
are two ways for the ball to be moved up the court on offence by dribbling the ball
that is by bouncing the ball with one hand only on it, or by passing it to another of
your team members. Passing is a lot faster and ensures all team members enjoy
the fun of the game. While stationary (not passing or dribbling) the player holding
the ball must always keep one of their feet on the floor, this is called the pivot foot.
Players can only lift their foot if they wish to dribble, pass or shoot the ball.
The pivot foot can twist but must remain in contact with the floor and in the same
place. If players move their foot/feet without dribbling, passing or shooting, they
are penalized and the ball given to the other team, this is called travel. The ball
must stay within the court of play (inside sidelines and baselines); otherwise, it
goes to the other team. No player may contact an opposition team member; this
is called a foul. If a foul takes place while a player is shooting for a basket, the
shooter is given free shots from the free-throw line. If a player receives five fouls
during a game, they must leave the court and can take no more part in the game.
Equipment
The following equipment shall be required:
–– Backboards, baskets comprising (pressure release) rings and nets,
backboard support structures including padding.
–– Basketballs, game clock, scoreboard , shot clock , stopwatch or suitable
(visible) device (not the game clock) for timing time-outs , 2 separate
distinctly different and loud signals, one of each for the shot clock operator,
scorer/timer. Score sheet, player foul markers, team foul markers, alternatingpossession arrow, playing floor, playing court and adequate lighting.
Duration
Generally in junior competition a game is made up of two halves (usually 18 or 20
minutes each half). For seniors the game is made up of 4 quarters of 10 minutes
for each one.
Timeouts
A coach can stop the game to talk to their players; usually a coach can call two
times outs in the first two quarters and three time outs in the two last quarters.
Rebounding
Players should assume that every basket shot would miss. Getting possession of
the ball after a missed shot is called a rebound. When two players get possession
of the ball at the same time, this is called a jump ball. A jump ball starts thebeginning of a game and after half time.
Fouls and Violations
Fouls
• Personal fouls: Personal fouls include any type of illegal physical contact
such as hitting, pushing, slapping, holding, illegal pick/screen.
• Personal foul penalties: If a player is shooting while a being fouled, then
he gets two free throws if his shot doesn’t go in, but only one free throw if his
shot does go in. Three free throws are awarded if the player is fouled while
shooting for a three-point goal and they miss their shot. If a player is fouled
while shooting a three-point shot and makes it anyway, he is awarded one free
throw. Thus, he could score four points on the play.
–– Inbounds: If fouled while not shooting, the ball is given to the team the
foul was committed upon. They get the ball at the nearest side or baseline,
out of bounds, and have 5 seconds to pass the ball onto the court.
–– Two free throws: If the team committing the foul has more than four fouls
during a quarter, the player who is fouled is awarded two three throws. He
makes his first shot, and then he is awarded another free throw.
–– Charging: An offensive foul that is committed when a player pushes or
runs over a defensive player. The ball is given to the team that the foul was
committed upon.
–– Blocking: illegal personal contact resulting from a defender not
establishing position in time to prevent an opponent’s drive to the basket.
–– Flagrant foul: Violent contact with an opponent. This includes hitting,
kicking, and punching. This type of foul results in free throws plus the
offense retaining possession of the ball after the free throws.
–– Intentional foul: When a player makes physical contact with another
player with no reasonable effort to steal the ball. It is a judgment call for
the officials.
–– Technical foul: A player or a coach can commit this type of foul. It does
not involve player contact or the ball but is instead about the manners of
the game. Foul language, obscenity, obscene gestures, and even arguing
can be considered a technical foul, as can technical details regardingfilling in the scorebook improperly or dunking during warm-ups.
Violations
–– Walking/Traveling: Taking more than a step and a half without dribbling
the ball is traveling. Moving your pivot foot once you have stopped dribbling
is traveling.
–– Carrying/palming: When a player dribbles the ball with his hand too far
to the side of or, sometimes, even under the ball.
–– Double Dribble: Dribbling the ball with both hands on the ball at the
same time or picking up the dribble and then dribbling again is a double
dribble.
–– Held ball: Occasionally, two or more opposing players will gain possession
of the ball at the same time. In order to avoid a prolonged and/or violent
tussle, the referee stops the action and awards the ball to one team or the
other on a rotating basis.
–– Goaltending: If a defensive player interferes with a shot while it is on the
way down toward the basket, while it is on the way up toward the basket
after having touched the backboard, or while it is in the cylinder above the
rim, it is goaltending and the shot counts. If committed by an offensive
player, it is a violation and the ball is awarded to the opposing team for a
throw-in.
–– Backcourt violation: Once the offense has brought the ball across the
mid-court line, they cannot go back across the line during possession. If
they do, the ball is awarded to the other team to pass inbounds.
–– Time restrictions: A player passing the ball inbounds has five seconds
to pass the ball. If he does not, then the ball is awarded to the other
team. Other time restrictions include the rule that a player cannot have the
ball for more than five seconds when being closely guarded and, in some
states and levels, shot-clock restrictions requiring a team to attempt a
shot within a given period.
The officials
–– The officials shall be an umpire(s) 1or 2. They shall be assisted by the
table officials and by a commissioner, if present.
–– The table officials shall be a scorer, an assistant scorer, a timer and a shot
clock operator.
–– The commissioner shall sit between the scorer and the timer. His primary
duty during the game is to supervise the work of the table officials and to
assist the crew chief and umpire(s) in the smooth functioning of the game.
–– The officials of a given game should not be connected in any way with
either team on the playing court. The officials, the table officials and the
commissioner shall conduct the game in accordance with these rules and
have no authority to change them.
–– The officials’ uniform shall consist of an officials’ shirt, long black trousers,
black socks and black basketball shoes. The officials and table officialsshall be uniformly dressed.
4.7. End unit assessment
Tutor divide student teachers into groups of six including two umpires, scorer,
an assistant scorer, a timer and a shot clock operator. After dividing student
teachers into their respecting groups, set the order on which groups will lead
the game, request the first group to start the match. Ask other remaining
student teachers to form two teams of five players for each one. Let the match
start, change groups which is officiating after five minutes. Officials become
players to replace those who are becoming officials.
–– During performing officiating for each group, observe how each student
teacher is accomplishing given tasks and roles.
–– Records their performance in order to give them feedback at the end ofthe exercise.
4.8. Additional activities
4.8.1. Remedial activities
Distribute balls to student teachers for regular familiarization with the ball focusingon techniques of playing basketball in small groups and in a full team.
4.8.2. Consolidation activities
Participate in competitions between small groups and choose their own officialsto lead the matches and make record of performance for different groups.
4.8.3. Extended activities
Organize basketball competition between classes for forming school teams and
participate in interclasses and friendly matches. Let student teachers officiates
matches. Encourages student teachers to exploit updated rules of the game ofbasketball regularly.
UNIT 5: HANDBALL
Key unit competence: Perform Handball techniques and tactics in the
game situation adhering to rules
5.1. Prerequisite (knowledge, skills, attitudes and values)
Student teachers of year 3 will perform better handball techniques and tactics in
the game situation adhering to official rules of the game if they have developedbasic techniques and tactics abilities in handball learnt in year 1 and two.
5.2. Cross-cutting issues to be addressed
• Gender
In teaching and learning process, the tutor must prepare and provide handball
activities that engage both girls and boys equally in exploiting their full
potential and talents without any discrimination or prejudice.
• Inclusive education
The tutor as a facilitator he/she must consider different special education
needs and select activities to adapt his teaching approaches to student
teachers. This creates a positive attitude and helps all student teachers to
participate actively and develop their competence levels.
• Financial education
The tutor should integrate Financial Education into his teaching/learning
activities by providing the local and no cost teaching material where is possible.
He/she must encourage student teachers to make their own materials that
can help them to develop competences not only in handball game but also in
their life.
• Standardization culture
The tutor must choose and select the standardized materials to use in his/her
teaching/learning process of handball. It is necessary to provide appropriate
materials required to the levels of student teachers and help them to develop
culture of checking and using the quality of sport materials for the competitions
before using them in order to prevent injuries and other cases of accident.
• Environment and sustainability
The tutor should provide materials and deliver the lesson by encouraging
student teachers to protect the environment and well use of materials. The
tutor helps them to develop the spirit of keeping safe the environment in
which they use during performing sports activities by avoiding waste left on
the ground.
• Peace and values education
The tutor helps student teachers to develop fair play and social values by
avoiding violence and conflict in the game and by setting clear and relevant
instructions. He/she should provide the activities that help student teachers
to develop their competence peacefully.
• Comprehensive sexuality education
The tutor provides handball activities and sets instructions that prevent sexual
harassment, any kind of gender-based violence like sexual abuse and physical
contacts oriented to the sexuality intention.
• Genocide studies
While conducting handball exercises a tutor should take a time to explain
student teachers how sports should be used to fight against Genocide
ideology and how to prevent it. For example, to organize Genocide memorial
tournaments at school and give the message related to the Genocide.
5.3. Guidance on introductory activity
Before introducing the lesson one of this unit, you must introduce the whole unit.
The tutor as a guide, facilitator and expert, asks questions and provides activities
related to rules of the game of handball in order to help them to predict what tobe learned in the whole unit.
5.4. List of lessons/sub-heading
Lesson 1: Recall on handball techniques and tactics in the game
situation
a) Learning objective
To overview and perform techniques and tactics of handballb) Teaching resources
c) Prerequisites/Revision/Introduction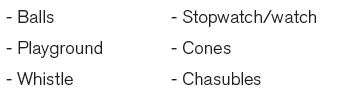
Student teachers of Year 3 will perform better recall on handball techniques
and tactics if they have developed techniques and tactics exercises learnt in
year 1 and 2.
d) Learning activities
Opening discussions
• Ask questions about handball techniques and tactics learnt in year 1 and 2.
• Let student teachers present their findings and introduce the prepared lesson.
• Invite student teachers to start warm up exercises.
Warm up exercises and cool down description
• Let student teachers perform general warm up exercises and specific warm
up based on the most body’s parts to be used while performing techniques
and stretch their muscles properly.
• One student teacher leads warm up and stretching exercises.
• Guide them while performing warm up and stretching exercises.
• Help them/demonstrate/correct where is necessary.e) Lesson development
Task/Activity
Student teachers play a certain game in a given time, e.g. Make teams of
seven prayers/team at least then the game takes 20min and every prayer
must occupy responsibilities of its position on the playground based onposition of player and assigned tasks in each group.
Description of the activity
During performing activities student teachers use: pass and reception,
dribbling, shooting in the goals, attacking and defending tactics.
Variation
According to the number of student teachers, the tutor replaces some prayers
until all prayers enter on the ground.
Teaching and learning points to consider:
–– Effectiveness in passing, dribbling, catching and shooting the ball.
–– In case of dribbling with and without an opponent.
–– Playing formations (systems) which teams are using.–– Offensive and defensive tactics used by the team.
Application activities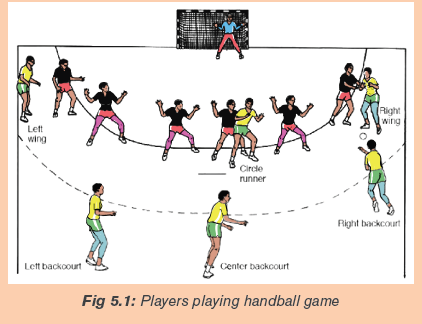
Form teams of 4 vs 4, 5 vs 5, 6 vs 6, and 7 vs 7. Let student teachers play
handball adhering to rules of the game on the appropriate court. The winner is
the team, which scores three goals before another. Distribute balls to student
teachers for regular familiarization with the ball and request them to choosetheir own officials.
Cool down exercises
–– Let student teachers do right exercises and stretch their group of muscles
by insisting on most used parts.
–– Randomly, one of student teachers leads cool down exercises.
–– Guide them while stretching their muscles systematically.
–– Help them/demonstrate/correct where is necessary.
Closing discussion
Reflect
–– Which challenges did you face during the execution of passing, receiving,
dribbling, shooting and blocking exercises in handball game? Why?
–– What went well during the performance of passing, receiving, dribbling,
shooting and blocking the ball in handball game? Why?
Connect
–– What conditions are necessary for a handball prayer to have the best
performance?
Apply
–– How will you do to make better your performance of handball techniques
and tactics after this session?
Lesson 2: Rules of the game
a) Learning objectiveDiscuss and interpret rules of the game of handball
b) Teaching resources
c) Prerequisites/Revision/Introduction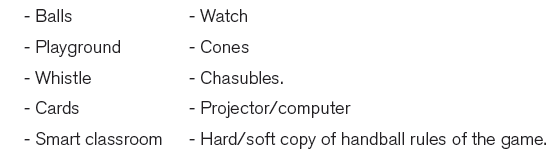
Student teachers of Year 3 will learn better rules of the game of handball if
they have developed techniques and tactics of playing handball game learnedin year 1 and year 2.
d) Learning activities
Put student teachers into eight groups and distribute to them questions based
on group numbers and let them discuss given questions into their respective
groups. Distribute rules of the game for each group based on questions given
to facilitate student teachers to get resources (if possible, you may use smartclassroom and let them use soft copy of rules of the game of handball).
• Pass though groups and help them where is necessary. Request student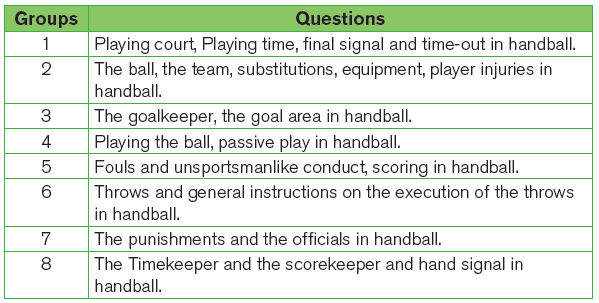
teachers to choose a secretary to record findings and group representative
who will present their findings.
• Request group representative to present their findings, group members may
support where is necessary.
• After presentation of all groups, use a projector to recap presentations,
show them fouls, and misconduct with the right hand signals to use whileofficiating in handball.
Hand signals used in officiating handball game
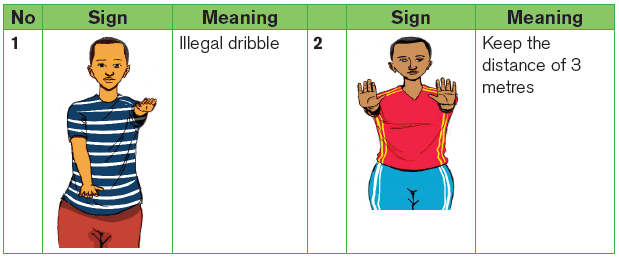
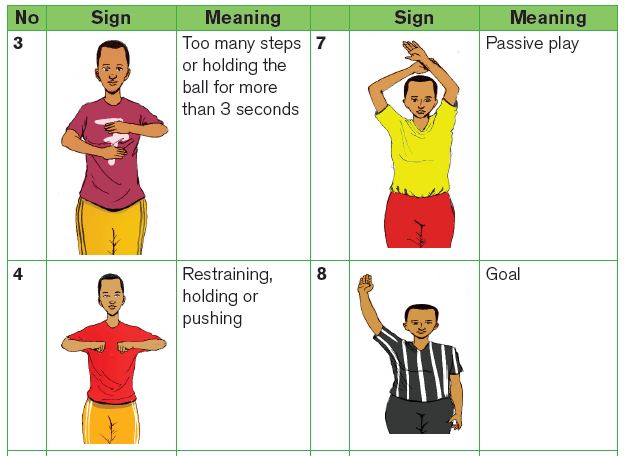
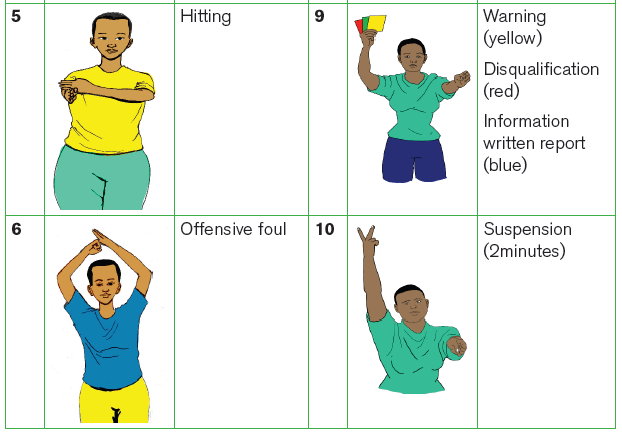
Application activity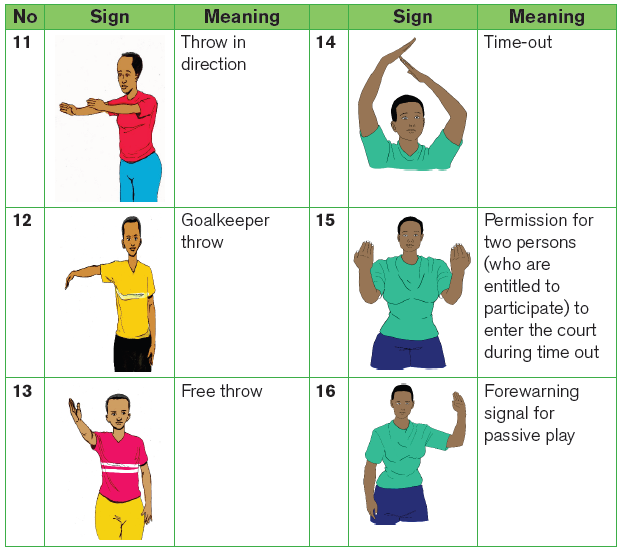
Provide one box which contains cards where written fouls and unsportsmanlike
conduct. Another box contains cards where written sanctions/punishment. In
groups, when one member picks a card written a foul or an unsportsmanlike
conduct, one from another group raises the card of its relative sanction/punishment. Continue the activity until the prepared cards finished.
Lesson 3: Playing handball game adhering to official rules of the
game
a) Learning objective
Playing handball game adhering to official rules of the gameb) Teaching resources

c) Prerequisites/Revision/Introduction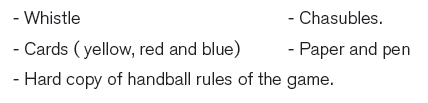
Student teachers of Year 3 will perform better the game situation adhering
to the official rules of the game of handball if they have developed basic
techniques and tactics of playing handball learned in year 1 and year 2.
d) Learning activities
Opening discussions
• Ask questions about rules of the game of handball.
• Let student teachers present their findings.
• Invite student teachers to start warm up exercises.
Warm up exercises
• Let student teachers perform general warm up exercises and specific
warm up based on the most used body’s parts to be used while in game
performance stretch their muscles properly.
• One student teacher leads warm up and stretching exercises.
• Guide them while performing warm up and stretching exercises.
• Help them/demonstrate/correct where is necessary.
e) Lesson developmentGame situation
Points to consider during this game situation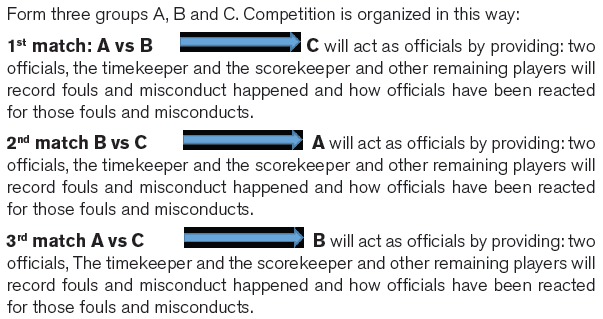
• Time for playing for each match: 6 minutes
• The winner is the team, which will gain many points in those three matches.
• Choose one student teacher to lead cool down and invite them to start after
game situation discussion.
• Start by giving time group A, B then C to share what they have recorded
based on rules of the games, decisions taken by officials, effectiveness of
hand signals used, and how officials are taking positions and their movement
during the match. Support them to clarify some rules of the game where is
necessary.
• Close the lesson by asking some questions on what they have beendiscussed.
5.5. Summary of the unit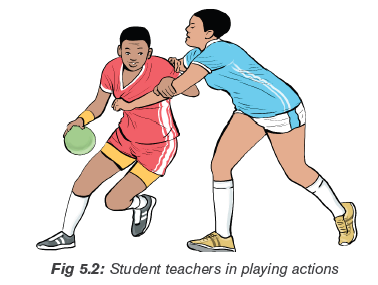
This unit comprises the reviewing techniques and tactics of handball in game
situation.
It describes the rules of the game of handball. It provides time for playing games
adhering to handball rules and helping student teachers to develop their knowledge
and competences in officiating of handball game through the following:
• Playing court, playing time, final signal and Time-Out.
• The ball, the team, substitutions, equipment, player injuries.
• The goalkeeper, the goal area.
• Playing the ball, passive play.
• Fouls and unsportsmanlike conduct, scoring.
• Throws and general instructions on the execution of the throws.
• The punishments and the officials.• The timekeeper and the scorekeeper and hand signals.
5.6. Additional Information for tutors
Playing court
Playing court is a 40 metres long and 20 metres wide rectangle, consisting of two
goal areas and a playing area. The longer boundary lines are called side-lines, and
the shorter ones are called goal lines (between the goalposts) or outer goal lines
(on either side of the goal). There should be a safety zone surrounding the playing
court, with a width of at least 1 metre along the side lines and 2 metres behind
the goal lines. The characteristics of the playing court must not be altered during
the game in such a way that one team gains an advantage.
The handball court consists of the following: The goal area, the free throw line,
the 7m throw, the goalkeeper’s restraining line, the centre line, the substitution line.
The Team
A team consists of up to 14 or 16 players depending on the competition. No more
than seven players may be present on the court at the same time. The remaining
players are substitutes. A player who is identified as a goalkeeper may become a
court player at any time. Similarly, a court player may become a goalkeeper at any
time as long as he is identified as a goalkeeper. The game may continue even if a
team is reduced to less than five players on the court. It is for the officials to judge
whether and when the game should be permanently suspended.
The goalkeeper is allowed to:
• Touch the ball with any part of his body while in the act of defence inside
the goal area.
• Move with the ball inside the goal area, without being subject to the
restrictions applying to court players.
• Leave the goal area without the ball and participate in the game in the
playing area; when doing so, the goalkeeper becomes subject to the rules
applying to players in the playing area.
• Leave the goal area with the ball and play it again in the playing area if he
has not managed to control it.
The goalkeeper is not allowed to:
• Endanger the opponent while in the act of defence.
• Leave the goal area with the ball under control; this leads to a free throw.
• Touch the ball when it is stationary or rolling on the floor outside the goal
area, while he is inside the goal area.
• Take the ball into the goal area when it is stationary or rolling on the floor
outside the goal area.
• Re-enter the goal area from the playing area with the ball.
• Touch the ball with the foot or the leg below the knee, when it is moving out
towards the playing area.
• Cross the goalkeeper’s restraining line (4-metre line) or its projection
on either side, before the ball has left the hand of the opponent who is
executing a 7-metre throw.
Playing the Ball
During playing the ball in handball game, it is permitted to:
• Throw, catch, stop, push or hit the ball, by using hands (open or closed),
arms, head, torso, thighs, and knees.
• Hold the ball for a maximum of 3 seconds, also when it is lying on the floor.
• Take a maximum of 3 steps with the ball ; one step is considered taken
when:
a) A player who is standing with both feet on the floor lifts one foot and puts
it down again, or moves one foot from one place to another.
b) A player is touching the floor with one foot only, catches the ball and then
touches the floor with the other foot.
c) A player after a jump touches the floor with one foot only, and then hops
on the same foot or touches the floor with the other foot.
d) A player after a jump touches the floor with both feet simultaneously, and
then lifts one foot and puts it down again, or moves one foot from one
place to another.
While standing or running
It is permitted to:
a) Bounce the ball once and catch it again with one or both hands.
b) Bounce the ball repeatedly with one hand (dribble), and then catch it or pick
it up again with one or both hands.
c) Roll the ball on the floor repeatedly with one hand, and then catch it or pick
it up again with one or both hands.
–– As soon as the ball thereafter is held in one or both hands, it must be
played within 3 seconds or after no more than three steps.
–– The bouncing or dribbling is considered to have started when the
player touches the ball with any part of his body and directs it towards
the floor.
–– After the ball has touched another player or the goal, the player is
allowed
d) To tap the ball or bounce it and catch it again.
e) Move the ball from one hand into the other one.
f) Play the ball while kneeling, sitting or lying on the floor; this means that
is it permitted to execute a throw (for instance a free throw), from such a
position.
During playing the ball in handball game, it is not permitted to:
• After the ball has been controlled, to touch it more than once, unless it has
touched the floor, another player, or the goal in the meantime.
• Touch the ball with a foot or leg below the knee, except when the ball has
been thrown at the player by an opponent.
Play continues
• If the ball touches a referee on the court.
• If a player with the ball moves outside the playing court with one or both
feet (while the ball is still inside the court), for instance to get around a
defending player, this shall lead to a free throw for the opponents.
• If a player from the team in possession takes up position outside the court
without the ball, the officials shall indicate to the player that he must move
into the court.
• If the player does not do so, or if the same team later repeats the action,
there shall be a free throw awarded to the opponents without any further
forewarning.
Fouls and Unsportsmanlike Conduct
Fouls that normally do not lead to personal punishment
It is not permitted:
• To pull or hit the ball out of the hands of the opponent.
• To block the opponent with arms, hand, legs, or to use any part of the body
to displace him or push him away; this includes a dangerous use of the
elbow, both as a starting position and in motion.
• To hold an opponent (body or uniform), even if he remains free to continue
the play.• Run into or jump into an opponent.
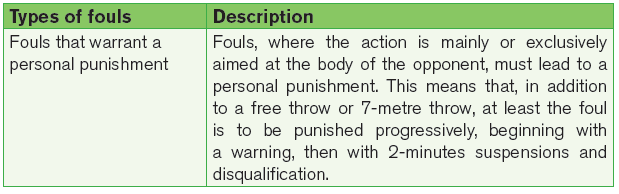
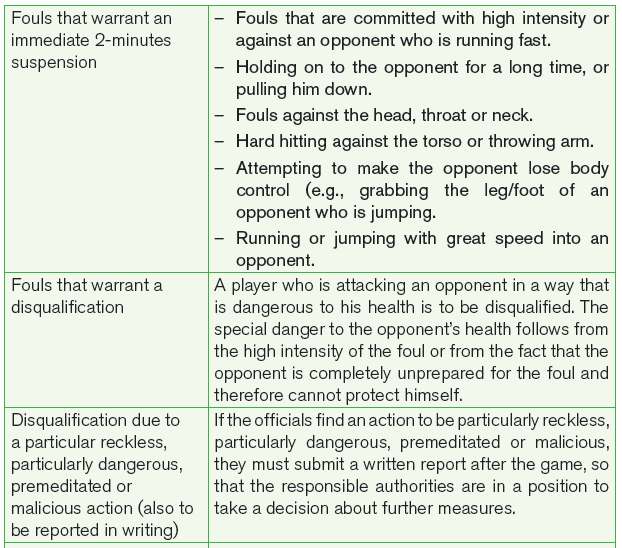
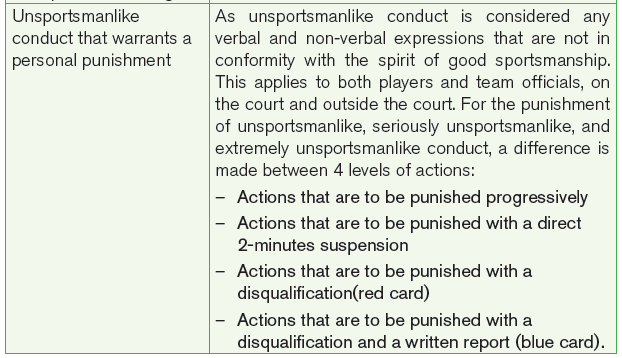
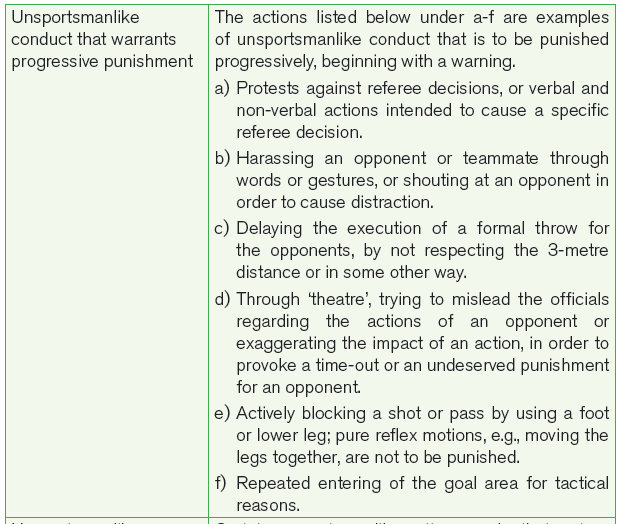
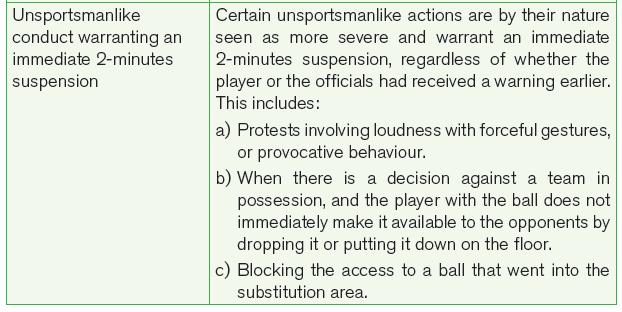
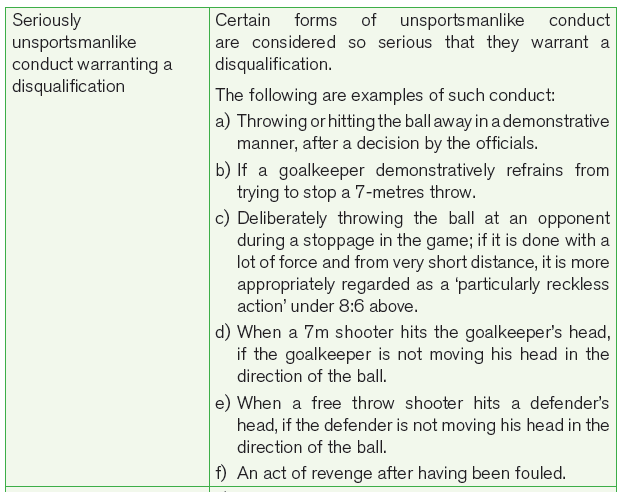
Decision-making criteria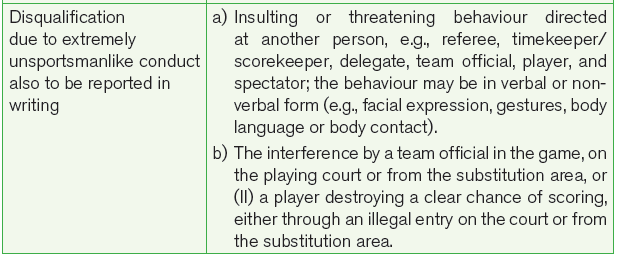
For the judgment as to which personal punishments are appropriate for specific
fouls, the following decision-making criteria apply; these criteria are to be used in
combination as appropriate in each situation:
a) The position of the player who commits the foul (frontal position, from the
side, or from behind);
b) The part of the body against which the illegal action is aimed (torso,shooting arm, legs, head/throat/neck);
c) The dynamics of the illegal action (the intensity of the illegal body contact,
and/or a foul where the opponent is in full motion);
d) The effect of the illegal action:
–– The impact on the body and ball control.
–– The reduction or prevention of the ability to move.
–– The prevention of the continuation of the game.
For the judgment of fouls, the particular game situation is relevant, too (e.g.,
shooting action, running into open space, situations with high running speed).
Scoring
A goal is scored when the entire ball has completely crossed the goal line, if the
thrower, a teammate or a team official has committed no violation of the rules
before or during the throw. The goal line referee confirms with two short whistle
signals and hand signal that a goal has been scored.
• A goal shall be awarded if there is a violation of the rules by a defender but
the ball still goes into the goal.
• A goal cannot be awarded if a referee, timekeeper or delegate has interrupted
the game before the ball has completely crossed the goal line.
• A goal shall be awarded to the opponents if a player plays the ball into
his own goal, except in the situation where a goalkeeper is executing agoalkeeper throw.
Throws
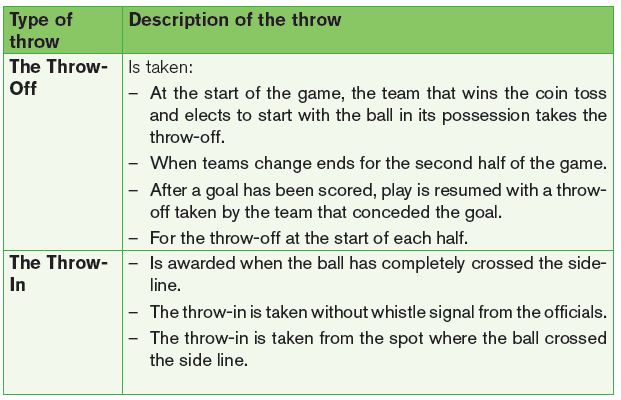
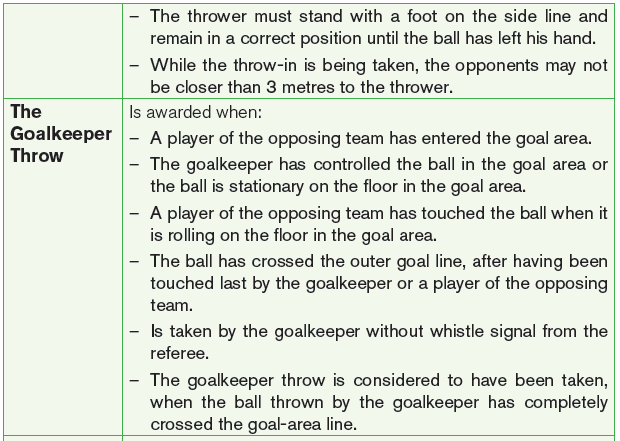
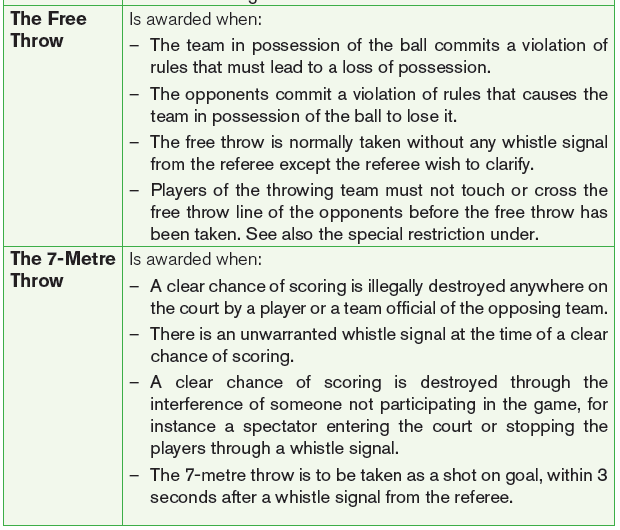
General Instructions for the Execution of the Throws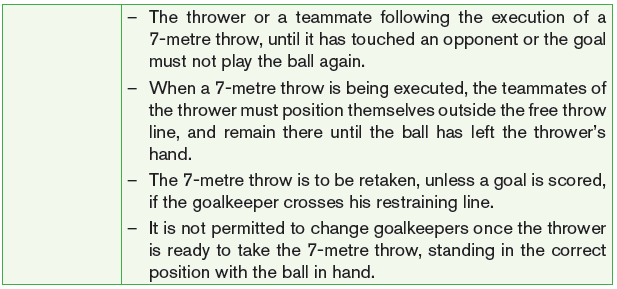
The Thrower
Prior to the execution: the thrower must be in the correct position prescribed
for the throw; the ball must be in the hand of the thrower.
During the execution, except in the case of the goalkeeper throw:
–– The thrower must have one part of a foot in constant contact with the
floor until the ball is released. The other foot may be lifted and put down
repeatedly.
–– The thrower must remain in the correct position until the throw has been
executed A throw is considered taken when the ball has left the hand of
the thrower.
–– The thrower must not touch the ball again until it has touched another
player or the goal.
A goal may be scored directly from any throw, except that a direct ‘own goal’
cannot be scored through a goalkeeper throw (i.e., by dropping the ball into
one’s own goal).
The teammates of the thrower and the defending players must remain in their
positions as rules describe it until the throw has been done.
Whistle signal for the restart
The referee must blow the whistle for the restart: always in the case of a throw-off,
7-metre throw.
In the case of a throw-in, goalkeeper throw or free throw: For a restart after a timeout,
for a restart with a free throw, when there has been a delay in the execution,after a correction of the player positions, after a verbal caution or a warning.
The punishments
The Officials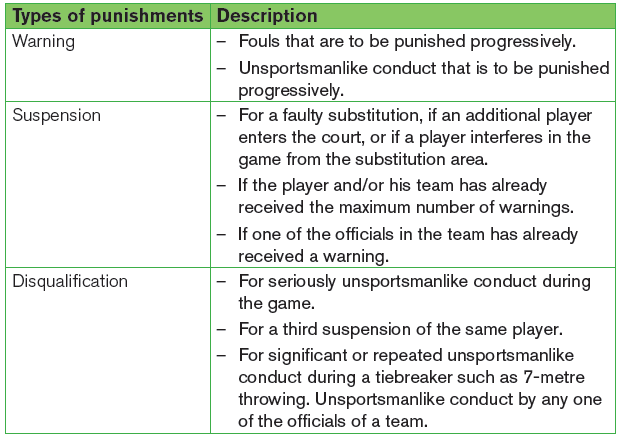
–– Two officials with equal authority shall be in charge of each game. A
timekeeper and a scorekeeper assist them.
–– The officials monitor the conduct of the players and team officials from the
moment they enter the premises until they leave.
–– The officials are responsible for inspecting the playing court, the goals,
and the balls before the game starts; they decide which balls will be used.
–– The officials also establish the presence of both teams in proper uniforms.
–– The coin toss is undertaken by one of the officials in the presence of the
other referee and the ‘responsible team official’ for each team, or a team
official or player (for instance, a team captain) on behalf of the ‘responsible
team official’.
The Timekeeper and the Scorekeeper
–– The timekeeper has the main responsibility for the playing time, the timeouts,
and the suspension time of suspended players.
–– The scorekeeper has the main responsibility for the team rosters, the score
sheet, the entering of players who arrive after the game has started, andthe entering of players who are not entitled to participate.
5.7. End unit assessment
Tutor divide student teachers into groups of four including two officials, the
timekeeper and the Scorekeeper. After dividing student teachers into their
respecting groups, set the order on which groups will lead the game, request the
first group to start the match. Ask other remaining student teachers to form two
teams of seven players for each one. Let the match start, change groups which is
officiating after five minutes. Officials become players to replace those who are
becoming officials.
–– During performing officiating for each group, observe how each student
teacher is accomplishing given tasks and roles.
–– Observe how techniques and tactics learned are being used.
–– Records their performance in order to give them feedback at the end of
the exercise.
5.8. Additional activities
5.8.1. Remedial activities
Distribute balls to student teachers for regular familiarization with the ball focusing
on techniques of playing handball through different game situation. Let student
teachers lead game situation by managing game situations as officials.
5.8.2. Consolidation activities
Encourage student teachers to participate in competitions among them and
choose their own officials to lead the matches and make records of the game
results.
5.8.3. Extended activities
Organize handball competition between classes for forming school teams and
participate in interclasses competitions and friendly matches. Request studentteachers to exploit regularly updated rules of the game of handball.
UNIT 6 :NETBALL
Key unit competence: Perform netball techniques and tactics in the
game situation adhering to the rules of the game
6.1. Prerequisite (knowledge, skills, attitudes and values)
Student teachers of year 3 will perform better techniques and tactics of netball
applied in the game situation adhering to the rules of the game if they have
developed basic techniques and tactics of playing netball learnt in year 1 and two.
6.2. Cross-cutting issues to be addressed
• Gender
In teaching and learning process, the tutor must prepare and provide netball
activities that engage both girls and boys equally in exploiting their full potential
and talents without any discrimination or prejudice.
• Inclusive education
The tutor as a facilitator he/she must consider different special education needs
and select activities to adapt his teaching approaches to student teachers. This
creates a positive attitude and helps all student teachers to participate actively
and develop their competence levels.
• Financial education
The tutor should integrate Financial Education into his teaching/learning
activities by providing the local and no cost teaching material where is possible.
He/she must encourage student teachers to make their own materials that
can help them to develop competences not only in netball game but also in
their life.
• Standardization culture
The tutor must choose and select the standardized materials to use in his/
her teaching/learning process of netball. It is necessary to provide appropriate
materials required to the levels of student teachers and help them to develop
culture of checking and using the quality of sport materials for the competitions
before using them in order to prevent injuries and other cases of accident.
• Environment and sustainability
The tutor should provide materials and deliver the lesson by encouraging
student teachers to protect the environment and well use of materials. The
tutor helps them to develop the spirit of keeping safe the environment in which
they use during sports activities by cleaning playgrounds and courts.
• Peace and values education
The tutor helps student teachers to develop fair play and social values by
avoiding violence and conflict in the netball game and by setting clear and
relevant instructions. He/she should provide the activities that help student
teachers to develop their competence peacefully.
• Comprehensive sexuality education
The tutor provides physical activities and sets instructions that prevent sexual
harassment, any kind of gender-based violence like sexual abuse and physical
contacts oriented to the sexuality intention.
• Genocide studies
While conducting netball exercises a tutor should take a time to explain student
teachers how sports should be used to fight against Genocide ideology and
how to prevent it. For example, to organize Genocide memorial tournaments at
school and give the message related to the Genocide
6.3. Guidance on introductory activity
Before introducing the lesson one of this unit, you must introduce the whole unit.
The tutor as a guide, facilitator and expert, asks questions and provides activities
related to the rules of game of playing netball in order to help them to predict
what to be learned in the whole unit.
6.4. List of lessons/sub-heading
Lesson 1: Recall on netball techniques and tactics in the game
situation
a) Learning objective
To overview and perform techniques and tactics of netball
b) Teaching resources
- Balls - Watch - Ring
- Playground - Cones - Whistle
- Chasubles
c) Prerequisites/Revision/Introduction
Student teachers of Year 3 will perform better recalling on netball techniques
and tactics if they can execute techniques and tactics exercises learnt in year
1 and 2.
d) Learning activities
Opening discussions
• Ask questions about netball techniques and tactics learned in year 1 and 2.
• Let student teachers present their findings and introduce the topic of the day.
•Invite student teachers to start warm up exercises.
Warm up exercises and cool down description
• Let student teachers perform general warm up exercises and specific warm
up based on the most body’s parts to be used while performing techniques
and stretch their muscles properly.
• One student teacher leads warm up and stretching exercises.
• Guide them while performing warm up and stretching exercises.
• Help them/demonstrate/correct where is necessary.
e) Lesson development
Task/Activity
Group student teachers into two groups. Let each group choose seven players
to start the game. The game shall take 20min (2 halves). Each players on the
court should perform her/his tasks and responsibilities to accomplish based
on the playing position he/she is occupying while playing.
Variation
The tutor replaces players until all players for each group enter on the ground
in order to participate in the play.
Teaching/learning points to consider
–– Accurately uses of learned tactics (passes, shooting, landing etc.)
–– Taking right playing positions on the ground.
–– How offensive and defensive tactics are being performed.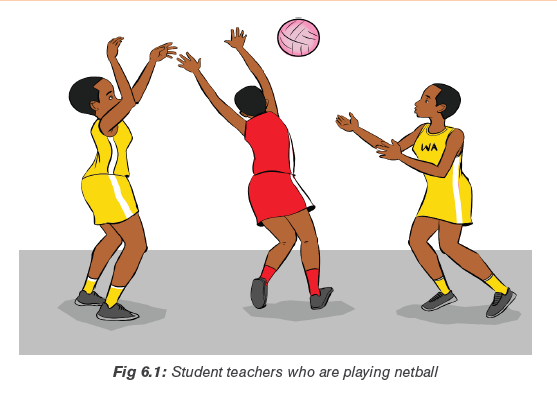
Cool down exercises
–– Let student teachers do light exercises and stretch their group of muscles
by insisting on most used parts.
–– Randomly, one of student teachers leads cool down exercises.
–– Guide them while stretching their muscles systematically.
–– Help them/demonstrate/correct where is necessary.
Closing discussion
Reflect
–– Which challenges did you face during the execution of passing, receiving,
landing and shooting exercises in netball? Why?
–– What went well during the performance of passing, receiving, landing and
shooting the ball in netball? Why?
Connect
–– What conditions are necessary for a netball prayer to have the best
performance?
Apply
–– How will you do to make better your performance of netball techniques
and tactics after this session?
Lesson 2: Rules of the netball game
a) Learning objective
Explain and interpret official rules of the game of netball
b) Teaching resources
- Balls - Watch
- Whistle - Videos of officiating netball
- Computer/projector - Smart classroom
- Chart/diagrams - Soft/hard copy of netball rules of the game
c) Prerequisites/Revision/Introduction
Student teachers of Year 3 will learn better rules of game of netball if they
have developed techniques and tactics of playing netball learned in year 1 and
year 2.
d) Learning activities
Put student teachers into eight groups and distribute to them the following
questions based on group numbers and let them discuss given questions into
their respective groups. Distribute rules of the game for each group based on
questions given to facilitate student teachers to get resources (if possible, you
may use smart classroom and let them use soft copy of rules of the game of
netball).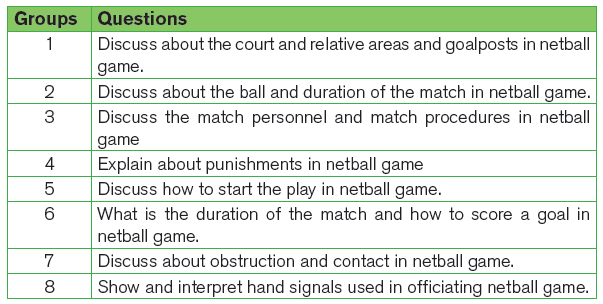
• Pass though groups and help them where is necessary. Request student
teachers to choose a secretary to record findings and group representative
who will present their findings.
• Request group representative to present their findings and group members
may support where is necessary.
• After presentation of all groups, use a projector to recap presentations,
show them fouls, and misconduct with the right hand signals to use while
officiating in handball.
Hand signals used in officiating handball game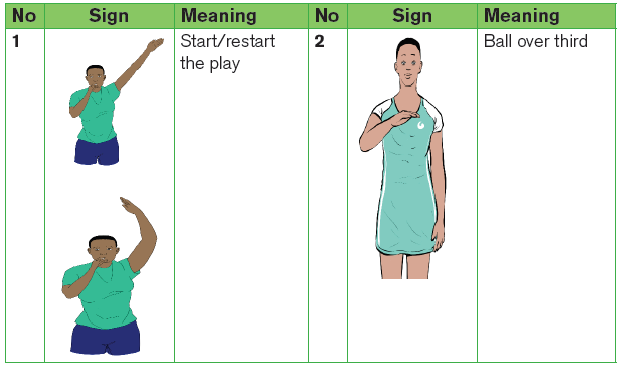
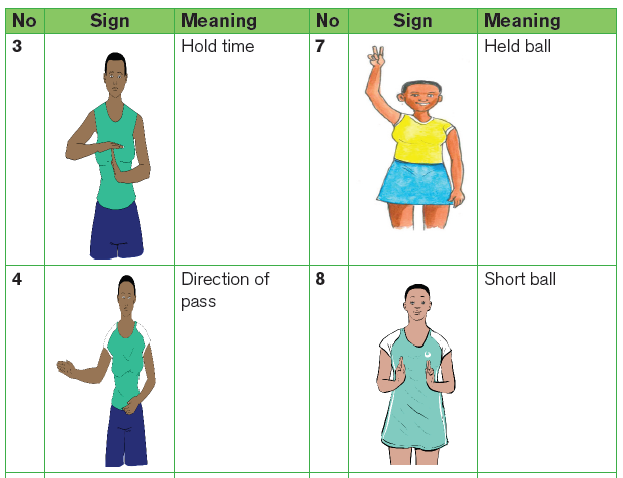
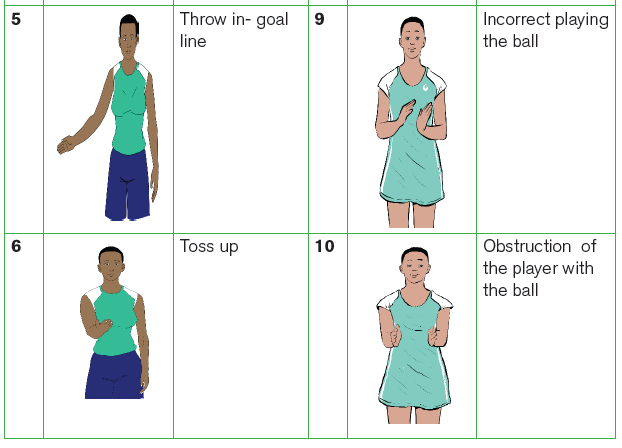

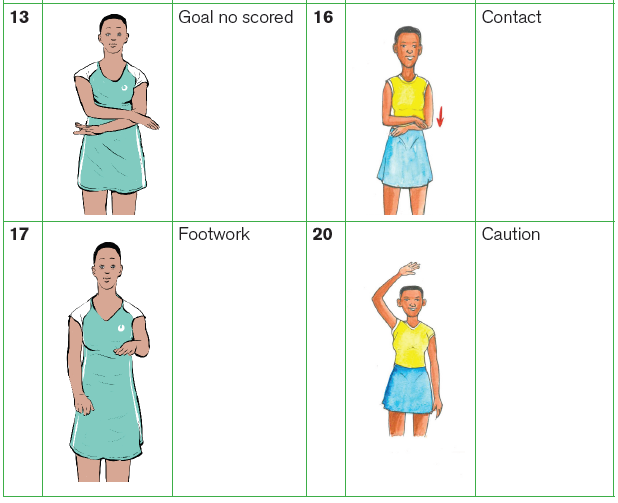
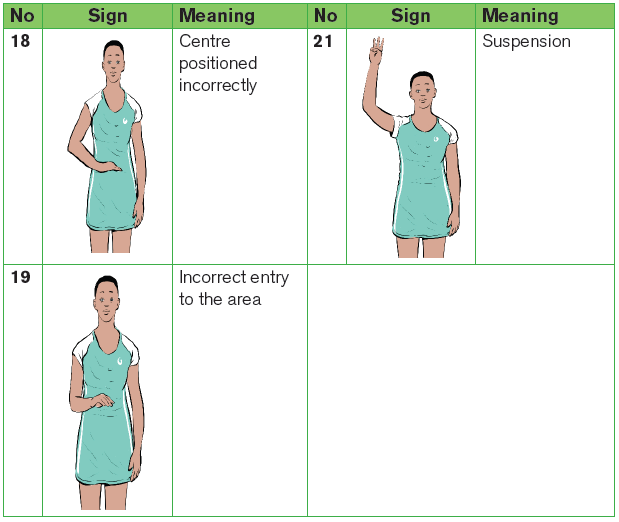
Application activity
Provide two groups, one with a box which contains cards where written fouls
and unsportsmanlike conduct. Another stay to show umpire signals. In groups,
when one member picks a card written a foul or an unsportsmanlike conduct,
one from another group show the relative umpire signals. Continue the activity
until the prepared cards finished.
Lesson 3: Netball game situation
a) Learning objective
Play game situation adhering to official rules of the game of netball
b) Teaching resources
- Balls - Watch - Playground/Rim and posts
- Cones - Whistle - Chasubles
- Hard copy of netball rules of the game
c) Prerequisites/Revision/Introduction
Student teachers of Year 3 will perform better in game situation if they have
developed techniques and tactics of playing netball game learned in ordinary
year 1 and year 2.
d) Learning activities
Opening discussions
• Ask questions about rules of the game of netball learned in lesson 1 and 2.
• Let student teachers present their findings and introduce the topic of the
day.
• Invite student teachers to start warm up exercises.
Warm up exercises and cool down description
• Let student teachers perform general warm up exercises and specific warm
up based on the most body’s parts to be used while in game performance
stretch their muscles properly.
• One student teacher leads warm up and stretching exercises.
• Guide them while performing warm up and stretching exercises.
• Help them/demonstrate/correct where is necessary.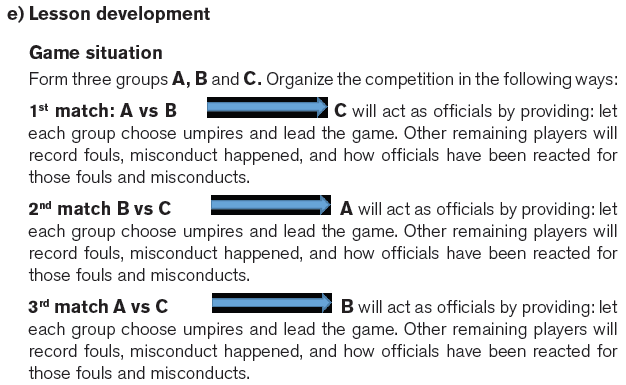
Points to consider during this game situation
• Time of playing for each match: 6minutes
• The winner is the team, which will gain many points in those three matches.
• Choose one student teacher to lead cool down and invite them to start after
game situation discussion.
• Start by giving time group A, B then C to share what they have recorded
based on rules of the games, decisions taken by officials, effectiveness of
hand signals used, and how officials are taking positions and their movement
during the match. Support them to clarify some rules of the game where is
necessary.
• Close the lesson by asking some questions on what they have been
discussed.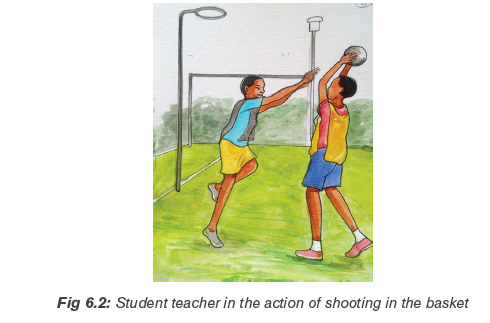
Application activities
Form teams of seven student teachers play netball adhering to rules of the
game on the appropriate court. The winner is the team, which scores three
goals before another.
6.5. Summary of the unit
This unit comprises the reviewing techniques and tactics of netball in game
situation. It describes the rules of the game of netball. It provides time for playing
games adhering to netball rules and helping student teachers to develop their
knowledge and competences in netball.
6.6. Additional Information for tutors
• Umpires
The umpires control a match according to the Rules and decide any matter not
covered by them. Their decisions are final and are given without appeal.
• After the captains have notified the umpires of the result of the toss for goal
end or first centre pass, the umpires toss for goal end. The umpire winning
the toss controls the side line nearer the official bench and the goal end to
the right when facing the court. Each umpire controls the same half of the
court throughout the match.
• An umpire’s whistle :
a) Starts and ends each quarter/half.
b) Restarts play after a goal has been scored.
c) Indicates when an infringement is penalized.
d) May be used to indicate when the ball is out of court if clarification is
needed.
e) Signals when the timekeepers are to hold time for a stoppage and when
to restart timing play.
–– The umpires work co-operatively and may appeal to each other for
decisions. An umpire must be ready for such an appeal at all times.
–– Each umpire controls and gives decisions for one half of the court
including the goal line.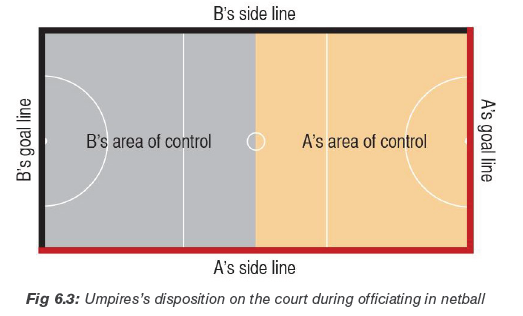
–– Each umpire makes all decisions for the throw in on one side line
including infringements by the player taking the throw in or any
opponent defending that player. If the sanction is awarded in the
co-umpire’s half, the co-umpire resumes control once it has been set.
–– Either umpire may hold time for injury/illness of a player, blood, foul
play, an emergency or other appropriate circumstances.
• Reserve Umpire
–– Replaces an umpire who becomes ill/injured during a match.
–– May assist the umpires with any procedures prior to the match or during
intervals.
–– Is seated at the umpires’ bench during a match.
–– Supervises a suspended player during the suspension period.
• Scorers
The scorers are jointly responsible for keeping an accurate record of the score.
–– Before the start of play, the scorers record the names of all players
(including playing positions for the start of play) and team officials.
–– During the match the scorers:
a) Record any changes of players and/or positions.
b) Record goals scored for each team as they occur as well as any
unsuccessful shots.
c) Keep a record of the centre pass taken by each team.
d) Call the centre pass if appealed to by an umpire.
e) Signal the direction of any centre pass to be taken immediately after a
stoppage.
f) Notify the umpires if a wrong centre pass is indicated.
g) Record any warning, suspension and/or ordering off.
• Timekeepers
The timekeepers are jointly responsible for ensuring that each playing period
and each interval is of the correct length of time. The timekeepers:
–– Notify the umpires when there are 30 seconds and 10 seconds remaining
before the start of a quarter/half.
–– Commence timing when the game is started by the umpire’s whistle.
–– When the playing time specified for a quarter/half has elapsed, notify the
umpires whose whistle ends play.
–– Hold time when signalled to do so by the umpire and restart timing when
the umpire signals for play to resume.
–– Notify the umpires when 10 seconds remain prior to the end of a stoppage
for injury/illness or blood.
Procedures for Centre Pass
Play is started with a centre pass at the beginning of each quarter/half and after
each goal scored.
• The umpires notify the teams when there are 30 seconds and 10 seconds
before the start of a quarter/half.
• The umpire controlling the goal end of the team taking the centre pass
starts the first centre pass in each quarter/half.
• During a quarter/half, the umpire controlling the goal end where the last
goal was scored starts the centre pass.
• Immediately a goal is signalled both umpires indicate the direction of the
next centre pass:
a) If they disagree, the umpires seek clarification from the scorer.
b) In the event that both umpires indicate the centre pass direction
incorrectly, the scorer notifies the umpires.
–– The umpire controlling the centre pass is responsible for penalising
any infringements by the centre taking the centre pass and any
opponent defending the pass (if a sanction is awarded in the coumpire’s
half, the co-umpire assumes control once it is set).
Procedures during Play
The umpires move along the sideline and behind the goal line to view play and
make decisions. They keep off the court during play except to take a toss up.
• The umpires:
a) When penalising an infringement: blow the whistle, state the infringement
and the sanction given, using hand signals to support their decisions.
b) When applying an advantage: refrain from blowing the whistle for an
infringement.
c) Signal a goal has been scored by raising one arm vertically.
–– If the ball strikes the umpire while on the court during play, or if an
umpire interferes with the movements of the players, play does not
cease unless one team has been unduly disadvantaged, in which case
a free pass is awarded to that team.
–– The umpires must not criticise or coach a team while a match is in
progress.
Procedures for Out of Court
The umpires give decisions relating to the goal line in the half each controls and
all of the nearer side line. The umpire controlling the goal/side line is responsible
for:
• Ruling when the ball is out of court and the team to take the throw in (no
whistle is required if it is clear the ball is out of court).
• Penalising infringements by the player taking the throw in or by any
opponent/s defending the throw in (if a sanction is awarded in the coumpire’s
half, the co-umpire resumes control once it is set).
Procedures for Toss Up
• The umpires enter the court to take a toss up as follows:a) In the goal, the umpire controlling that goal end takes circle the toss up.
b) Outside the goal, the nearer umpire who also controls all related
procedures takes circle the toss up.
• The umpire ensures players are correctly positioned before taking a toss up.
• Before taking the toss up, the umpire momentarily is stationary, holding the
ball in the palm of one hand at a point midway between the two players and
just below the shoulder of the shorter player in normal standing position.
• The umpire flicks the ball vertically in the air no more than 600 mm and
simultaneously blows the whistle.
Procedures for Stoppages
• The umpire:
–– Signals to the timekeeper to hold time when required.
–– Where appropriate notifies the players when 10 seconds remain prior to
the end of the stoppage.
–– Signals to the timekeeper when play restarts.
Procedures for Game Management
• The umpire holds time to caution a player, to give a warning, to suspend a
player or to order a player off, also using any hand signal that applies.
• The umpire advises the co-umpire of any warning, suspension or ordering
off.
TYPES OF SANCTIONS
During a match, the umpires may penalize an infringement and award a sanction
to the non-infringing team as follows:
• Free pass: awarded for minor infringements.
• Penalty pass: awarded for major infringements.
• Conditions for all Sanctions
Sanctions are awarded to a team and may be taken by any player allowed
in the area. The player taking the sanction must:
• Take up the position indicated by the umpire as follows:
a) For a free pass: the position is where the infringement occurred.
b) For a penalty pass: the position is where the infringer was standing
unless this disadvantages the non-infringing team.
Sanction: Free pass. If a player deliberately or repeatedly takes a sanction
from the incorrect position, the player will be penalized for delaying play.
• The foot placed at the point indicated is considered as equivalent to a ‘one
foot landing’.
Sanction: Free pass
• Release the ball within 3 seconds of the sanction being set.
Sanction: Free pass
Conditions for Free Pass
A player taking a free pass may not shoot for goal.
Sanction: Free pass – no goal is scored.
Conditions for Penalty Pass
• The infringer must stand out of play. This means the infringer must:
a) Move quickly to the position indicated.
b) Stand beside but away from the player taking the penalty pass so as not
to impede that player.
c) Remain in this position and not move or take any part in play (including
verbal comments) until the ball has been released.
Sanction: A further penalty pass is awarded (which may be advanced if it is
judged to be delaying play).
• An opposing player may not obstruct or contact the player taking a penalty
pass before the ball has been released.
Sanction: Penalty pass where second infringer was standing – both
infringers stand out of play.
• If Goal Shooter or Goal Attack takes a penalty pass in the goal circle the
player may either pass or shoot for goal. If this has been awarded but not
taken when the timekeeper signals the end of a period of play, the penalty
pass must be taken before play is ended.
• A player who is correctly positioned to take a penalty pass may choose to
play the ball before the sanction has been set. If the player chooses to play
the ball immediately:
a) The infringer may not take part in play until the ball has been released
or make any attempt to intercept the penalty pass.
b) The penalty pass will be retaken if the infringer interferes with it.
• If an infringer is substituted or changes positions before a penalty pass is
taken, the player who takes the position of the penalised player stands outof play.
ADVANTAGE
The umpire should refrain from blowing the whistle for an infringement when by
so doing the non-infringing team would be disadvantaged.
• The umpire indicates an advantage is being applied by:
a) Calling ‘advantage’ and stating the infringement.
b) Using the hand signal for advantage.
• If the whistle is blown for an infringement, the sanction must be awarded,
except that if a goal is scored that is to the advantage of the non-infringing
team, the umpire will award the goal.
Failure to Take the Court
• If a team does not have five players present at the start of a quarter/half, the
umpires will wait up to 30 seconds for additional player/s to arrive:
a) If the team takes the court within 30 seconds: the offending team will be
penalized immediately following the whistle for the centre pass.
Sanction: Penalty pass taken in centre third by the transverse line at the
goal end of the non-infringing team – the whistle is blown to start play then
the infringement is penalized. The Centre stands out of play for the penalty
pass.
b) If the team is not able to take the court within 30 seconds: the umpires
will award the match to the opposing team.
• If a team delays taking the court after a stoppage when requested by
the umpires, the umpires penalize the team for delaying as soon as play
resumes. If play was due to restart with a centre pass, the sanction is
awarded immediately following the whistle for the centre pass.
Sanction: Penalty pass that may be advanced unless it disadvantages the
non-infringing team – the whistle is blown to start play then the infringementis penalized.
CENTRE PASS
• Play is started at the beginning of each quarter/half and after each goal by
a centre pass. The Centre of each team takes the centre pass alternately.
• If at a centre pass, the ball is still in the Centre’s hands and no player from
that team has been penalised before the whistle was blown to end the
quarter/half, the centre pass will be ruled not to have been taken.
Positioning of Players for Centre Pass
• The Centre in possession of the ball stands with at least one foot wholly
within the centre circle.
Sanction: Free pass – the whistle is blown for the centre pass then the
infringement is penalised.
• The opposing Centre is in the centre third and free to move.
• All other players are in their respective goal thirds and are free to move but
must not enter the centre third until the whistle has been blown to start play.
Sanction: Free pass – the whistle is blown for the centre pass then the
infringement is penalised.
• If two opposing players enter the centre third simultaneously before the
whistle is blown:
a) If neither player makes contact with the ball they are not penalised and
play continues.
b) If either player catches or touches the ball, either while standing in the
centre third or immediately before or after landing in the centre third, a
toss up is taken between the two players concerned where the player
caught or touched the ball.
c) If one umpire blows the whistle for a sanction and the other umpire
indicates an advantage has applied, the sanction will stand.
• All other players are in their respective goal thirds and are free to move but
must not enter the centre third until the whistle has been blown to start play.
Sanction: Free pass – the whistle is blown for the centre pass then the
infringement is penalised.
• If two opposing players enter the centre third simultaneously before the
whistle is blown:
a) If neither player makes contact with the ball they are not penalised and
play continues.
b) If either player catches or touches the ball, either while standing in the
centre third or immediately before or after landing in the centre third, a
toss up is taken between the two players concerned where the player
caught or touched the ball.
c) If one umpire blows the whistle for a sanction and the other umpireindicates an advantage has applied, the sanction will stand.
Controlling the Centre Pass
• When the whistle is blown to start play, the Centre in possession of the ball
may step outside the centre circle but must obey the footwork rule. If when
the whistle was blown:
a) Only one foot was wholly inside the centre circle, this foot will be
considered the ‘landing foot’.
b) Both feet were wholly inside the centre circle, the foot not moved first
will be considered the ‘landing foot’.
• The Centre must release the ball within 3 seconds.
Sanction: Free pass
• A centre pass must be touched or caught by a player who:
a) Is standing wholly within the centre third or
b) Lands with the first or both feet wholly within the centre third.
Sanction: Free pass
• If the ball from a centre pass goes untouched over the side line bounding
the centre third, a throw in is awarded to the opposing team where the ball
crossed the line.
• A player from the team taking the centre pass may not:
a) Touch or catch the ball in the air then land on both feet simultaneously
astride the transverse line or
b) Touch or catch the ball in the goal third if it has not been touched.
Sanction: Free pass in goal third where ball crossed the transverse line.
• The umpire may apply advantage and allow play to continue if a player from
the opposing team:
a) Catches the centre pass in the goal third or
b) After catching the ball in the air lands with feet astride the transverse
line, (this player’s subsequent pass is deemed to have been made from
the goal third).
OUT OF COURT
Ball Out of Court
• The ball is out of court when:
a) It touches the ground outside the court.
b) It touches any person or object in contact with the ground outside the
court.
Action: Throw in by team that did not touch the ball last on court
• The ball is put out of court by a player who:
a) Catches the ball in the air just before landing with the ball either wholly
or partly outside the court.
b) Catches or touches the ball while standing on the ground, partly inside
and partly outside the court.
Action: Throw in by team that did not catch or touch the ball.
• If the ball is caught simultaneously by two opposing players, either of whom
lands or is standing wholly or partly outside the court, a toss up is taken on
court between the players concerned.
• A ball is not out of court if it hits any part of the goalpost and rebounds into
the court.
Player Outside the Court
• A player may jump from a position inside the court and throw or bat the ball
before landing outside the court.
• A player having no contact with the ball may move into the court surround
provided this is done solely for the purpose of repositioning back onto the
court.
Sanction: Free pass on court (near where the player left the court)
• A player who has left the court to retrieve a ball or to take a throw in must
be allowed direct re-entry to the court.
Sanction: Penalty pass on court (near where the player left the court)
• A player who is partly or wholly in the court surround must re-enter the court
and have no contact with the court surround before playing the ball.
Action: Throw in by the opposing team
• A player who leaves the field of play without the permission of the umpire
may not be replaced. If this player is the Centre, one player must immediately
move to play as Centre. The player may, after first reporting to the umpire,
return to the court immediately after:
a) A goal has been scored (in this case the player must play in the vacant
position).
b) A stoppage for injury/illness or
c) An interval.
Sanction: Free pass where ball was when play stopped – the player is sent
from the court until the correct time for entry.
THROW IN
When the ball is ruled to be out of court play restarts with a throw in.
Requirements for Taking Throw In
• The player taking the throw in:
a) Stands outside the court with at least one foot within 15 cm (6 in) of
the line at the point indicated by the umpire (this foot is considered ‘the
landed foot’).
b) Ensures all other players are on the court before releasing the ball.
c) Throws the ball within 3 seconds of taking up this position.
d) Observes the rules for footwork and playing the ball.
e) May not enter the court (including the lines bounding the court) until the
ball has been released.
f) May not step behind any offside area while holding the ball.
Action: Throw In by opposing team
• The player taking the throw in must throw the ball:
a) From the goal line: into the goal third.
b) From the side line: into the nearest or adjacent third.
Sanction: Free pass taken in the third where ball entered incorrectly
• If the opposing team takes, the ball from a throw in goes out of court without
being touched, a throw in where the ball went out.
• If the ball from a throw in fails to enter the court, a throw in is taken by the
opposing team from the same position.
TOSS UP
A toss up is taken to restart play when:
• Two opposing players gain possession of the ball simultaneously (with one
or both hands).
• Two opposing players send the ball out of court simultaneously or the umpire
is unable to determine which player touched it last.
• Two opposing players are offside simultaneously and one or both touch or
catch the ball.
• At a centre pass, two opposing players enter the centre third before the
whistle and one or both touch or catch the ball.
• Two opposing players contact each other simultaneously.
• After a stoppage, the umpires are unable to determine which player had the
ball or the ball was on the ground when play stopped.
Position for Toss Up
The toss up is taken between the two opposing players concerned at the point
where the incident occurred, except when it involves players who have different
playing areas as follows:
• If the two players have a common playing area: the toss up is taken between
them in their common area as close as possible to the original position.
• If the two players have no common playing area: the toss up is taken in the
centre third between any two opposing players allowed in the area at a point
as close as possible to the original position.
Position of Players for Toss Up
• Before taking the toss up the umpire checks the two players are positioned
as follows:
a) The players face each other and their goal ends.
b) There is a distance of 0.9 m between the nearer feet of the players.
c) Their arms are straight with hands at sides.
• The two players remain stationary until the whistle is blown as the umpire
releases the ball.
Sanction: Free Pass
• All other players may stand or move anywhere within their playing areas
provided they do not interfere with the toss up.
Outcome of Toss Up
• Player may either catch the ball or bat it in any direction except directly at
another player.
Sanction: Free Pass
• A Goal Shooter or Goal Attack who catches the ball at a toss up in the goal
circle may either shoot for goal or pass.
SUBSTITUTIONS AND TEAM CHANGES
• Both teams have the right to make substitutions and/or team changes:
a) During an interval.
b) When play is stopped for injury/illness or blood.
• The number of substitutions is not limited provided the players used are
those named for the match.
LATE ARRIVALS
• An umpire must check a player who arrives after a match has started before
taking the court.
• A late player may not immediately replace a player who is already on the
court but may be used subsequently as a substitute.
• If a position has been left vacant the late arrival may not enter the match
while play is in progress but may take the court immediately after:
a) A goal has been scored (in this case the player must play in the position
left vacant)
Sanction: Free pass where ball was when play stopped – the player is sent
from the court until the correct time for entry
a) A stoppage for injury/illness or blood.
b) An interval.
STOPPAGES
• The umpires hold time for injury/illness upon appeal from an on-court
player or for blood and may hold time for an emergency or such other
circumstances as they consider appropriate. During a stoppage:
a) For injury/illness of a player or blood: all players not affected or being
substituted remain on the court.
b) In an emergency or other circumstances: the umpires decide whether
the players leave the court or not.
• Play restarts from where the ball was when play stopped:
a) If the ball was out of court play restarts with a throw in.
b) If an infringement was signaled before play was held play restarts with
the sanction awarded.
c) If the ball was on the ground or the umpire is unable to say which team
had possession of the ball, play restarts with a toss up between any two
opposing players allowed in the area.
• In extreme circumstances and in consultation with the event organizer, the
umpires may decide to abandon a match if the safety of players and/or
officials is considered to be at risk.
Injury/Illness or Blood
• The umpires hold time for blood when noticed or for injury/illness when
requested by an on-court player (in extreme circumstances the umpires
may hold time without a request being made).
• The player concerned must leave the court within 30 seconds and receive
any treatment off the court. The timekeepers advise the umpires when 10
seconds remain.
• Only primary care person/s are permitted on the court to assess the player’s
medical condition and to assist the player from the court.
• In the event that the primary care person/s advise the umpires that the
player concerned cannot be removed safely within 30 seconds, the umpires
will extend the time for the player to leave the court.
• The umpires may authorise other persons (including team officials) to assist
the player to leave the court if needed.
• Any blood on the ball or the court must be cleaned before play restarts and
any blood-stained clothing replaced.
• During the stoppage both teams may make substitutions and/or team
changes, provided these are completed within the time allowed for the
stoppage by the umpires.
• If no substitution is made for the injured/ill player, or for a player who is
bleeding, play may resume with the position left vacant. If the player is the
Centre and no substitution is made, one player must move to play as Centre
to allow the match to continue.
• If the position is left vacant the player concerned or a substitute may
subsequently, after advising the umpire, take the court immediately after
one of the following:
a) A goal has been scored (in this case the player or the substitute must
play in the position left vacant).
Sanction: Free pass where ball was when play stopped – the player is sent
from the court until the correct time for entry.
b) A stoppage for injury/illness or blood.
c) An interval.
Other Stoppages:
• The umpires may hold time or extend an interval if considered appropriate.
Examples for which time may be held include (but are not limited to):
a) Emergencies such as serious injury/illness of a player, injury/illness of
an umpire or technical official/s, the equipment, the court, the weather
or technical equipment.
b) Retrieving the ball.
c) Disciplining a player, team official or bench player.
• The umpires decide the length of such a stoppage and ensure play restarts
as soon as possible.
• Team officials are not permitted on the court during a stoppage other than
specified.
PLAYING THE BALL
Methods of Playing the Ball
• To gain possession a player may:
a) Catch the ball with one or both hands.
b) Roll the ball to oneself.
c) Catch the ball if it rebounds from the goalpost.
• A player who has possession of the ball may throw or bounce it in any
direction to another player with one or both hands. The player with the ball:
a) May not throw it deliberately at another player.
b) May not roll it to another player.
c) Must release the ball within 3 seconds.
d) After releasing the ball, may not replay the ball until another player has
touched it or it rebounds from the goalpost.
Sanction: Free pass
• Without having possession of the ball a player may:
a) Bat or bounce the ball to another player but may not bat it deliberately
at another player.
b) Tip the ball in an uncontrolled manner once or more than once, then
either catch the ball or bat or bounce it to another player.
c) Bat the ball once before either catching the ball or batting or bouncing
it to another player.
d) Bounce the ball once before either catching the ball or batting or
bouncing it to another player.
Sanction: Free pass
• A player may not deliberately:
a) Kick the ball.
b) Fall on the ball to gain possession.
c) Strike the ball with a fist.
Sanction: Free pass
• A player who falls to the ground while holding the ball must regain footing
before playing the ball and release it within 3 seconds of first catching it.
A player may not:
a) Gain possession of the ball while lying, sitting or kneeling on the ground.
b) Throw or play the ball while lying, sitting or kneeling on the ground.
Sanction: Free pass
• A player may not use the goalpost to regain balance or as a support to
recover the ball.
Sanction: Free pass
PASSING DISTANCES
Short Pass
• When a player passes, the ball there must be sufficient space for an
opposing player on the court to be able to intercept the ball as it moves
from the hands of the thrower to those of the receiver.
Sanction: Free pass
• If two players from the same team gain possession of the ball in quick
succession, the second player’s hands must be removed or it will be deemed
to be a short pass.
Sanction: Free pass
• If two opposing players gain possession of the ball in quick succession, the
umpire calls ‘possession’, indicates the player who caught the ball first and
allows play to continue.
Over a Third
• The ball must be caught or touched by a player in each third of the court.
• The player who touches or catches the ball must:
a) Be standing wholly in the third concerned when the ball is caught or
touched or
b) After catching or touching the ball in the air, land either with the first foot
or both feet wholly in the third concerned.
Sanction: Free pass taken by the transverse line where the ball first entered
the third incorrectly, except if the ball goes out of court over the goal line a
throw in is awarded.
• After catching the ball correctly a player may step into an adjacent third. Any
subsequent throw is deemed to have been made from the third where the
player first landed.
• If a player either catches the ball before landing with feet astride the
transverse line, or is standing on both feet astride the transverse line when
the ball is caught, the pass made by this player must be touched or caught
in one of these two thirds.
Sanction: Free pass taken in the goal third by the transverse line where the
ball entered the third incorrectly.
FOOTWORK
One Foot Landing
A player who either receives the ball with one foot on the ground or, who after
catching the ball in the air lands on one foot, may:
• Step with the second foot in any direction, lift the landing foot and throw or
shoot before the landing foot is regrounded.
• While pivoting on the landing foot, step with the second foot in any direction
one or more times. The landing foot may be lifted but the player must throw
or shoot before regrounding it.
• Jump from the landing foot onto the second foot and jump again but must
throw the ball or shoot before regrounding either foot.
• Step with the second foot and jump but must throw the ball or shoot before
regrounding either foot.
Sanction: Free pass
Two Foot Landing
A player who receives the ball while both feet are on the ground, or who catches
the ball in the air and lands on both feet simultaneously, may:
• Step with one foot in any direction, lift the second foot and throw or shoot
before the second foot is regrounded.
• Step with one foot in any direction one or more times while pivoting on the
second foot. The second foot may be lifted but the player must throw or
shoot before regrounding it.
• Jump from both feet onto one foot but must throw or shoot before
regrounding the second foot.
• Step with one foot then jump but must throw the ball or shoot before
regrounding either foot.
Sanction: Free pass
Other Foot Movements
A player in possession of the ball may not:
• Drag or slide the landing foot.
• Hop on either foot.
• Jump from both feet and land on both feet while still in possession of the
ball.
Sanction: Free pass
OFFSIDE
• A player is offside when the player enters a court area not designated for
that player’s position. This applies whether the player has contact with the
ball or not.
Sanction: Free pass
• A player may reach across and pick up a ball from an offside area or lean
on the ball in an offside area, provided the player makes no physical contact
with the ground in that area.
Opposing Players Offside
• If two opposing players enter an offside area, one before the other, the first
player is penalised.
Sanction: Free pass
• If two opposing players enter an offside area simultaneously:
a) If neither player makes any contact with the ball they are not penalised
and play continues.
b) If either player catches or touches the ball while standing in the offside
area, or immediately before or after landing in the offside area, a toss up
is taken between the two players in their own area of play.
REQUIREMENTS FOR SCORING A GOAL
Goal Shooter or Goal Attack scores a goal when the ball is thrown or batted above
and completely through the ring from any point within the goal circle including the
lines bounding the goal circle.
• If the whistle to end play or to hold time is blown before the ball has passed
completely through the ring no goal is scored.
• If a player other than Goal Shooter or Goal Attack throws or bats the ball,
through the ring no goal is scored and play continues.
• If a defending player deflects, a shot for goal and the ball then passes above
and completely through the ring a goal is scored.
• If the ball is won at a toss up in the goal circle the Goal Shooter or Goal
Attack may either shoot for goal or pass.
REQUIREMENTS FOR TAKING A SHOT
• In taking a shot at goal the player must:
a) Have no contact with the ground outside the goal circle either while
catching or holding the ball. The player may lean on the ball in the goal
third outside the goal circle or may roll the ball or pick it up from this
area, provided the player makes no physical contact with the ground
outside the goal circle
b) Shoot within 3 seconds of catching the ball.
c) Obey the footwork rule.
Sanction: Free pass
• A defending player may not:
a) Cause the goalpost to move so as to interfere with a shot at goal and
cause it to miss.
Sanction: Penalty pass
b) Deflect a ball on its downward flight towards the ring, including touching
the ball up through the net.
Sanction: Penalty pass. If a shot is successful, the goal is scored
OBSTRUCTION OF A PLAYER IN POSSESSION OF THE BALL
An opposing player may attempt to intercept the ball or defend a player in
possession of the ball, provided there is a distance of not less than 0.9 m from
the landing position of the player with the ball. This distance is measured on the
ground as follows:
• One foot landing by the player with the ball:
a) If the player remains in the landing position: from the landing position to
the nearer foot of the defending player.
b) If the player steps away from the landing position: from the point where
the player landed to the nearer foot of the defending player.
• Two foot landing by the player with the ball:
a) If the player does not move either foot: from whichever foot is closer to
the nearer foot of the defending player.
b) If the player moves one foot: from the foot that remains grounded to the
nearer foot of the defending player.
• An opposing player who is the correct distance from a player with the ball
may attempt to intercept the ball or defend the player with the ball:
a) Either by jumping upwards or towards the player with the ball and
landing within 0.9 m provided this does not interfere with the shooting
or passing action.
b) If the player with the ball reduces the distance between them.
• A defending player may be within 0.9 m of an opponent with the ball provided
there is no interference with the throwing or shooting action of this player.
The defending player may not make any effort to intercept the ball or defend
the player with the ball.
OBSTRUCTION OF A PLAYER NOT IN POSSESSION OF THE BALL
• A player who is within 0.9 m of an opponent (measured on the ground) may
stretch out arms to:
a) Catch, deflect or intercept a pass or a fake pass.
b) Catch, deflect or bat a rebound from an unsuccessful shot at goal.
c) Momentarily signal for a pass or to indicate the intended direction of a
movement.
• A player who is within 0.9 m of an opponent (measured between nearer feet
on the ground) may not, whether attacking or defending, use movements
that take the arms away from the body so as to limit the possible movement
of an opponent, except as required for natural body stance.
DEFENCE INVOLVING A PLAYER OUTSIDE THE COURT
Defending a Player from Out of Court
A player who is standing outside the court may not attempt to defend a player
on the court whether that player has the ball or not.
The sanction is taken on the court close to where the infringer was standing
Defending a Player who is Out of Court
• A player may defend an opponent who has chosen to go out of court
provided the defending player does not leave the court or own playing area
or obstruct the player.
• A player who goes out of court to retrieve a ball or to take a throw in must
be allowed back onto the court at the point where the player left the court
or took the throw in. Any opponent attempting to prevent the player from
re-entering the court is penalised.
CONTACT AND CONTEST
When attacking, defending or playing the ball, opposing players may come into
physical contact with each other. Provided the players do not interfere with each
other’s play or use their bodies to gain an unfair advantage over their opponent,
it is deemed to be ‘contest’ and play continues. ‘Contact’ occurs when a player’s
actions interfere with an opponent’s play whether these are accidental or
deliberate.
INTERFERENCE
Interference may occur in the following ways:
• Physical contact using any part of the body to limit an opponent’s ability to
move freely (this includes, but is not limited to, pushing, tripping, holding or
leaning on an opponent).
• Knocking or hitting a player including when shooting for goal.
• Placing hand/s on the ball held by an opponent.
• Hitting the ball held by an opponent or removing it from an opponent’s
possession.
• While holding the ball, pushing it into an opponent.
Moving into Player’s Space
A player causes contact by:
• Landing in a place already occupied by an opponent before the movement
began.
• Moving into the path of an opponent who is committed to a particular landing
space.
Inevitable Contact
Player/s, whether moving or stationary, may not position so closely to an
opponent that this player is unable to move without contacting.
Simultaneous Contact
If two opposing players contact simultaneously a toss up is taken between the
two players concerned.
Game Management
The umpires apply the Rules of the Game fairly, communicate clearly and
maintain a calm, decisive control. A player who infringes any part of the foul
will be disciplined. Players on the court are expected to respond to rulings by
the umpires and adjust their play accordingly. Similar requirements apply to
team officials and bench players.
ACTIONS THAT MAY BE TAKEN BY UMPIRES
• To manage a match the umpires may, in addition to the normal sanction, use
any of the following:
a) Caution a player: a player is advised that the behaviour specified must
change.
b) Issue a warning to a player: a player is warned that suspension will follow
if the behaviour specified continues.
c) Suspend a player: a player who is suspended takes no part in play for 2
minutes.
d) Order a player off: a player who is ordered off takes no further part in
the match.
• A decision to give a warning, to suspend a player, or to order a player off,
will be considered to have been made jointly by the two umpires and is thus
binding on the co-umpire:
a) The umpires may confer before deciding on the action to be taken.
b) The controlling umpire should ensure the co-umpire is aware of the
action taken and, if appropriate, the reasons for it.
Warning
If a player continues to infringe after receiving a caution for a specified
behaviour, the umpire will issue a warning to the player. Where appropriate a
warning may be given even if no caution has been issued.
The umpire:
• Advises the player by:
a) Using the term ‘warning’.
b) Specifying the behaviour for which the warning is being given.
c) Signals to the official bench that a warning has been given.
• May also state any action that will follow if the behaviour does not change.
Suspension
The umpire will suspend a player following a warning for foul play if the player
continues to infringe the Rules. In the case of dangerous play or misconduct,
a player may be suspended without an official warning if the umpire considers
this action is justified.
• The umpire advises the player of the suspension and signals to the official
bench that the player has been suspended.
• A player who is suspended must immediately leave the court.
• While off the court the player is seated at the umpires’ bench under the
supervision of the reserve umpire.
• No substitute is permitted and the suspended player’s position is left vacant
unless this player is the Centre. In this case one player must move to play as
Centre during the suspension.
• The suspension period of 2 minutes playing time begins when play restarts.
Once the suspension period has been completed, the player is able to
return to the court at the next break in play (after a goal is scored, during
a stoppage or interval, when a sanction is awarded, a throw in or toss up
taken).
• The suspended player returns to the original playing position and any player
who moved to play as Centre during the suspension returns to the previous
playing position.
• A suspended player may join the team during any interval that occurs during
the suspension but must return to the umpires’ bench when play resumes.
Ordering off
The umpire may order a player off the court for serious misconduct or continued
foul play. While this will normally follow, a suspension or warning this is not a
prerequisite if the umpire considers such action is justified.
• The umpire advises the player of the ordering off and signals to the official
bench that the player has been ordered off.
• The player reports to the appropriate team officials on the team bench and
takes no further part in the match.
• No substitute is permitted and the player’s position is left vacant for the
remainder of the match. In the event that this player is the Centre, one
player must move to play as Centre and the position of this player is left
vacant for the remainder of the match.
FOUL PLAY
Foul play is anything a player does within the field of play that is contrary to the
letter and spirit of the rules of the game or does not meet accepted standards of
good sportsmanship. It includes unfair play, dangerous play and misconduct.
Unfair Play
A player must not play unfairly. This includes delaying play, intentional infringing
(including when the ball is not in play), persistent infringing, intimidation or
retaliation.
i) Delaying play
A player may not intentionally waste time or delay play.
Sanction: Penalty pass that is advanced (unless the non-infringing team is
disadvantaged) and the player is cautioned.
1. The sanction may be advanced up to half a third (this may be to inside
the goal circle if the infringement is in the goal third).
2. The infringer stands out of play at the new position. If this is in an offside
area the infringer moves to the edge of this area.
ii) Intentional infringing
A player must not intentionally infringe any rules.
Sanction: Penalty pass and the player is cautioned. If the player continues
to infringe either a warning will be given or, if considered appropriate, the
umpire will suspend the player
iii) Infringements when the ball is not in play
A player must not infringe when the ball is not in play. This includes:
a) Between the ball going out of court and a throw in being taken.
b) Between the awarding and the taking of a sanction or a toss up.
c) Between the scoring of a goal and the taking of a centre pass.
d) During a stoppage.
Sanction: Free pass (for minor infringement) or penalty pass (for major
infringement). If the action is considered appropriate, the player is cautioned
1. For (a) and (b) the infringement is penalized immediately
2. For (c) and (d) the whistle is blown to start play then the infringement is
penalized
v) Persistent infringing
A player must not persist in repeatedly infringing a rule or combination of
rules.
Sanction: Penalty pass and the player is cautioned. If the player continues
to infringe either a warning will be given or, if considered appropriate, the
umpire will suspend the player.
vi) Intimidation
A player, either with or without the ball, may not intimidate an opponent by
using intentional behavior (including verbal comments) designed to distract.
Sanction: Penalty pass and the player is cautioned
vii) Retaliation
A player must not retaliate even if an opponent infringes the Rules.
Sanction: Penalty pass and the player is cautioned. If the action is considered
to be serious the player is given a warning or suspended
viii) Dangerous Play
A player may not take any action, either deliberate or accidental, that could
affect the safety of another player. Such actions may include but are not
limited to:
• Punching, kicking or striking a player with any part of the body.
• Tripping or pushing a player.
• Causing a player in the air to fall by moving into the path of that player.
Sanction: Penalty pass
1. Accidental action: the umpire will issue a warning or suspend the player
2. Deliberate action: the umpire will suspend the player or, in a serious
case, order the player off
ix) Misconduct
Misconduct is any behaviour that is contrary to accepted standards of good
sportsmanship.
x) Dissent with an umpire
A player may not dispute a ruling given by an umpire or direct any offensive,
insulting or abusive language and/or gestures at an umpire. If an umpire’s call
is not clearly heard a player may ask the umpire to repeat the infringement
penalized or seek clarification of where a sanction is to be taken.
Sanction: Penalty pass and the player is either cautioned or given a warning.
In a serious case the umpire will suspend the player
xi) Actions contrary to good sportsmanship
A player must not act in a manner contrary to accepted standards of good
sportsmanship.
Sanction: Penalty pass and the player is either given a warning or suspended.
In a serious case the umpire will order the player off
xii) Continued misconduct
A player who has been suspended in a match must not continue to infringe
the Rules.
Action: The player is ordered off
DISCIPLINE OF TEAM OFFICIALS AND BENCH PLAYERS
During play team officials and bench players must remain at the team bench,
except that bench players may leave the team bench for a valid reason (such as
to warm up).
• During a match team officials and bench players may not:
a) Criticize the umpires or their decisions.
b) Use offensive, insulting or abusive language and/or gestures.
c) Use excessive noise or interruption.
d) Encourage foul play by on-court players.
• Umpire may either hold time or notify the person/s concerned regarding
such behaviour.
The following progression of actions will normally be used:
a) Caution
b) Warning
c) Order the person’s removal from the playing enclosure.
• A warning may, if appropriate, be advised as applying to all team officials
and bench players of the team concerned.
Sanction: Free pass taken where the ball was when play stopped
6.7. End unit assessment
Tutor divide student teachers into groups of five including two umpires, reserve
umpire, scorer and timekeeper. After dividing student teachers into their
respecting groups, set the order on which groups will lead the game, request the
first group to start the match. Ask other remaining student teachers to form two
teams of seven players for each one. Let the match start, change groups which is
officiating after five minutes. Officials become players to replace those who are
becoming officials.
• During performing officiating for each group, observe how each student
teacher is accomplishing given tasks and roles.
• Observe how techniques and tactics learned are being used.
• Records their performance in order to give them feedback at the end of the
exercise.
6.8. Additional activities
6.8.1. Remedial activities
Distribute balls to student teachers for regular familiarization with the ball focusing
on techniques and tactics of playing of playing netball game by respecting official
rules of the game.
6.8.3. Consolidation activities
Encourage student teachers to participate in competitions between small groups
and choose their own officials to lead the matches. Request officials to record
match results.
6.8.3. Extended activities
Organize netball competition between classes for forming school teams and let
student teachers officiate the matches. Encourage student teachers to officiate
interclasses and friendly matches. Request student teachers to read updatedrules of the game of netball game.
UNIT 7: GOAL BALL
Key unit competence: Perform goal ball techniques and tactics in thegame situation adhering to the rules of the game
7.1. Prerequisite (knowledge, skills, attitudes and values)
Student teachers of year 3 will apply and interpret rules of the game of goal ball
game in the game situation if they have developed basic techniques and tacticsabilities in goal ball learnt in year 1 and 2.
7.2. Cross-cutting issues to be addressed
• Gender
In teaching and learning process, the tutor must prepare and provide goal
ball activities that engage both girls and boys equally in exploiting their full
potential and talents without any discrimination or prejudice.
• Inclusive education
The tutor as a facilitator he/she must consider different special education
needs and select activities to adapt his teaching approaches to student
teachers. This creates a positive attitude and helps all student teachers to
participate actively and develop their competence levels.
• Financial education
The tutor should integrate Financial Education into his teaching/learning
activities by providing the local and no cost teaching material where is possible.
He/she must encourage student teachers to make their own materials that
can help them to develop competences not only in goal ball game but also in
their life.
• Standardization culture
The tutor must choose and select the standardized materials to use in his/her
teaching/learning process of goal ball. It is necessary to provide appropriate
materials required to the levels of student teachers and help them to develop
culture of checking and using the quality of sport materials for the competitions
before using them in order to prevent injuries and other cases of accident.
• Environment and sustainability
The tutor should provide materials and deliver the lesson by encouraging
student teachers to protect the environment and well use of materials. The
tutor helps them to develop the spirit of keeping safe the environment in
which they use by cleaning playground and courts after the lesson.
• Peace and values education
The tutor helps student teachers to develop fair play and social values by
avoiding violence and conflict in the game and by setting clear and relevant
instructions. He/she should provide the activities that help student teachers
to develop their competence peacefully.
• Comprehensive sexuality education
The tutor provides goal ball activities and sets instructions that prevent sexual
harassment, any kind of gender-based violence like sexual abuse and physical
contacts oriented to the sexuality intention.
• Genocide studies
While conducting goal ball exercises a tutor should take a time to explain
student teachers how sports should be used to fight against Genocide
ideology and how to prevent it. For example, to organize Genocide memorial
tournaments at school and give the message related to the Genocide.
7.3. Guidance on introductory activity
Before introducing the lesson one of this unit, you must introduce the whole unit.
The tutor as a guide, facilitator and expert, asks questions related to rules of the
game of playing goal ball in order to help them to predict what to be learned inthe whole unit.
7.4. List of lessons/sub-heading
Lesson 1: Recall on goal ball techniques and tactics in the game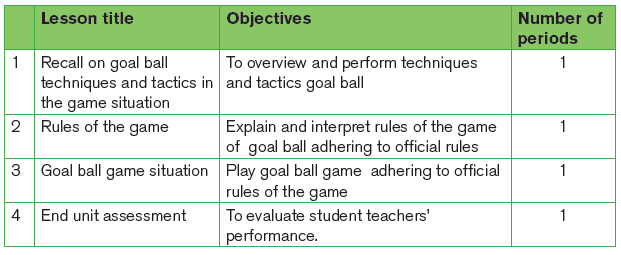
situation
a) Learning objective
Reviewing techniques and tactics of goal ball learned in year 1 and 2 in order
to prepare the good understanding of two last lesson of year 3.
b) Teaching resources
- Balls - Stopwatch/Watch
- Playground - Cones
- Whistle - Chasubles
- Goal posts used in goal ball game.
c) Prerequisites/Revision/Introduction
Student teachers of Year 3 will perform better in game situation related to
recall goal ball techniques and tactics if they have developed techniques and
tactics exercises learnt in year 1 and 2.
d) Learning activities
Opening discussions
• Ask questions about techniques and tactics of goal ball learned in year 1 and 2.
• Let student teachers present their findings and introduce the topic of the day.
• Invite student teachers to start warm up exercises.
Warm up exercises and cool down description
• Let student teachers perform general warm up exercises and specific warm
up based on the most body’s parts to be used while in game performance
stretch their muscles properly.
• One student teacher leads warm up and stretching exercises.
• Guide them while performing warm up and stretching exercises.• Help them/demonstrate/correct where is necessary.
e) Lesson development
Task/Activity 1
In pairs, one student teacher tries to score by hitting the wall behind the
opposite defending student teacher.
Variation
–– Let student teachers practise the same exercises in team of 2 vs 2, 3 vs 3.
–– Let student teachers play a normal game by using teams of threepersons.
Task/Activity 2
Step 1
In pairs, request one student teacher to hold the ball in one hand with the
fingers spread and supporting the ball with the other hand. Ask him/her to
draw the ball backward by releasing supporting hand and extend the arm to
a distance that maintains control of the ball. Ask him/her to step forward with
the opposite leg to his/her throwing arm and keep both feet pointing in the
direction of the throw.
Step 2
Student teacher swings the ball forwards very quickly and release the ball
close to the floor so that it makes very little sound. Let all student teachersperform this exercise.
Points to consider
• Ensure the other arm is extended outwards to help balance.
• To follow though the following arm in the direction that he/she wishes the
ball to travel.• Keep the knees bent.
Closing discussion
Reflect
–– Which challenges/benefits did you face during performing tactical
exercises of handling and throwing the ball in different positions in Goal
ball?
Connect
–– What are conditions do you need to perform tactical exercises of handling
and throwing the ball in Goal ball?
Apply
–– What is the usefulness of applying tactics in Goal ball?
Lesson 2: Rules of the game
a) Learning objective
Play goal ball game adhering to official rules of the game
b) Teaching resources
- Balls - Stopwatch/watch
- Playground - Cones
- Whistle - Chasubles/bibs
- Hard/soft copy of goal ball game rules.
- Projector, computer and videos related to goal ball refereeing.
c) Prerequisites/Revision/Introduction
Student teachers of Year 3 will learn better rules of goal ball game if they have
developed techniques and tactics of playing goal ball game.
d) Learning activities
• Put student teachers into seven groups and distribute to them the following
questions based on group numbers and let them discuss given questions
into their respective groups. Distribute rules of the game for each group
based on questions given to facilitate student teachers to get resources (if
possible, you may use smart classroom and let them use soft copy of rulesof the game of goal ball).

• Pass though groups and help them where is necessary. Request student
teachers to choose a secretary to record findings and group representative
who will present their findings.
• Request group representative to present their findings and group members
may support where is necessary.
• After presentation of all groups, use a projector to recap presentations,
show them fouls, and misconduct with the right hand signals to use while
officiating sitting volleyball.
Lesson 3: Goal ball game situation
a) Learning objective
Play goal ball game adhering to official rules of the game
b) Teaching resources
- Balls - Stopwatch/watch
- Playground - Cones
- Whistle - Chasubles
- Goal posts for goal ball game
c) Prerequisites/Revision/Introduction
Student teachers of Year 3 will perform better goal ball game situation if they
have learned rules of the game of goal ball and developed basic techniques
and tactics of playing goal ball learned in year 1, year 2.
d) Learning activities
Opening discussions
• Ask questions about rules of the game of goal ball.
• Let student teachers present their findings.
• Invite student teachers to start warm up exercises.
Warm up exercises and cool down description
• Let student teachers perform general warm up exercises and specific warm
up based on the most body’s parts to be used while in game performance
stretch their muscles properly.
• One student teacher leads warm up and stretching exercises.
• Guide them while performing warm up and stretching exercises.• Help them/demonstrate/correct where is necessary.
Points to consider during this game situation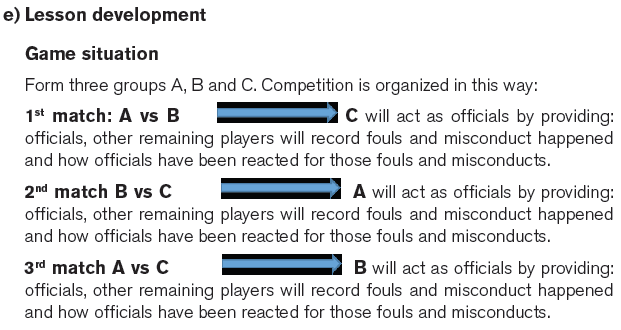
• Time for playing for each match: 6minutes
• The winner is the team, which will gain many points in those three matches.
• Choose one student teacher to lead cool down and invite them to start after
game situation discussion.
• Start by giving time group A, B then C to share what they have recorded
based on rules of the games, decisions taken by officials, effectiveness of
hand signals used, and how officials are taking positions and their movement
during the match. Support them to clarify some rules of the game where is
necessary.
• Close the lesson by asking some questions on what they have beendiscussed.
7.5. Summary of the unit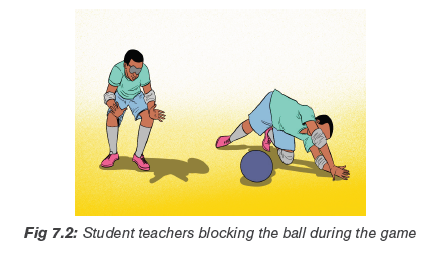
This unit comprises the reviewing techniques and tactics of goal ball in game
situation. It describes the rules of the game of goal ball. It provides time for playing
games adhering to goal ball rules and helping student teachers to develop theirknowledge and competences in goal ball.
7.6. Additional Information for tutors
Court
• The dimensions
The court will be a rectangle 18.0 m long by 9.0m wide. Measurements are
to the outside edges. Nothing except the court markings will be allowed as
markings on the court.
• Team Bench Area
Each team will have a team bench area, which will be positioned on either
side of the officials’ table, a minimum of 3.0m from the court’s side line.
The goals will extend across each end of the court. The internal measurements
will be 9.0m across and 1.3 m high and at least 0.5m deep (measured fromthe front of the crossbar to the closest rear part of the goal).
• Ball
The ball will conform to the following specifications:
–– Diameter: 24-25 cm.
–– Circumference: 75.5 cm-78.5 cm.
–– Weight: 1.250 g.
–– Sound holes: Four holes in upper hemisphere staggered from four holes
in lower hemisphere.
–– Bells: 2 pieces
–– Elastomer: Natural Rubber (NR).
–– Colour: blue
• Uniforms
All players must wear a team jersey.
• Competition Categories and Classification
Competition will be divided into two categories, male and female.
• Team Composition
At the beginning of every game, each team will consist of three (3) players
on court with a maximum of three (3) substitutes. A team will be forced to
forfeit the game if they cannot start that game with three (3) players on court.
In addition, each team may have up to three escorts on the bench during the
game. The total number of individuals allowed in the team bench areas must
be not more than nine, including the three starting players. Failure to complywith this will result in a team penalty delay of game.
• Officials
Each game will have 2 officials, 4 goal judges, 1 scorer, 1 timer, 2 ten secondtimers and 1 back-up timer.
• Length of the Game
A game will be a total of 24 minutes divided into 2 halves of 12 minutes each.
There will be at least 5 minutes between the end of a game and the start
of the next game. An audible signal will be given 5 minutes before the start
of the game. There will also be a second audible signal 90 seconds before
the start of each half. Players who are going to start any half must be on
court, facing their own goal and ready for eyeshade check by the officials, 90
seconds before the start of each half, Failure to comply will result in a Teamor Personal Penalty for Delay of Game.
• Scoring
At any time where the game clock is running and the ball is in play and
completely crosses a goal line, a goal is scored. The referee will whistle two
times and announce the goal. The game clock will stop on the referee’s firstwhistle. A goal cannot be scored by an official passing the ball into play.
• Team Time-Out
Each team will be allowed four (4) time-outs of 45 seconds during the game.
At least one of these time-outs must be taken during the first half or this timeout
will be lost. Once one of the teams has called a time-out both teams may
use the time-out. Each team will be allowed one time-out during the entireovertime. All time-outs not used at the end of regulation time will be lost.
• Official’s Time-Out
A referee may call an official’s time-out at any time. If a referee has whistled
for an official’s time-out as the result of the actions of the team in possession
of the ball, the ball will be controlled by the goal judge. At the end of the
official’s time-out, the goal judge will drop the ball 1.5 meters in front of thegoal post.
• Medical Time-Out
Medical time-out is a maximum of forty-five (45) seconds. In the event of
an injury or illness a referee may call a “medical time-out”. The referee will
consult and determine whether the player is able to continue to play at theconclusion of forty-five (45) seconds.
• Blood Rule
If a player receives an injury where blood is observed by the referee, a medical
time-out will be called. The player will be removed from the court and may not
return to the court until bleeding has stopped, the wound is covered, and if
necessary, the uniform changed. If the bleeding has not stopped, the wound
is not covered and the uniform has not been changed within the medical timeout period, a medical substitution is required.
• Team Substitution
Each team will be allowed four (4) substitutions during a game. At least one
substitution must be taken during the first half of the game or this substitutionwill be lost.
• Medical Substitution
A medical substitution will not count as one of the four (4) substitutions
allowed during regulation time or the one (1) substitution allowed duringovertime.
• Premature Throw
A Premature Throw occurs if a player throws the ball before the referee hasgiven the “play” command.
• Ball Over
If a ball is blocked by a defending player and the ball rebounds; (a) over the
centre line or (b) over the sideline in the neutral area, the referee will whistle
and call “ball over”. The ball will then be dropped back into play and to the
opposing Team Area from which it was blocked out. The referee will then call“quiet please” and blow their whistle and say “play”.
• Short Ball
Any time a thrown ball stays on the court but forward motion of the ball stops
before the defending team’s Team Area, the player who threw the ball willreceive a short ball penalty.
• High Ball
If the ball does not touch the court at least once on or before the High Ball (6
meter) Line at the front of the thrower’s Team Area when the ball is releasedfrom the thrower’s hand, the thrower will receive a high ball penalty.
• Long Ball
Notwithstanding the rule in paragraph 24, during the throw, the ball must also
touch the floor at least once in the Neutral Area or the thrower will receive along ball penalty.
• Eyeshades
During the game, any player on the court who intentionally touches their
eyeshades or the eyeshades of any other player without the referee’s
permission will receive an eyeshades penalty. A player removed from the
court during a penalty situation may not touch their eyeshades or they willreceive an eyeshades penalty.
• Illegal Defense
The first defensive contact with the ball must be made by a player who has
at least any part of their body in the Team Area (Orientation and Landing
Areas). When a defending player has committed an illegal defence, play will
be allowed to continue until the ball is controlled, blocked out or scores. If thegoal is scored, the penalty will not be called.
• Personal Delay of Game
Players must be prepared to play at the start of any half, on the referee’s
command. Players must not be re-orientated by anyone other than an oncourt
team member unless they are being assisted by the referee or goaljudge after a penalty situation.
• Personal Unsportsmanlike Conduct
If the referee determines that a player is not behaving in a sportsmanlike
manner, the player will be given a personal unsportsmanlike conduct penalty.
Any personal unsportsmanlike penalty received by a single player during
a game may result in ejection from that game. Any player ejected from a
game as the result of an unsportsmanlike conduct penalty will receive an
automatic suspension from their next game in the same tournament. Any
further unsportsmanlike conduct may result in ejection from the venue ortournament.
• Ten Seconds
A team has 10 seconds to ensure the ball crosses the court center line orside line from their first defensive contact with the ball.
• Team unsportsmanlike Conduct
Any violation of warm-up protocol. All members of the team and its delegation
that are present at the game must behave in a sportsmanlike manner.
Any further unsportsmanlike conduct may result in elimination from the game
or the premises and/or further participation in the tournament if a referee
feels the situation deserves it. The referee has to report the incident to the
Technical Delegate for further decision. If the Technical Delegate feels it isnecessary, a team may be ejected from further games in the tournament.
• Illegal coaching
The illegal coaching penalty may be called by either referee or can be drawn
to the officials’ attention by either ten second timer. If called by the latter,
ten second timer will signal to the referee by using the sound used to indicate
a ten second penalty. The table referee will check the details of the Illegal
coaching penalty with the ten second timer before confirming the penalty hasbeen made and taking the appropriate action.
• Noise
Any unnecessary noise made by any member of the throwing team during theact of throwing until the ball touches the defensive team, will be penalized.
• Overtime
If a winner is needed in the case of a tied score at the end of regulation play,
the teams will play two (2) additional three (3) minute halves if needed. There
will be a three (3) minute break between the end of regulation time and the
first overtime half. During this time, there will be a coin toss to determinewhich team throws and defends and which end the teams will start play.
• Extra Throws
If the score is still tied at the end of overtime, extra throws will decide the
winner. The rules of the game apply to all extra throws. When the winner of a
game needs to be determined, the coach will be provided with a line up sheet
for extra throws at the coin toss before the game. The line-up sheet mustinclude all players on the information score sheet.
• Sudden Death Extra Throws
If the score is still tied at the end of extra throws, sudden death extra throws
will decide the winner. The rules of the game apply to all sudden death extrathrows.
• Signing the Score Sheet and Protest Procedures
Immediately after the game a coach of each team, both officials and the
scorer will sign the score sheet at the table. If a coach does not sign the
score sheet immediately after the end of the game, the coach cannot protestthe results of that game.
• Officials’ Authority
In all matters of safety, the referee will make the rules, procedures and play,
the final decision. If there is a dispute between a team and an official, only
the head coach may speak to the referee. The discussion will only occur at an
official break in play and only after the referee has acknowledged the requestof the coach.
7.7. End unit assessment
Tutor divide student teachers into groups of eleven including 2 officials, 4 goal
judges, 1 scorer, 1 timer, 2 ten second timers and 1 back-up timer. After dividing
student teachers into their respecting groups, set the order on which groups will
lead the game, request the first group to start the match. Ask other remaining
student teachers to form two teams of three players for each one. Let the match
start, change groups which is officiating after five minutes. Officials becomeplayers to replace those who are becoming officials.
–– During performing officiating for each group, observe how each student
teacher is accomplishing given tasks and roles.
–– Observe how techniques and tactics learned are being used.
–– Records their performance in order to give them feedback at the end ofthe exercise.
7.8. Additional activities
7.8.1. Remedial activities
Distribute balls to student teachers for regular familiarization with the ball focusingon techniques of playing goal ball.
7.8.2. Consolidation activities
Participate in competitions between small groups and choose their own officialsto lead the matches.
7.8.3. Extended activities
Organize goal ball competition between classes for forming school teams let
student teachers officiate interclasses and friendly matches. Encourage studentteachers to exploit regularly updated rules of the game of goal ball.
UNIT 8: SITTING VOLLEYBALL
Key unit competence: Perform sitting volleyball techniques and tactics
in the game situation adhering to official rules of the game
8.1. Prerequisite (knowledge, skills, attitudes and values)
Student teachers will learn better rules of the game of sitting volleyball applied
through the game situation if they have developed techniques and tactics of
playing sitting volleyball learned in year 1 and year 2.
8.2. Cross-cutting issues to be addressed
• Gender
In teaching and learning process, the tutor must prepare and provide sitting
volleyball activities that engage both girls and boys equally to exploit their full
potential and talents without any discrimination or prejudice.
• Inclusive education
The tutor as a facilitator he/she must consider different special education
needs and select activities to adapt his teaching approaches to student
teachers. This creates a positive attitude and helps all student teachers to
participate actively and develop their competence levels.
• Financial education
The tutor should integrate Financial Education into his teaching/learning
activities by providing the local and no cost teaching material where is possible.
He/she must encourage student teachers to make their own materials that
can help them to develop competences not only in sitting volleyball but also
in their life.
• Standardization culture
The tutor must choose and select the standardized materials to use in his/
her teaching/learning process of sitting volleyball. It is necessary to provide
appropriate materials required to the levels of student teachers and help them
to develop culture of checking and using the quality of sport materials for thecompetitions before using them in order to prevent injuries and accidents.
• Environment and sustainability
The tutor should provide materials and deliver the lesson by encouraging
student teachers to protect the environment and well use of materials. The
tutor helps them to develop the spirit of keeping safe the environment they
use during sports activities by cleaning playground and courts.
• Peace and values education
The tutor helps student teachers to develop fair play and social values by
avoiding violence and conflict in the sitting volleyball game and by setting
clear and relevant instructions. He/she should provide the activities that help
student teachers to develop their competence peacefully.
• Comprehensive sexuality education
The tutor provides sitting volleyball exercise and sets instructions that prevent
sexual harassment, any kind of gender-based violence like sexual abuse and
physical contacts oriented to the sexuality intention.
• Genocide studies
While conducting sitting volleyball exercises a tutor should take a time to
explain student teachers how sports should be used to fight against Genocide
ideology and how to prevent it. For example, to organize Genocide memorial
tournaments at school and give the message related to the Genocide.
8.3. Guidance on introductory activity
Before introducing the lesson one of this unit, you must introduce the whole unit.
The tutor as a guide, facilitator and expert, ask questions or give activity related
to rules of sitting volleyball in order to help them to predict what to be learned inthe whole unit.
8.4. List of lessons/sub-heading
Lesson 1: Recall on techniques and tactics of playing sitting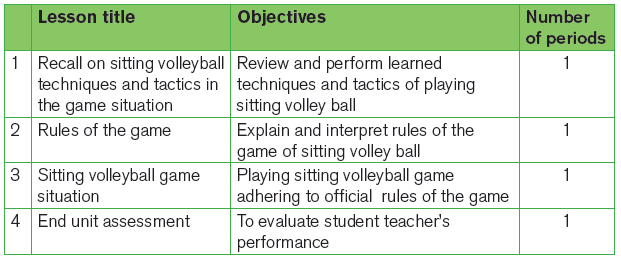
volleyball in the game situation
a) Learning objective
To perform learned techniques and tactics used in sitting volleyball
b) Teaching resources
Balls, watch, whistle, cones, chasubles, trees, net and posts.
c) Prerequisites/Revision/Introduction
Student teachers of year 3 will learn better the lesson of recalling techniques
and tactics used in sitting volleyball, if they have performed better basic
techniques and tactics of playing sitting volleyball learned in year 1 and 2.
d) Learning activities
Opening discussions
• Let student teachers brainstorm different techniques and tactics learned in
year 1 and year 2.
• Let student teachers present their findings and support them where is
necessary for complement.
• Introduce the topic of the day ‘recall of techniques and tactics of playing
sitting volleyball’.
• Invite student teachers to start warm up session.
Warm up exercises and cool down description
• Randomly request one student teacher to lead warm up.
• Student teachers perform general and specific warm up.
• Let them perform stretching by stretching the whole body and insist on thebody’s part, which will be used more in different activities.
e) Lesson development
Task/Activity 1
Put student teachers in two teams. Let one group be at the service line.
Give balls to each group. Tell student teachers to perform different services
while sitting down. After performing five services for each one, request three
student teachers for each group to enter in the court and be positioned in
front area. Let one of the remaining students who are on the service line
perform a service and those who are in the court make reception; play a
normal game by using three hits then send the ball to the opponent then
opponents make three hits send back the ball over the net; the exercise
continue this way until the ball goes out or another foul occurs. After five
minutes let other three players for each team enter onto the court, now each
group has six players. One of the remaining players make a service, players
who are in the court play a normal game until the ball goes out or any foul
occurs. Change players’ roles, those who are in the court replace those whoare making services verse versa.
Task/Activity 2
Form two groups of 6 to 12 players in order to teach proper techniques and
tactics used in playing sitting volleyball. Request student teachers to choose
positions in which they will play in when they enter in the court. Tell them that
all student teachers they should participate in game situation as player orsubstitute.
Description of the activity
First six student teachers for each group enter into the court and start playing
a normal game. Student teachers are requested to use all learned techniques
and tactics in order to win. Let two groups play 10 min, the winning team, is
the team, which will gain many points within 10 minutes. After 10 minutes,
winning team will pay to the next group. Remind group to make substitutionin order to let all group members to participate in the play.
Cool down exercises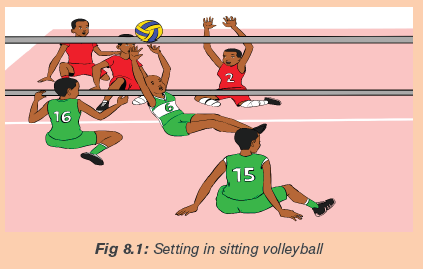
–– Let student teachers practise cool down exercises and light stretching by
focusing the most used muscles.
–– Guide them how they can stretch their muscles accordingly.–– Help them/demonstrate/correct where is necessary.
Closing discussion
Reflect
–– Which were the most challenging/benefits when performing set activities
in sitting volleyball?
Connect
–– How do you set/smash the ball in a sitting volleyball?
–– How do you attack the ball in sitting volleyball?
–– Which techniques and tactics do you need in order to play sitting volleyball?
Apply
–– How will you use learned techniques and tactics in sitting volleyball in yourdaily life?
Lesson 2: Rules of the game
a) Learning objective
To use rules of the game of sitting volleyball ball in a given situation game
b) Teaching resources
Balls for sitting volleyball game, whistles, cards (red card and yellow card) used
in refereeing, flags used by line judges, projector, computer, soft copy and
hard copy for sitting volleyball rules, smart classroom.
c) Prerequisites/Revision/Introduction
Student teachers of year 3 will learn better official rules of the game of sitting
volleyball, if they have performed better basic techniques of sitting volleyball
learned in year 1 and tactics of playing sitting volleyball learned in year 2.
d) Learning activities
Put student teachers into six groups and distribute to them the questions based
on group numbers and let them discuss given questions into their respective
groups. Distribute rules of the game for each group based on questions given
to facilitate student teachers to get resources (if possible, you may use smartclassroom and let them use soft copy of sitting volleyball rules).
• Pass though groups and help them where is necessary. Request student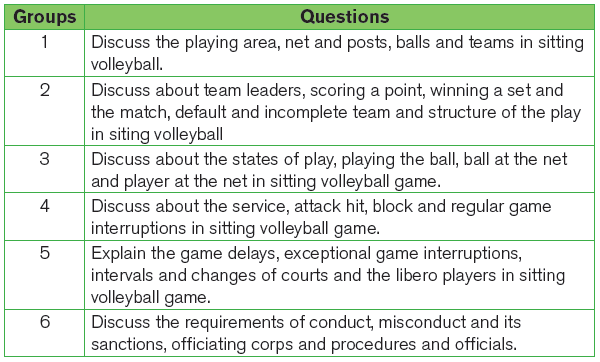
teachers to choose a secretary to record findings and group representative
who will present their findings.
• Request group representative to present their findings and group members
may support where is necessary.
• After presentation of all groups, use a projector to recap presentations,
show them fouls, and misconduct with the right hand signals to use whileofficiating sitting volleyball.
Application activity
Let student teachers show different hand signals used in sitting volleyballgame and interpret their meaning.
Signs used in officiating sitting volleyball
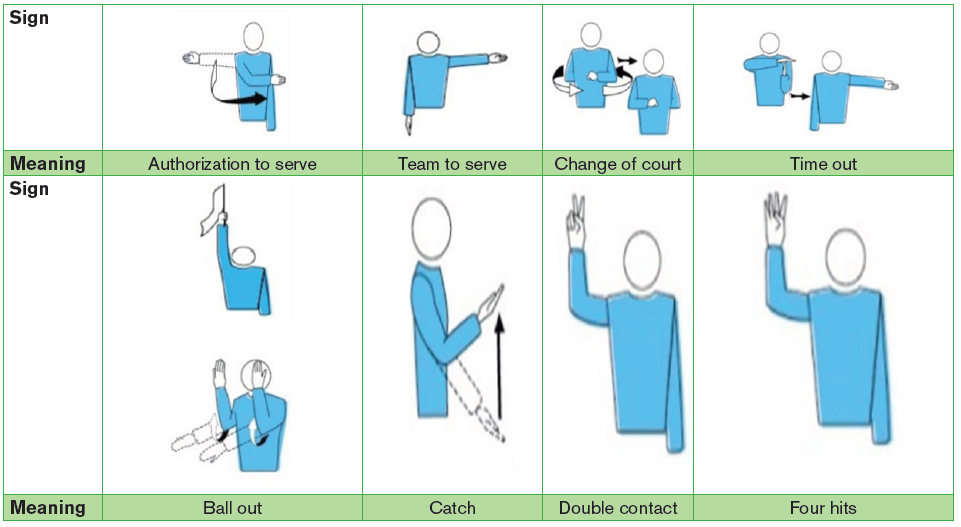
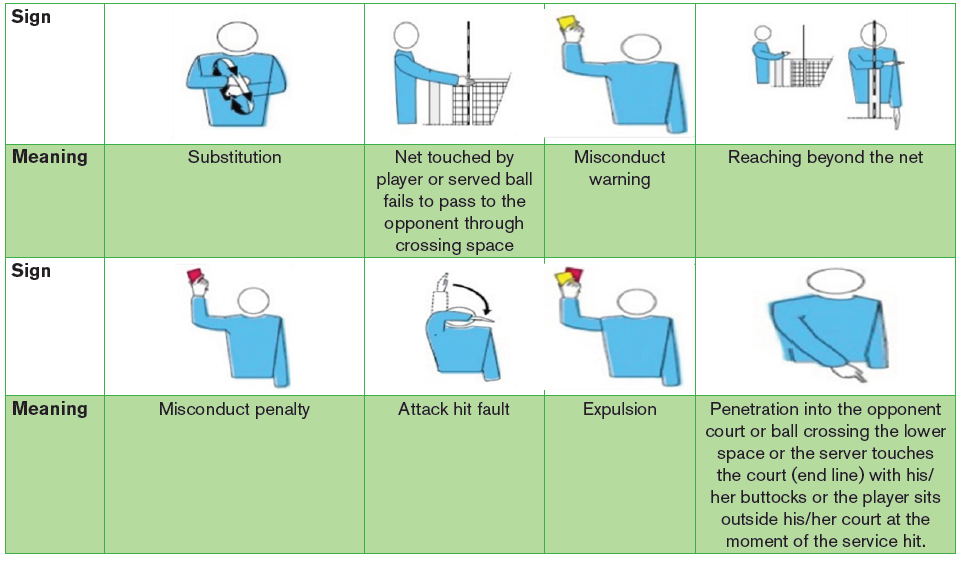
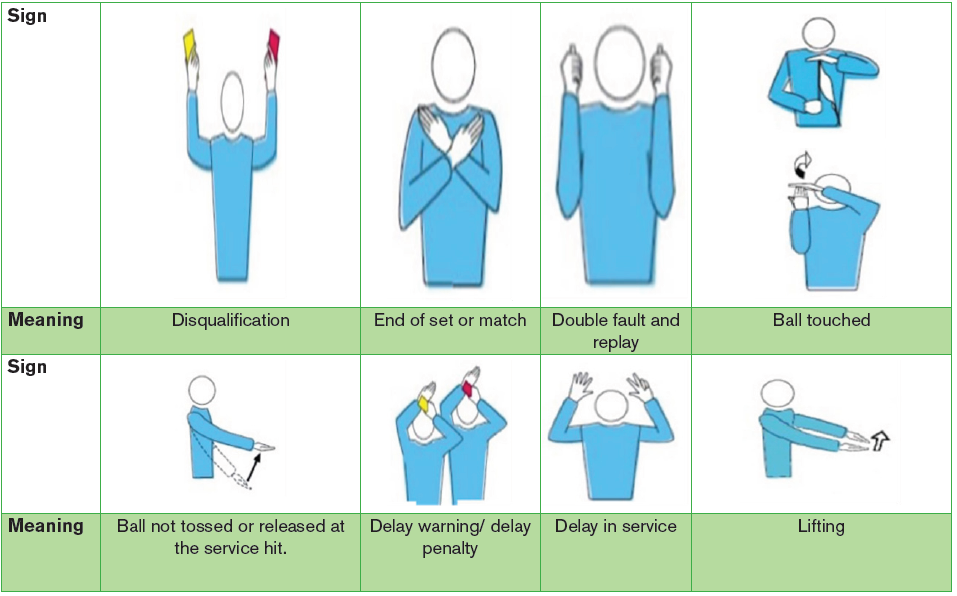
Lesson 3: Sitting volleyball game situation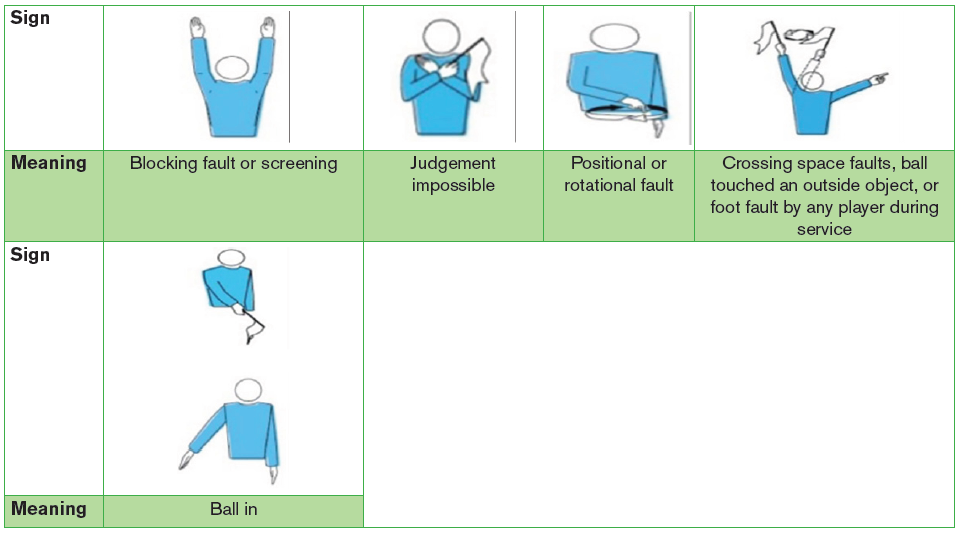
a) Learning objective
Playing sitting volleyball game adhering to official rules of the game
b) Teaching resources
Hall floor or volleyball court with synthetic floor, balls, whistles, net and posts,
protective equipment, watch, cards (red card and yellow card) used in refereeing,
flags used by line judges, printed sitting volleyball rules.
c) Prerequisites/Revision/Introduction
Student teachers of year 3 will learn better recalling on techniques and tactics
used in playing sitting volleyball, if they have performed better basic techniques
and tactics of sitting volleyball learned in year 1 and 2.
d) Learning activities
Opening discussions
• Brainstorm about basic sitting volleyball rules learned in the previous years
(insist on court of sitting volleyball, number of players, ball etc.).
• Let student teachers answer asked questions.
• Support them by clarifying their answers where is necessary and add
information where is needed.
• Introduce the topic of the day and invite student teachers to start the warm
up session.
Warm up exercises and cool down exercise
• Randomly request one student teacher to lead warm up.
• Student teachers perform general and specific warm up.
• Let them perform stretching by stretching the whole body and insist on thebody’s part, which will be used more in different activities.
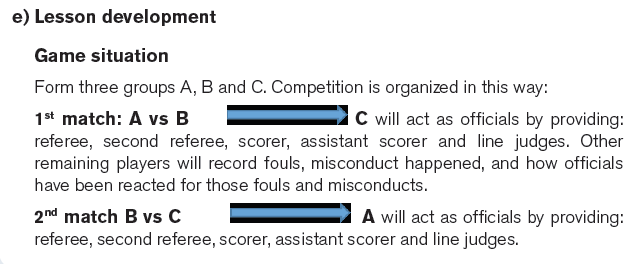
Points to consider during this game situation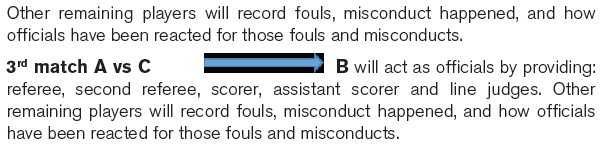
• Time for playing for each match: 6minutes
• The winner is the team, which will gain many points in those three matches.
• Choose one student teacher to lead cool down and invite them to start after
game situation discussion.
• Start by giving time group A, B then C to share what they have recorded
based on rules of the games, decisions taken by officials, effectiveness of
hand signals used, and how officials are taking positions and their movement
during the match. Support them to clarify some rules of the game where is
necessary.
• Close the lesson by asking some questions on what they have beendiscussed.
8.5. Summary of the unit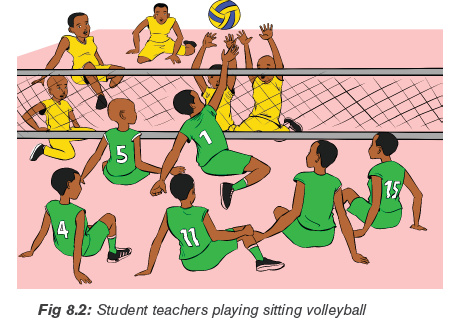
In this unit, student teachers perform exercises for recalling techniques and tactics
of sitting volleyball. They have also learned rules of sitting volleyball game and
how to apply them during the game. Those rules are summarized as the following:
• Playing area: dimensions, playing surface, line of the court, zones and
areas, temperature and lighting.
• Net and posts: height of the net, structure of the net, side bands, antennae,
posts and additional equipment.
• Balls: standards balls, uniformity of balls, five-ball system.
• Teams: team composition, location of the team, equipment, changes of
equipment, forbidden objects.
• Team leaders: captain, coach, assistant coach.
• Scoring a point, winning a set and winning the match.
• Default and incomplete team.
• Structure of the play: the toss, official warm up session, team starting
line-up, positions, positional fault, rotation and rotational fault.
• States of play: ball in play and out of play, ball in and out.
• Playing the ball: team hits, characteristics of the hit, faults in playing the
ball, contact with the court.
• Ball at the net: Ball crossing the net, ball touching the net, ball in the net.
• Player at the net: reaching beyond the net, penetration under the net,
contact with the net, player’s faults at the net.
• Service: first service in a set, service order, authorization of the service,
execution of the service, screening, service faults and positional faults.
• Attack hit: characteristics of attack hit, restrictions of the attack hit, and
faults of the attack hit.
• Block: blocking, block contact, blocking within the opponent’s space. Block
and team hits, blocking the service, blocking faults.
• Regular game interruptions: number of regular interruptions, sequence
of regular game interruptions, requests for regular game interruptions, timeouts
and technical time-outs, substitution (limitation, exceptional substitution,
substitution for expulsion or disqualification, illegal substitution, substitution
procedure and improper requests).
• Game delays: types of game delay and their sanctions.
• Exceptional game interruptions: injury/illness, external interference,
prolonged interruptions.
• Intervals and changes of courts: intervals, change of courts,
• The libero players: designation of the libero, equipment, actions involving
the libero, re-designation of a new libero.
• Requirements of conduct: sportsmanlike conduct, fair play.
• Misconduct and its sanctions: minor misconduct, misconduct leading to
sanctions, sanction scale, application of misconduct sanctions, misconductbefore and between sets and sanction cards.
• Officiating corps and procedures: composition, procedures, first
referee (location, authority and responsibilities), second referee (location,
authority and responsibilities), scorer (location and responsibilities),
assistant scorer (location and responsibilities), and line judges (location andresponsibilities).
• Official signals: referee’s hand signals, line judges’ hand signals.
Student teachers have given time to put in practice by officiating sitting volleyball
games situations.
8.6. Additional Information for tutors
• Playing area and the ball
The playing court is a rectangle measuring 10 x 6 m, surrounded by a free
zone, which is a minimum of 3 m wide on all sides. The free playing space is
the space above the playing area, which is free from any obstructions. The
free playing space shall measure a minimum of 7 m in height from the playing
surface. For World Para Volley World and Official Competitions, as well as
Zonal Championships, the free zone shall measure a minimum of 4 m from
the sidelines and 6 m from the end lines. The free playing space shall measure
a minimum of 10 m in height from the playing surface. Surface areas, nets,
posts, and lines of the court should respect an official rule of the game for
sitting volleyball (from Synthetic leather material and colour combinations
of balls used in World Para Volley World and Official Competitions, as well
as Zonal Championships, must comply with World Para Volley standards. Itscircumference is 65–67 cm and its weight is 260–280 g.
• Team composition and equipment
A team may consist of a maximum of 12 players Internationally classified with
a ‘Confirmed’ sport class status or a ‘Review’ sport class status, including a
maximum two players classified as of “minimal impairment” (*MD/VS2), one
coach, a maximum of two assistant coaches, one team therapist and one
medical doctor. Only the players recorded on the score sheet may enter the
court and play in the match. Once the coach and the team captain have signed
the score sheet (team list for electronic score sheet) the recorded players
cannot be changed. See about location on the team. A player’s equipment
consists of a jersey, shorts or long pants, socks (the uniform) and sport shoes.
Players may play without shoes. It is forbidden to wear objects, which may
cause injury, or give an unfair artificial advantage to the player. Bandages maybe worn, but not anything that may be dangerous is permitted.
• Playing format
A team scores a point:
–– By successfully grounding the ball on the opponent’s playing court;
–– When the opposing team commits a fault;
–– When the opposing team receives a penalty.
A team commits a fault by making a playing action contrary to the Rules
(or by violating them in some other way). The officials judge the faults and
determine the consequences according to the Rules. If two or more faults
are committed successively, only the first one is counted, if opponents commit
two or more faults simultaneously, a double fault is called and the rally is
replayed.
A rally is the sequence of playing actions from the moment of them service
hit by the server until the ball is out of play. A completed rally is a sequence of
playing actions, which result in the award of a point. This includes:
–– The award of a penalty.
–– Loss of service for service hit made after the time limit.
If the serving team wins a rally, it scores a point and continues toServe. If the receiving team wins a rally, it scores a point and it must serve next.
At the moment the ball is hit by the server, each team must be positioned
within its own court in the rotational order (except the server). The positions
of the players are numbered as follows: the three players along the net are
front-row players and occupy positions 4 (front-left), 3 (front-centre) and 2
(front-right); the other three are back-row players occupying positions 5 (back
left), 6 (back-centre) and 1 (back-right).
The team commits a positional fault if any player is not in his/her correct
position at the moment the ball is hit by the server. When a player is on court
through illegal substitution, and play restarts, this is counted as a positional
fault with the consequences of an illegal substitution. A rotational fault is
committed when the service is not made according to the rotational order.
• Playing actions
The ball is in play from the moment of the hit of the service authorised by the
first referee. The ball is out of play at the moment of the fault that is whistled
by one of the officials: in the absence of a fault, at the moment of the whistle.
The ball is “in” if at any moment of its contact with the floor, some part of the
ball touches the court, including the boundary lines. The ball is “out” when:
–– All parts of the ball, which contact the floor, are completely outside the
boundary lines; it touches an object outside the court, the ceiling or a
person out of play; it touches the antennae, ropes, posts or the net itself
outside the side bands.
–– Either it crosses the vertical plane of the net partially or totally, outside
the crossing space, it crosses completely the lower space under the net.
A hit is any contact with the ball by a player in play. The team is entitled to a
maximum of three hits (in addition to blocking), for returning the ball. If more
are used, the team commits the fault of “four hits”.
Faults in playing the ball
–– Four hits: a team hits the ball four times before returning it.
–– Assisted hit: a player takes support from a teammate or any structure/
object in order to hit the ball within the playing area.
–– Catch: the ball is caught and/or thrown; it does not rebound from the
hit.
–– Double contact: a player hits the ball twice in succession or the ball
contacts various parts of his/her body in succession.
–– Lifting: the part of the player’s body between the buttocks and theshoulders loses contact with the court during a playing action.
Player’s faults at the net
A player touches the ball or an opponent in the opponent’s space before or
during the opponent’s attack hit. A player interferes with the opponent’s play
while penetrating into the opponent’s space under the net. A player penetrates
into the opponent’s court interfering with the opponent’s play. A player interferes
with the opponent’s play by (amongst others):
–– Touching the top band of the net between the antennae or the antenna
itself during his/her action of playing the ball or attempting to play the
ball.
–– Using the net between the antennae as a support or stabilising aid
simultaneously with playing the ball.
–– Creating an advantage over the opponent.
–– Making actions, which hinder an opponent’s legitimate attempt to play
the ball.–– Catching/holding on to the net.
Service order
The players must follow the service order recorded on the line-up sheet. After
the first service in a set, the player to serve is determined as follows: when
the serving team wins the rally, the player (or his/her substitute) who served
before, serves again; when the receiving team wins the rally, it gains the right
to serve and rotates before actually serving. The player who moves from thefront-right position to the back-right position will serve.
Faults made during the service
–– Violates the service order.
–– Does not execute the service properly.
–– Lifts his/her buttocks.
Faults after the service hit
After the ball has been correctly hit, the service becomes a fault (unless a
player is out of position) if the ball: touches a player of the serving team or fails
to cross the vertical plane of the net completely through the crossing space;
goes “out”; passes over a screen. If the server makes a fault at the moment
of the service hit (improper execution, wrong rotational order, etc.) and the
opponent is out of position, it is the serving fault, which is sanctioned. Instead,
if the execution of the service has been correct, but the service subsequently
becomes faulty (goes out, goes over a screen, etc.), the positional fault hastaken place first and is sanctioned.
Faults of the attack hit
A player hits the ball within the playing space of the opposing team. A player
hits the ball “out”. A back-row player completes an attack hit from the front
zone, if at the moment of the hit the ball is entirely higher than the top of the
net. A player lifts his/her buttocks at the moment he/she hits the ball. A Libero
completes an attack hit if at the moment of the hit the ball is entirely higher
than the top of the net. A player completes an attack hit from higher than the
top of the net when the ball is coming from an overhand finger pass by a Liberoin his/her front zone.
Blocking faults
The blocker touches the ball in the opponent’s space either before or
simultaneously with the opponent’s attack hit. A back-row player or a Libero
completes a block or participates in a completed block. The blocker lifts his/
her buttocks when he/she is playing the ball or participates in a block. The
ball is sent “out” off the block. Blocking the ball in the opponent’s space fromoutside the antenna. A Libero attempts an individual or collective block.
• Interruptions, intervals and delays
For World Para Volley World and Official Competitions, as well as Zonal
Championships, in sets 1-4, two additional 60-second “Technical Time-Outs”
are applied automatically when the leading team reaches the 8th and 16th
points. In the deciding (5th) set, there are no “Technical Time-Outs”; each team
may request only two time-outs of 30 seconds duration. An improper action
of a team that defers resumption of the game is a delay and includes, among
others: delaying regular game interruptions; prolonging interruptions, after
having been instructed to resume the game; requesting an illegal substitution;repeating an improper request; delaying the game by a team member.
During this period, the change of courts and line-up registrations of the teams
on the score sheet are made. The interval between the second and third sets
can be extended up to 10 minutes by the competent body at the request of
the organiser. In the deciding set, once a team reaches 8 points, the teams
change courts immediately and the player positions remain the same. If the
change is not made once the leading team reaches 8 points, it will take place
as soon as the error is noticed. The score at the time that the change is maderemains the same.
• Libero players
Each team has the right to designate from the list of players up to two specialist
defensive players: Libero. All Libero must be recorded on the score sheet
before the match only in the special lines reserved for this. The Libero on court
is the Acting Libero. If there is another Libero, he/she is the second Libero for
the team. Only one Libero may be on court at any time. The Libero player(s)
must wear a uniform (or jacket/bib for the redesignated Libero) which has a
different dominant colour from any colour of the rest of the team. The uniform
must clearly contrast with the rest of the team. The Libero uniforms must be
numbered like the rest of the team. If the Libero is expelled or disqualified,
the team’s second Libero may replace him/her immediately. Should the teamhave only one Libero, then it has the right to make a re-designation.
• Minor misconduct
Minor misconduct offences are not subject to sanctions. It is the first referee’s
duty to prevent the teams from approaching the sanctioning level. This isdone in two stages:
Stage 1: by using a verbal warning through the game captain.
Stage 2: by use of a yellow card to the team member(s) concerned. This
formal warning is not in itself a sanction but a symbol that the team member
(and by extension the team) has reached the sanctioning level for the match.It is recorded on the score sheet but has no immediate consequences.
Misconduct leading to sanctions
Incorrect conduct by a team member towards officials, opponents, teammates
or spectators is classified in three categories according to the seriousness ofthe offence.
Rude conduct: action contrary to good manners or moral principles.
Offensive conduct: defamatory or insulting words or gestures or any action
expressing contempt.Aggression: actual physical attack or aggressive or threatening behaviour.
Sanctions scales in sitting volleyball
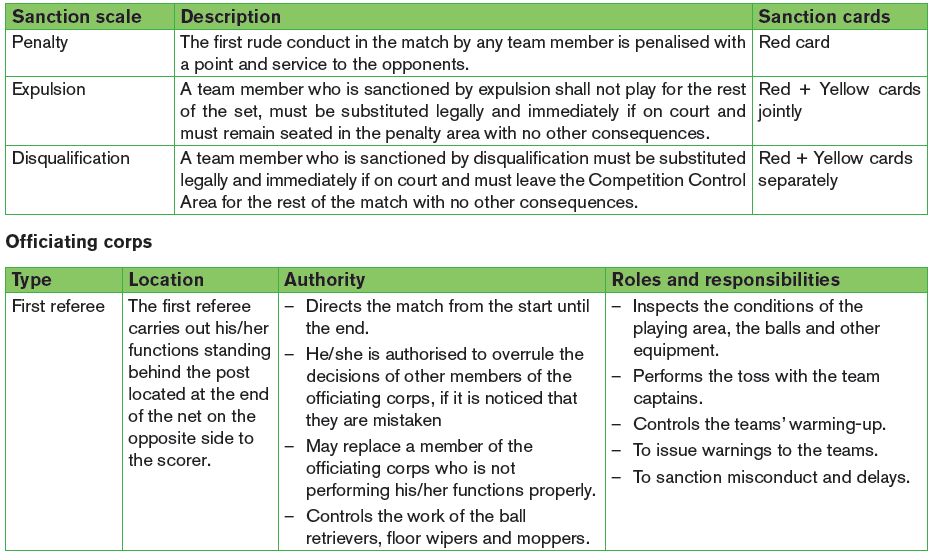
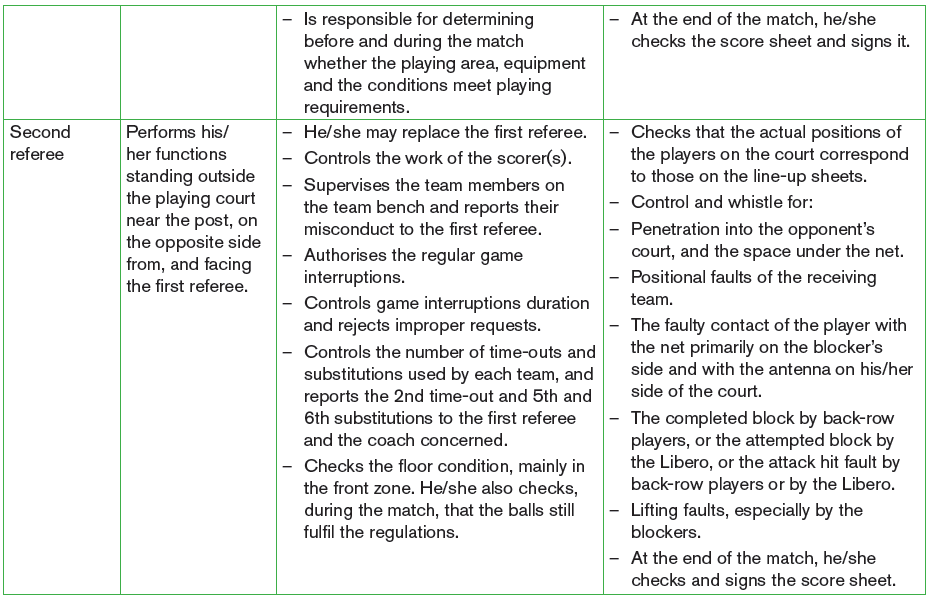

8.7. End unit assessment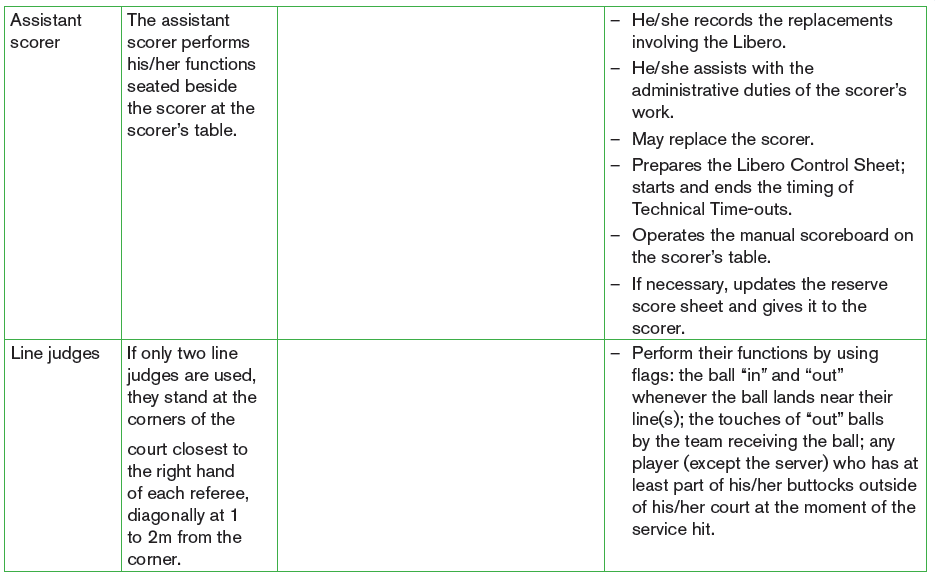
Tutor puts student teachers into groups of five including first referee, second
referee, scorer and two line judges. After dividing student teachers into their
respecting groups, set the order on which groups will lead the game, request the
first group to start the match. Ask other remaining student teachers to form two
teams of six players for each one. Let the match start, change groups which is
officiating after five minutes. Officials become players to replace those who are
becoming officials.
–– During performing officiating for each group, observe how each student
teacher is accomplishing given tasks and roles.
–– Records their performance in order to give them feedback at the end of
the exercise.
8.8. Additional activities
8.8.1. Remedial activities
Student teachers read hard/soft copy of rules of the game for sitting volleyball.
8.8.2. Consolidation activities
1. In pair or in-group request student teachers to discuss the following:
• Facilities and equipment
• Participants
• Playing format
• Playing action
• Interruptions, intervals and delays
• The libero player
• Participants conduct
• Officials
2. In pairs, student teachers demonstrate hand signals used in officiating
sitting volleyball game.
8.8.3. Extended activities
Encourages student teachers to lead sitting volleyball matches/competitionsorganized by the school such as interclasses competitions or friendly matches.
UNIT 9 : FIRST AID
Key unit competence: Apply/perform the practice of first aid.
9.1. Prerequisite (knowledge, skills, attitudes and values)
Student teachers will learn better this lesson, if they could be able to understand
key concepts related to first aid.
9.2. Cross-cutting issues to be addressed
• Gender
In teaching and learning process, the tutor must prepare and provide first aid
activities that engage both girls and boys equally to exploit their full potential
and talents without any discrimination or prejudice.
• Inclusive education
The tutor as a facilitator he/she must consider different special education
needs and select activities to adapt his teaching approaches to student
teachers. This creates a positive attitude and helps all student teachers to
participate actively and develop their competence levels.
• Financial education
The tutor should integrate Financial Education into his teaching/learning
activities by providing the local and no cost teaching material where is possible.
He/she must encourage student teachers to make their own materials that
can help them to develop competences not only in first aid at school but also
in their life.
• Standardization culture
The tutor must choose and select the standardized materials to use in his/her
teaching/learning process. It is necessary to provide appropriate materials
required to the levels of student teachers and help them to develop culture
of checking and using the quality of first aid materials for the competitions
before using them in order to provide first aid to injured people.
• Environment and sustainability
The tutor should provide materials and deliver the lesson by encouraging
student teachers to protect the environment and well use of materials. The
tutor helps them to develop of cleaning an area where first aid has been
provided.
• Peace and values education
The tutor helps student teachers to develop fair play and social values by
avoiding violence and conflict in the game and by setting clear and relevant
instructions. He/she should provide the activities that help student teachers
to develop their competence peacefully.
• Comprehensive sexuality education
The tutor provides first aid activities and sets instructions that prevent sexual
harassment, any kind of gender-based violence like sexual abuse and physical
contacts oriented to the sexuality intention during providing of first aid.
• Genocide studies
While conducting basics first aid a tutor should take a time to explain student
teachers how first aid should be used during Genocide memorial events.
9.3. Guidance on introductory activity
Before introducing the lesson one of this unit, you must introduce the whole unit.
The tutor as a guide, facilitator and expert, ask questions or give activity relatedto first aid in order to help them to predict what to be learned in the whole unit.
9.4. List of lessons/sub-heading
Lesson 1: Introduction to first aid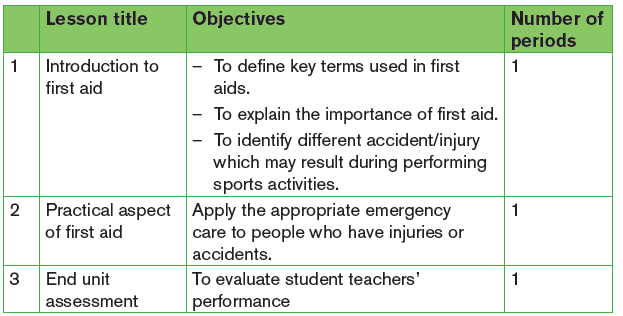
a) Learning objective
Student teachers will be able:
• To define key terms used in first aids.
• To explain the importance of first aid.
• To identify different accident/injury which may result during performing
sports activities.
b) Teaching resources
Images/pictures that show injured people, first aid books, first aid kit, watch,
chalk, notebook and pens.
c) Prerequisites/Revision/Introduction
Student teachers of Year 3 will learn better introduction to first aid if they have
learned human skeletal, joint and movement, circulatory system in humans,
muscular system in previous years.
d) Learning activities
As a facilitator, help student teachers in the following ways:
• Form six groups.• Assign to each group their first aid term to discuss as follow:
• Pass around groups by guiding and facilitating student teachers.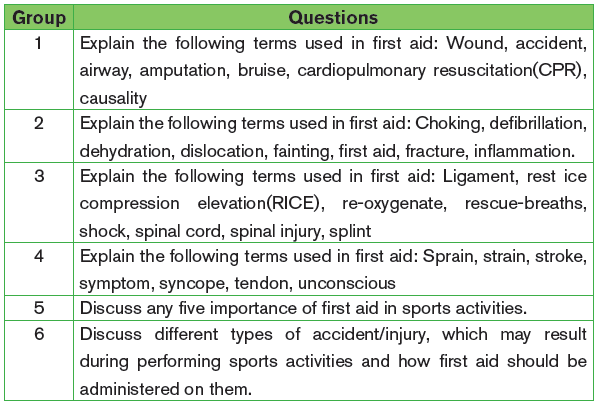
• Ask groups to present their findings to the whole class by requesting the
group representative to write them on the chalkboard or flip chart.
• Enable the class to ask questions related to the presented findings. Initially,
request the members of the groups that have presented on to respond to
the questions: if they are not able to clarify, ask other groups to contribute.
• Assess the lesson by letting student teachers attempt the application
activity.
• During presentation of findings by different groups, observe that the
information given is full for fractures, lesions of articulations their sign and
symptoms and their emergencies. If is not complete support their answers
by using information given below.
• Remind student teachers that Injuries to bones, joints and muscles are
common even though they are usually not life threatening, they can be
painful and debilitating. Appropriate first aid for these injuries can reducethe pain and prevent further injury.
Some information about skeletal and articulation attacks
i) Types of fractures
• Closed: where the bone has broken but the skin over the fracture isnot broken.
• Open: where the bone is broken and the skin over the fracture is broken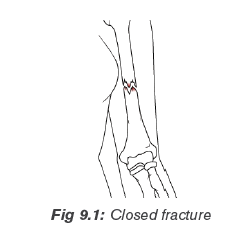
so that the bone is visible.
ii) Causes, signs and symptoms of fracture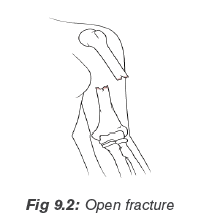
Causes
• A direct force (e.g. a punch or kick) and an indirect force (e.g. a fall), or
by a twisting force.
• Certain bone diseases, such as osteoporosis, make bones very brittle
and they can break without much force.
• Old age and related conditions (osteoporosis) can weaken bones making
them brittle and at risk of breaking.
Signs and symptoms
• Pain and tenderness: Worse when the injury is touched or moved.
• Loss of function: The casualty cannot use the injured part.
• A wound: The bone ends may be sticking out.
• Deformity: Any unnatural shape or unnatural position of a bone or joint.
• Distortion/bending/ or shortening of the affected limb.
• Unnatural movement.
• Crepitus: A grating sensation or sound that can often be felt or heard
when the broken ends of bone rub together.
• Swelling and bruising: Fluid accumulates in the tissues around the
fracture.
iii) Signs and symptoms of spinal cord injury
• Swelling and/or bruising at the site of the injury.
• A loss of feeling in the arms and legs on one or both sides of the body.
• An injured person is not able to move arms and/or legs on one or both
sides of the body.
• Pain at the injury site.• Signs of shock.
You should suspect a spinal injury if the person has been involved in an
incident that is directly affected their spine, such as a fall from height or
being struck directly in the back complains of severe pain in their neck or
back, not moving their neck, feels weak, numb or paralysed, has lost control
of their limbs, bladder or bowels.
If you think a person may have a spinal injury, do not attempt to move
them until the emergency services reach you.
iv) Rib fracture and chest
Broken ribs or thoracic cage are painful and can hurt with every breath and
if they are broken severely they can seriously damage internal organs in
thoracic cavity.
Cause of ribs/chest breaking
• A traffic accident.
• Being punched in your rib cage during sports activities.
• Contact sports for example: football, handball, rugby, boxing, karate, etc.
• Repeated movements, like swinging a golf club, rowing or swimming.
• Coughing very hard repeatedly.
• A fall onto a hard surface.• Breaking of ribs while getting Cardiopulmonary Resuscitation.
v) Signs and symptoms for ribs or chest injury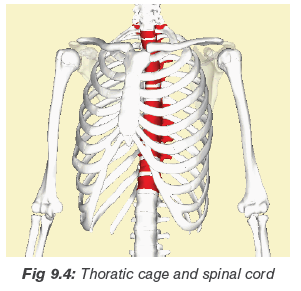
• Pain at injury site when casualty moves, coughs or breathes deeply.
• Shallow breathing.
• Deformity and discoloration.
• The existence of the wound.
• May cough up frothy blood.
• May show signs of shock.
• Bruising over the affected fracture site.
• Pain on breathing, particularly inspiration.
vi) Dislocation
A dislocation is when the bones of a joint are not in proper contact.
Causes and consequences of dislocation
A force stretches and tears the joint capsule, causing the dislocation. Once
this occurs, the bones can put pressure on blood vessels and nerves, causing
circulation and sensation impairments below the injury. The most commonly
dislocated joints are shoulder, elbow, thumb, fingers, jaw, and knee.
The signs and symptoms of a dislocation are similar to those of a fracture,
and may include:
• Deformity or abnormal appearance (a dislocated shoulder may make the
arm look longer).
• Pain and tenderness aggravated by movement.
• Loss of normal function (the joint may be “locked” in one position).• Swelling of the joint.
Lesions of articulations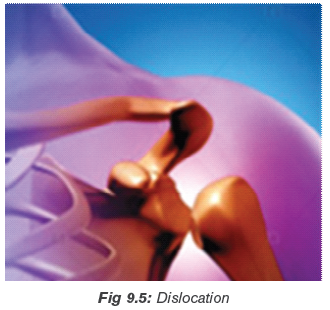
i) The signs and symptoms of sprains
Sprain is when there is stretching or tearing of ligaments at a joint.
• Pain that may be severe and increase with movement of the joint.
• Loss of function.• Swelling and discoloration.
ii) The signs and symptoms of strains
Strain is when there is stretching or tearing of muscles or tendons.
The signs and symptoms of a strain often show up many hours after the
injury.
• Sudden sharp pain in the strained muscle.
• Swelling of the muscles causing severe cramps.
• Bruising and muscle relaxedness.• Casualty may not be able to use the affected body part (loss of function).
Muscles injuries
i) Muscle cramp
These are painful, spasmodic muscle contractions.
Causes:
• Long periods of exercise or physical labor, particularly in hot weather,
can lead to muscle cramps.
• Some medications and certain medical conditions also may cause
muscle cramps
Signs of muscle cramp:
• Sharp pain.
• Feel or see a hard lump of muscle tissue beneath your skin.
Emergency for muscle cramp:
• Gentle stretch.
• Massage and drinking fluid especially in hot weather.
See a doctor if your cramps:
• Cause severe discomfort.
• Are associated with leg swelling, redness or skin changes.
• Are associated with muscle weakness.
• Happen frequently.
• Do not improve with self-care.• Are not associated with an obvious cause, such as strenuous exercise.
Prevention of muscle cramp
Avoid dehydration: Fluids help your muscles contract, relax, and keep
muscle cells hydrated and less irritable. During activity, drink fluids at regular
intervals, and continue drinking water or other fluids after you are finishedyour activity.
Stretch your muscles: Warm and stretch muscles before and after you
use any muscle especially for an extended period.
ii) Rupture
This is complete tearing of muscle, which may occur in the freshy part of
the tendon.
• Partial tears: These tears damage the soft tissue but do not completely
sever the tendon.
• Complete tears: A complete tear will detach the tendon completely
from its attachment point at the bone.
Causes:
• Injuries
• Some medicaments like Corticosteroid medications
Signs or symptoms:
• Pain.
• Swelling.
• Tenseness.
• Bruising.
• Inability/weakness to move.
• Visible bruising in the elbow and forearm
Emergency and treatment:
Nonsurgical Treatment
It focuses on relieving pain and maintaining as much arm function as
possible. Treatment recommendations may include the use of RICE and
physical therapy (after the pain decreases, your doctor may recommend
rehabilitation exercises to strengthen surrounding muscles in order to
restore as much movement as possible).
Surgery
This is carried out to reattach the tendon to the bone is necessary to regain
full muscle functions. Surgery to repair the tendon should be performed
during the first 2 to 3 weeks after injury.
Treatment of common muscles injuries
Use RICE
–– Rest: Ensure rest, steady and support of injured area in the most
comfortable position.
–– Ice: If the injury has just happened, apply ice pack or cold compress to
cool the injured area to reduce swelling, bruising and pain.
–– Compress: Apply gentle, massage even pressure or compression, to the
injured area using cotton wool or plastic foam.–– Elevation: Raise and support the injured limb.
Application activity
Question 1: Explain the following terms used in first aid
a) Sprain
b) Open fracture
c) Dislocation
d) Bruise
e) Symptom
Question 2: Explain any four importance of first aid in the society.
Question 3: Discuss common emergency for injuries to bones, joint and
muscles.
Question 4: Choose the right answer
i) What is the correct sequence for the Primary Survey?
a) Damage, Response, Airway, Breathing.
b) Danger, Response, Airway, Breathing.
c) Danger, Reply, Artery, Breathing.
d) Danger, Response, Advice, Back
ii) What is normal body temperature?
a) 36-37.5°C
b) 39°C
c) 31.5°Cd) 40.5°C
Lesson 2: Practical aspect of first aid
a) Learning objective
Apply the appropriate emergency care to people who have injuries or accidents.
b) Teaching resources
Band-Aid(compulsory), wound cleaning agent (optional)such as sealed
moistened towelette, scissors(compulsory), at least one blanket (optional),
latex gloves( compulsory), wound cleaning agent(optional), triangular
bandage(compulsory), thermometer(compulsory), cleansing agents
(isopropyl alcohol, soap/germicide)(optional), first aid manual, water, razor
blades, chair, stretcher, clothes, trees for making improvised stretchers, watch/chronometer, notebook and pen.
c) Prerequisites/Revision/Introduction
Student teachers of Year 3 will perform better in practical aspect of first aid if
they have learned introduction to first aid in lesson one.
d) Learning activities
Tutor as a guide and facilitator, starts the lesson by asking student teachers
questions related to the lesson one.
Tell student teachers that their roles as first aiders are:
• To recognize the emergency.
• To protect themselves and others.
• To access help.
• To act according to their skills and training.
Remind student teachers that they may call emergency if:
• There is a danger to them or others.
• If an injured person:
Is not easily accessible, is not breathing normally, has persistent chest pain or
pressure, has severe bleeding, has a head, neck, or spinal injury and has an
observable mental health crisis.
General first aid for injuries to bones and joints
Tell student teachers that the aim of first aid given to a person with bone and
joint injuries is to prevent further tissue damage and to reduce pain.
The following are procedures to follow while applying first aid to bones and
joints:
Check for potentially fatal conditions, the ABCs.
A = Airway (If the casualty is conscious, ask, “What happened?” How well the
casualty responds will help you determine if the airway is clear. Use a head-tiltchin-
lift to open the airway of an unresponsive casualty).
B = Breathing (If the casualty is conscious, check by asking how their
breathing is, If the casualty is unconscious, check for breathing for at least
five seconds, and no more than 10 seconds. If breathing is effective, move on
to check circulation. If breathing is absent or ineffective (gasping and irregular,
agonal), begin CPR.
C = Circulation ( Control obvious, severe bleeding, Check for shock by
checking skin condition and temperature, Check with a rapid body survey for
hidden, severe, external bleeding and signs of internal bleeding ).
Rapid body survey: The rapid body survey is a quick assessment
of the casualty’s body, which is performed during the primary survey.When performing the rapid body survey:
Wear gloves when possible, and check gloves for blood every few seconds, be
careful not to cause any further injuries while performing the survey, look at thecasualty’s face to notice any responses to the rapid body survey.
Perform a scene survey and a primary survey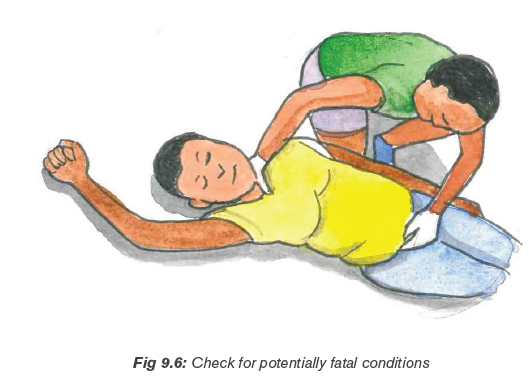
• CPR (Cardiopulmonary Resuscitation)
CPR is an artificial respiration and artificial circulation.
–– Artificial respiration provides oxygen to the lungs.
–– Artificial circulation causes blood to flow through the body.
It is used to circulate enough oxygenated blood to the brain and organs
to delays damage until either the heart starts beating again, or medical
help takes over from you. There are two main steps in CPR: Applying chest
compressions and then providing breaths.
• Applying 30 chest compressions
The first aider should kneel next to the person who is injured. They should be
lying on their back.
–– For adults, place the heel of one hand in the middle of the chest. Place
your other hand on top of the first hand and interlace the fingers.
–– Push the chest down about 3.5cm to 5cm. If the person is a child aged
between 1 and 8 years, compress to a maximum of 3.5cm with one
hand. Let go, and wait for the chest to come back up completely before
repeating. Your elbows must remain straight throughout.
–– Push the breastbone up and down to a depth of about 5 cm about 30times, at a pulse rate of 100 beats per minute.
Provide two breaths: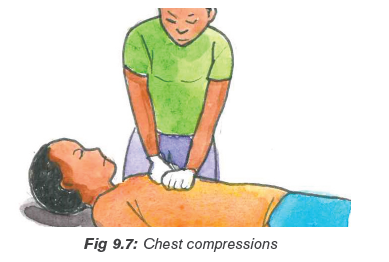
• Make sure the airway is open, and pinch the nose so it closes.
• Gently raise the chin upwards with two fingers of your other hand.
• Take a deep breath, seal your mouth over that of the person with the
injury, and exhale into the airway.
• You should see the chest rise and fall.
• To get another breath, lift your head and breathe in deeply. Perform steps
1, 2, 3, and 4 again.
Repeat the 30 chest compressions followed by the two breaths about five
times, and then check for normal breathing. If they are not breathing normally,
carry on performing CPR. If breathing restarts as normal, stay with the injured
person until help arrives.
It is important not to let your hands bounce when performing chest
compressions. Make sure the heel of your hand is touching the chestthroughout chest compressions.
Remind student teachers that once they have begun CPR, do not stop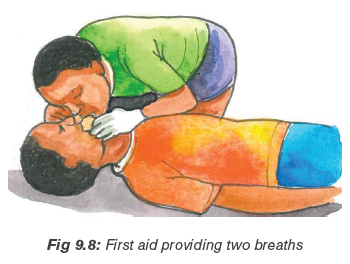
except in one of these situations:
• There is a sign of life, for example breathing.• Another trained responder take over.
The secondary survey is applied if: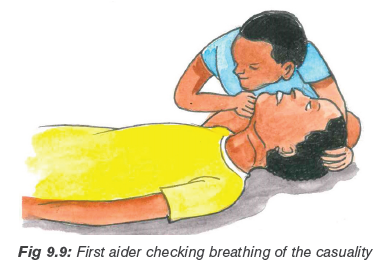
• The casualty has more than one injury.
• Medical help will be delayed more than 20 minutes: Steady and support
the injured part and maintain support until medical help takes over, or
the injury is immobilized, protect protruding bones. Do not push the bone
ends back in, do not attempt to apply traction to a limb (pull on it) or
manipulate it in any way,
• Medical help is not coming to the scene and you have to transport the
casualty: immobilize the injury, apply cold to the injury, as appropriate, if
medical help is on the way and will arrive soon, steady and support theinjury with your hands until they arrive.
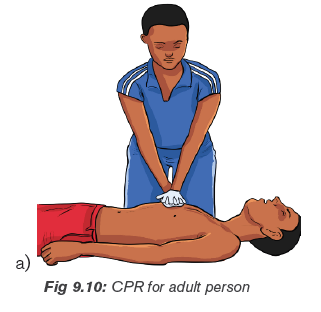
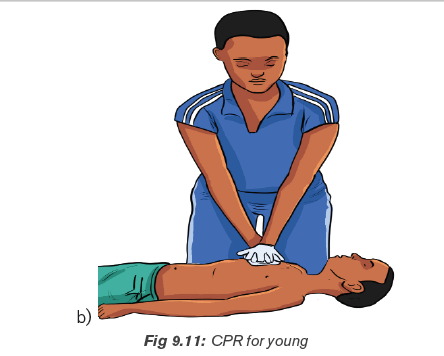
Emergency for bones and articulations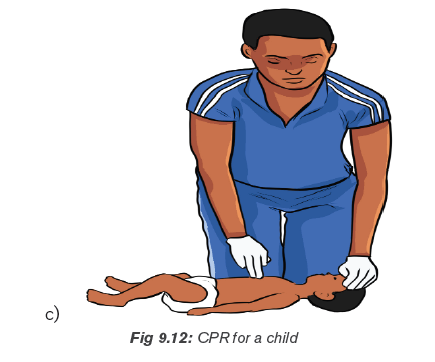
• Expose the injured area and look for a wound. If there is a wound, put a
dressing on the wound and get medical help quickly.
• If injuries permit, place the casualty in a semi-sitting position, leaning
slightly toward the injured side for easily breathing.
• Support the arm on the injured side to restrict movement.• Give ongoing casualty care, monitor breathing often and get medical help.
Bleeding and wound emergency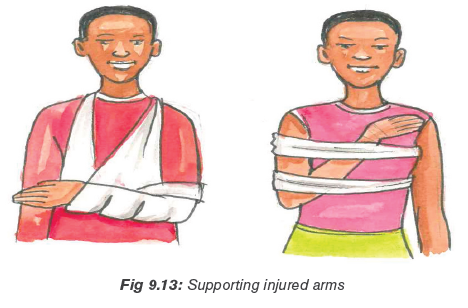
i) Nose bleeding
How to stop nose bleeding?
• Lean forward slightly with the head tilted forward (Leaning back or tilting
the head back allows the blood to run back into the sinuses and throat,
and can cause gagging or inhaling of blood).
• Do not spit out any blood that may collect in your mouth and throat (It
may cause nausea, vomiting, or diarrhoea if swallowed).
• Pinch all the soft parts of the nose together between the thumb and
index finger.
• Press firmly toward the face (compressing the pinched parts of the nose
against the bones of the face, breathe through your mouth).
• Hold the nose for at least five minutes. Repeat as necessary until the
nose has stopped bleeding.
• Sit quietly, keeping the head higher than the level of the heart. Do not lay
flat or put your head between your legs.
• Apply ice (wrapped in a towel) to nose and cheeks afterwards.
Stuffing cotton or tissue into your nose is not recommended.
• Resting with your head higher than your heart.
• Talking to your doctor about skipping blood-thinning medications, such
as aspirin, warfarin (Coumadin) and clopidogrel (Plavix).
• Avoiding blowing your nose or putting anything in your nose.
• Limiting bending.
• Not lifting anything heavy.
• Quitting smoking.
• Avoiding hot liquids for a minimum of 24 hours
• Sneezing with your mouth open, trying to push air out of your mouth andnot your nose.
ii) Wound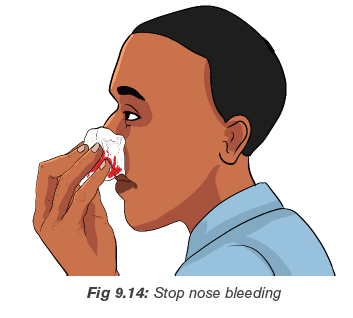
Open wound: An open wound is an injury involving an external or internal
break in body tissue, usually involving the skin.
–– Abrasion: An abrasion occurs when the skin rubs or scrapes against
a rough or hard surface. Road rash is an example of an abrasion. There
is usually not a lot of bleeding, but the wound needs to be scrubbed
and cleaned to avoid infection.
–– Laceration: A laceration is a deep cut or tearing of your skin. Accidents
with knives, tools, and machinery are frequent causes of lacerations.
In the case of deep lacerations, bleeding can be rapid and extensive.
–– Puncture: a puncture is a small hole caused by a long, such as a nail
or needle. Sometimes, a bullet can cause a puncture.
–– Avulsion: an avulsion is a partial or complete tearing away of skin and
the tissue beneath. Avulsions usually occur during violent accidents,
such as body crushing accidents, explosions, and gunshots. They
bleed heavily and rapidly.
Closed wound
–– Contusions: a kind of wound causing pressure damage to the skin
and/or underlying tissues (includes bruises).
–– Blisters: a kind of wound that has fluid filled pockets under the skin.
–– Seroma: a wound that has a fluid filled area that develops under the
skin or body tissue (commonly occur after blunt trauma or surgery).
–– Hematoma: a blood filled area that develops under the skin or body
tissue (occur due to internal blood vessel damage to an artery or vein).
–– Crush injuries: can be caused by extreme forces, or lesser forcesover a long period.
Common emergency for injuries to bones, joint and muscles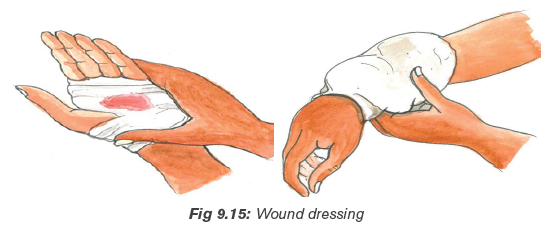
Use RICE for emergency
R stands for Rest: Stop the activity that has caused the injury. Have the
injured person rest comfortably.
I stands for Immobilize: Suspecting a fracture whenever there is an
injury to an arm or a leg and taking steps to prevent movement of the injured
limb.
C stands for Cold: Applying cold to the injury as soon as you can once
the injury has been immobilized.
E stands for Elevate: Raising the injured part if possible. Only elevate if it
will not cause more pain or harm to the casualty. Elevation helps to reduce
swelling and makes it easier for fluids to drain away from the injury. This inturn, helps reduce swelling (do not elevate a “locked” joint).
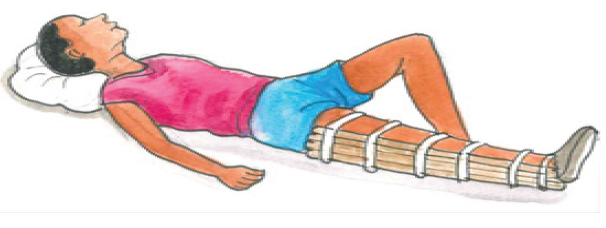
Remind student teachers to consider the following when making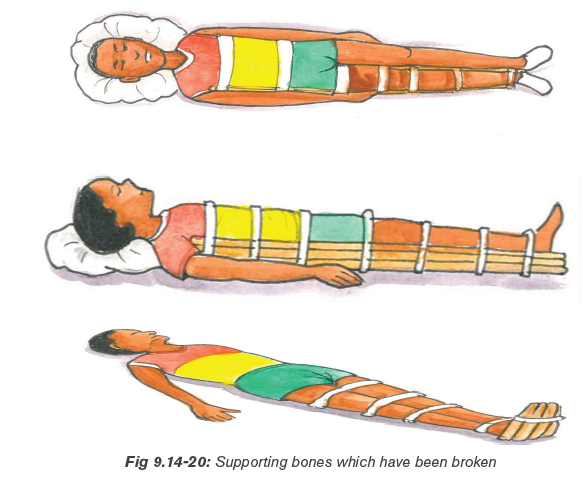
their decisions during providing first aid to the casualty
• Are there other risks to the casualty?
• Are there risks to themselves or others?
• If medical help can get to the scene, how long will it take?
• Do you have the materials needed to properly immobilize the injury?
• How long will it take to immobilize the injury compared to how long it will
take medical help to arrive?
Proper ways used in transportation of injured person/casualty
• Pick-a-back
It is used for transporting a conscious casualty with lower limb injuries in
case a casualty can use his arms. The casualty must be able to help get intoposition on your back or be already seated at chair or table height.
• Cradle carry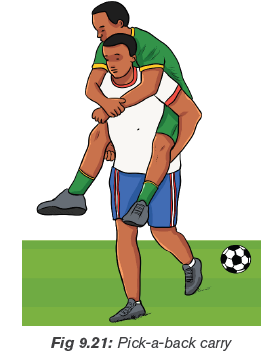
It is suitable for carrying children and light weighted adults.
Procedures
–– Kneel on one knee at the casualty’s side.
–– Place the casualty’s arm around your neck as you support the back and
shoulders.
–– Pass your other arm under the knees to grasp the thighs.
–– Ensure a solid footing and place the feet apart for good balance.
–– Lift using your legs; keep your back straight, and your abdominal musclestense.
• Fire fighter’s carry
This way should be used for casualties who are helpless and are not too
heavy for the rescuer.
Procedures
–– With the casualty lying face up in front of you, stand with your toes
against the casualty’s toes.
–– Grasp her wrists and pull her upward and forward.
–– Maintain a grip on one wrist as you turn and bend to catch the casualty’s
upper body across your shoulder. The lifting manoeuvre is a continuous,
smooth motion to bring the casualty through a sitting position to an
upright position, finishing with the casualty draped over your shoulder.
–– Adjust the weight across your shoulders, with the casualty’s legs
straddling your shoulder.
–– Pass your arm between the casualty’s legs and grasp her wrist. This willstabilize the casualty on your shoulders and leave your other hand free.
Two first aiders can carry a casualty who is unable to support his upper body.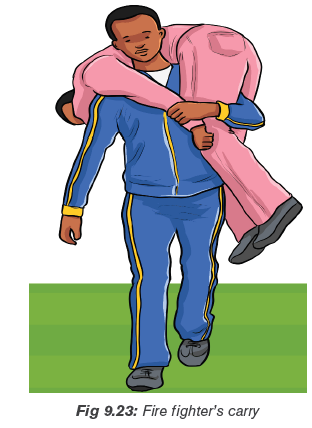
Procedures
–– The first aiders crouch on either side of the casualty.
–– Each first aider reaches across the casualty’s back to grasp his clothing
at the waist on the opposite side.
–– Each first aider passes his other hand under the thighs, keeping his
fingers bent and holding padding to protect against the fingernails. Hook
the bent fingers together to form a rigid seat. Alternatively, the rescuers
can hold each other’s wrists.
–– The first aider lifts with their legs, keeping their backs straight. Once
in the standing position, the rescuers adjust their hands and arms for
comfort. When the casualty is securely positioned, the bearers step offtogether, each using the inside foot.
It is used by the single first aider to drag a casualty who is either lying on their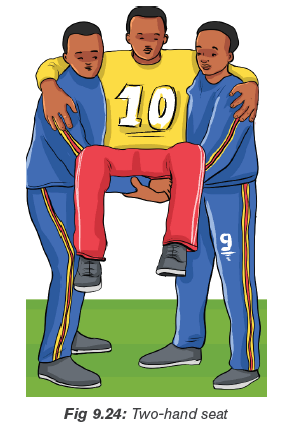
back or in a sitting position. The drag carry provides maximum protection to
the head and neck, and therefore should be used when you are moving a
casualty with this type of injury.
Procedures
To perform a drag carry:
–– Stand at the casualty’s head facing their feet.
–– Crouch down and ease your hands under the casualty’s shoulders.
Grasp the clothing on each side. Support the casualty’s head between
your forearms to stop movement.
–– Drag the casualty backward only as far as necessary for their safety.
As an alternate method, the first aider can use a blanket to support and drag
the casualty.
Because of the risk of aggravating any injuries, only use drag carries in theextreme cases when there is an immediate threat to life.
This carry is used if a leg or foot is injured; help the casualty to walk on their
good leg while you give support to the injured side.
Procedures
–– Take the weight of the casualty’s injured side on your shoulders by
placing the casualty’s arm (on the injured side) around your neck and
grasping the wrist firmly, Reach around the casualty’s back with your
free hand, and grasp the clothing at the waist, Tell the casualty to step
off with you, each using the inside foot. This let you, the first aider to takethe casualty’s weight on the injured side.
• Chair carry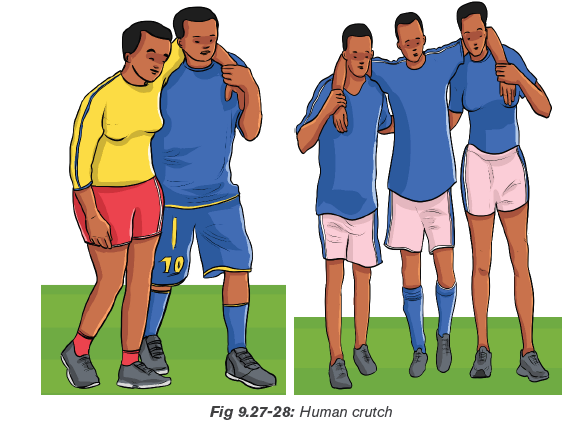
This carry enables two first aiders to carry a conscious or unconscious casualty
through narrow passages and up and down stairs.
Do not use this carry for casualties with suspected neck or back injuries.
Specially designed first aider chairs are available and should be used for this
type of carry.
If the casualty is unconscious or helpless:
–– Place an unconscious casualty on a chair by sliding the back of the chair
under their legs and buttocks, and along the lower back.
–– Strap their upper body and arms to the back of the chair.
–– Two first aiders carry the chair, one at the front and one at the back.
–– The first aider at the back crouches and grasps the back of the chair,
while the first aider at the front crouches between the casualties’ knees
and grasps the front chair legs near the floor.
–– The first aiders walk out-of-step.
Tell student teachers that while going down stairs:
–– The casualty faces forward.
–– The front first aider faces the casualty.
–– A third person/first, aider should act as a guide and support the front firstaider in case they lose their footing.
• Extremity carry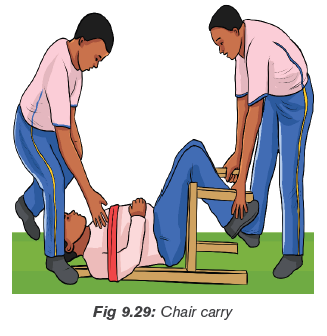
Use the extremity carry when you do not have a chair and do not suspect
fractures of the trunk, head, or spine.
Procedures
–– One first aider passes their hands under the casualty’s armpits, and
grasps the casualty’s wrists, crossing them over their chest.
–– The second first aider crouches with their back between the casualty’s
knees and grasps each leg just above the knee.–– The first aider step off on opposite feet.
• Stretchers (commercial stretchers, improvised stretchers)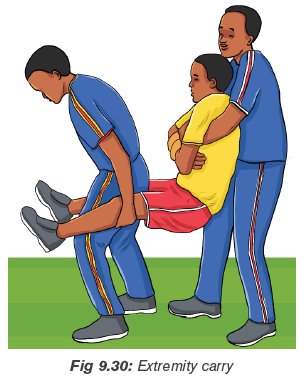
If the casualty cannot walk, or if the injury or illness allows only the gentlestmovement, a stretcher should be used.
Principles of using stretchers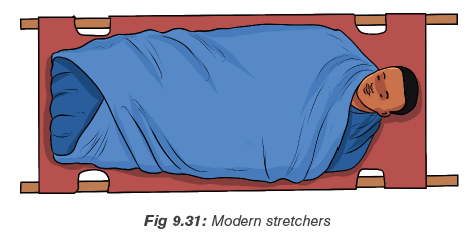
–– Complete all essential first aid and immobilization before moving the
casualty onto a stretcher.
–– Bring the blanketed and padded stretcher to the casualty, rather than
moving the casualty to the stretcher.
–– As the first aider in charge, take the position that permits you to watch
and control the most sensitive area of the body, usually at the head and
shoulders, or the injured part.
–– Tell the bearers what each is expected to do. If the move is difficult, and
time permits, it is a good idea to practice with a simulated casualty. This
reduces risks and reassures the conscious casualty.
–– Test an improvised stretcher with someone equal to or heavier than the
casualty to ensure that, it will hold.
–– Check the clearance of an improvised stretcher to ensure that it will pass
through hallways, doors and stairways without harm to the casualty.
–– Use clear commands to ensure smooth, coordinated movements.
Improvised blanket stretcher
Procedures
–– Place the blanket flat on the ground and place a pole one-third of the
way from one end. Fold the one-third length of blanket over the pole.
–– Place the second pole parallel to the first so that it is on the doubled part
of the blanket, about 15 cm from the doubled edge.
–– Fold the remaining blanket over the two poles. The casualty’s weight onthe blanket holds the folds in place.
Improvised jacket stretcher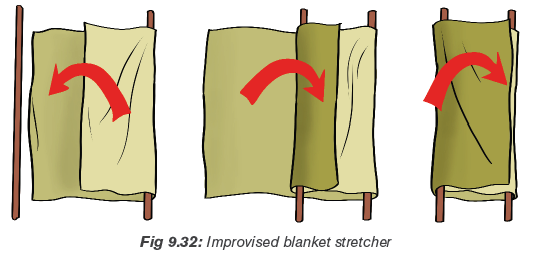
A non-rigid stretcher can also be improvised from two jackets and two or four
poles/strong trees.
Procedures
–– Button and zipper the jackets closed and pull the sleeves inside out so
that the sleeves are inside. Lay the jackets on the ground so that the top
edge of one jacket meets the bottom edge of the other.
–– Pass the poles through the sleeves of the two jackets on either side to
complete the stretcher.
–– If the casualty is tall, prepare another jacket as before and add it to thestretcher with the head of the jacket towards the middle.
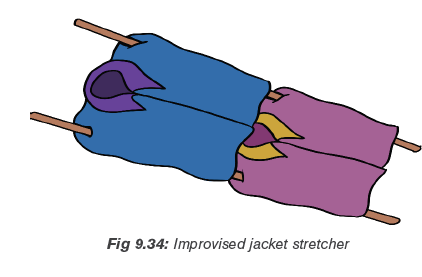
Application activity 1
In pairs or group, let student teachers perform different carries used in first aid.
Application activity 2
In an assimilated situation, let student teachers apply how to perform CPR onassimilated injured person.
9.5. Summary of the unit
In first aid, there are different terms, which should be used. Those terms are
as the follow: wound, accident, airway, amputation, bruise, Cardiopulmonary
Resuscitation (CPR), casualty, choking, defibrillation, dehydration, dislocation,
fainting, first aid, fracture, inflammation, ligament, R.I.C.E (Rest Ice Compression
Elevation), re-oxygenate, first aider breaths, shock, spinal cord, spinal injury, splint,sprain, strain, stroke, symptom, syncope, tendon, unconscious.
Carrying out first aid during sports activities helps to:
• Preserve life
The overriding aim of all medical care, which includes first aid, is to save lives
and minimize the threat of death.
• Alleviate suffering
First aid done correctly should help reduce the patient’s level of pain and calmthem down during the evaluation and treatment process.
• Prevent further harm
Prevention of further harm includes addressing both external factors, such
as moving a patient away from any cause of harm, and applying first aid
techniques to prevent worsening of the condition, such as applying pressureto stop a bleed becoming dangerous.
• Promote recovery
First aid also involves trying to start the recovery process from the illness or
injury, and in some cases might involve completing a treatment, such as in thecase of applying a plaster to a small wound.
Different accident/injury may result during performing sports activities. Some
of those injuries and accidents are as the following: closed and open fracture,spinal cord injury, ribs and chest fracture, dislocation, sprain and strain.
9.6. Additional Information for tutors
• Terminologies used in first aid
–– A wound: is an abnormal break in the skin or other tissues of the body
that permits the escape of blood internally or externally and may allow
the entrance of germs and infection.
–– Accident: unplanned event or act that may result in injury, property
damage, death or is suddenly ill.
–– Airway: The tubes from the nose and mouth to the lungs.
–– Amputation: Cutting off a finger, toe or limb.
–– Bruise: is the damage to soft tissues and blood vessels causing bleeding
under the skin.
–– Cardiopulmonary Resuscitation (CPR): A life saving procedure that
includes the timed external compression (pushing) on the casualty’s
chest (to stimulate blood flow) by pumping the heart, and alternating
with mouth-to-mouth breathing to provide oxygen. Usually administered
as 30 chest compressions to every two breaths.
–– Casualty: The person who is ill or injured.
–– Choking: is obstruction of the flow of air from the environment into the
lungs.
–– Defibrillation: Delivering a dose of electrical energy to the affected heart
with a device called a defibrillator to stop the heart shaking.
–– Dehydration: Insufficient (not enough) fluid in the body because of loss
of body water or not drinking enough.
–– Dislocation: is an injury in which the ends of bones are forced from their
normal positions.
–– Fainting: is a temporary loss of consciousness caused by a shortage of
oxygenated blood to the brain.
–– First: aid is the initial assistance or treatment given to a person who is
injured or suddenly becomes ill.
–– Fracture: A fracture is a lesion produced by mechanical force on the
hard or mineralized tissues such as bone, which are characterized
by whether there is a solution of continuity or tissue breakage (there
is a break in the continuity of the bone).Graze: Usually a minor injury
removing the top layer of skin
–– Inflammation: Redness, heat and swelling around an injury.
–– Ligament: A band of fibrous tissue that connects bones or cartilage to
support and strengthen joints.
–– R.I.C.E (Rest – Ice – Compression – Elevation): treatment used during
the first 48 hours for most soft tissue damage. (Bruises, sprains, strains
etc.)
–– Re-oxygenate: To give more oxygen to someone or something.
–– Rescue breaths: Blowing air into an unconscious casualty through the
nose or mouth to get the chest to rise and get air into their lungs to reoxygenate
them.
–– Shock: physical condition that happens when the body is unable to
circulate blood properly.
–– Spinal cord: The nerve fibres within the backbone (spine) which allow
nerves to connect between the brain and muscles.
–– Spinal injury: An injury to the backbone, which can lead to spinal cord
damage, which can cause paralysis (inability to move).
–– Splint: support that helps keep a possible fracture from moving.
–– Sprain: the tearing of ligaments at a joint.
–– Strain: an overstretched muscle or tendon.
–– Stroke: A bleed or blocking of a blood vessel of the brain.
–– Symptom: What a casualty experiences and feels e.g. ‘it hurts’ ‘I feel
sick’.
–– Syncope: A medical word to faint.
–– Tendon: A fibrous, strong, connective tissue that connects muscle to
bone.
–– Unconscious: Does not respond to pain.
• General guidelines for safe practice
As the person in charge of the session, you are advised to monitor the day-today
health of those in your group. If students show signs of illness or injury, for
example shivering or muscle soreness, during the session, you must decide
whether they should continue. Most ailments become even worse under the
strain of physical activity and therefore the safest option is always to stop.
Remember that some injuries are accidental and unavoidable; others result
from negligence or overuse when the body is tired.
–– If students are tired or stressed, you may be wise to advise them to rest.
–– If they do have an injury, be sure it has fully recovered before they return
to sporting activities and build up the intensity gradually.
When you take sports sessions, you need to be familiar with basic first aid
procedures. Make sure you know where to find the nearest first aid worker
and, if possible, have a first aid kit at hand. Standard contents should cater for
strapping and bandaging, cleansing and dressing. If you do not have access
to a first aid kit, use clean water and clean material (preferably cotton) instead
to clean any wounds in the event of an injury, you should ‘STOP’:
• S stands for: Stop the activity and stay calm.
• T stands for: Talk to the injured student; reassure the student; ask what
happened and whether or where he or she feels pain.
• O stands for: Observe the student while speaking; is his or her behaviour
normal or confused. Is any part of the body swollen? If you are worried,
get help.
• P stands for: Prevent further injury and decide if the injury is severe use
your emergency action plan (see under Emergency procedures).
Emergency procedures
In case of emergencies, there must always be a plan of action. As each school is
different, a Physical Education and Sports tutor must plan him/herself how to give
first aid to their student teachers by doing the following:
–– Assess the situation and the injury.
–– Know how to contact a first aid worker or other medical help.
–– Know where you might get transport.
–– Keep a note of the events, for example how the injury happened, when,
what you saw and heard, for your own records and so you can pass on
accurate information.
–– Contact friends and family if necessary, and tell them the situation clearly
and calmly.
• For minor injuries
Most injuries in sport do not require emergency treatment. They need time
and a sensible course of action to make a full recovery. It is important forinjuries to be dealt.
Do not use heat or massage with any of the above injuries, for minor injuries,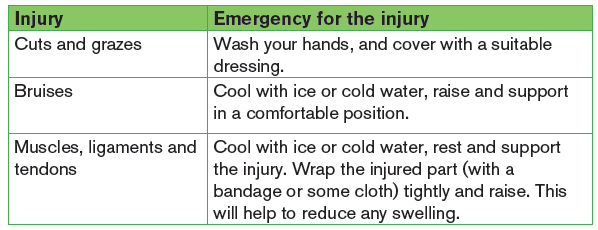
remember ‘RICE’:
–– Rest: Stop the activity immediately.
–– Ice: Apply ice or cold water (see bruises above) to the injured area; you
can protect skin from ice burns with a thin layer of doth.
–– Compress: Wrap the injured area tightly with a bandage or some cloth.
–– Elevate: Raise the injured limb.
Remember helping your students to prevent suffering from dehydration or
heat exhaustion/exposure by encouraging them to:
–– Drink plenty before, during and after exercise.
–– Eat sensibly.
–– Wear cool, breathable clothing, for example cotton T-shirts.
–– Wear light-coloured clothing because dark colours retain more heat.
–– Keep the sun off their heads and faces by wearing caps or similar items.–– Stay in the shade as much as possible.
• Movement of the major joints of the body
Recovery position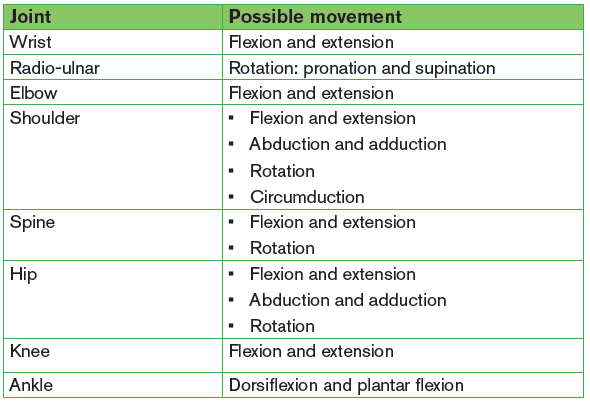
The most effective position is lying propped on the side with the mouth and
head positioned to allow drainage. The First Aider should obviously be very
careful if neck or other injury is suspected but remember airway always comes
first.
Use the recovery position for:
–– Any unresponsive casualty who is breathing normally, but you are
concerned about a risk to their airway, e.g. they may vomit.
–– Any conscious player if they are going to be left alone whilst help is
summoned and they are at risk of lapsing back into unconsciousness,
and becoming unresponsive.
To place a player into the recovery position
–– With the person lying on their back, kneel on the floor at their side.
–– Extend the arm nearest you at a right angle to their body with their palm
facing up.
–– Take their other arm and fold it so the back of their hand rests on the
cheek closest to you, and hold it in place.
–– Use your free hand to bend the person’s knee farthest from you to a right
angle.
–– Carefully roll the person onto their side by pulling on the bent knee.
–– Their bent arm should be supporting the head, and their extended arm
will stop you rolling them too far.
–– Make sure their bent leg is at a right angle.
–– Open their airway by gently tilting their head back and lifting their chin,
and check, that nothing is blocking their airway.
–– Stay with the person and monitor their condition until help arrives.
If a person is unconscious but is breathing and has no other life-threatening
conditions, they should be placed in the recovery position.
Principles to follow in placing an injured person in recovery position
–– The casualty should be in as near a true lateral position as possible with
the head dependent to allow free drainage of fluid.
–– The position should be stable.
–– Any pressure of the chest that impairs breathing should be avoided.
–– It should be possible to turn the victim onto the side and return to the
back easily and safely, having particular regard to the possibility of
cervical spine injury.
–– Good observation of and access to the airway should be possible.–– The position itself should not give rise to any injury to the casualty.
• The skeletal system
The framework of the human body is made up of just over 200 bones, whichvary considerably in size and shape.
• Muscular system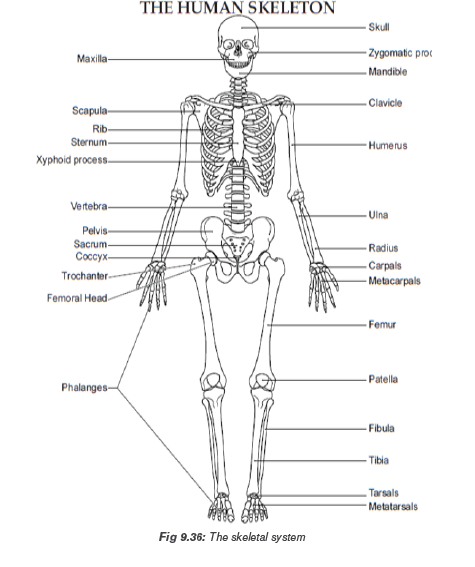
The muscular system constitutes about 45% of our total body weight. Muscles
are made up of 30% protein and 70% salt solution. Without muscles, not
all actions, including movements as simple as maintaining normal posture,breathing, and walking, would be possible.
• Cardio-vascular system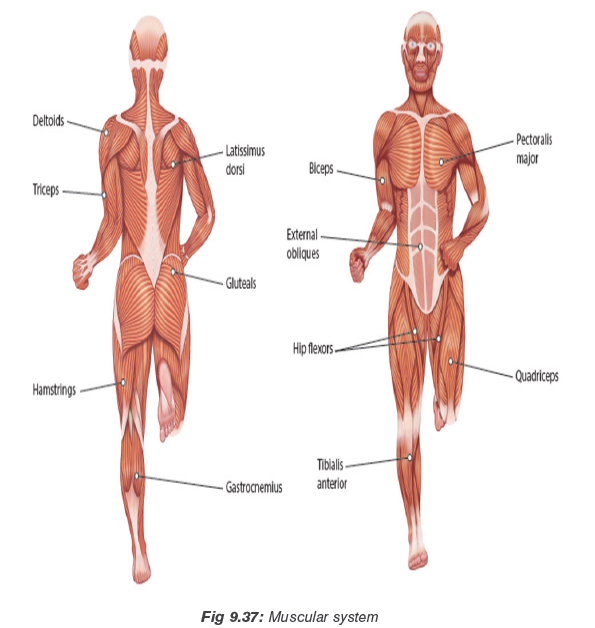
The cardiovascular system (the circulatory system or circulation) it is the
system formed by your heart, blood vessels and blood. The heart is a muscular
pump. It has four chambers:
–– Two atria: that collect the blood as it comes into the heart.
–– Two ventricles: that pump the blood out of the heart.
The structure of the blood vessels
There are three main types of blood vessel:
–– Arteries (Red): which generally take blood away from the heart.
–– Veins (blue): which return blood it to the heart.
–– Capillaries: distribute blood within the organs.
• Respiratory system
Every tissue within the body needs oxygen to function. The respiratory system
is the system of organs and vessels that gets oxygenated blood to the bodytissues and removes waste gases.
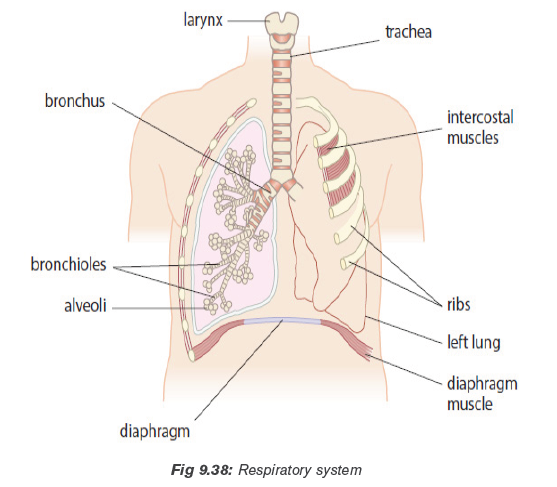
• Signs and symptoms for casualty
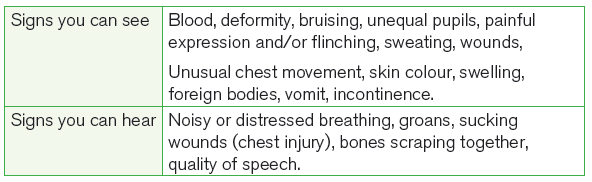
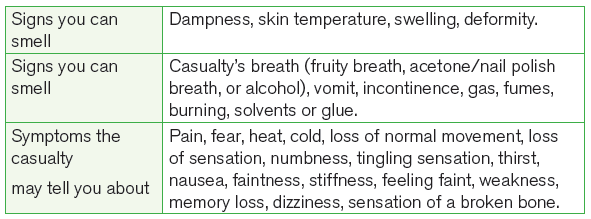
• CPR skills comparison
9.7. End unit assessment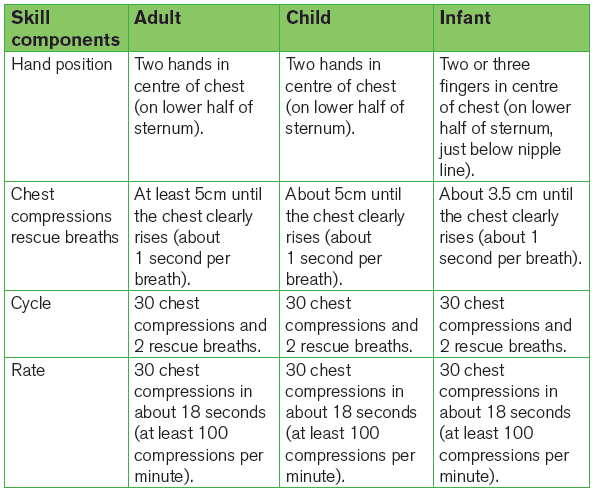
1)
a) Assume you are attending a football match in your local area. Unfortunately,
there are accidents where one of players breaks his tibia. Briefly explain
how you can provide basic first aid to this player.
b) After giving basic first aid to the above player describe how you can carry
this casualty to the nearest dispensary or hospital because no other means
of transport is possible in this area.
2) Explain when and how to use CPR during providing basics first aid.
9.8. Additional activities
9.8.1. Remedial activities
Student teachers discuss the implication of first aid in any sports situation at
school.
9.8.2. Consolidation activities
By using a scenario, student teachers perform first aid to support injured people.
9.8.3. Extended activities
Encourages student teachers to provide first aid during sports competitionsorganized by the school or sector.
REFERENCES
1. Dave Carnell, John Ireland, Claire Jones, Ken Mackreth, Sarah van Wely
(2002), Advanced PE for OCR, Oxford U.K
2. ELIAS, A. HILGERS, W. JETTER, M. RASHDORFF. J. WINTERMEIIER, D.
WOLFARTH Education Physique et Sportive pour les Ecoles Primaire et
les CERAI, F, Kigali.
3. FIFA. (2018). Coaching manual
4. Goldberger, M. and Howarth, K. (1990). The National Curriculum in Physical
Education and the Spectrum of Teaching Styles. British Journal of Physical
Education.
5. Ken Jones and Pat Welton (1979) Soccer Skills and Tactics, Crown
Publishers.
6. Ministry of Education. (1998). Physical and Sports Training Programme in
Ordinary Level. National Curriculum Development Centre.
7. Peter J L Thomson (2009) The Official IAAF Guide to Teaching Athletics
8. REB (2019). The Teacher Training Colleges (TTCS) COMPETENCE
BASED CURRICULUM ORIENTATION MANUAL, Kigali.
9. REB. (2015). Ordinary level Physical Education syllabus
10. REB (2019). TTCs Physical Education and Sports syllabus
11. REB. (2016), Physical Education for Rwandan Schools. Teacher’s Guide,
Ordinary level 1, MK Publishers, Kigali, Rwanda.
12. REB. (2016), Physical Education for Rwandan Schools. Teacher’s Guide,
Ordinary level 2, MK Publishers. Kigali, Rwanda.
13. Right to Play, (2007). Football for development. Coaching manual
14. Williams, A. (1993). Aspects of Teaching and Learning in Gymnastics.
British Journal of Physical Education.
15. St John Ambulance (2019) saving lives REFERENCE GUIDE, Fourth
Edition, Canada.
16. Gina M. Piazza, DO, FACEP (2014) First Aid Manual, fifth Edition, New
York.
17. AL JUFAILI Mahmood S. Dr (all) (2015) Football Emergency Medicine
Manual, 2nd Edition, Zurich.
Electronic references
1. http://vcdm.org/global/images/misc/SIT_Drills_All.pdf.
2. http://vcdm.org/global/images/misc/SIT_Systems_Offensive.pdf.
3. http://www.blazesports.org.
4. http://www.dhamilton.net/goalball/HOW_TO_PLAY_GOALBALL/How_
to_Play_GOALBALL.htm.
5. http://www.education.auburn.edu/wpcontent/uploads/2015/09/
Handball-handbook.
6. http://www.olympichandball.org/wpcontent/Basic%20Handball%20
Methods.
7. https://www.disabled-world.com/sports/goalball.php.
8. https://www.nchpad.org/1073/5480/Sitting~Volleyball~~A~Skill
Enhancing~and~Physically~Demanding~Activity.
9. https://www.quora.com/What-are-the-best-techniques-for-efficientlyrunning-
long-distance.
10. http://www.worldparavolley.org/disciplines/sitting-volleyball/).
11. www.cifstate.org
12. www.fiba.com
13. www.fifa.com
14. www.fivb.com
15. www.ihf.com
16. www.iaaf.com17. www.netbalnation.com.