Topic outline
UNIT 1:TOYS, BASIC TOOLS, MATERIALS AND TEACHING AIDS
1.0 Introduction
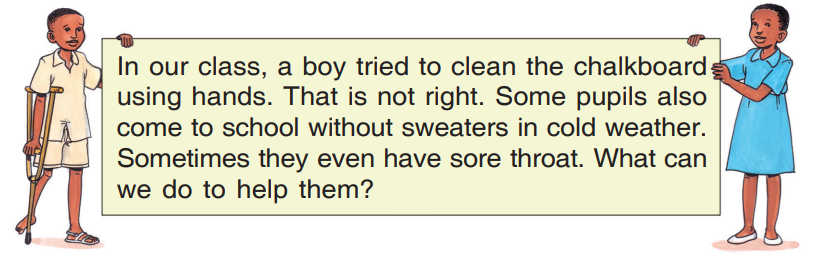
1.1. Making a chalkboard duster using a piece of cloth
Activity 1
a. Look at the pictures 1, 2, 3, 4, 5 and 6 below:
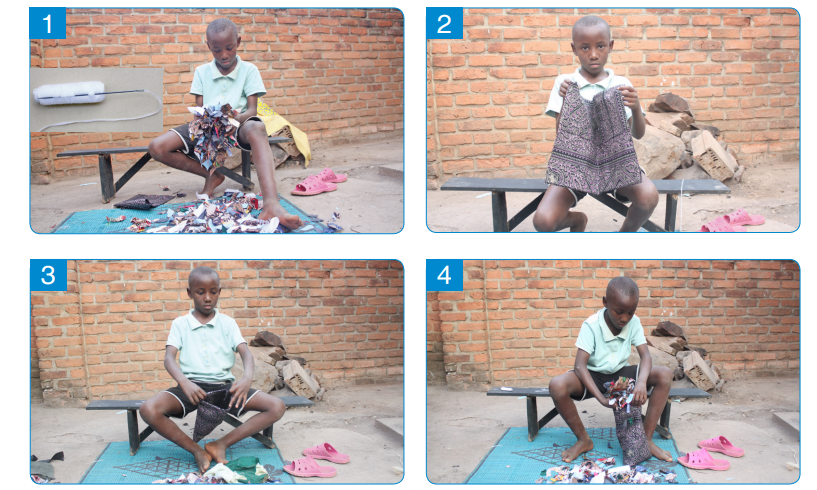
b. Name the materials used in these pictures.
c. Following the examples of these pictures, use the same materials to make a chalkboard duster.
I have discovered that:
To make a duster, I need the following materials: Pieces of cloth, a needle and thread.
Now, I can:
- Put a piece of thread in the needle.
- Fold a piece of cloth into two and sew it to make a small bag.
- Fill the bag with small pieces of cloth.
- Sew the top part of the bag
- Clean the chalkboard with the duster I made.
Exercise
Arrange the following steps that you take when making a chalkboard duster with pieces of cloth.
1. Fold a piece of cloth into two and sew it to make a small bag.
2. Put a piece of thread in the needle. 3.
Clean the chalkboard with a duster
4. Sew the top part of the small bag which is filled with pieces of cloth.
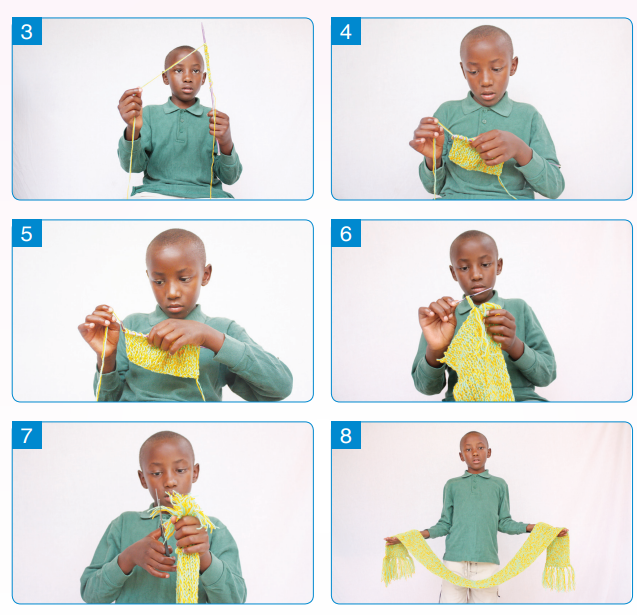
1.2. Knitting a neck scarf with multiple or single loop
1.2.1. Knitting a scarf with multiple loops
Activity 1
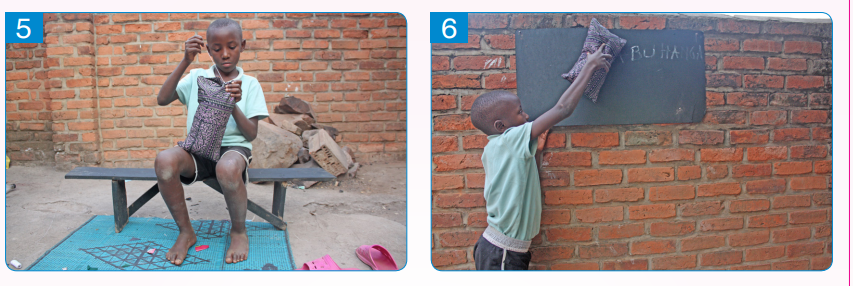
a. Look at the following pictures 1,2,3,4,5,6,7 and 8:
b. Name the different materials you can see in these pictures.
c. What type of knitting did they use?
d. Prepare the materials you can use to knit a scarf.
e. Knit a scarf following the main steps shown in the pictures above.
I have discovered that:
To knit a scarf with multiple loops, I need the following materials:
• needles for knitting,
• thread and scissors.
Now, I can:
- Make a sliding knot
- Make fifty loops
- Knit outside and inside out
- Knit until I have the right length I want
- Finish and add linings.
Application activity 1
Knit a scarf using multiple loops while I knit with single loop.
Then we see who knits faster than the other.
1.2.2. Knitting a scarf with single line loops
Activity 2
a. Look at the picture 1, 2, 3, 4, 5, 6, 7 and 8 that follow:

 b. Name the material you can see in picture 8.
 c. What type of knitting did they use?
d. Prepare the materials you can use to knit a scarf.
e. Knit a scarf following the main steps shown in the pictures above.
I have discovered that:
When a person knits a scarf with single loop, he/she needs the following materials: needles for knitting, knitting thread and scissors.
Now, I can:
- Make a sliding knot
- Make fifty loops,
- Knit outside and inside out,
- Knit until I have the length I want,
- Finish and add linings.
 Knit a neck scarf using multiple loops while he/she knits
using single line loops. Check who knits faster than the
other.
Exercise
Knit a neck scarf using multiple loops while he/she knits
using single line loops. Check who knits faster than the
other.
Exercise 1. Give two methods used to knit a neck scarf?
2. What is the use of a neck scarf:
a) to the person who wears it?
b) to the person who knits it?
Application activity 2
Make a scarf using single or multiple loops and give it to your parents as a present.
1.3. Weaving a mat using grass
Activity 1
a. Look at pictures 1, 2, 3 and 4.
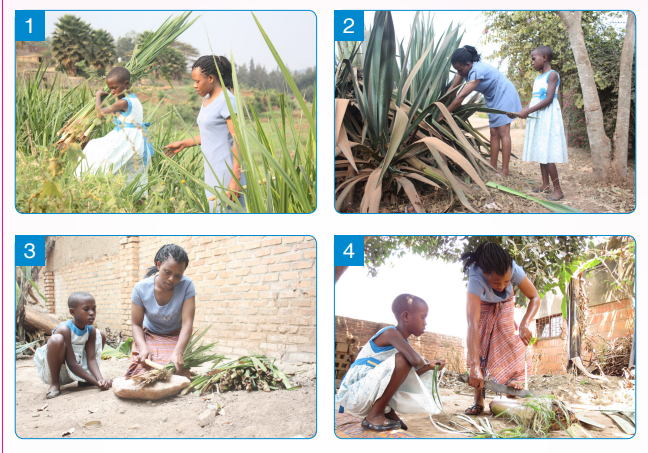
b. Name the materials you can see in pictures 1 and 2.
c. Explain what the girls are doing in pictures 3 and 4.
d. Which materials do people use to weave mats in your area?
I have discovered that:
– To weave a mat, I need the following materials: papyrus, sisal, a knife, a razorblade, water and a stone.
– Before I start weaving a mat, I must prepare the materials
Activity 2
a. Look at picture 1, 2, 3 and 4 below:
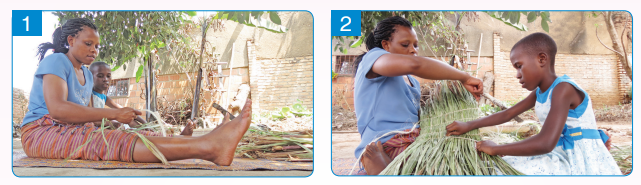
b. Name the materials you can see in the pictures.
c. List down the steps to follow when making a mat.
d. Weave a mat that you will give as a gift to your grandmother.
Now, I can:
A. Prepare materials for weaving a mat as follows:
- Cut and collect papyrus - Cut and collect sisal
- Crush and dry them - Then separate them
B. For me to weave a mat, I do the following:
- Start weaving the first row of the mat.
- Make sure that rows are straight from the start to the top.
- Finish and cut the edges when the mat is complete.
Application activity 3
a. Weave a mat, using grass, which you will offer to your parent as a gift.
b. Weave a mat with dry banana fibres and decorate your bedroom. Place it in front of your bed.
c. Give other materials you can use to knit a mat.
1.4. Weaving a bag with dry banana fibres
Activity 1
a. Look at picture 1, 2, 3 and 4 that follow:
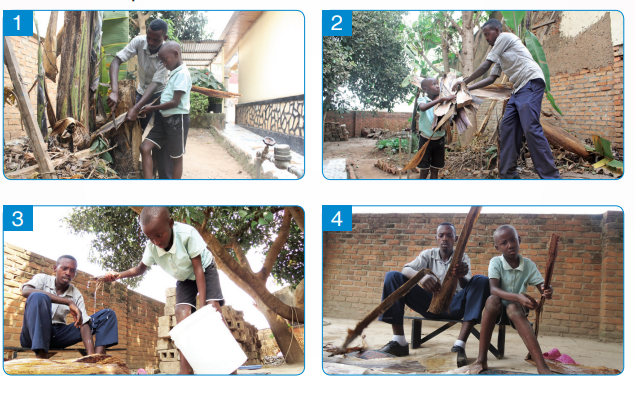
b. Which materials can you see in the pictures 1, 2, 3 and 4?
c. Explain the activities that are taking place in pictures 1,2,3 and 4.
d. Why are dry banana fibers soaked in water before using them?
Activity 2
a. Look at the pictures 1, 2, 3 and 4 below:
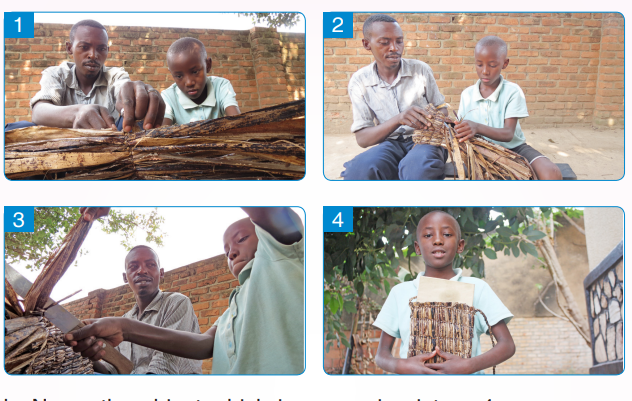
b. Name the object which is woven in picture 4.
c. Explain what the children are doing in pictures 1,2, and 3.
d. Use materials like those you see in the pictures to weave a sack. Follow the steps shown in the pictures.
I have discovered that:
- When you are weaving, you use dry banana fibers and a sharp knife.
- When you want to weave a sack, you do two important things: Preparing materials, weaving the needed sack.
Now I can:
- Cut dry banana fibers from a banana plantation
- Pour water on dry banana fibers
- Split dry banana fibers
- Make the first row
- Fold into two from the starting row
- Knit the sack going round
- Finish and cut the edges from the sack
- Knit the belt and put it on the sack.

Weave a sack using dry banana fibers.
Tell your friend to knit with sisal and papyrus and see who has made a better sack.
Application activity 4
Weave a sack that you can use to carry things when you go for shopping.
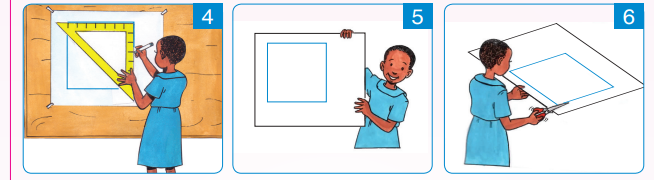
1.5. Making shapes and figures with soft paper and boxes
1.5.1. Making a square shape
a. Look at the pictures 1, 2, 3, 4, 5, 6 and 7. What can you see in the pictures?
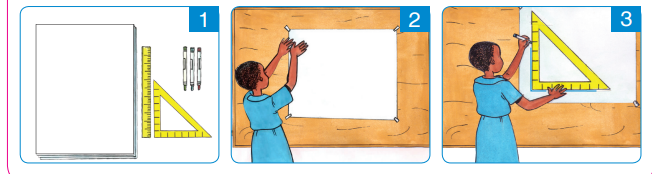
I have discovered that:
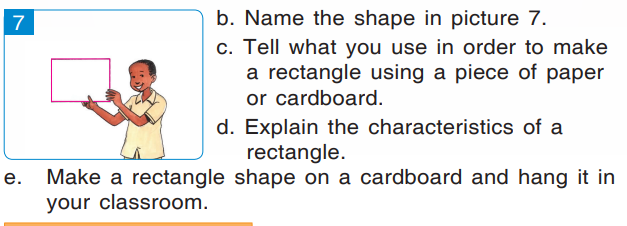
When you want to make a rectangle, you need the following materials: A piece of paper or cardboard, a table, a pair of scissors, a pencil, coloured pencils, markers, a ruler or set square.
Now, I can:
- Draw a right angle using a set square.
- Measure 12 cm of length and 6 cm of width on the lines that make this angle.
- Draw another right angle opposite to the first angle.
- Join the lines of this angle to the lines of the first angle.
- Check if the rectangle I have made has two sides which are parallel and are equal in length.
- Check if the rectangle has four right angles (900 each).
- Cut out the rectangle shape I have made using a pair of scissors.
Application activity 5
(b) Make a rectangle shape using a piece of paper and hang it in your bedroom.
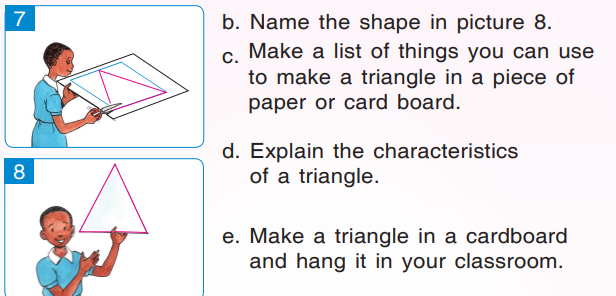
1.5.3. Making a triangle shape
Activity 3
a. Look at the pictures 1, 2, 3, 4, 5, 6, 7 and 8:
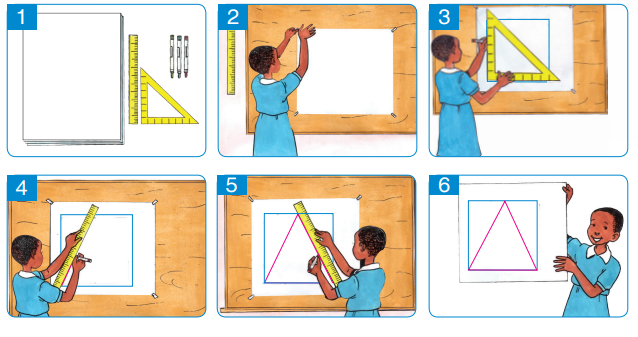
I have discovered that:
To make a triangle, I need the following materials:
A piece of paper or cardboard, a table, scissors, a pencil, coloured pencils, markers, a ruler or set square.
Now, I can:
- Draw a square shape or a rectangle shape using a set square.
- Draw a dot in the middle of the upper side of a square or rectangle shape.
- Join the dot with the angle of the square or rectangle on the bottom line.
- See if I have made a shape with three sides.
- Cut out the triangle shape I have made.
Application activity 5
(c) Make a triangle shape and hang it in your bedroom.
1.6. Making a pot using clay
Activity 1.
a. Look carefully at the pictures 1 and 2:
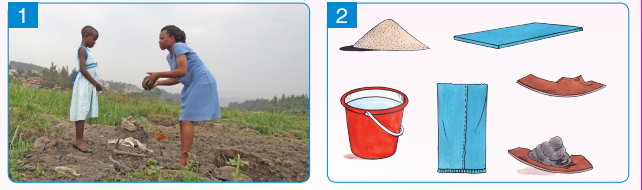
b. What are the girls doing in picture 1?
Activity 2
a. Look carefully at picture 1, 2, 3, 4, 5 and 6
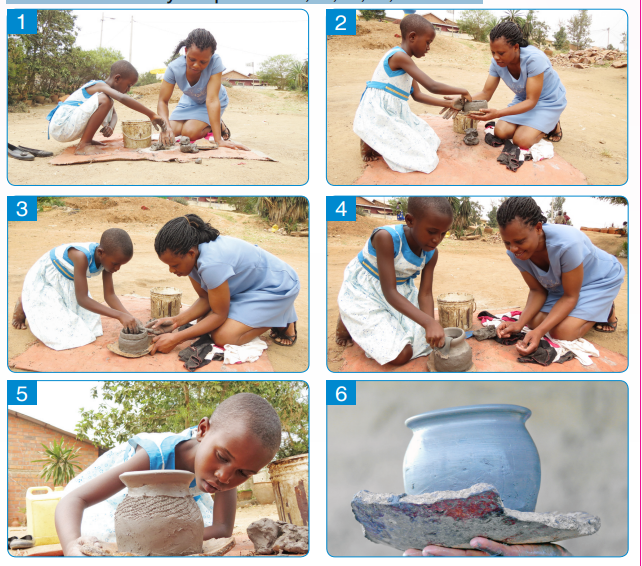
b. Name the materials you can see in the picture
c. Use the materials you see in the pictures to make a pot. Follow the steps as shown in the pictures.
I have discovered that:
When you want to make a pot, you need the following materials: clay, water, clay mixed with sand, foil, piece of a broken pot, broken stones.
Now, I can:
- Mix clay with water to make a solid plaster.
- Start with the base of a pot.
- Make the middle part of the pot.
- Make the neck of the pot.
- Smooth the pot.
Application activity 6
Make a pot, fill it with soil. Plant a flower in the pot. Give it to your parents as a present.
1.7. Making a toy car using wires
Activity 1
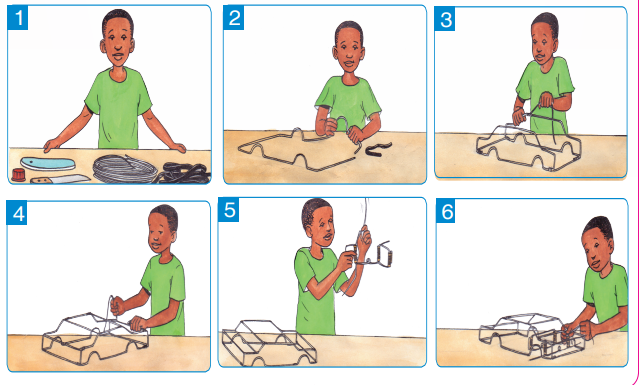
a. Look at pictures 1, 2, 3, 4, 5, 6, 7, 8.
 \
\
b. Name the materials you can see in the pictures.
c. Use these materials to make a toy car with wires.
Follow the steps as indicated in the pictures.
I have discovered that:
When you want to make a toy car, you need the following materials: wires, plastic ropes, tyres, bottle tops, bamboo sticks to make shock absorbers, a razor blade.
Now, I can:
- Bend a wire to make the bottom part of the toy car.
- Bend a wire to make the top part of the toy car.
- Make horizontal wire sticks which join the two top parts. Make sure these wires are parallel to the width of the bottom part of the toy car.
- Make the part of the toy car which allows the front tyres to turn.
- Fix the part of the toy car which makes the toy car to turn.
- Make the tyres of the toy car.
- Fix the tyres to the toy car.
Application activity 7
Use wires to make
a small car which you will offer to your cousin as a gift. 18 19 19 7 8
b. Name the materials you can see in the pictures.
c. Use these materials to make a toy car with wires.
Follow the steps as indicated in the pictures.
I have discovered that:
When you want to make a toy car, you need the following materials: wires, plastic ropes, tyres, bottle tops, bamboo sticks to make shock absorbers, a razor blade.
Now, I can:
- Bend a wire to make the bottom part of the toy car.
- Bend a wire to make the top part of the toy car.
- Make horizontal wire sticks which join the two top parts. Make sure these wires are parallel to the width of the bottom part of the toy car.
- Make the part of the toy car which allows the front tyres to turn.
- Fix the part of the toy car which makes the toy car to turn.
- Make the tyres of the toy car. - Fix the tyres to the toy car.
Application activity 7
Use wires to make a small car which you will offer to your cousin as a gift.
End of unit assessment 1
1. Knit:
a. a scarf with multiple loops.
b. a scarf with single loop.
c. a mat.
d. a sack.
2. Make the following shapes using a piece of paper or cardboard:
a. square.
b. rectangle.
c. triangle.
3. Make a toy car using wires.
4. Mould a small pot.
. List the materials you need in order to make the following things:
a. Weaving a mat.
b. Weaving a bag.
c. Making shapes.
d. Molding a pot.
e. Making a toy car.
6. Explain the uses of the following basic materials
a. Scarf.
b. Mat.
c. Sack.
d. Pot.
e. Chalkboard duster.
7. Make a chalkboard duster using pieces of cloth.
- Science and Elementary Science P3 Student Book File Uploaded 14/11/20, 18:03
- Science and Elementary Science P3 Teacher t Book File Uploaded 14/11/20, 18:04
UNIT 2 : THE USE OF A TELEPHONE
2.0. Introduction

2.1. Telephone keypad
2.1.1. Main parts of a telephone keypad
Activity 1
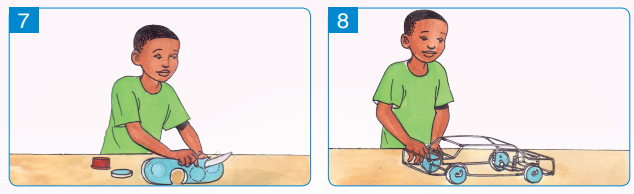
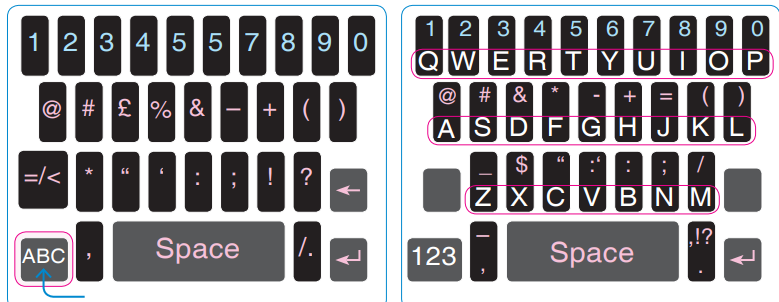
a. Look at the following pictures:
b. What is the name of the telephone part which is in the red rectangles?
c. Name parts in the red rectangle which are written in the following colors:
1. Blue 2. White 3. Red
I have discovered that:
A telephone keypad has the following keys:
1. Letter keys 2. Numeric keys 3. Special keys
Application activity
1.Give five examples of:
a. Letter keys
b. Numeric keys
c. Special keys you can see on the telephone keypad.
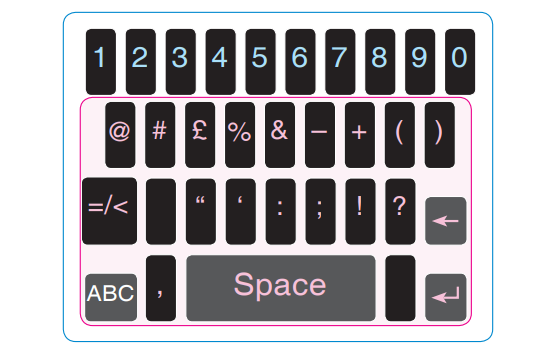
2.1.2. Using numeric keys
Activity 2
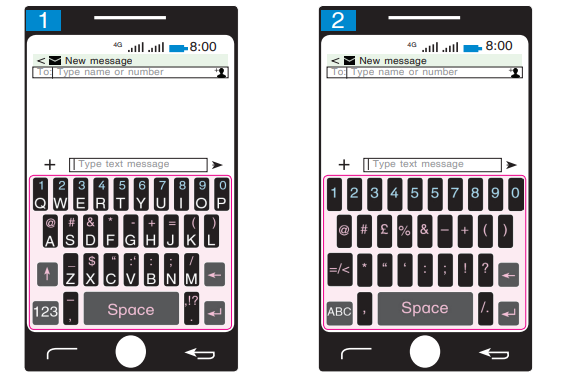
a. Look at the following pictures:
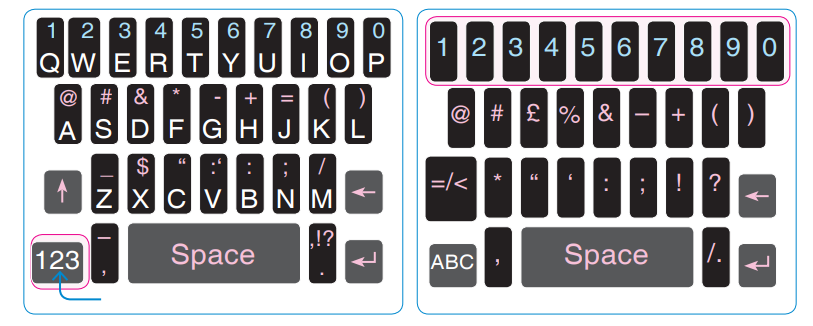
b. Show where you can touch in order to use the numeric keys found on the keypad.
c. How many numeric keys are on the keypad above?
d. Which key is on the left of the numeric keys?
e. What is the use of the numeric keys on the keypad above?
I have discovered that:
• To use the numeric keys of the keypad you press on the button

• There are 10 numeric keys on a telephone keypad (1, 2, 3, 4, 5, 6, 7, 8, 9, 0).
• Numeric keys start with 1 on the left and end with 0 on the right.
The use of those keys is to write the following:
- Telephone numbers.
- Amount of money.
- Password.
- Hour and minutes (time).
- Dates.
2.1.3. Using letter keys
Activity 3
a. Look at the following pictures :
b. What do you do in order to use letters on the telephone keypad?
c. What is the number of letter keys which are on this telephone keypad?
d. What is the importance of letter keys that are on the telephone keypad above?
I have discovered that: When you want to use letter keys on the telephone keypad, you press on the key with letters ABC The telephone keypad has 26 letter keys. These letter keys are used to write words.
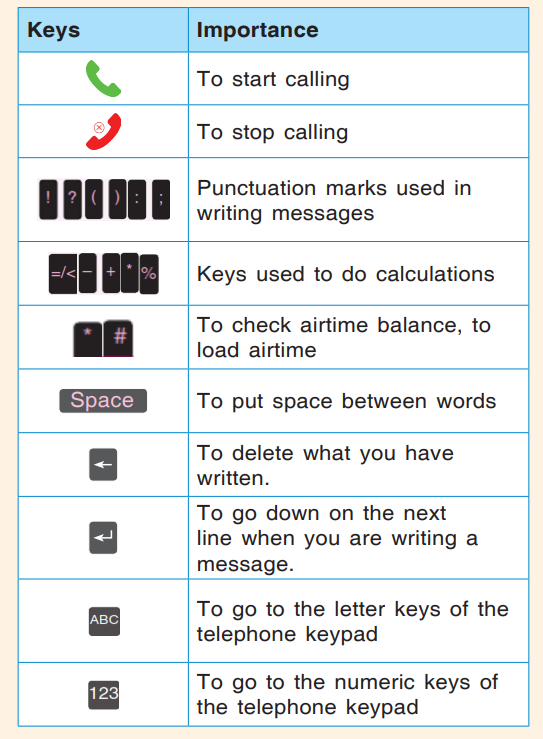
2.1.4. Importance of special keys that are on a telephone keypad
Activity 4.
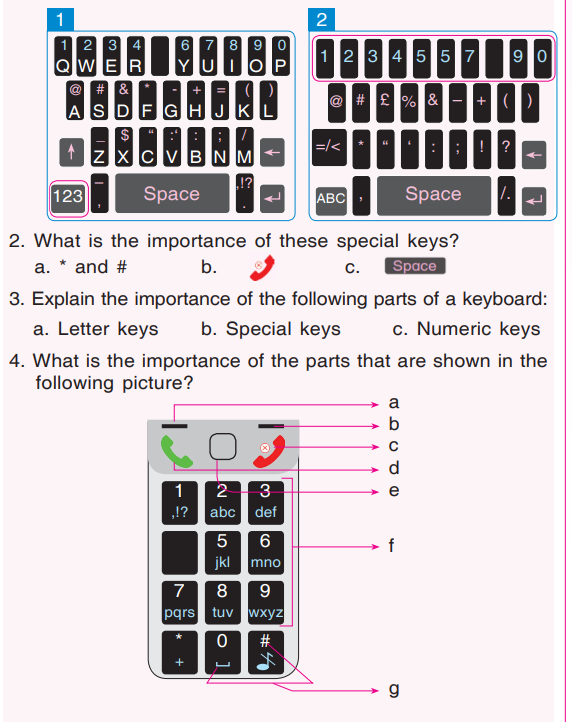
a. Look at the following telephone keypad:
b. Explain the importance of the keys in the red rectangle.
I have discovered that:
• The keys in the red rectangle are called Special keys
• The table below shows the importance of the keys on the telephone keypad.
2.2. Writing, sending and receiving short messages on a telephone
2.2.1. Writing and sending short messages
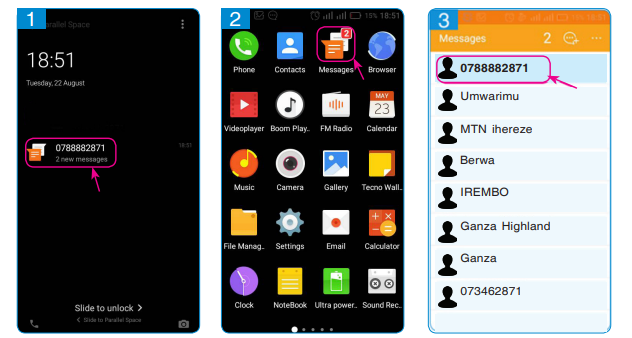
Activity 1
a. Look at the pictures 1 to 6.
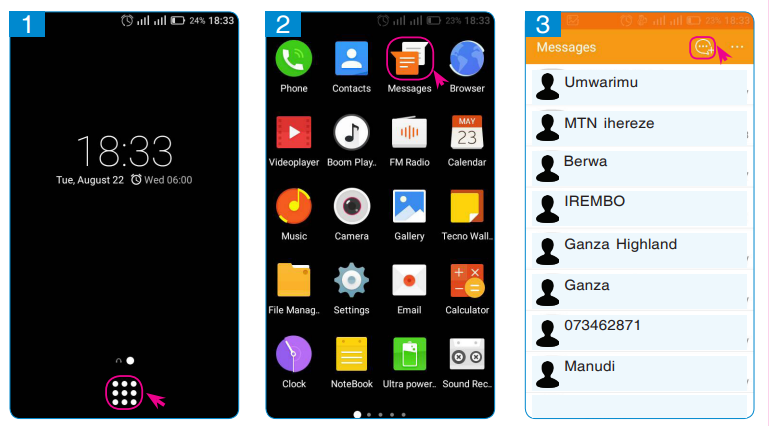
b. Do the same as in the images 1, 2 and 3 to write a short message. What have you discovered?
c. Which picture shows how to write short messages?
I have discovered that:
Picture number 2 shows the program to write short messages. To write short messages using a telephone you follow these steps:
- Press on the menu button

- Press on the short messages icon

- Press the button to write a new message

d. Look at the pictures below.
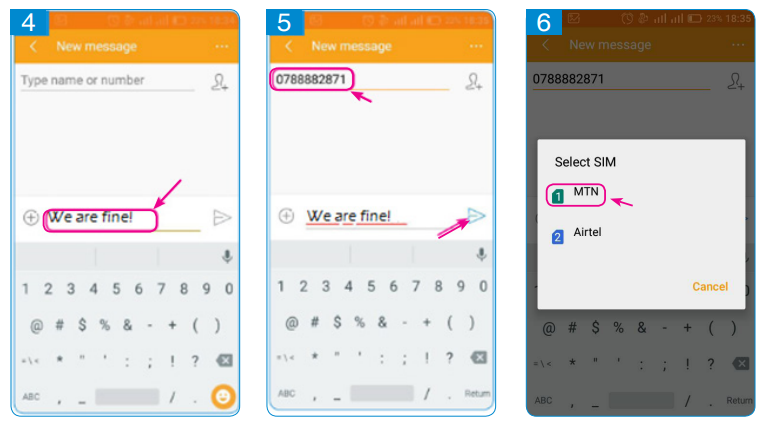
e. After doing what is shown in images 1, 2 and 3 do as in images 4, 5 and 6.
Now I can:
- Write a short message using the keypad.
- Write a telephone number of the person I am writing to. Then press the button “send”
- Choose the “SIM card” (MTN, Airtel, Tigo) to use.
Application activity
Borrow your teacher’s telephone and write to your parents telling them that you arrived at school safely.

Borrow a telephone from your teacher and write an SMS to your parents telling them what you learnt at school. Borrow your parents’ telephone and tell your teacher that you have arrived at home.
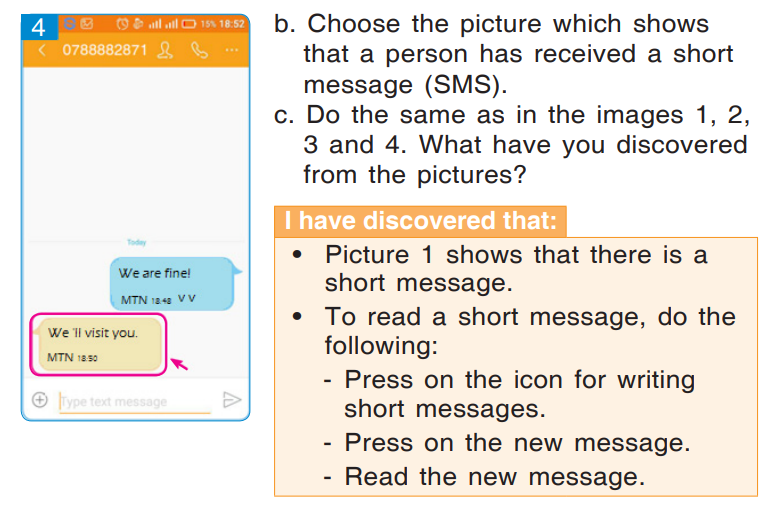
2.2.2. Receiving short message
Activity 2
a. Look at the pictures 1, 2, 3 and 4 below:
Application activity
Write and send a short message to your friend.
Tell him/ her to write back to you.
2.3. Saving a telephone number and making a call
2.3.1. Saving a telephone number
Activity 1
a. Look at the pictures 1, 2, 3, 4, and 5.
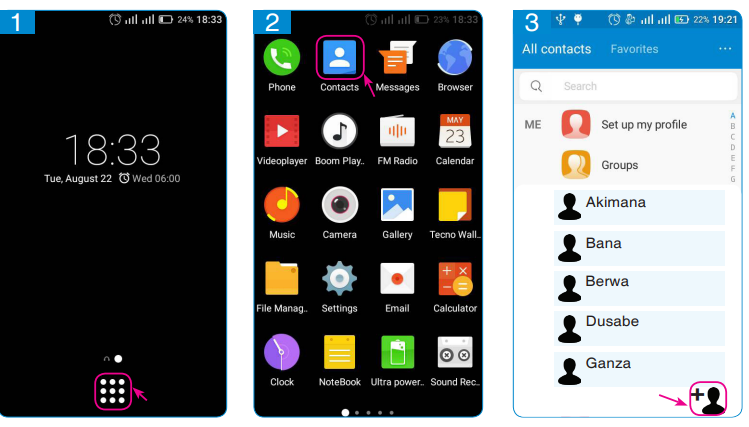
b. Do what you see in pictures 1, 2 and 3. What have you discovered?
I have discovered that:
- To save a number in a telephone, we do the following:
• Press on the Menu icon

• Press on the Contacts icon .

• Press on the icon for “new contacts”

c. Look at the pictures 4 and 5:
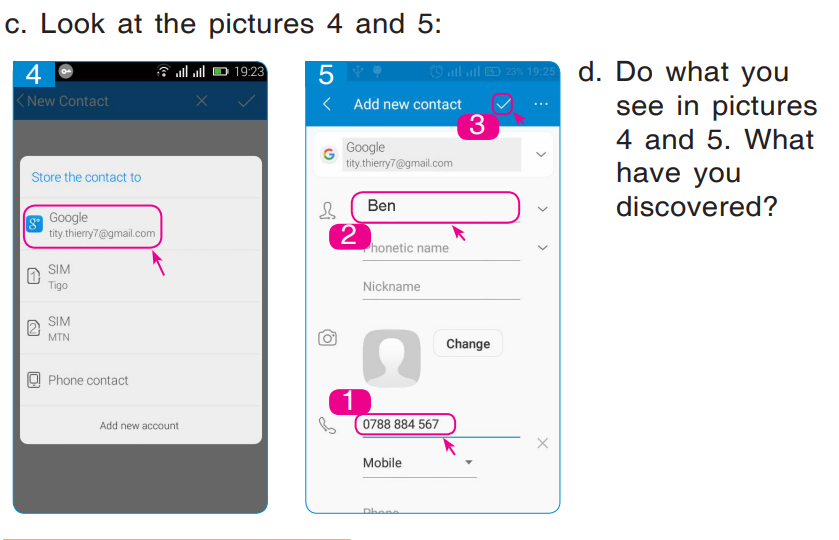
I have discovered that:
The step in picture 4 is to choose where to save the number.
Example: “Telephone” or “sim card” The step in picture 5 is to write the telephone number and the name
 and save
  them
them  .
. Application activity
Ask your friend the telephone number of her/his parent and save it in the telephone. Self
-assessment Is it easy for me to write and save a telephone number?

Is it easy for me to write and save a telephone number?
2.3.2. Making a telephone call
Activity 2
a. Look at the following pictures 1, 2 and 3
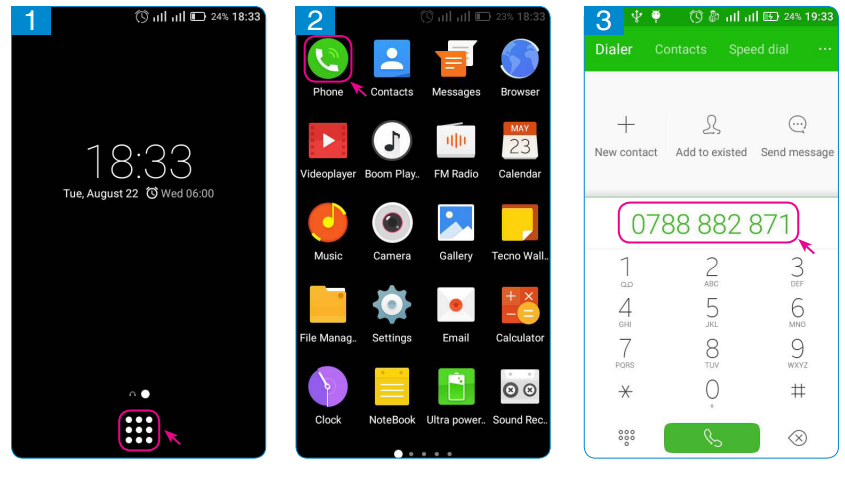
b. Choose the picture which shows how to make a call.
c. Do the same as in pictures 1, 2 and 3.
What have you discovered?
I have discovered that:
- To make a telephone call you follow these steps:
• Press the menu icon

• Press on the special key for calling

• Write the number to call.
d) Look at the pictures 4, 5 and 6
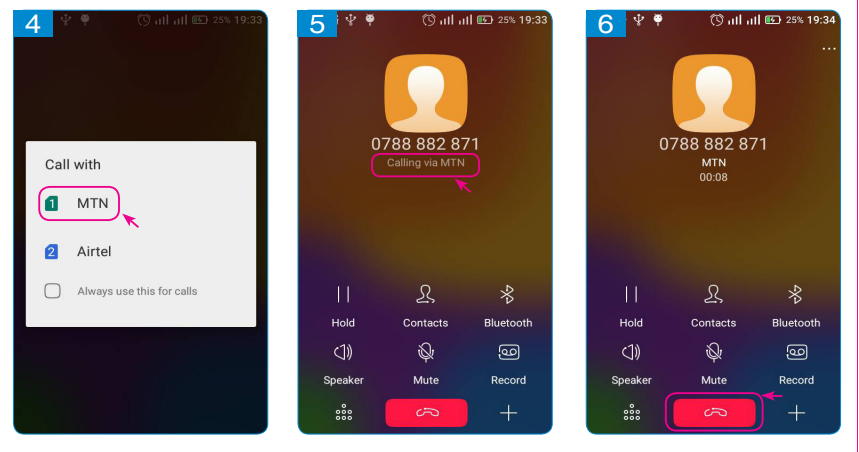
e) Do the same as in pictures 4, 5 and 6.
What have you discovered?
I have discovered that:
The steps in pictures 4, 5 and 6 are:
• To choose the SIM card to use (MTN, Airtel or Tigo).
• To wait for the person you have called to answer. You talk with him/her.
• To press the key
 to end the call.
Application activity

1. Use a telephone to ask your classmate if he/she understood the lesson you have learnt today.
2. Use a telephone to save the telephone numbers of your parents. Call your parents to tell them that now you know how to use a telephone.
3. Choose one of the telephone numbers that is saved in the telephone. Call that number.
4. Check the missed calls. Call one of them.
2.4. Taking pictures and recording sounds using a telephone
2.4.1. Taking pictures
Activity 1
a. Look at the pictures 1, 2 and 3:
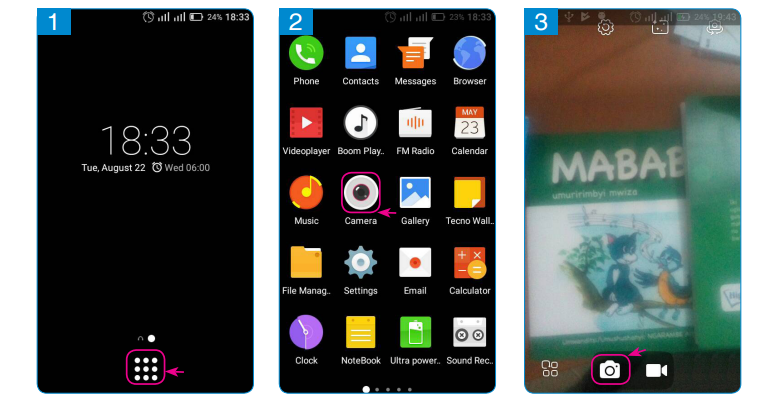
b. Choose the picture which shows a sign of a camera.
c. Do what you see in pictures 1, 2 and 3.
Explain what you have discovered.
I have discovered that:
- Picture 2 shows a camera. A camera takes pictures.
- To take pictures with a telephone, follow these steps:
• Press the menu icon

• Press on the camera icon

• Press on the flash icon

Exercise
a. Use a telephone to take pictures of your classmates.
b. Take a picture of the chalkboard and show it to other pupils.
Application activity
Use a telephone and take a picture of your home.
2.4.2. To record sounds
Activity 2
a. Look at the pictures 1, 2 and 3:
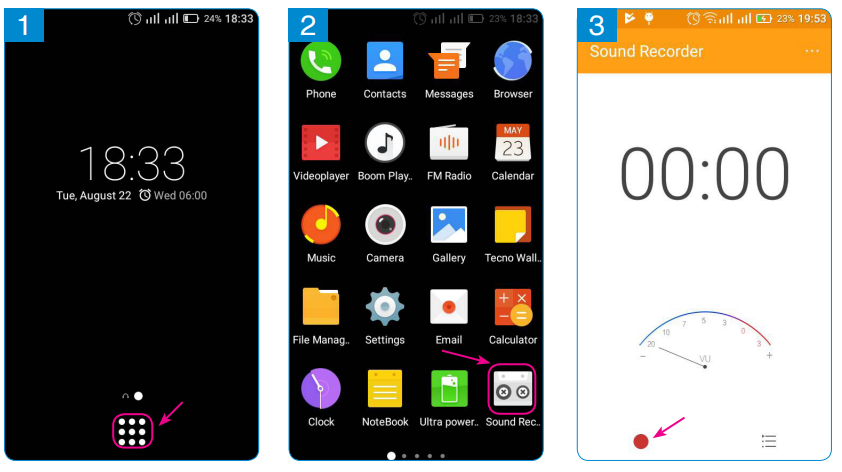
b. Show the picture of a sound recorder.
c. Do what you see.
What have you discovered?
I have discovered that:
- Picture 2 shows a sign of a sound recorder.
- To record sound you do the following:
• Press the menu icon

• Press the sound recorder icon (Sound Rec)
• Press a red button to start recording sound.
d. Look at the following pictures 4 and 5
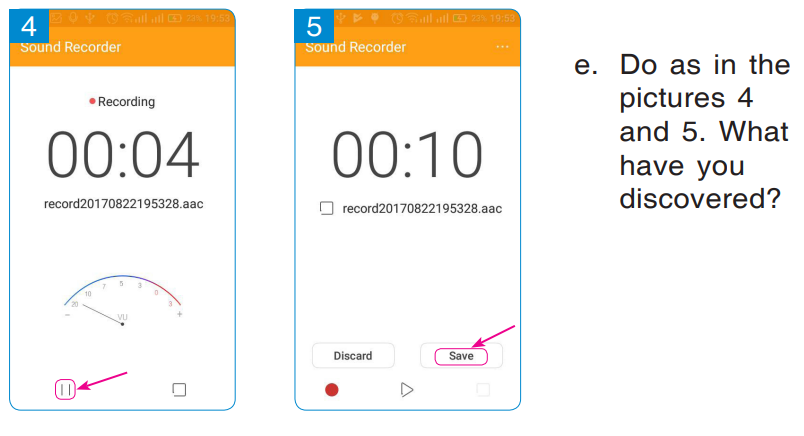
I have discovered that:
• To stop recording, you press on the Stop icon

• To save the sound, press on Save icon


Application activity

Using a telephone, sing and record your voice.

Ask your classmate to sing and you record his/her voice using a telephone. Check to see if you recorded his/her voice well. Let’s use a telephone. You record my voice and I also record your voice. We listen to our recordings to see if we took them well.
2.5. Transactions on mobile phone
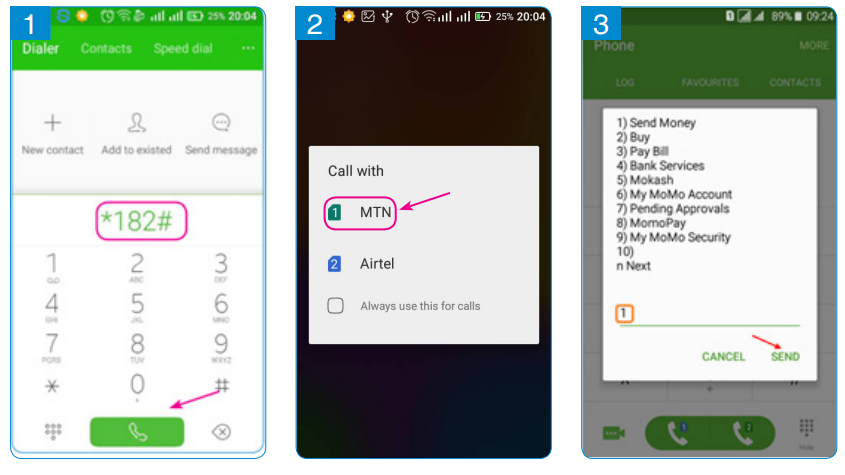
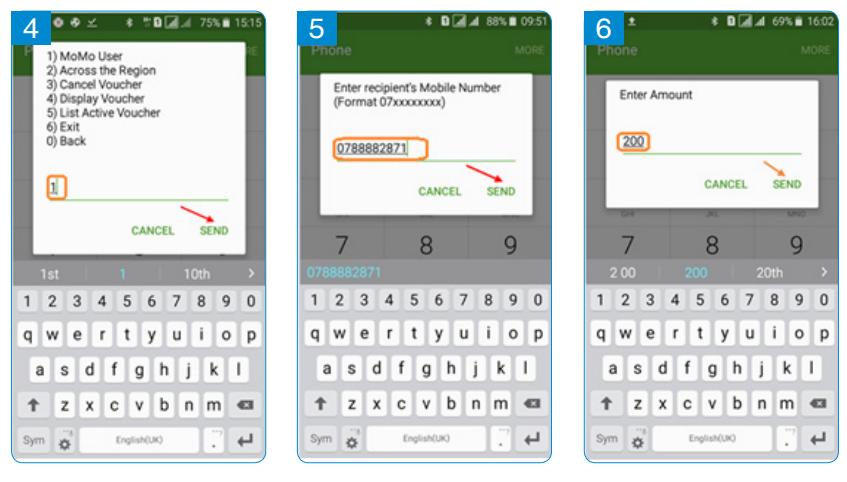
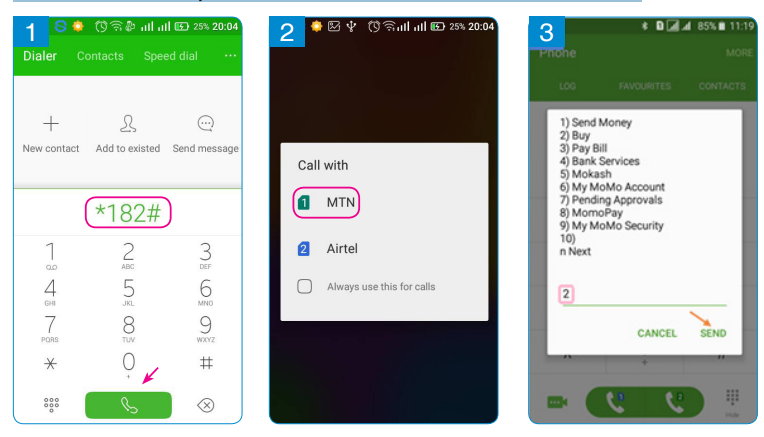
2.5.1. Sending money using MTN Mobile Money
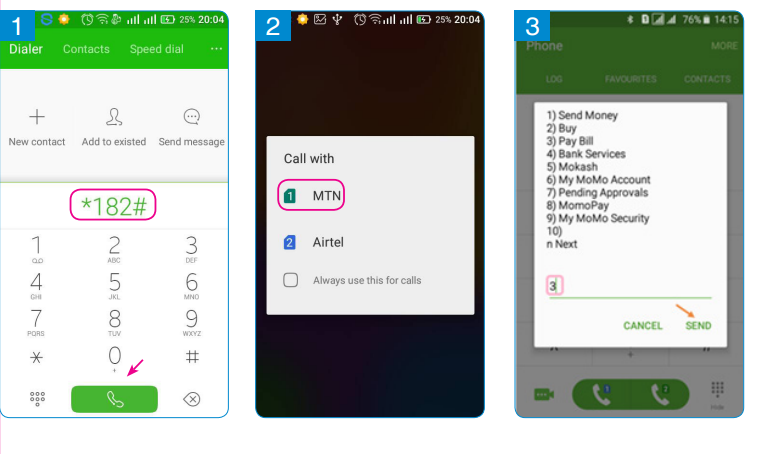
Activity 1
a. Look at pictures 1 to 7
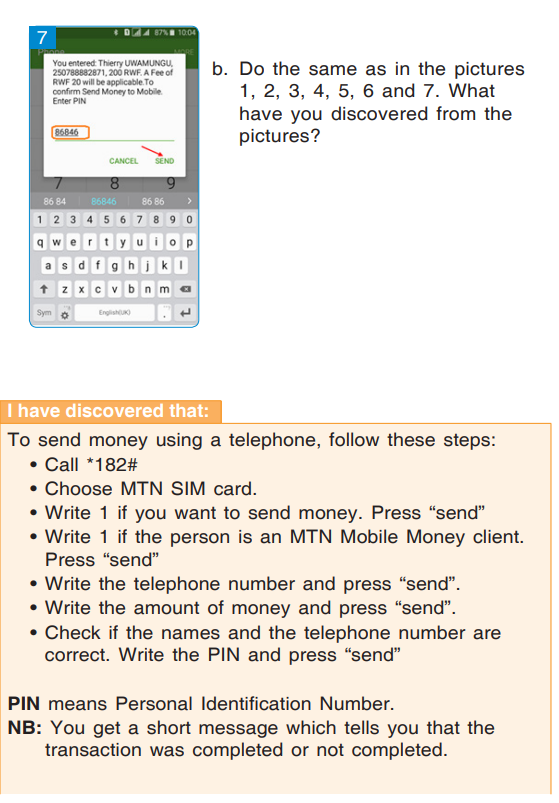 \
\2.5.2. Checking the balance on MTN Mobile Money
Activity 2
a. Look at the pictures 1, 2, 3, 4, 5 and 6
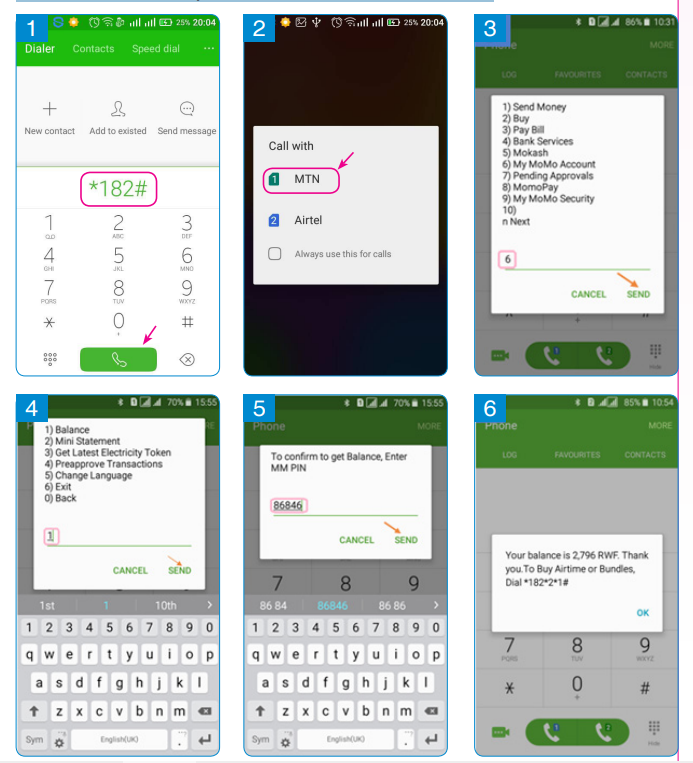
b. Do what you see in the pictures 1, 2, 3, 4, 5 and 6.
What have you discovered?
I have discovered that:
To check the balance on MTN Mobile Money, you follow these steps:
• Call 182#
• Choose MTN SIM card
• Write 6 to choose Mobile Money and press “send”w
• Write 1 to check the balance and press “send”
• Write the PIN and press “send”
NB. You get a message which tells you the remaining balance
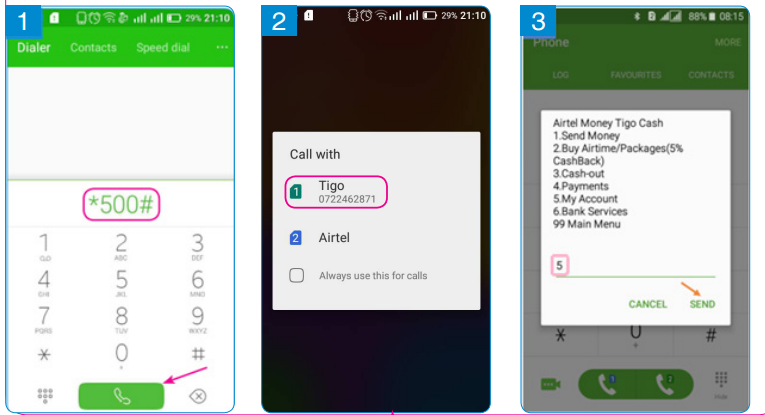
2.5.3. Sending money using “Tigo cash”
Activity 3
a. Look at the pictures 1, 2, 3, 4, 5, 6 and 7
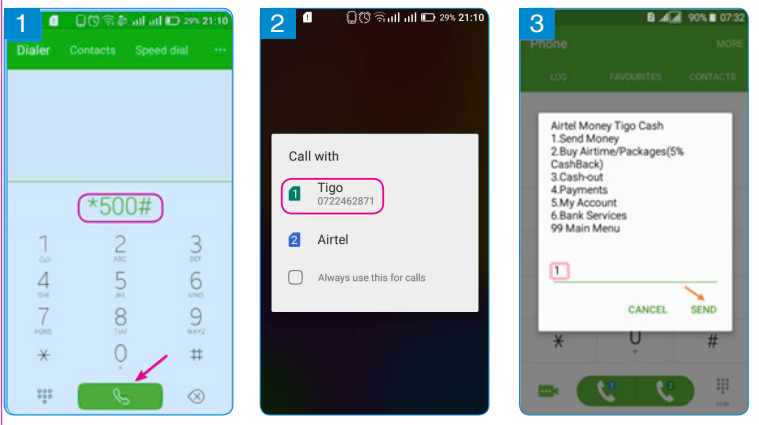
I have discovered that:
To send money with Tigo cash do the following:
• Call *500 #
• Choose Tigo SIM card
• Write 1 to choose “send money”. Press “send”
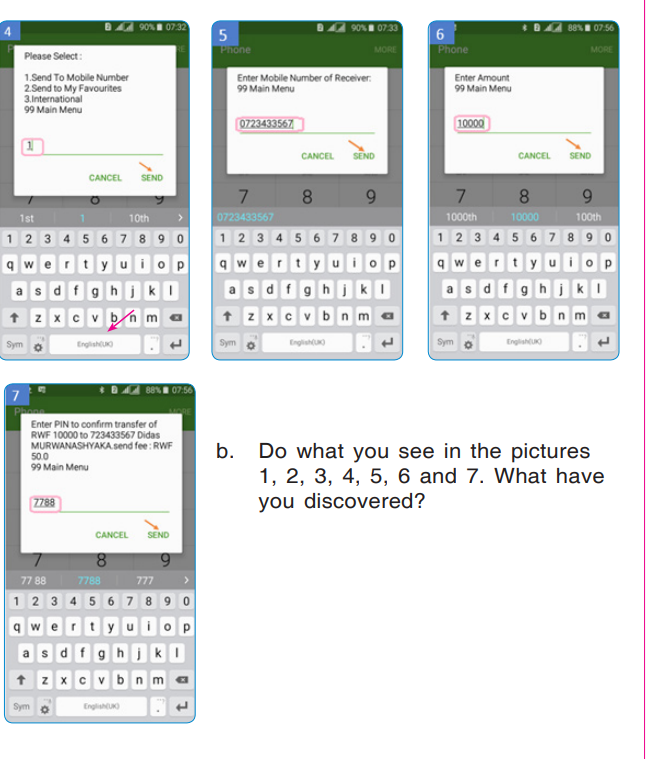
• Write 1 to choose “send money to a mobile number” and press “send”
• Write the number to which you want to send money and press “send”
• Write the amount of money and press “send”.
• Check the names and telephone number of the person you are sending money to. If they are right, write your PIN and press “send”.
NB. You get a short message which tells you that the transaction was completed or not completed.
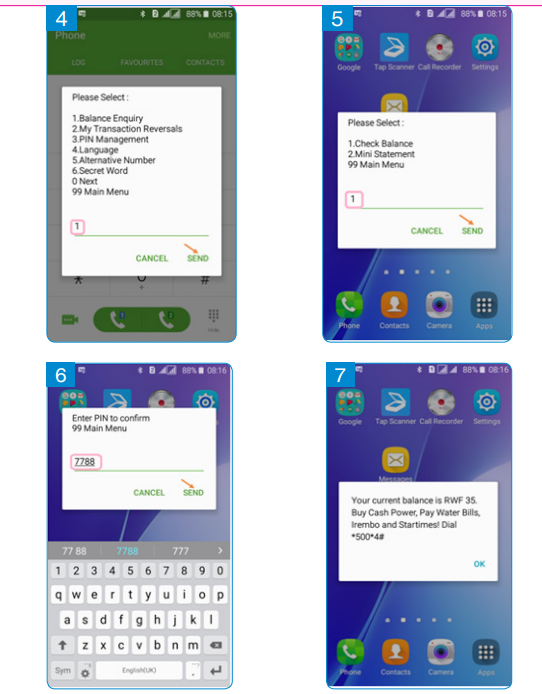
2.5.4. Checking the balance on Tigo cash
Activity 4
a. Look at the pictures 1, 2, 3, 4, 5, 6 and 7
b. Do as in the pictures 1, 2, 3, 4, 5, 6 and 7. What have you discovered?
I have discovered that:
For you to see how much money is on your Tigo account, you do this:
• Call *500#
• Choose Tigo SIM card.
• Write 5 to choose “my account” and press “send”.
• Write 1 to choose “balance inquiry” and press “send”
• Write your PIN and press “send”.
• Read the message showing the balance
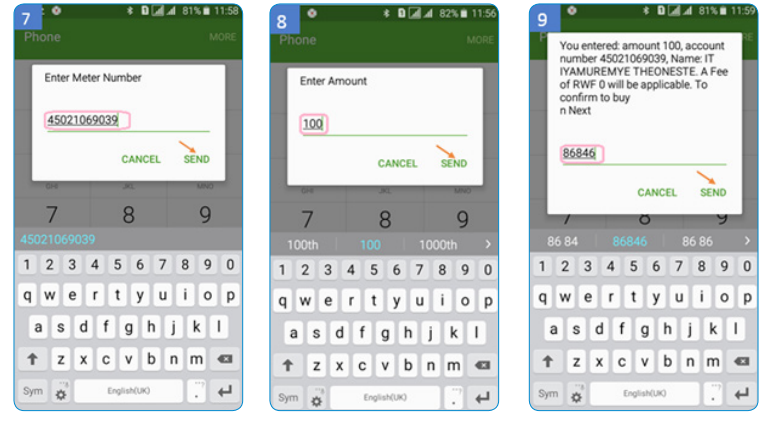
2.5.5. Buying electricity using a telephone
Activity 5
a. Look at the pictures 1, 2, 3, 4, 5, 6, 7, 8 and 9.
b. Do as in the pictures 1, 2, 3, 4, 5, 6, 7, 8 and 9. What have you discovered?
I have discovered that:
To buy electricity with MTN mobile money, you do this:
• Call *182#.
• Choose MTN SIM card.
• Write 2 to choose “buy” and press “send”
• Write 2 to choose “electricity” and press “send”
• Write 2 to choose “cashpower estep” and press “send”
• Write 1 to choose “purchase” and press “send”
• Write your meter number and press “send”.
• Write the amount of money to buy electricity and press “send”
• Check to see if the meter and amount of money are correct. Write your PIN and press “send”.
NB. You get a short message to tell you that buying electricity was done or not done.
Exercise
a. Use a telephone to buy electricity with Tigo cash
Application activity
Use your telephone to buy electricity for the meter at my home.
I also buy electricity for the meter at your home.
Use a telephone to send the numbers you get and I send the numbers to you.
We write the numbers in the meters at our homes. Who has done it well?
 2.5.6. Paying TV subscription with MTN mobile money
Activity 6
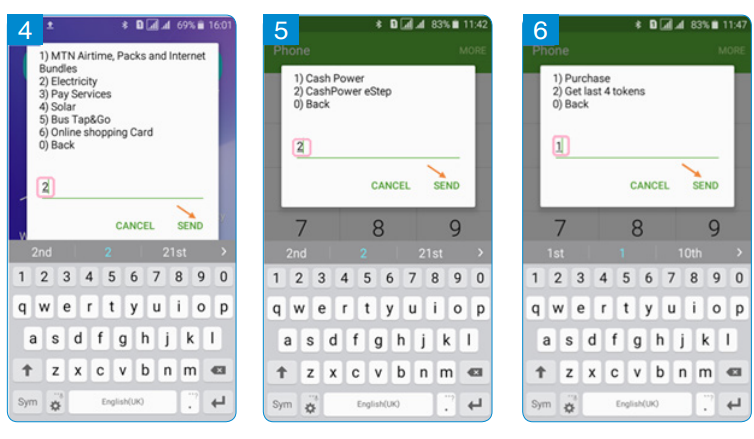
a. Look at the pictures 1, 2, 3, 4, 5, 6, 7, 8 and 9:
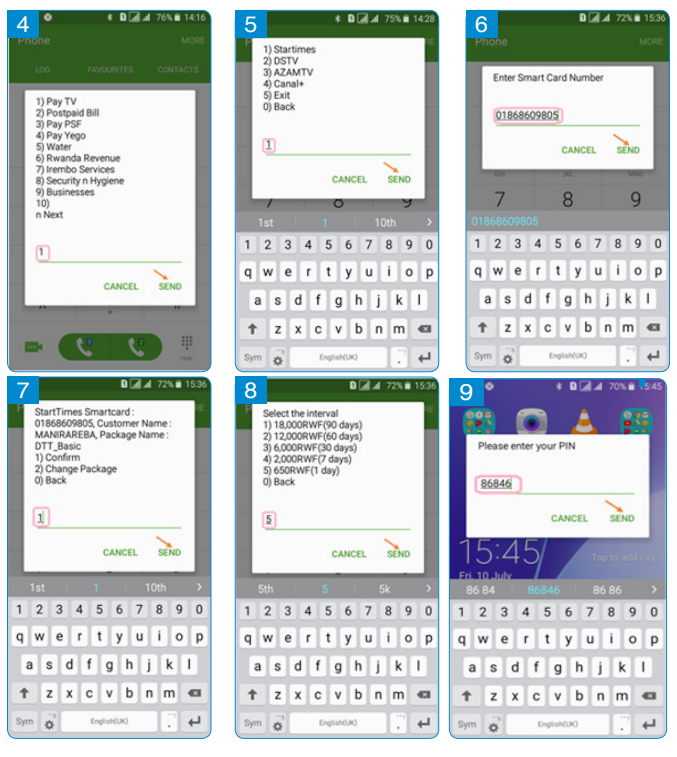
b. Do as in the pictures 1, 2, 3, 4, 5, 6, 7, 8 and 9. What have you discovered?
I have discovered that:
To buy Star Times Subscription with mobile money, you follow these steps:
• Call *182# and press
• Choose MTN SIM card.
• Write 3 to choose “pay bill” and press “send”.
• Write 1 to choose “pay TV” and press “send”.
• Write 1 to choose “Star times and press “send”.
• Write the number of your subscription card and press “send”
• Check to see if the subscription number and name are correct
• Write 1 to choose “DTT_Basic” package and press “send”. You can also change the package by writing 2 and pressing “send“
• Write the number corresponding to the amount to pay. In the images above the buyer has chosen 5 to pay 650RWF. • Write your PIN and press “send”.
NB: you will get a message to tell you that buying TV subscription was completed.
End of unit assessment 2
1. Look at the pictures (1 and 2) and give the name of each part surrounded by a red line.
5. Save a telephone number which called you but was not in the telephone contacts before
6. List the things you can do when you call *182#.
7. Tell your classmates about the importance of a telephone.
8. Call one of your parents to tell him/her that you learnt how to use a telephone.
9. Explain how the following steps are done: a. To call a number which is not in the telephone.
b. To call a number which is already in the telephone.
c. To buy DSTV subscription using MTN Mobile Money.
d. To buy AZAM TV subscription using Airtel money.
e. To buy Star times subscription using Tigo Cash.
10. You can buy airtime, electricity, and television subscription using MTN Mobile Money, Tigo Cash and Airtel money. What other things can you buy using them?
11. Explain the steps you follow when you are:
a. Recording sound using a telephone,
b. Taking pictures using a telephone.
12. Write a short message to your parents and then read their reply.
13. Use a telephone to send money to a number given to you.
UNIT 3: COMPUTER MY FRIEND
3.0. Introduction

3.1. Using the Keyboard
3.1.1. Parts of the keyboard of an XO laptop
Activity 1
a. Look at the following picture
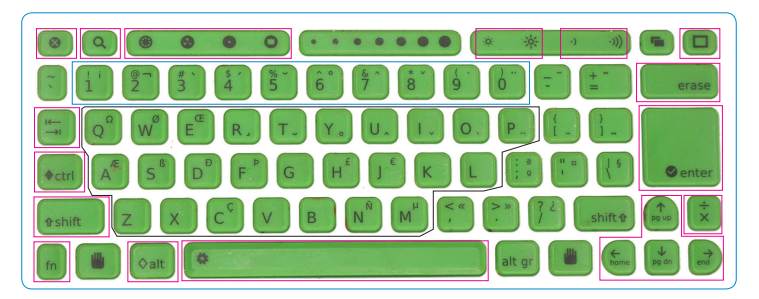
b. What are the main parts on the keyboard that are in different colors?
I have discovered that:
The keyboard of an XO laptop has the following parts:
a. The part of Letter keys
b. The part of numeric keys
c. The part of special keys
3.1.2. Letter keys on the keyboard of an XO laptop
Activity 2
a. Look at the following picture
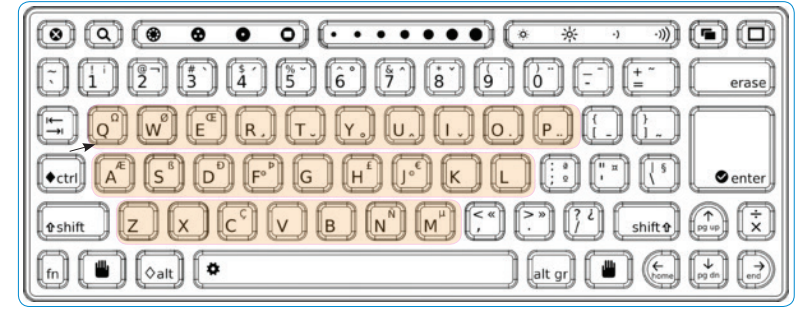
b. How many letters keys are on a keyboard?
c. How many rows of letter keys are on a keyboard?
I have discovered that:
On the keyboard of an XO laptop there are 26 letters in three rows.
1. The top row has these letters: Q W E R T Y U I O P
2. The middle row has these letters: A S D F G H J K L
3. The bottom row has these letters Z X C V B N M
3.1.3. Numeric keys which are on the keyboard of an XO laptop
Activity 3
a. Look at the following keyboard:
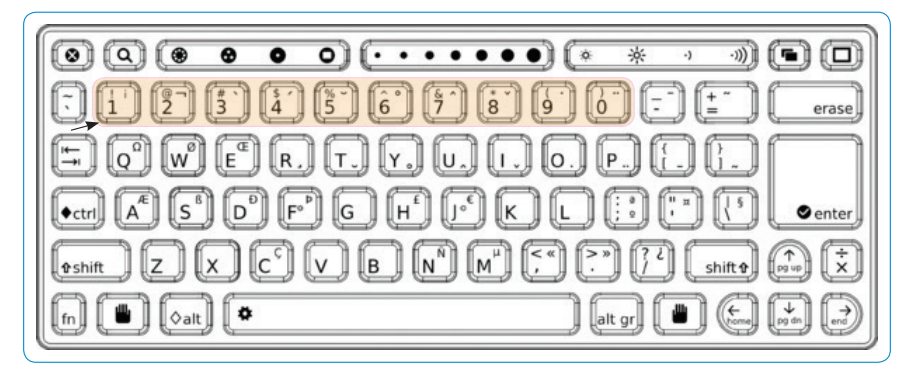
b. How many numeric keys are on the keyboard of an XO laptop?
I have discovered that:
There are 10 numeric keys on the keyboard of an XO laptop. They follow this order: 1, 2, 3, 4, 5, 6, 7, 8, 9, 0.

1. How many parts are on the keyboard of an XO laptop?
2. Which letter keys are in the top row of the keyboard of an XO laptop?
3. How many letter keys are in the middle row of the keyboard of an XO laptop?
3.1.4. Use of special keys that are on the keyboard of an XO laptop
Activity 4
a. Look at the following picture:
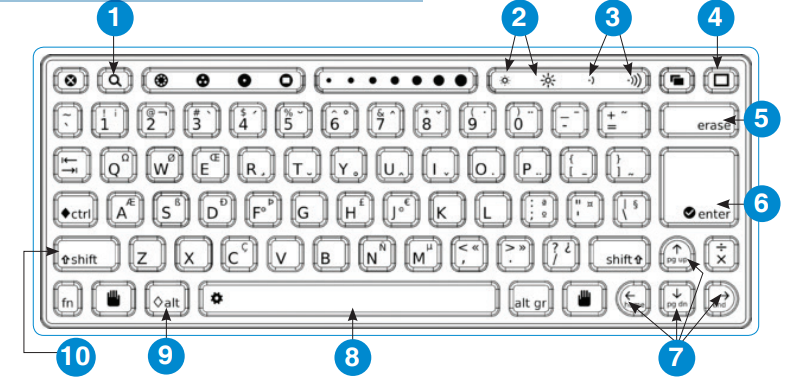
b. Name the keys which are labelled with the following numbers:

I have discovered that:
On the keyboard of an XO laptop, there are these special characters:
1 - The Search key
2 - The Brightness Control Key:
To increase or decrease screen light
3 - Volume Control Key: To increase or decrease the sound volume
4 - Frame key: To increase or decrease the window size
5 - Erase key: To delete text
6 - Enter key: To go to a new line
7 - Arrow keys: To go on the right, left, up and down on the screen
8 - Space bar: To put space between two letters
9 - Alt key: To write symbols
10 - Shift key: To write characters on top of the key
Application activity
Give any two special keys. What is their use?
3.2. “Typing turtle” program
3.2.1. Opening the Typing Turtle program
Activity 1
a. Look at the following pictures 1, 2, 3 and 4.
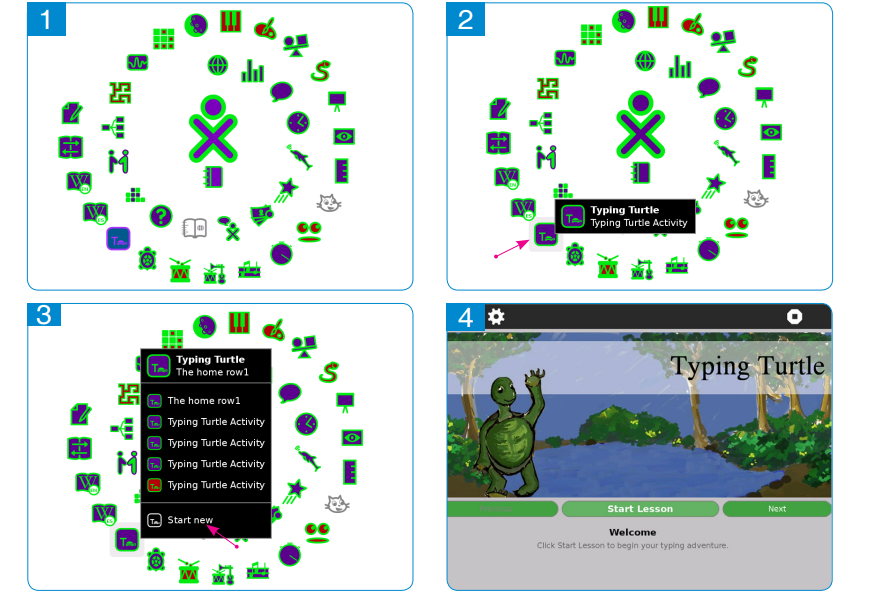
b. Do what you see on the pictures 1, 2, 3 and 4. What have you discovered?
I have discovered that:
When you want to open Typing Turtle on an XO laptop, you follow these steps:
• You go to “Home view”
• Put the Pointer on the Typing Turtle icon

•Click on “Start, new”
3.2.2. Using Typing Turtle
Activity 2
a. Look at the pictures (1, 2, 3 and 4)
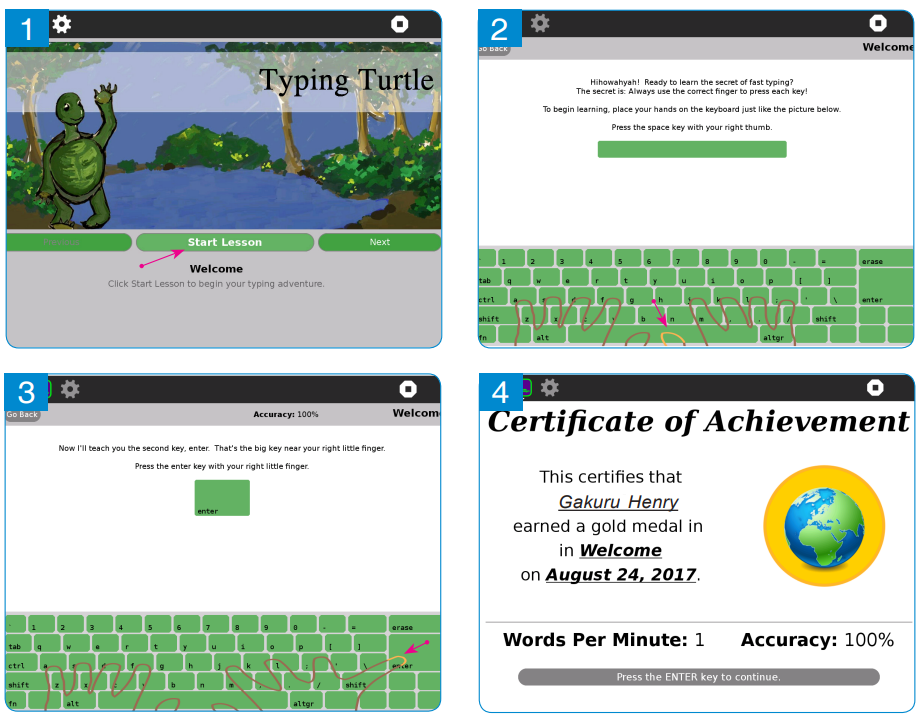
b. Do what you see in the pictures 1, 2, 3 and 4. What have you discovered?
I have discovered that:
To get the “Certificate of Achievement” in Typing Turtle you follow these steps:
• Click on the button “Start lesson”
• Press twice the “Space bar” using the right hand thumb finger.
• Press twice the “Enter key” using the right hand little finger.
Application activity
Using an XO laptop open Typing Turtle. Click on Start lesson. Press twice the Space Bar.
3.2.3. Writing letters in the middle row of the keyboard on an XO laptop (The home row)
Activity 3
a. Look at the following pictures (1, 2 and 3):
I have discovered that:
To write letters that are in the middle row with Typing Turtle, you follow these steps:
• Press on the button “Next” on the first window of “Typing Turtle”
• Press on the button “Start lesson”
• Press on the “Enter key” using the finger which is shown on the keyboard.
• Write the letters they have given you. Use the appropriate finger and then check the marks they give you (WPM).

Which letters are in the middle row of the keyboard of XO laptop with “Typing Turtle”?
3.2.4. Writing words using letters which are in the middle row on the keyboard of an XO laptop (Home row balloons)
Activity 4
a. Look at the following pictures (1, 2 and 3):
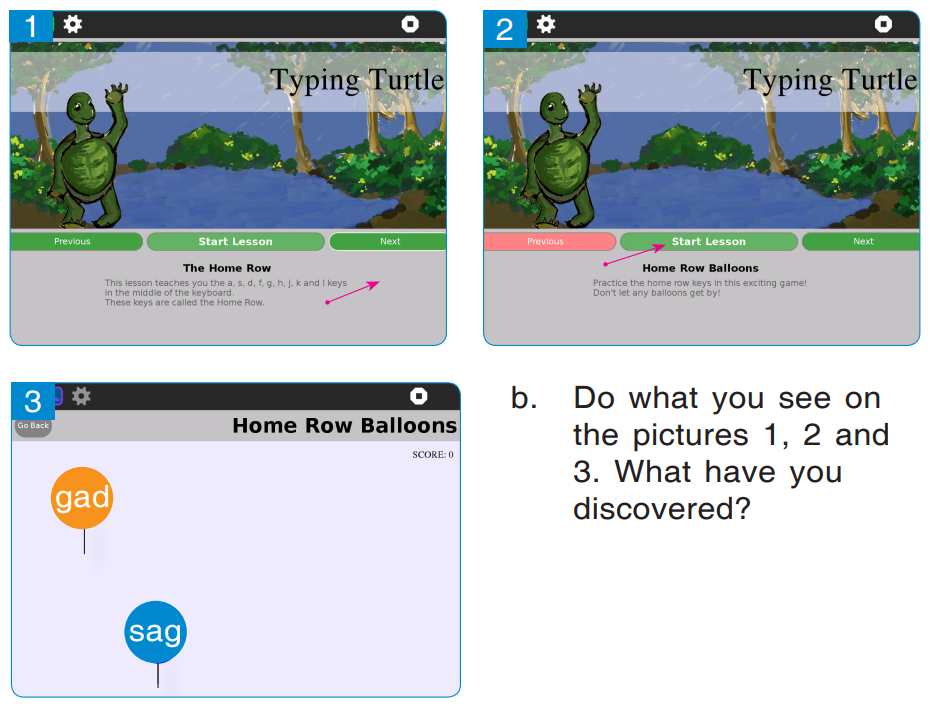
I have discovered that:
To write words using letters in the middle row of “Typing Turtle, you follow these steps:
• Click the button “Next” on the first window of “home row”
• Click the button of “Start Lesson”
• Write the words they have given you in the balloons. Then check the scores they give you.

Can I write 10 words given to me in balloons in “Typing Turtle”?
3.2.5. Writing letters that are on the top row on the keyboard of an XO laptop
Activity 5
a. Look at the pictures 1, 2 and 3:
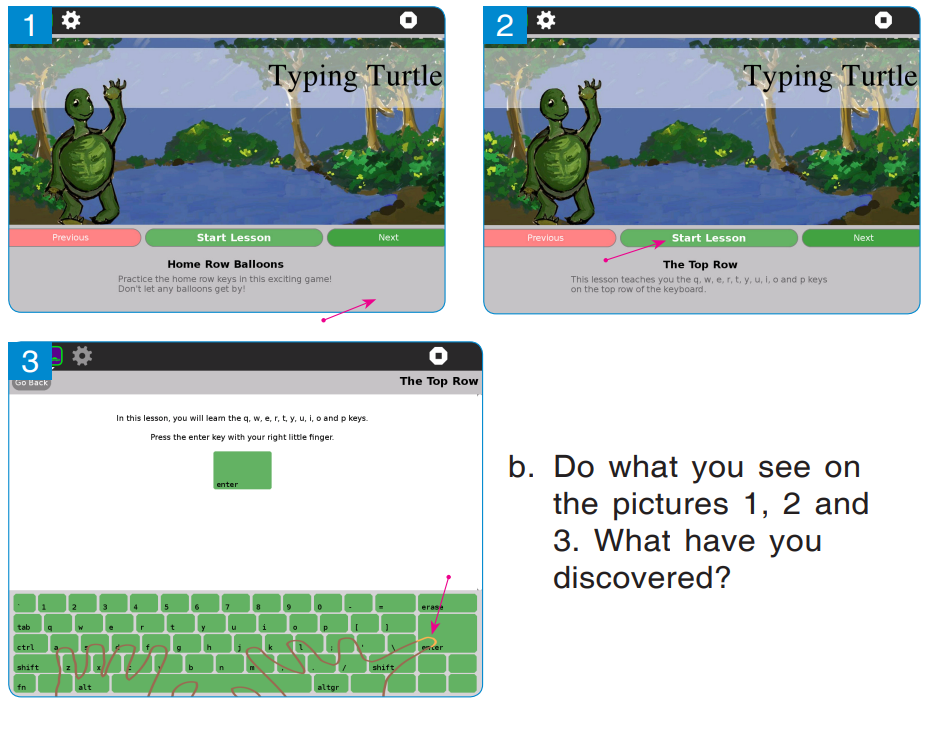 I have discovered that:
 To write letters that are on the top row in “Typing Turtle”, you follow these steps:
• Click the button “Next” at the first window of the “Home Row Bubbles”
• Click the button of “Start lesson”
• Press the “Enter key” using the finger that they show you on the keyboard of your computer. Write the letter you are given and check your scores (WPM).

I can write the letters on the top row of the keyboard of an XO laptop using “Typing turtle”?
3.2.6. Writing words using letters that are in the top and middle rows on the keyboard of an XO laptop (The top row Balloons)
Activity 6
a. Look at the following pictures 1, 2 and 3.
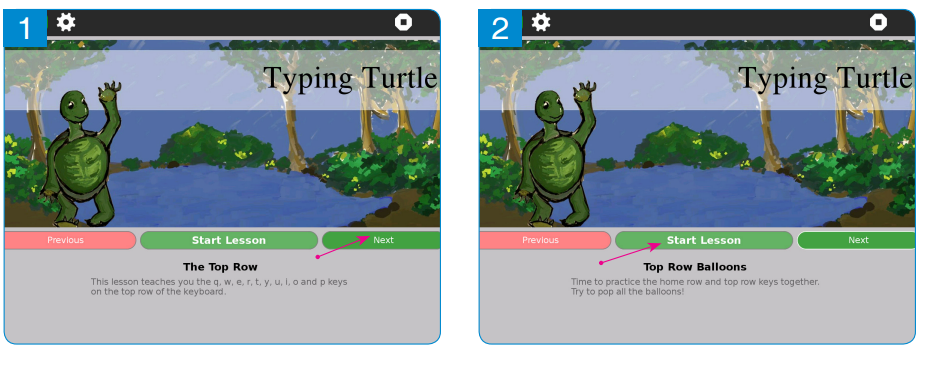
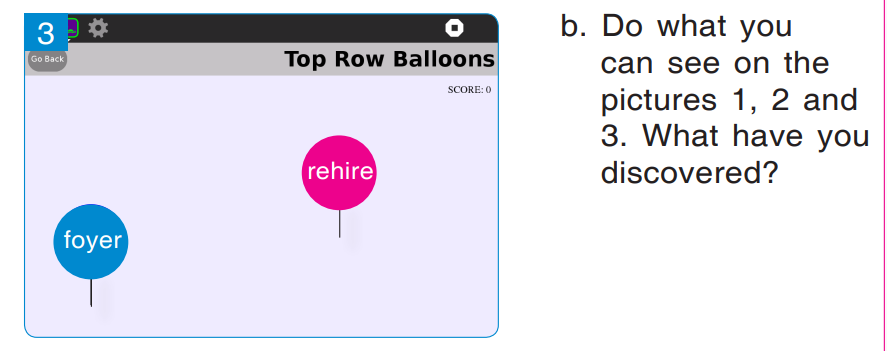
I have discovered that:
To write words on the top row in “Typing Turtle”, follow these steps:
• Click the button “Next” in the first window (The Top Row).
• Click the button “Start Lesson” in the second window (Top Row Balloons)
• Write the words given in the balloons and check your scores.

With your classmate, open Typing Turtle.
Write the words you see on the Top Row Balloons. Tell your classmate the score you get.
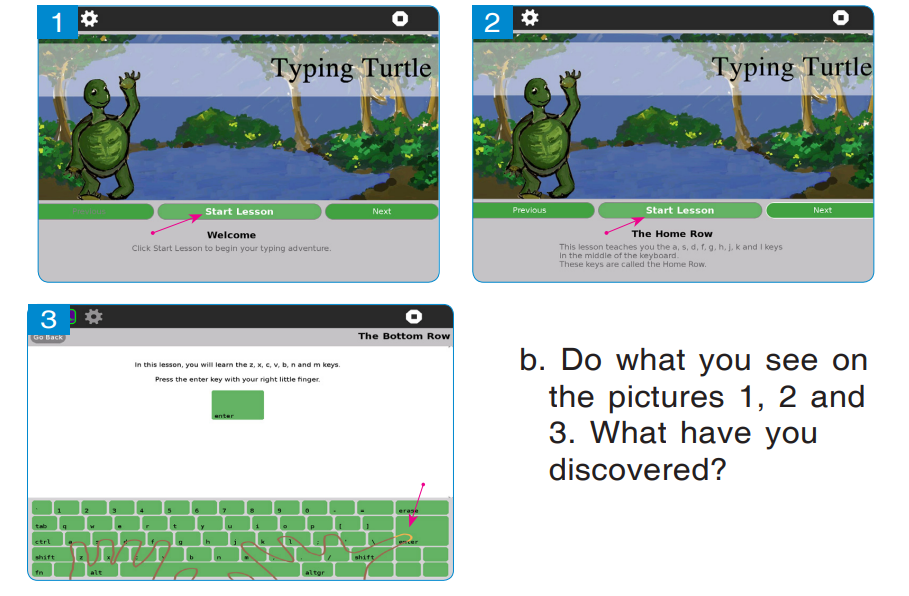
3.2.7. Writing the letters that are on the bottom row on the keyboard of an XO laptop (The Bottom Row)
Activity 7
a. Look at the following pictures (1, 2 and 3)
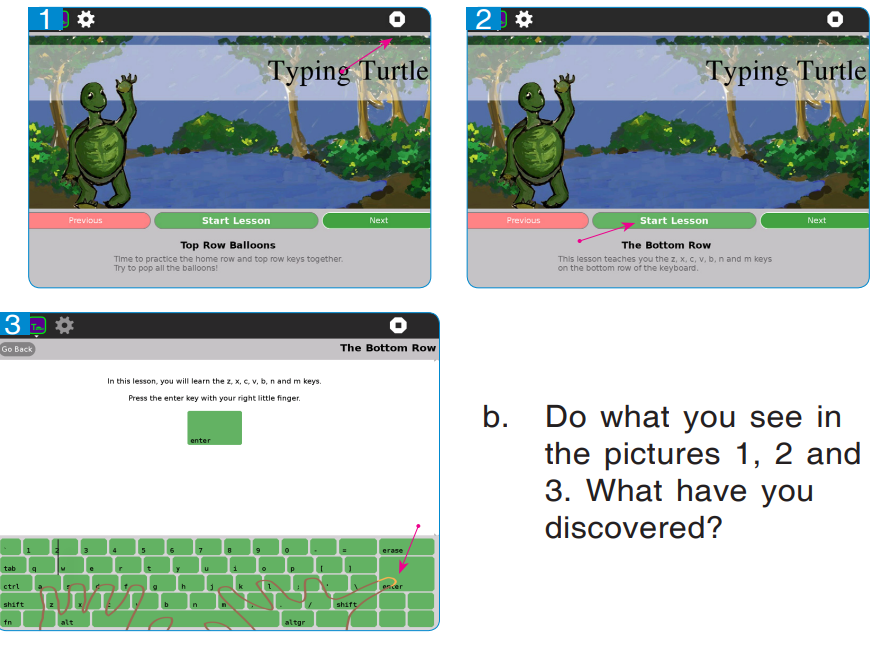 b. Do what you can see in the pictures 1, 2, 3 and 4.
What have you discovered?
b. Do what you can see in the pictures 1, 2, 3 and 4.
What have you discovered?I have discovered that:
To write capital letters in “Typing Turtle” using the left hand on the keyboard of an XO laptop, I follow these steps:
• Click the button “Next” in the first window (Alphabet Balloons).
• Click the button “Start Lesson” in the second window (Left Hand Capitals)
• Press the “Enter key” on the keyboard of an XO laptop.
• Press the “Shift key” on the keyboard using the thumb of the right hand. You write the letters they give you and check your score (WPM).

Using an XO laptop keyboard, show how to write your names in capital letter
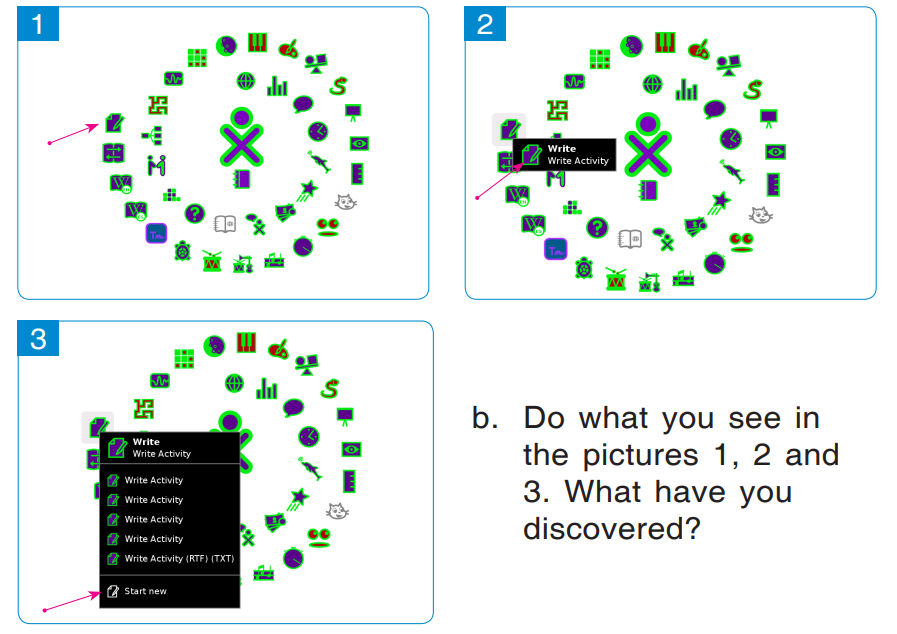
3.2.10. Writing capital letters using the right hand on the keyboard of XO laptop (Right Hand Capitals)
Activity 10
a. Look at the following pictures (1, 2, 3 and 4):
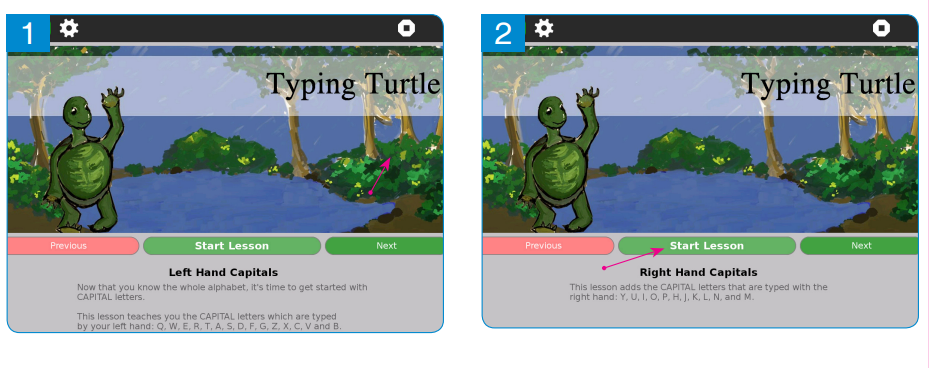
I have discovered that:
To write capital letters using the right hand in the Typing Turtle on the keyboard of an XO laptop, I follow these steps:
• Press on the button “Next” in the first window (Left Capitals Balloons)
• Click the button “Start Lesson”
• Press the “Enter key” on the keyboard of XO laptop.
• Press the “Shift key” on the keyboard using the thumb of the left hand. You write then the letter they have given you and check your scores (WPM).

Can I write 10 capital letters with the program “Typing Turtle using my right hand?
3.2.11. Writing words which have capital letters in “Typing Turtle” on the keyboard of an XO laptop (Capital Balloons) Activity 11
a. Look at the following pictures (1, 2 and 3)

I have discovered that:
To write words which have capital letters in “Typing Turtle” on the keyboard of an XO laptop, I follow these steps:
• Press on the button “Next” in the first window (Right Hand Capitals).
• Press the button “Start Lesson” in the second window (Capital Balloons)
• Type the words they have given you in balloons and check your scores.

Can I write the name of my parents well?
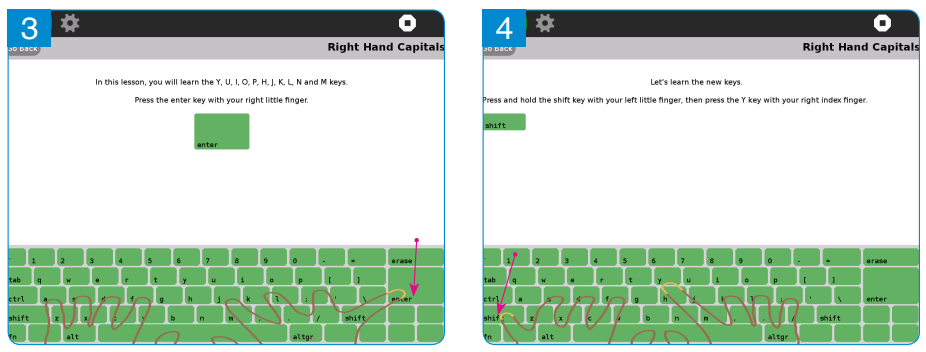
3.3. Write Activity program
3.3.1. Opening Write Activity
Activity 1
a. Look at the following pictures (1, 2 and 3)
I have discovered that:
To open the program Write Activity in an XO laptop and follow these steps:
• You go to “Home view” of your laptop.
• Put the pointer on the icon of the Write Activity program
• Press the button “Start new” on the keyboard.

Can I open the Write Activity program?
3.3.2. Main parts of Write Activity
Activity 2
a. Look at the following picture:
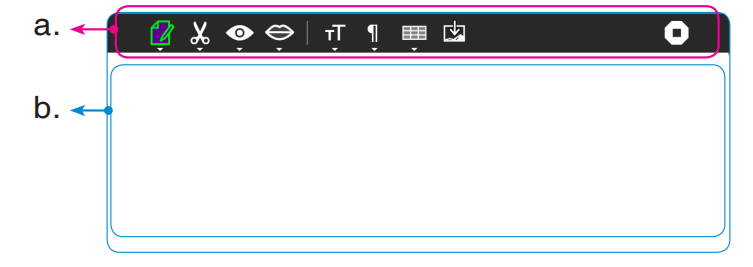
b. How many parts are in Write Activity?
c. Name the two parts labelled with a and b on the picture above. What have you discovered?
I have discovered that:
There are two parts in Write Activity. These are:
• The Toolbar which is the part with icons
• The Text area which is the part where to write.
3.3.3. Formatting a text in Write Activity
Activity 3
a. Look at the following picture

b. Give the role of the part which is shown by an arrow on the picture above
c. State the role of the tools in a blue line on the above picture. What have you discovered?
I have discovered that:
• The arrow shows the tool which is used to format text in Write The tool to change the Font type of the text
 .
. • The to change the size of the text (Font size)
 .
.• The tool to make the text dark black B
• The tool used to make text italic (oblique) I
• The tool to underline the text U
• The tool to change the color of a text of a text you are writing


Can I write this text?
Rwanda is a beautiful country which is in the East African Community.
3.3.4. Changing the Font type (type of text)
Activity 4
a. Look at the following pictures (1, 2, 3, and 4)
b. Do what you see in the pictures 1, 2, 3 and 4. What have you discovered?
I have discovered that:
To change the font type of the text in Write Activity, I follow these steps:
• Write the text.
• Select the text you want to change.
• Click on the tool

• Choose the font type by using this tool

• Choose one font type and click on it.
Application activity
Write the text below:
a. I am Rwandan
b. To fight is bad.
c. A good child loves his/her country.
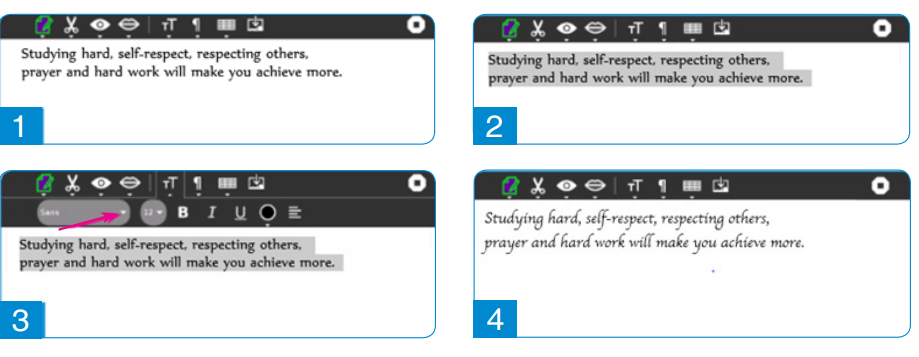
3.3.5. Changing the Font size (Size of a text)
Activity 5
a. Look at the following pictures (1, 2, 3 and 4)
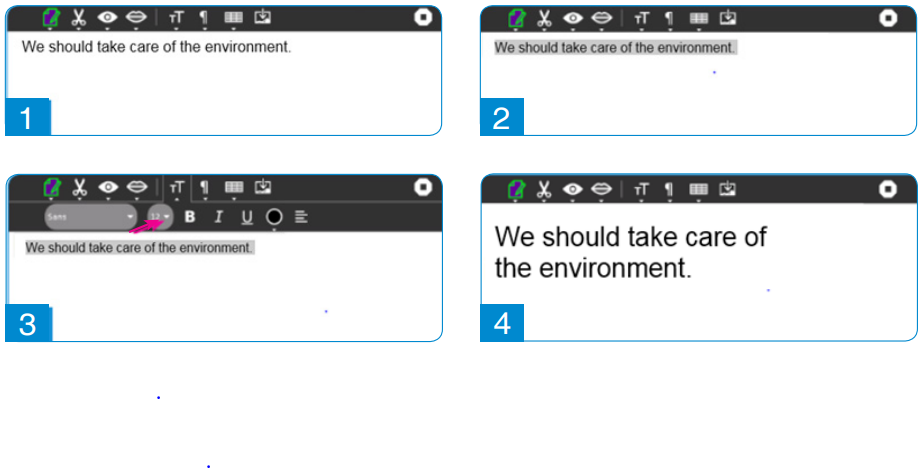
b. Do what you see in the pictures 1, 2, 3 and 4. What have you discovered?
I have discovered that:
To change the font size of a text in Write Activity, I follow these steps:
• Write the text.
• Select the text to change the size.
• Press on the tool to change the size
• Click on the size you want
Application activity
Write the sentences below:
a. A good pupil cleans the classroom and his/her clothes
b. I must visit my neighbor who is sick.
3.3.6. Changing the font of a text to bold
Activity 6
a. Look at the following pictures (1, 2, 3 and 4)
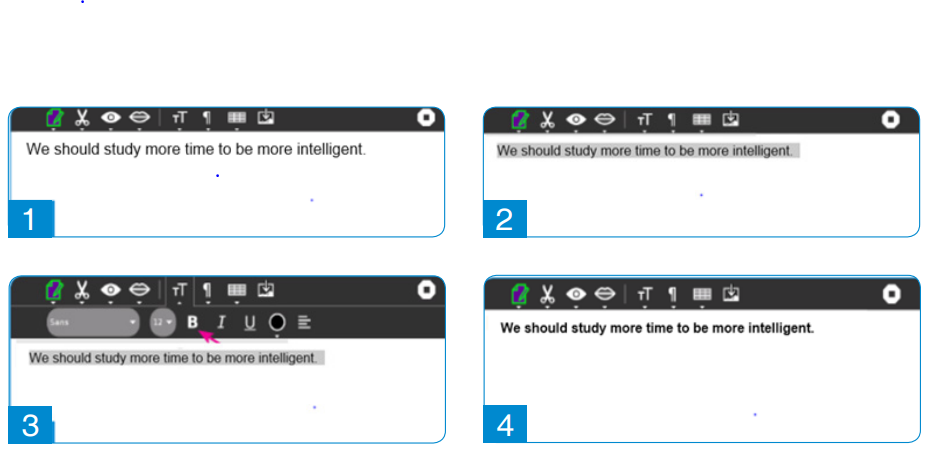
b. Do what you see in the pictures 1, 2, 3 and 4. What have you discovered?
I have discovered that:
To change the font of a text to Bold Write Activity follow these steps:
• Write the text.
• Select the text for which you want to change the font.
• Click on TT tool.
• Click on B
Application activity
Write these sentences:
a. Computer my friend.
b. Every person is able to do something.
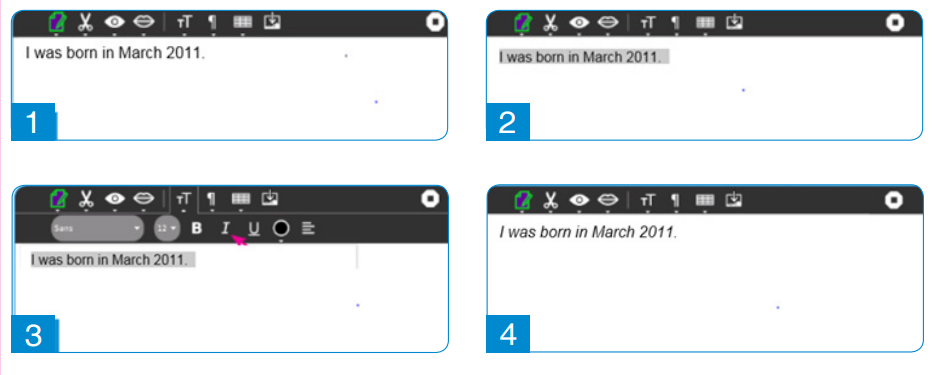
3.3.7. Changing the text to Italic
Activity 7
a. Look at the following pictures (1, 2, 3 and 4)
b. Do what you see in the pictures 1, 2, 3 and 4. What have you discovered?
I have discovered that:
To change the text to italic in Write Activity, I follow these steps:
• Write the text.
• Select the text that you want to put in italic
• Press on TT tool
• Press on I
Application activity
Write sentences like these below:
a. A good pupil respects his classmates.
b. Kinyarwanda is a language which is spoken in Rwanda.
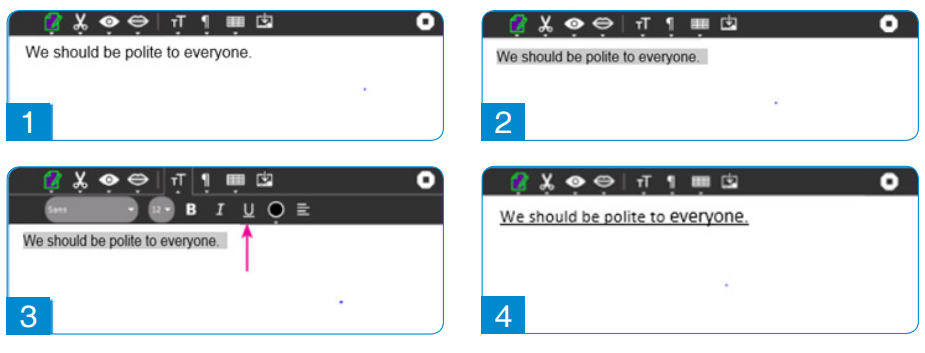
3.3.8. Underlining a text Activity 8
a. Look at the following pictures (1, 2, 3 and 4)
b. Do what you see in the pictures 1, 2, 3 and 4. What have you discovered?
I have discovered that:
To underline a text in Write Activity I follow these steps:
• Write the text.
• Select the text that you want to underline.
• Click on TT tool
• Click on U
Application activity
Write the sentences like these below:
a. Self-reliance is our pride.
b. Rwanda receives many visitors.
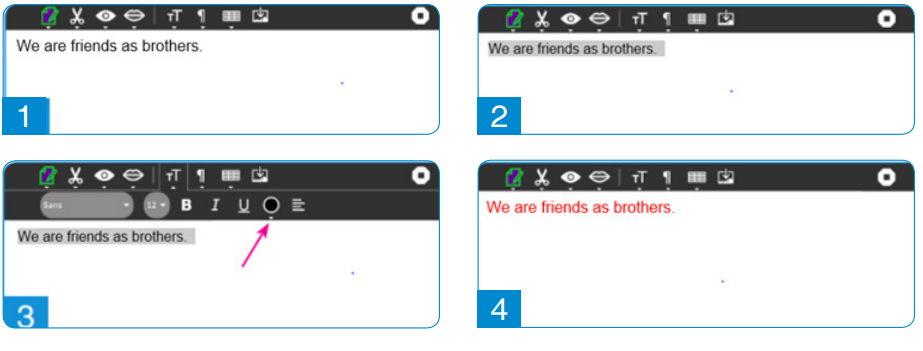
3.3.9. Changing the Font color of a text (color of a text)
Activity 9
a. Look at the following pictures (1, 2, 3 and 4)
b. Do what you see in the pictures 1, 2, 3 and 4. What have you discovered?
I have discovered that:
To change the color of a text in Write Activity I follow these steps:
• Write the text.
• Select the text for which to change the color
• Press on TT tool
• Click on the tool to choose the color you want.
Application activity
1. Write the sentences like these below:
a. Kigali is the capital city of Rwanda.
b. Rwanda Nziza.
2. Write the following words. Do not change the way they are written.
Justice Education Farming Health care
Agriculture Transport
3.4. Record Activity Program
3.4.1. Opening the Record Activity program

Activity 1
a. Look at the following pictures 1, 2 and 3.
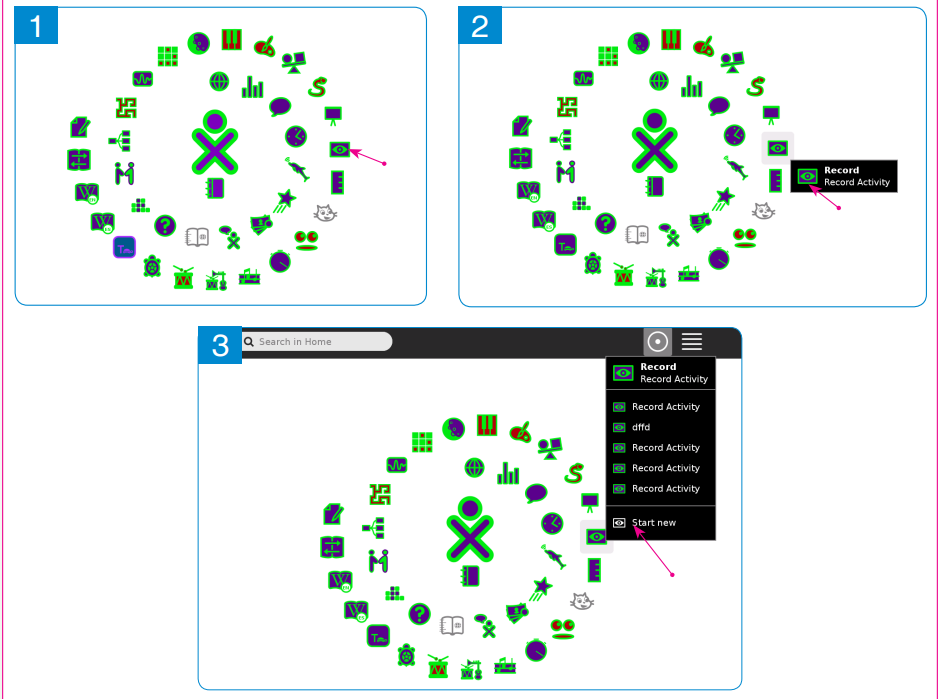
b. Do what you see in the pictures1, 2 and 3. What have you discovered?
I have discovered that:
To open the “Record Activity” program in XO laptop, I must follow these steps:
• Go to “Home view” of your XO laptop.
• Put the pointer on the icon of Record activity program

• Click the button “Start new”.
3.4.2. Taking pictures in Record
Activity Activity 2
a. Look at the following picture:
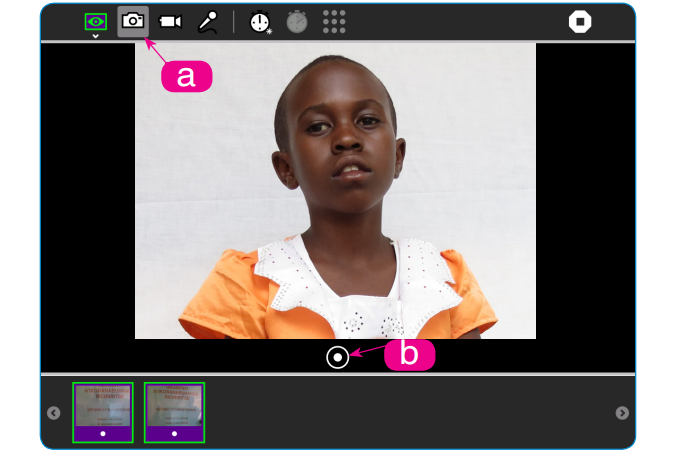
b. Do what you see in this picture. What have you discovered?
I have discovered that:
To take a picture using an XO laptop, you open the Record Activity program and follow these steps:
• Click the button “Camera”
 which is shown by letter
 on the picture. Check if you can see well the
picture you are going to take.
on the picture. Check if you can see well the
picture you are going to take.• Click on the button to take the picture
 . It is shown
by letter
. It is shown
by letter which you can see on this picture.
Application activity
Take your picture using an XO laptop camera.
3.4.3. Taking a video and record sound in Record Activity
Activity 3
a. Look at the following pictures 1 and 2:
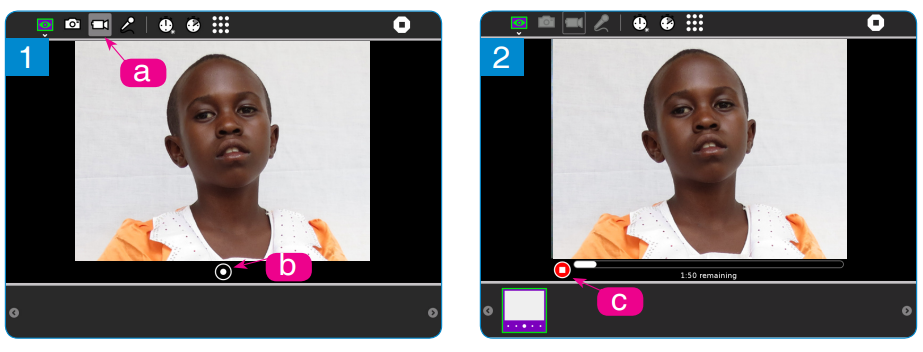
b. Do what you see in the pictures 1 and 2.
I have discovered that:
To take video and record sounds using an XO laptop, you open Record Activity and follow these steps:
• Click on the icon for Video
 which is shown by
small letter
which is shown by
small letter  on the first picture. Check if you can
see well the video you are taking.
on the first picture. Check if you can
see well the video you are taking. • Click on the icon for Record
 which is shown by
small letter on the first picture.
which is shown by
small letter on the first picture. • Press the red icon
 which is shown by small letter
 which you can see on the second picture. Save
the picture you have taken.
which you can see on the second picture. Save
the picture you have taken.Application activity
Say the names of the months and record your voice while saying them.
3.4.5. Naming pictures, sound and videos you have taken
Activity 5
a. Look at the following pictures 1, 2, 3 and 4:
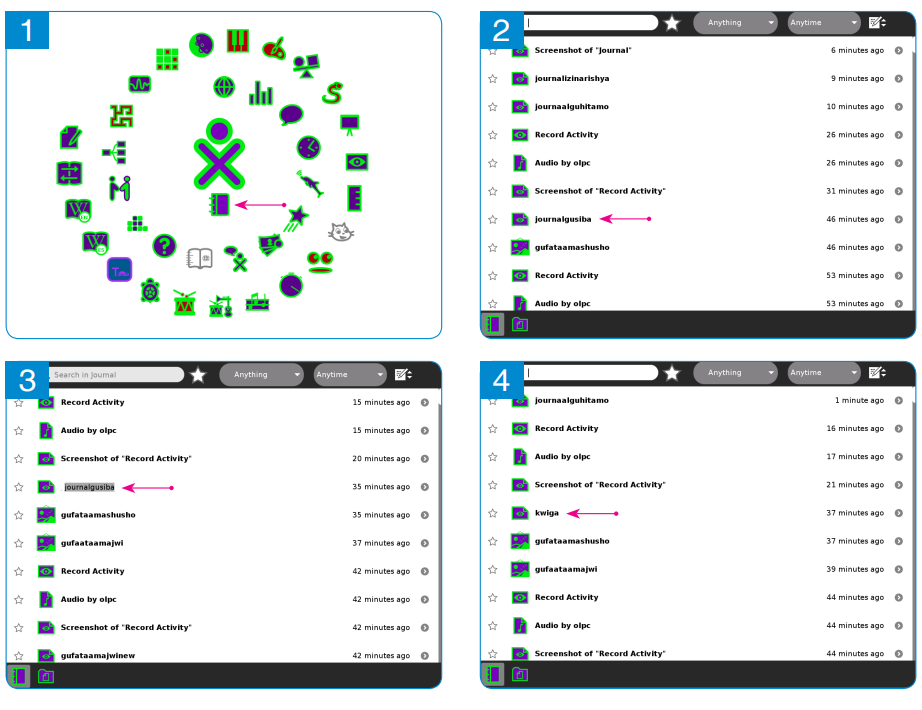
b. Do what you see in the pictures 1, 2, 3 and 4.
I discover that:
To name what you have taken in an XO laptop, follow these steps:
• Go to “Home view” of an XO laptop.
• Click on the Journal icon
 to open it
 • Select what you want to name and double click it
• Delete the old name and write a new name.
• Press the “Enter key” on the keyboard.
3.4.6. Deleting pictures, sound and videos you have taken
Activity 6
a. Look at the following pictures 1, 2, 3 and 4:
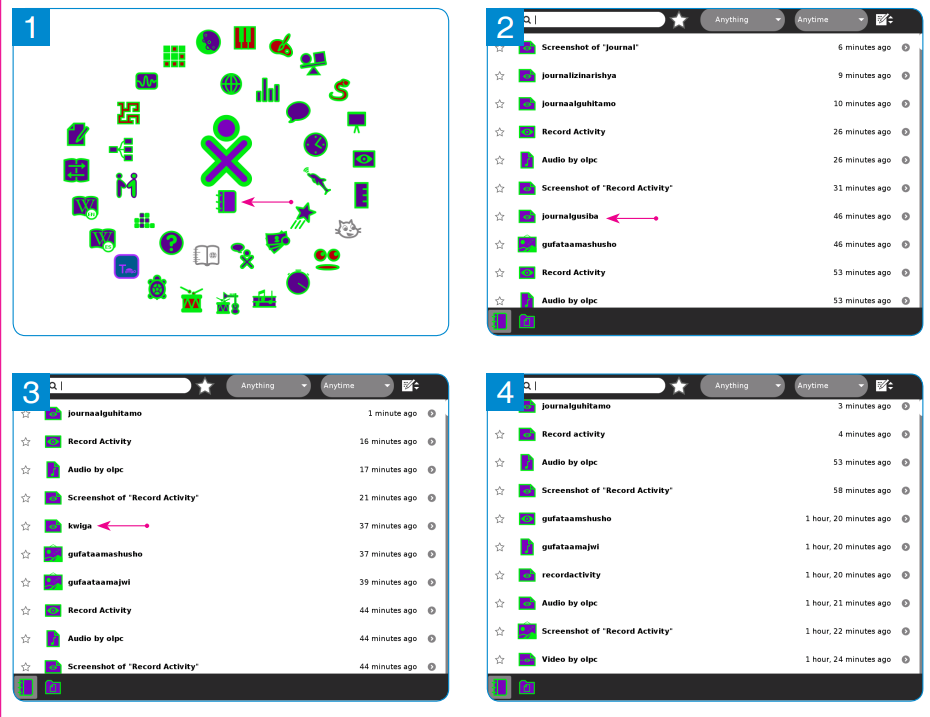
b. Do what you see in the pictures 1, 2, 3 and 4
I have discovered that:
To delete what you have taken in XO laptop, follow these steps:
• Go to “Home view” of an XO laptop.
• Open Journal of an XO laptop

• Put the pointer on what you want to delete and press the “Erase key”.
• Press “Erase” on the window that appears. What you delete leaves immediately the Journal.
End of unit assessment 3
1. Write the following story in Write Activity with an XO laptop.
One day Gabriel and Nancy went to the market together. They were talking about their success in school. Gabriel bought exercise books and pens. Nancy bought sports shoes because those she had were old.
Gabriel and Nancy were good children, they were well educated. When they finished buying they went home.
2. Take your own pictures (selfies) and record your voice while singing the Rwanda National Anthem “Rwanda Nziza” using an XO laptop.
3. Delete the pictures you have taken today.
4. Use Typing Turtle to write:
a. The letters which are in the middle row of the keyboard.
b. Words which have letters in balloons in the middle and first rows.
c. Capital letters using your right hand.
5. Use an XO laptop to take a video of yourself. Save it and give it a name.
6. Go to where you have saved the Rwanda national Anthem and name it “Rwanda Nziza”.
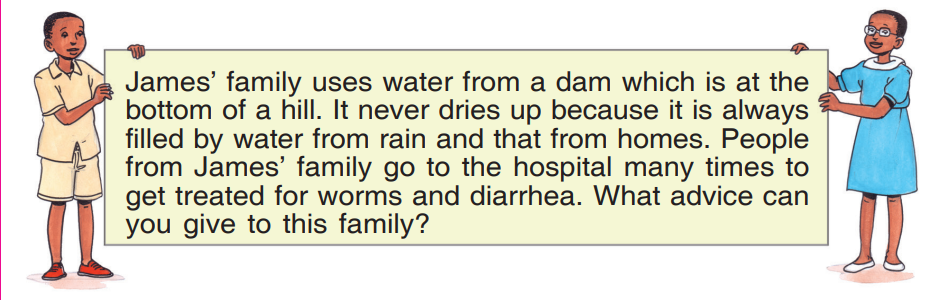
UNIT 4: WATER
4.0. Introduction
4.1. Preparation of drinking water
4.1.1. Boiling water for drinking
Activity 1
a. Look at these pictures 1, 2,3,4,5 and 6:
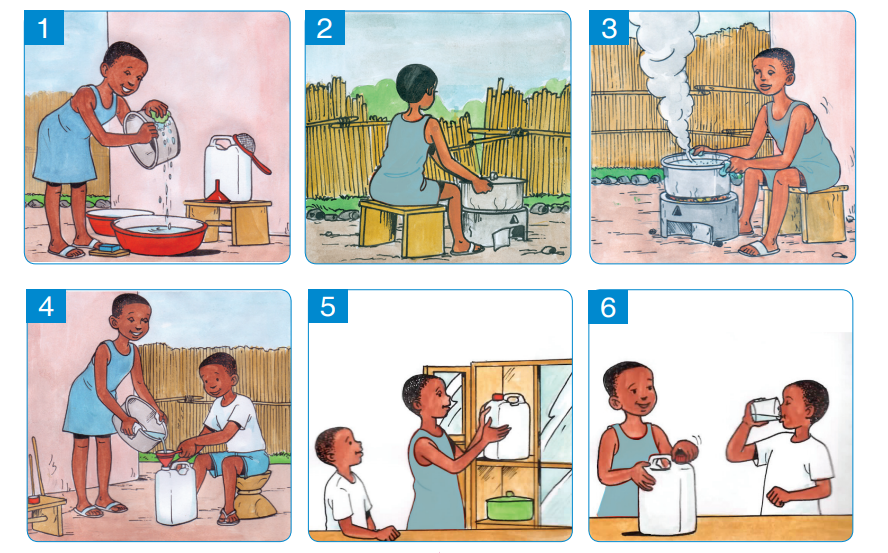
b. What materials can you see in picture 1?
c. Which picture shows:
1. Boiling water?
2. Filtering water?
3. Keeping water in a well-covered container?
d. Follow the steps shown in the pictures and prepare drinking water.
I have discovered that:
To prepare drinking water, you must follow these steps:
• Clean all the materials that you are going to use.
• Boil water which is well covered.
• Let water cool down until it is warm.
• Filter water with a clean filter (sieve).
• Keep the drinking water in a very clean and covered container.
• Drink water using a clean cup or glass
I have decided to:
√ Always drink boiled water which is filtered and well kept.
√ Avoid drinking dirty water because it can cause illnesses like cholera, diarrhea, worms, dysentery, typhoid and others.

Can you prepare drinking water?
Remember: You need the help of an adult
Application activity
Talk to your parents and friends on how to boil and filter drinking water and how to keep it well.
4.1.2. Cleaning drinking water using chemicals e.g. “SUR’EAU”
Activity 2
a. Look at pictures 1,2,3,4,5 and 6:
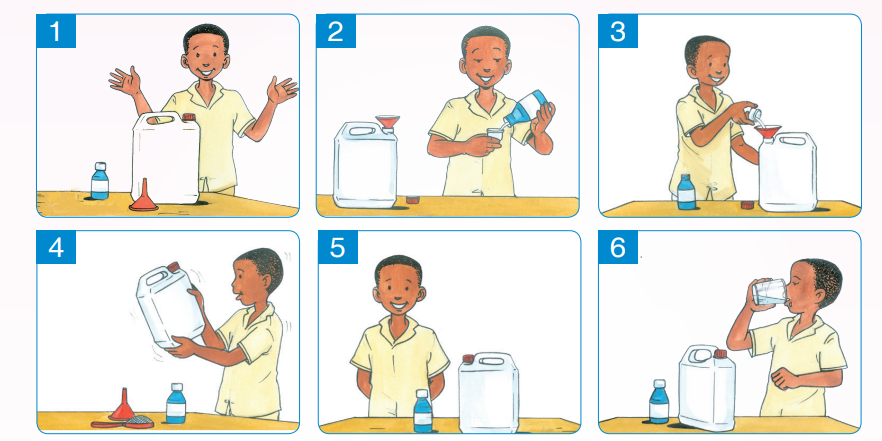
b. Name the materials which can be used to prepare drinking water as shown in the pictures.
c. In which pictures can you see the following
1. Shaking water which contains “Sur’ Eau”.
2. Waiting for “Sur’ Eau” to work.
d. How does “Sur’ Eau” clean drinking water?
I have discovered that:
I can use “Sur’ Eau” to clean water following the steps below:
√ Prepare the necessary materials in a clean way.
√ Measure “Sur’ Eau” by using the cup with recommended measurements.
√ Pour “Sur’ Eau” in the water I want to clean.
√ Shake the container until “Sur’ Eau” is well mixed with water.
√ Put water mixed with “Sur’ Eau” at the right place. Cover this water very well and wait for 30 minutes.
√ Drink water with a clean material.
Application activity
1. Put 10 liters of water in a clean container.
2. Pour “Sur Eau” into water in the right quantity. With one small cup of “Sur’ Eau”, you can prepare 20 liters of water. With a half of small cup of “Sur’ Eau”, you can clean 10 liters of water.
3. Filter the drinking water with a clean filter.
End of unit assessment 4
1. Explain how you can treat water using the disinfectant “Sur’Eau”
2. List down any three diseases caused by drinking dirty water.
3. Name any one chemical which is used to clean water for drinking.
4. List the steps that you can follow when preparing water for drinking.
5. Why do people boil water for drinking?
6. Arrange the following steps of cleaning water in their correct order.
a. Cover drinking water
b. Drink clean water
c. Wash your hands d. Pour “Sur’ Eau” into the water
e. Prepare the materials
f. Shake the water
7. Write all the materials needed to boil water for drinking.
UNIT5: SOIL
5.0. Introduction
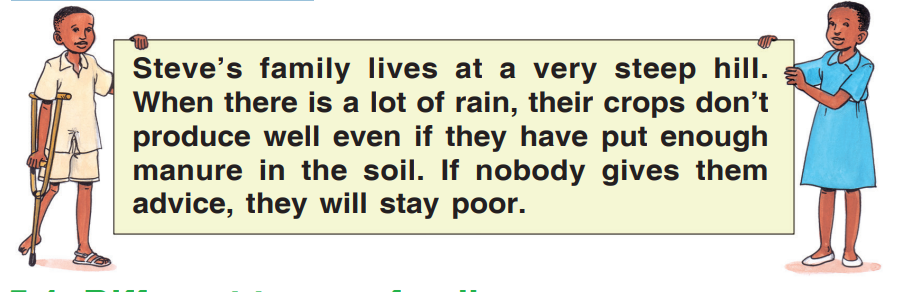
5.1. Different types of soil Activity
a. Look at the following pictures 1, 2, and 3

b. Name the different types of soil you observed on pictures 1, 2, and 3 above.
I have discovered that:
There are three types of soil:
√ Clay soil: This does not allow water to pass through easily.
√ Sandy soil: This allows water to pass through easily.
√ Loam soil: This is a mixture of sand and clay. It does not lose water easily.
Activity
Collect different types of soil from your home or on your way to school. Bring them to school and show them to your teacher and classmates.
5.2. Erosion Erosion is the washing away of top soil by running water or wind.
5.2.1. Types of erosion
Activity 1
a. Look at these pictures:
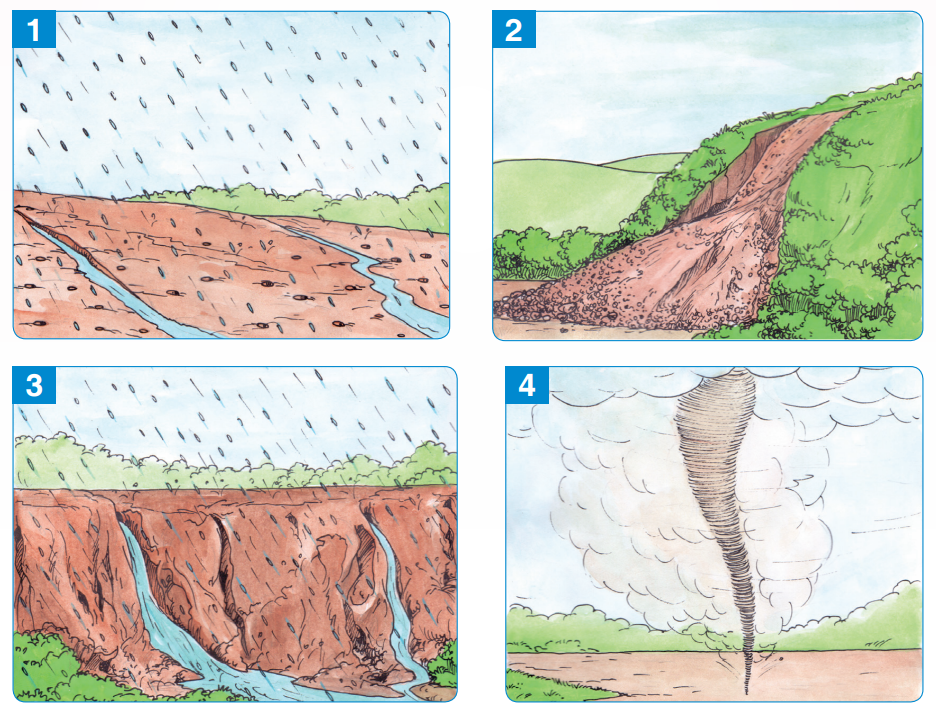
b. What do these pictures show?
c. What are the causes of erosion?
I have discovered that:
There are many types of erosion:
a. Erosion caused by rainy water: Water from the rain takes soil when it flowing.
b. Landslide: This is caused by too much water from rain.
c. Erosion caused by floods
d. Erosion caused by the storm (strong winds) which sweeps soft soil and leaves strong soil. Erosion takes away soil and anything it finds on its way. Landslides destroy houses and roads. They carry away crops and may kill people and animals.
Application activity
Talk to your friends about the bad effects of landslides.
5.2.2. Causes of erosion
a. Look at the following pictures 1, 2, 3, 4, 5 and 6.
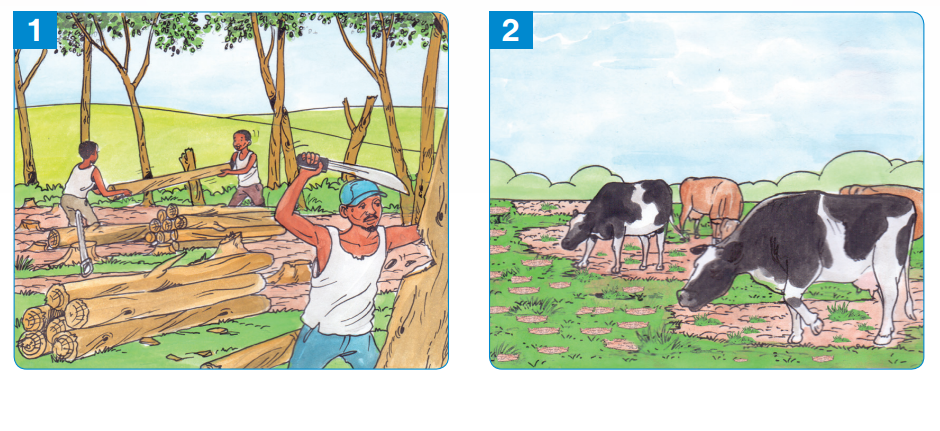
I have discovered that:
Erosion is caused by the following:
- Cutting down trees - Burning bushes.
- Over grazing. - Too much wind.
- Rain water.

1. What are the bad effects of wind?
2. Give any two bad effects of cutting down trees.
Application activity
1. What is erosion?
2. Why should farmers avoid over grazing?
3. Complete the following sentences with correct words.
a. People cause erosion by cutting down _________.
b. _________which graze in the fields eat everything that covers soil and when there is rain or __________ wind, it takes away soil.
c. People who burn ___________cause erosion.
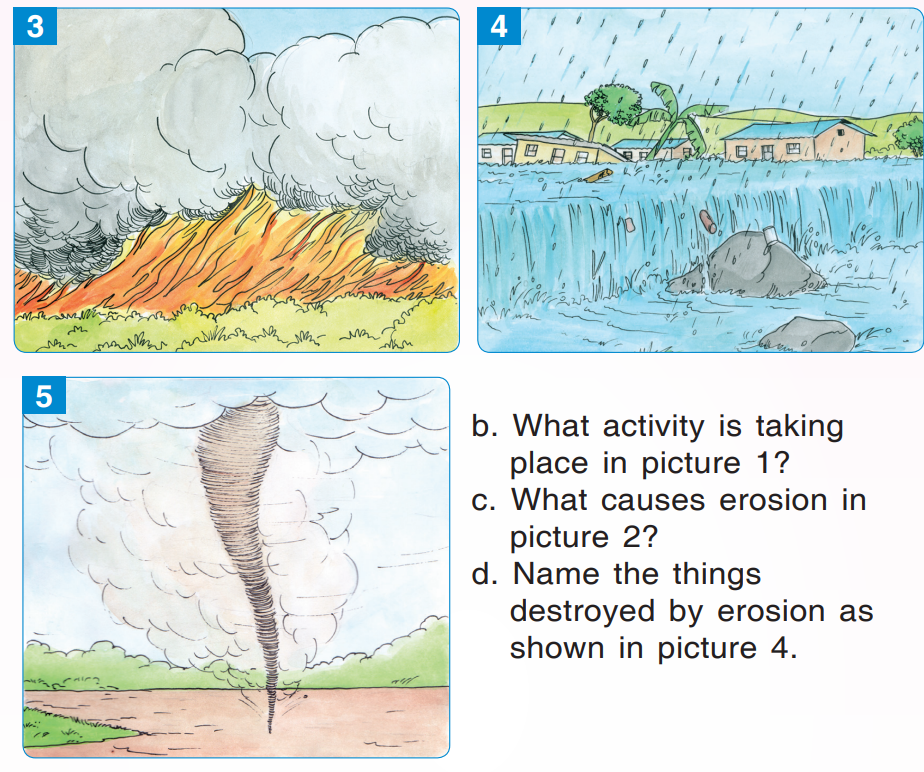
5.2.3. Ways of preventing soil erosion
Activity 3
a. Look at the following pictures 1,2,3,4 and 5.
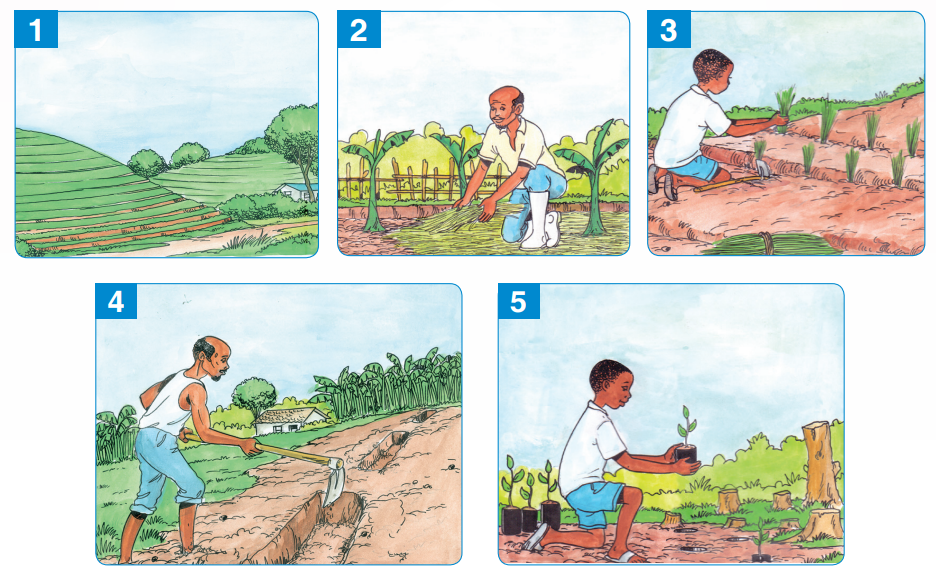
b. What do you see in these pictures?
c. Explain the importance of activities shown in the pictures.
d. Which type of grass do you know can prevent soil erosion?
I have discovered that:
In order to prevent soil erosion, you should:
1. Make terraces
2. Do mulching
3. Plant grass.
4. Plant trees mostly on hills and mountains.
Application activity
Have a small garden and protect it from soil erosion.
End of unit assessment 5
1. Answer YES or NO
a. Terracing can prevent erosion.
b. It is not good to plant trees on mountains.
c. Keeping animals in a shed causes erosion.
d. Planting trees which can grow with crops can prevent erosion.
e. Light drops of rain water can cause erosion.
f. Clay and sand soil are types of soil.
g. Burning forests prevent erosion.
2. List examples of grass and trees which people plant to prevent soil erosion.
3. Apart from soil, write two other things that can be destroyed by erosion.
4. Explain the word “Landslide”
5. Name the types of erosion which happen in your area.
6. State other ways of soil prevention which are not in the pictures.
7. Explain the role of mulching the garden.
8. Name the types of grass people use to feed animals in your area.
9. Explain the ways people in your area use to prevent soil erosion.
UNIT 6: ANIMALS
6.0. Introduction
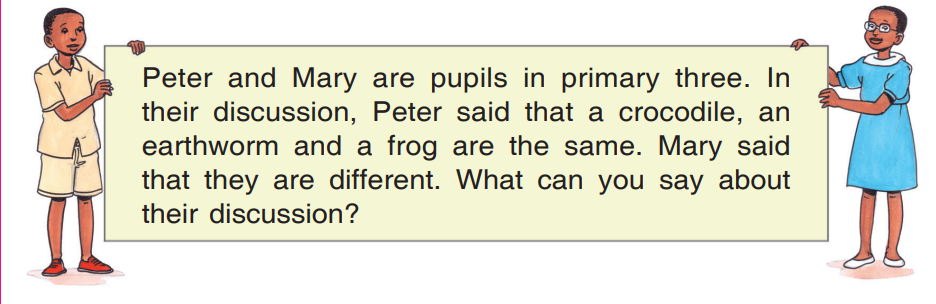
6.1. Vertebrate animals
Activity 1
a. Look at the following pictures 1 to 9
b. Name the animals you see in the pictures.
c. What is common in all the animals in the pictures?
d. Do you think a fish, snake and frog have bones in their body?
I have discovered that:
Vertebrates are animals with a backbone. All vertebrates have bones in their bodies.
Examples of vertebrates include; a goat, cow, crow, bird, toad, fish, and others.
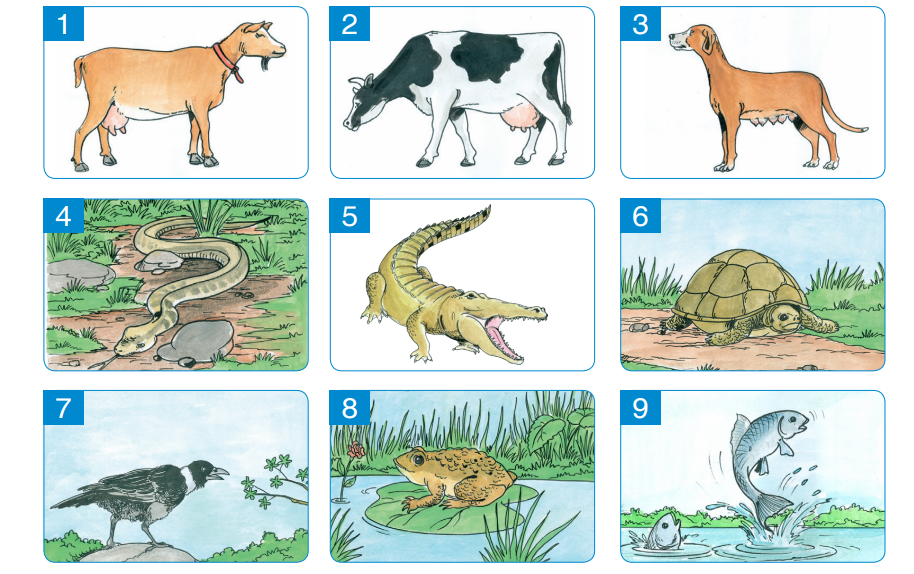
6.2. Invertebrate animals
Activity 2
a. Look at the following pictures 1, 2,3,4,5, and 6
b. What is common in all the animals above?
I have discovered that:
Invertebrates are animals without backbone. Some invertebrates have three main body parts, which are Head, thorax and abdomen. Examples include insects, worms and snails.
End of unit assessment 6
1. What is the difference between vertebrates and invertebrates?
2. Name any two domestic animals which are vertebrates.
3. State one wild animal which is a vertebrate.
4. List any two examples of invertebrates.
5. Group the animals below into vertebrates and invertebrates: Flea, cow, mosquito, lion, bees, dog, hen, wasp, rabbit and beetle.

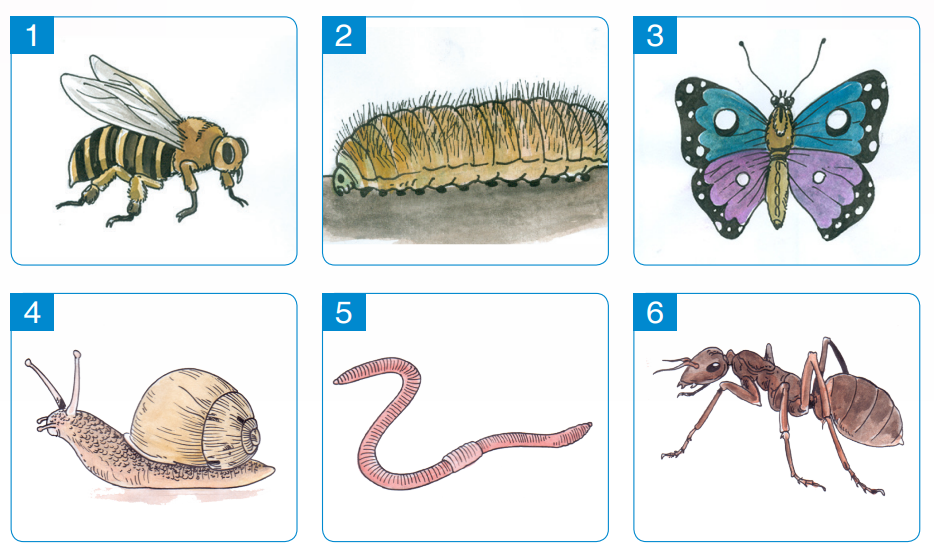
6. Look at the following table and put a tick () where the answer is correct and a cross (x) where the answer is wrong.
7. Circle animals which have no backbone.
a. Wasp d. Fish g. Mole
b. Caterpillar e. Black ant h. Rabbit
c. Smelling ant f. Sheep i. Ant\
UNIT 7: MUSCLES AND BONES
7.0. Introduction
7.1. Parts of a human body
Activity 1
a. Look at the following pictures
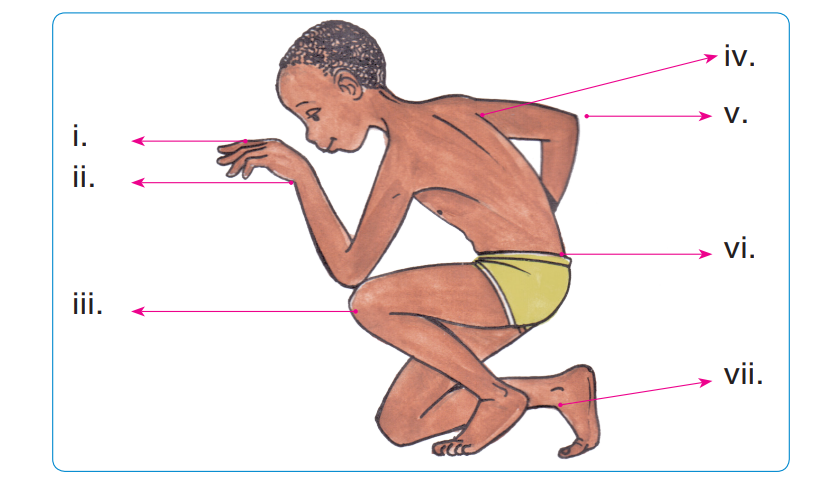
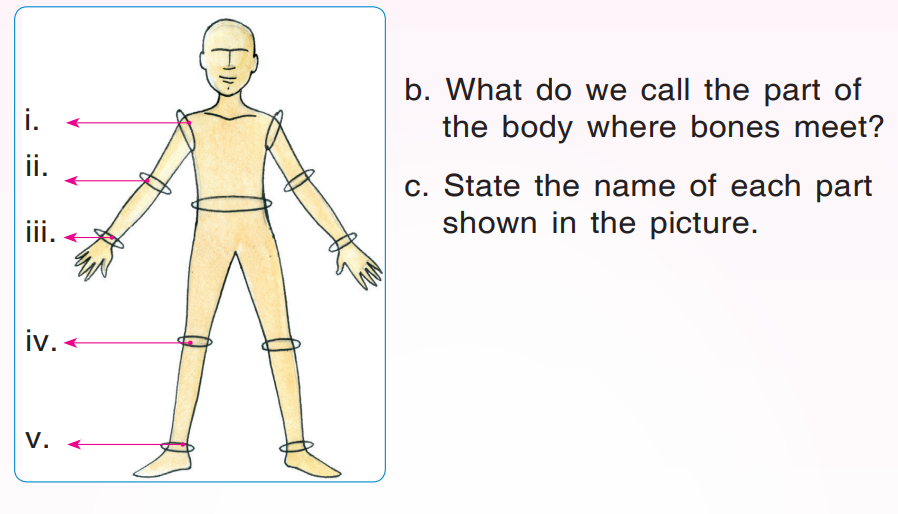
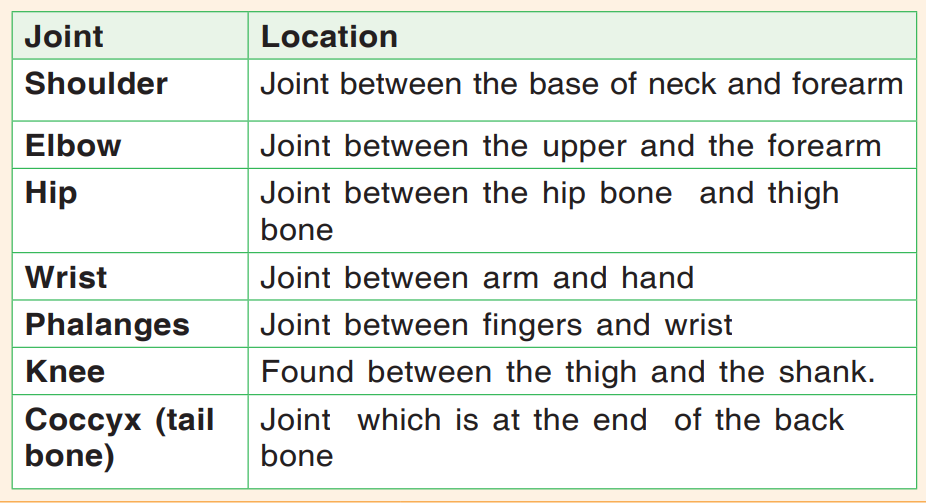
I have discovered that :
A joint is where bones meet.
The table below shows joints in the human body:
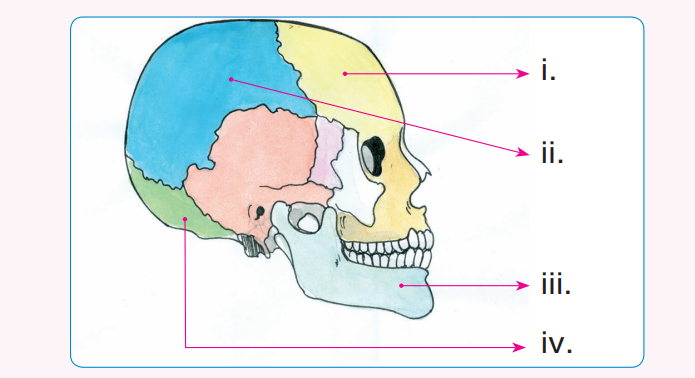
7.2. Bones of the human body
7.2.1. Bones of the head
Activity 1
a. Look at the picture below:
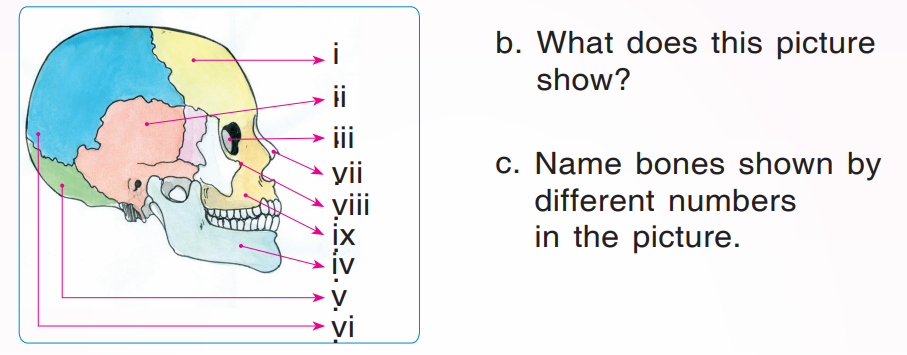
I have discovered that
Human head is made up by the following main bones:
• Frontal bone (i) • Occipital bone (v),
• Temporal bone (ii), • Parietal bone (vi),
• Zygomatic bone (Viii) • Nasal bone (vii)
• Mandible bone (iv • Orbit bones (iii)
• Maxilla (ix)
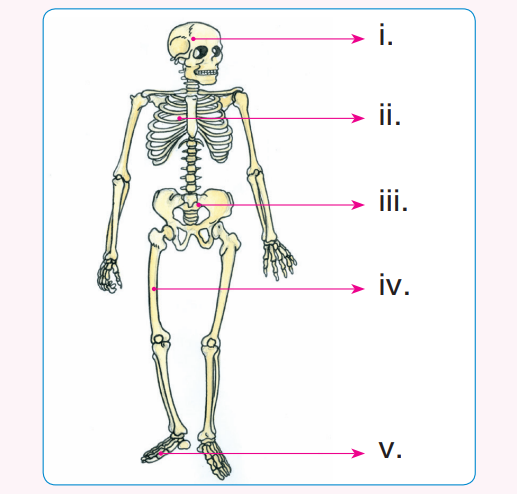
7.2.2. Bones of the trunk
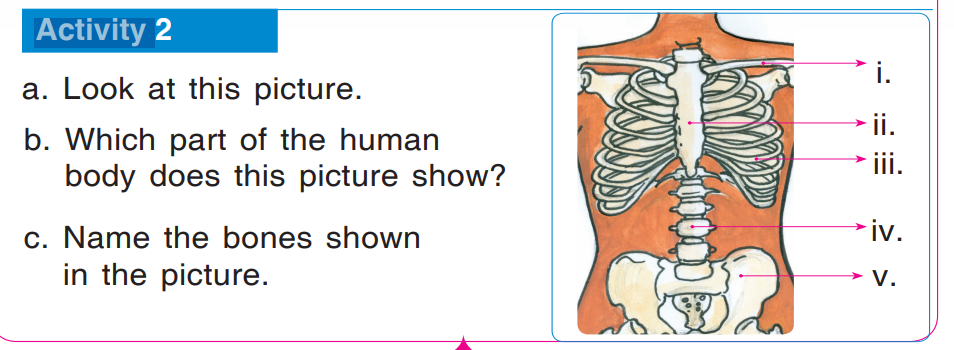
I have discovered that:
The bones of the trunk are the following:
• Clavicle (i) • Ribs (iii)
• Sternum (ii) • Backbone (iv) • Hip bone (v)
7.2.3. Bones of the arm
Activity 3
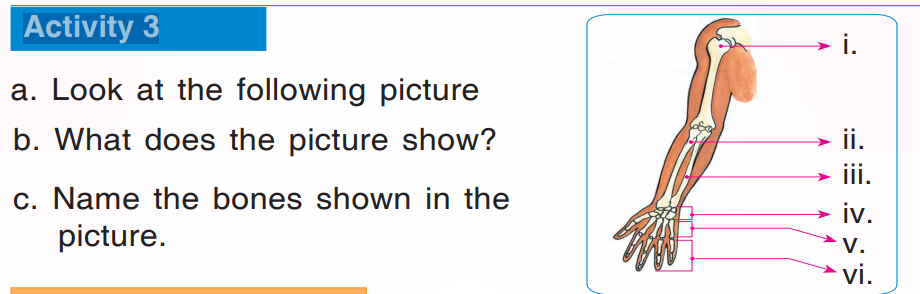
I have discovered that:
The arm is made up of the following bones:
• Humerus (i) • Carpals (iv)
• Radius (ii) • Metacarpals (v)
• Ulna (iii) • Phalanges or bones of the fingers (vi)
7.2.4. Bones of the legs
Activity 4
a. Look at this picture:

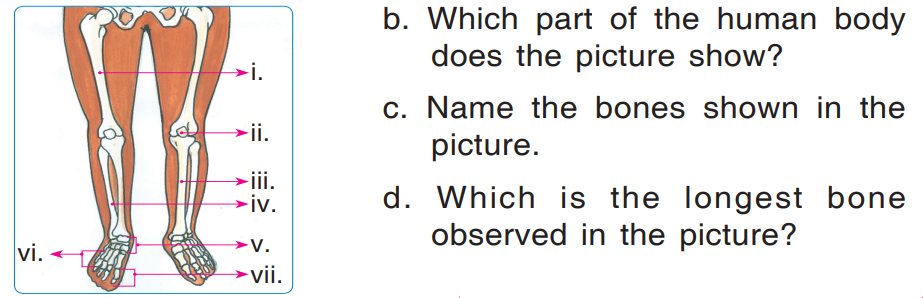
I have discovered that:
The bones of the leg are:
Femur (i) Tibia (iii) Talus (v)
Patella (ii) Fibula (iv) Cuboid (vi)
N.B: The femur is the longest bone of skeleton.
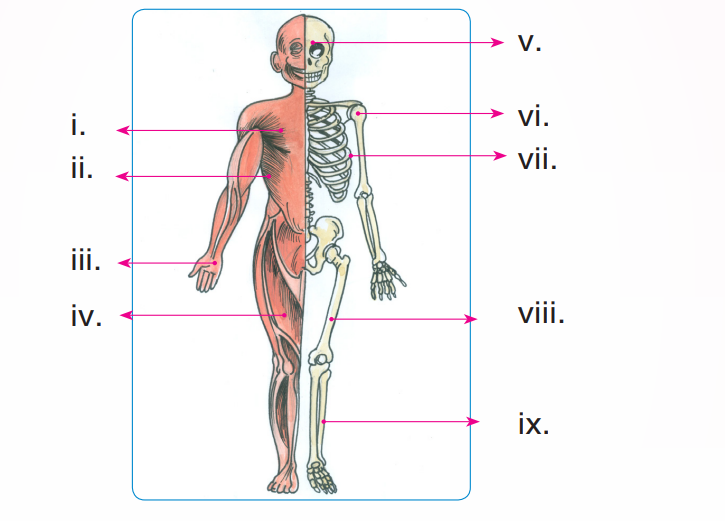
7.3. The muscles of the human body
Activity 1
a. Look at the picture below:
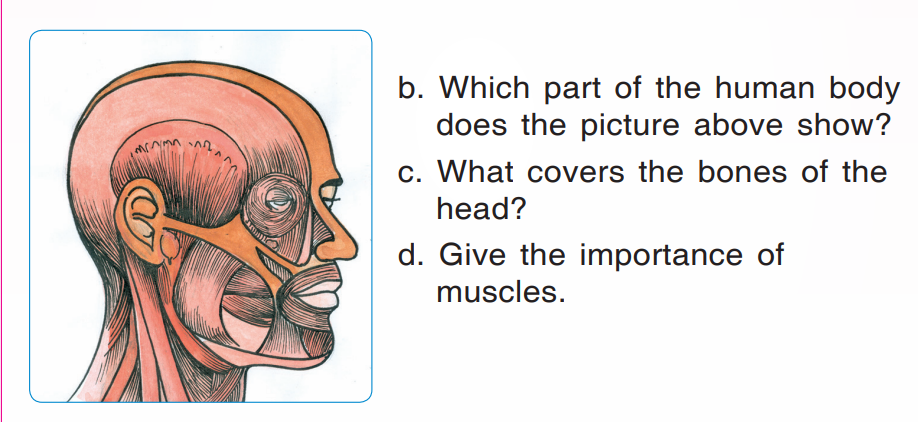
I have discovered that:
• Human head bones are covered by tissue known as muscles.
• All head bones are covered by muscles.
• Muscles help body joints to perform movement like touching, walking, running, and bending.
7.3.2. Muscles of the trunk
Activity 2
a. Look at the following pictures:
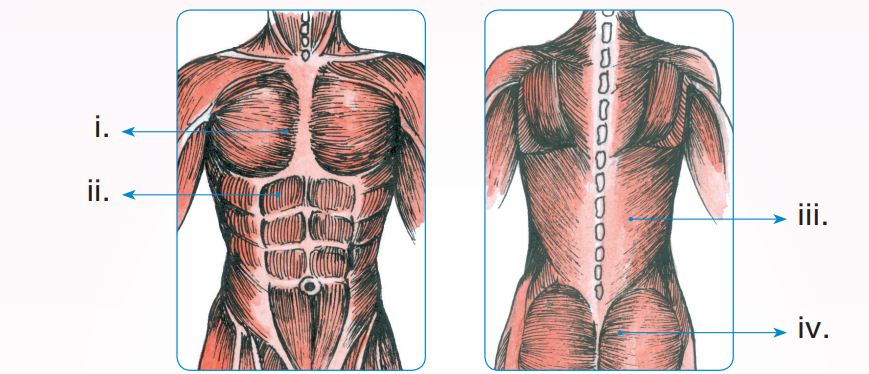
b. What do the pictures above show?
c. Name the muscles shown by the letters i, ii, iii, iv.
I have discovered that:
The human trunk is made up of the following main muscles:
Abdominal muscles, trunk muscles, bum muscles and back muscles.
• Trunk muscles (i): They help in movement of the upper trunk.
• Abdominal muscles (ii): These help in body movement and breathing.
• Back muscles (iii): These help in movement of the back as well as sleeping.
• Bum muscles (iv): They help people to sit and sleep.
7.3.3. Muscles of the leg
Activity 3
a. Look at the following picture
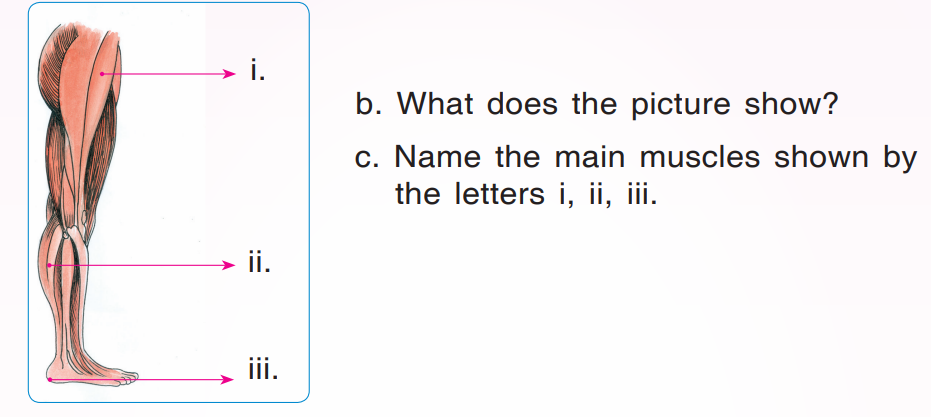
I have discovered that:
The main leg muscles are:
• Thigh muscles (i)
• Calf muscles (ii)
• Heel muscles (iii)
7.3.4. Muscles of arm
Activity 4
a. Look at the picture below:
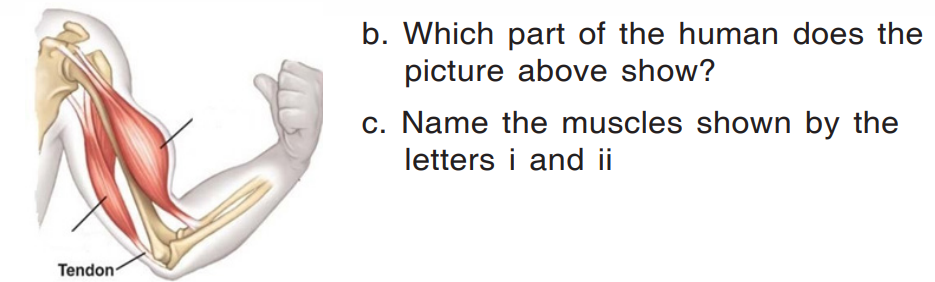
I have discovered that:
The main muscles of the arm are the following:
• Biceps
• Triceps
7.4. Comparing joints, muscles and bones
Activity
a. Look at the diagram below.
b. What are the 3 main body parts that make up the picture above?
c. Write one sentence about each of the parts above.
I have discovered that:
The human body is made up of:
Bones which make up the body structure.
Joints which join bones together, all covered by muscles.
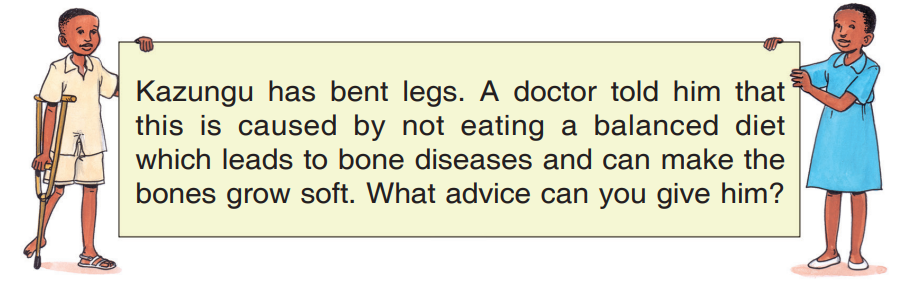
7.5. Taking care joints, muscles and bones
Activity
a. Look at the pictures 1 and 2:
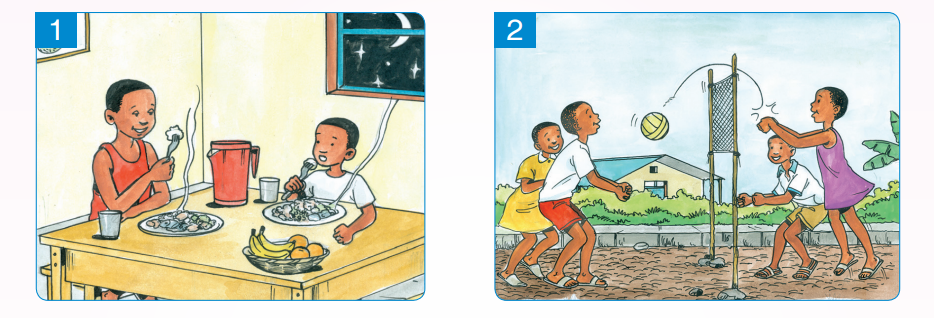
b. What do these pictures show?
c. How can we keep our muscles, joints and bones healthy?
I have discovered that:
We take care of our muscles, joints and bones by:
• Doing physical exercises.
• Eating a balanced diet.
• Drinking a lot of water.
End of unit assessment 7
1. Fill the gaps with the correct words:
a. The bones of skull are called ___________________. b. ________________ is the longest bone in the body.
2. What can you do to take care of your joints, muscles and bones?
3. Name the joints found in the human leg.
4. Give any two the functions of bones
5. State the name of bones around the eyes.
6. Name the bones marked with letters i, ii, iii, iv in the following picture:
7. Where in the body are the following bones located?
a. Back bone
b. Femur
8. What is a joint?
9. The diagram below shows the human skeleton.
Draw and name the parts marked i, ii, iii, iv, and v.
10. Give any one function of muscles.
UNIT 8: TYPES OF ENERGY
8.0. Introduction
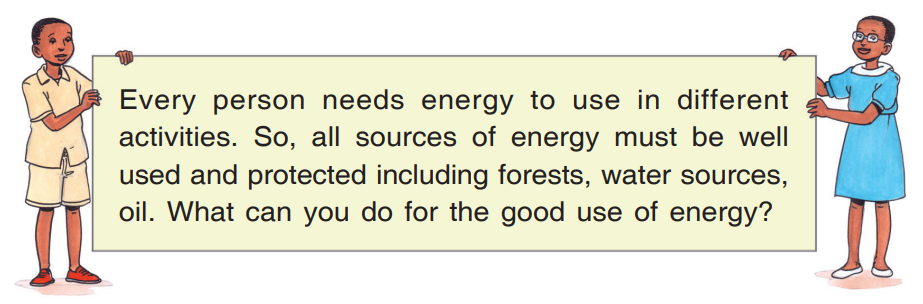
8.1. The meaning of Energy
Activity 1
a. Look at the following pictures 1, 2,3,4,5, and 6:
b. As seen from the pictures:
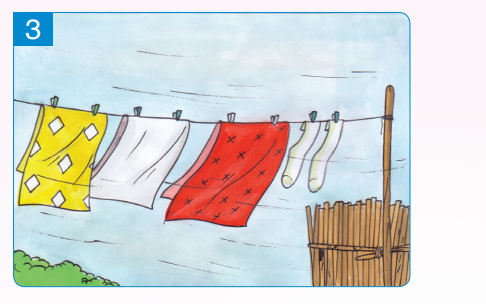
1. What makes an umbrella to fly?
2. What makes wet clothes to dry?
c. What form of energy is used to do the following?
1. Cooking food
2. Playing a ball
d. What are other forms of energy are not shown in the diagram?
I have discovered that:
Energy is ability to do work.
• Energy helps in movement of people and materials.
• Energy gives us light and heat.
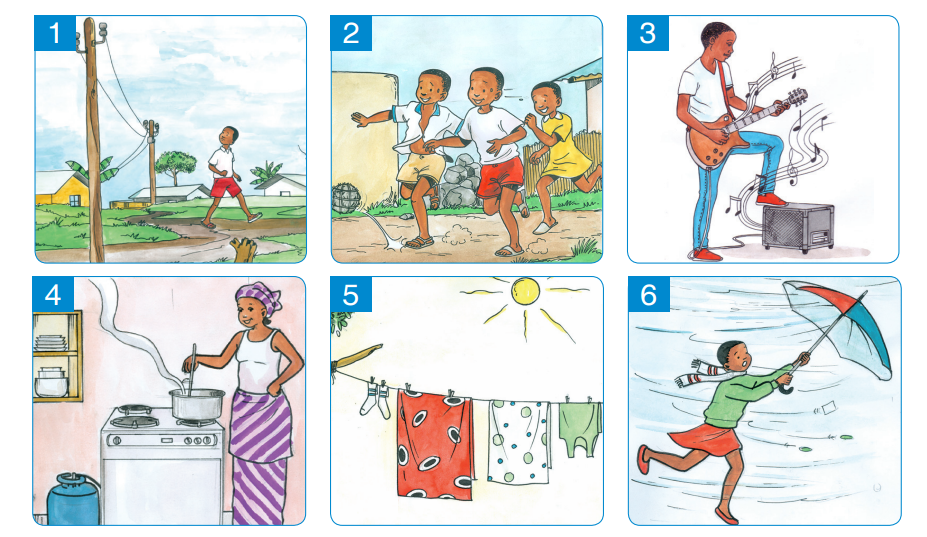
8.2. Sources of energy
Activity 1
a. Look at the following pictures 1, 2,3,4,5 and 6.
b. Name any two the sources of heat energy used in cooking food.
c. Give two examples of sources of energy used in vehicles.
d. Apart from those seen in the pictures above, give other examples of sources of energy.
I have discovered that:
• Charcoal, wood and gas provide heat energy that is used for cooking food.
• Gasoline or petrol and diesel provide energy that helps to move vehicles.
8.3. Types of energy
Energy exists in many different forms or types
8.3.1. Forms of energy
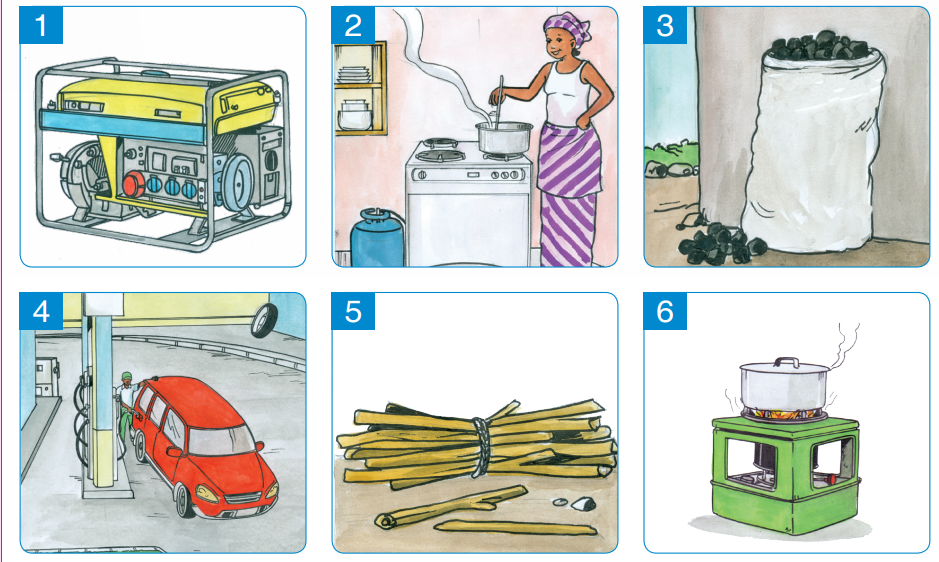
Activity 3.a
a. Look at the following pictures 1, 2, 3 and 4

b. What is the type of energy used in doing activities shown in the pictures?
c. Name the source of light energy shown in the pictures.
d. Apart from the sun, name any other two sources of light.
e. What type of electricity is got from solar energy?
I have discovered that:
Solar energy is energy from the sun. It gives light and heat. Light and heat from the sun helps in:
• Drying wet clothes
• Providing electricity
• Growing of plants.
8.3.2. Source of heat
Activity 3.b
a. Look at the following pictures 1, 2, 3, and 4.
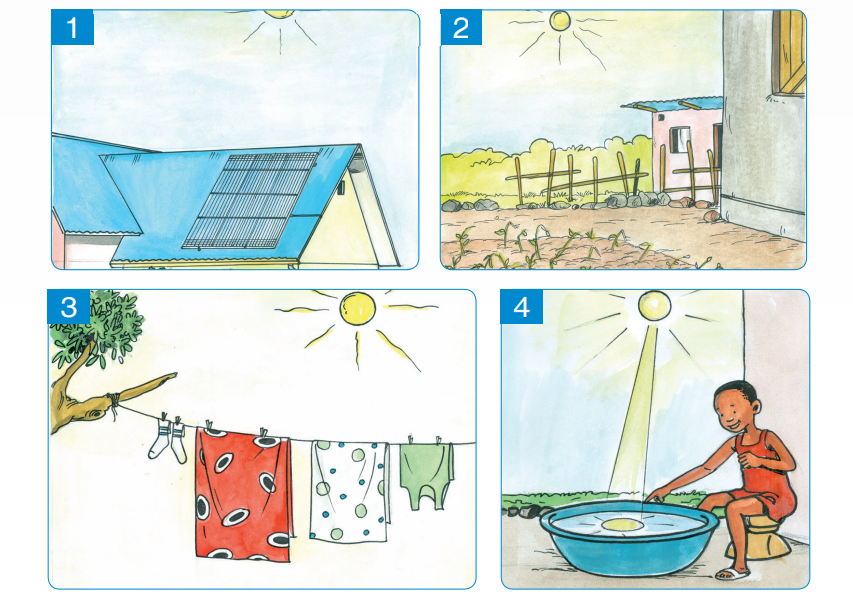
b. What form of energy is used in activities shown in the pictures?
c. What are the sources of energy used in activities seen in the pictures?
d. Give a reason why plants in picture 4 dried up?
I have discovered that:
Heat is a form of energy. Heat moves from hot objects to cool objects. It is got from the sun, electricity and burning fuels. Heat helps in burning, cooking food, ironing, etc.
Remember: When heat from the sun is too much for a long period of time, it may cause drought. This may lead to famine.
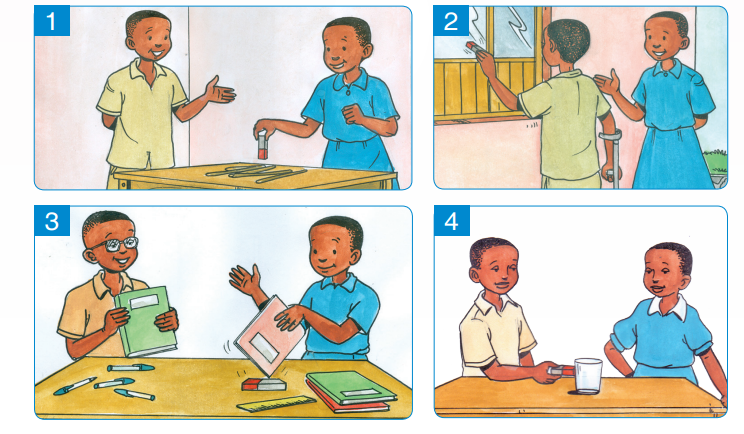
8.3.3. Materials that produce sound
Activity 3.c
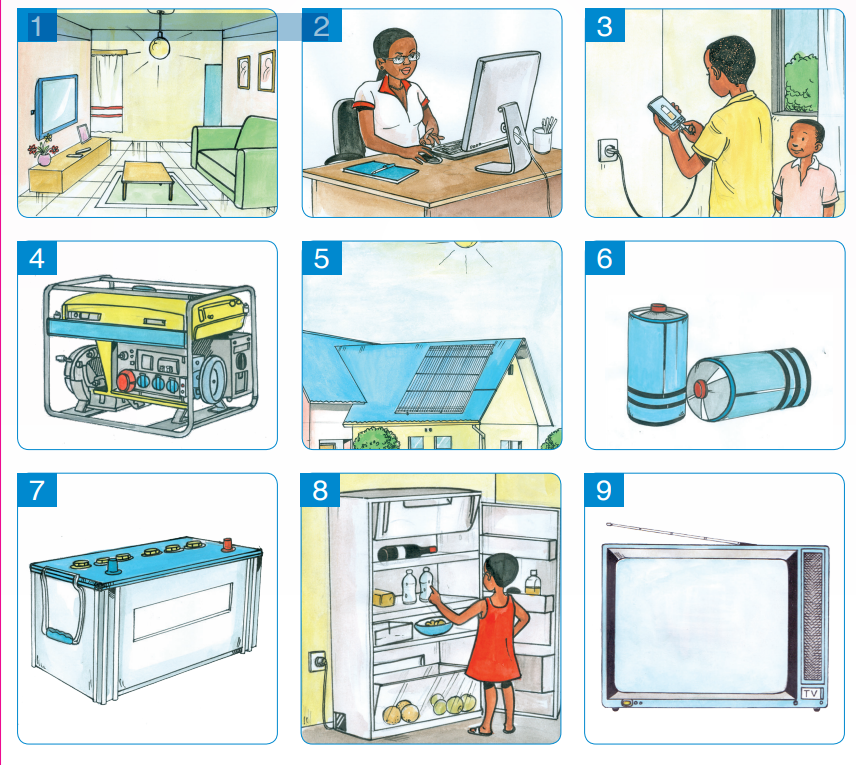
a. Look at the following pictures 1 and 2:
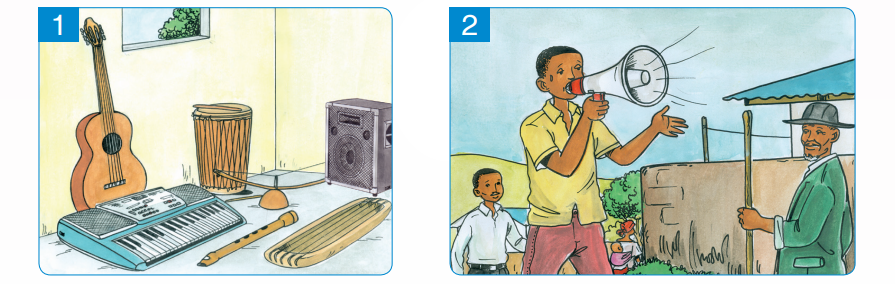
b. What do you see in the pictures 1 and 2?
Name the form of energy produced by the loud speaker in picture 2?
c. Name the music instruments shown in picture 1
I have discovered that:
• Sound is the form of energy. It is produced when an object vibrates.
• It is something you can hear.
• Loud speakers help to carry sound. They are used in churches, wedding ceremony, etc.
• Noise is unwanted sound (sounds in disorder).

During break time I have to communicate to all primary three pupils in a very loud voice that “Today is our turn to pick rubbish” around our school.
8.3.4. Importance of electricity
Activity 3.d
a. Look at the following pictures1 to 11.
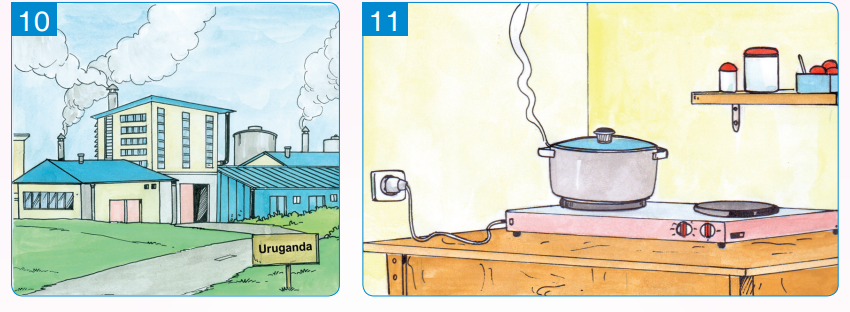
b. Name the form of energy being used in each picture observed.
c. List the materials you can see in the pictures.
I have discovered that:
Electricity is a type of energy that can flow. It moves in wires. Electricity helps to power machines such as radios, television, computers, and telephones.
8.3.5. Importance of wind
Activity 3.e
a. Look at the following pictures 1, 2, and 3.
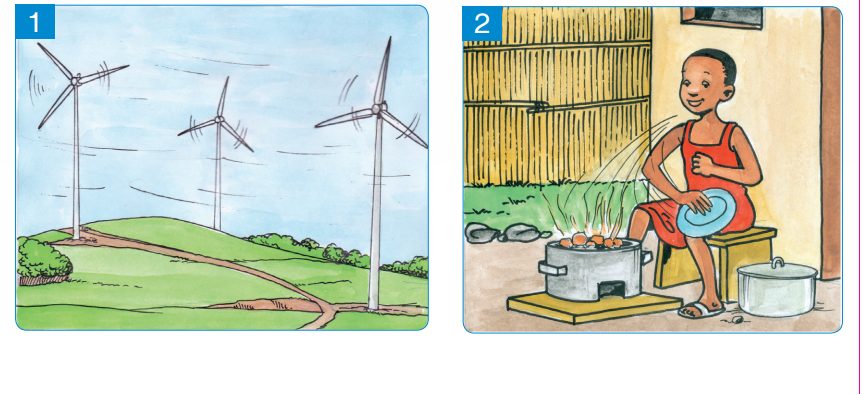
b. What do the pictures above show?
c. What type of energy is shown in the pictures?
I have discovered that:
Wind energy is a form of energy that:
• Produces electricity.
• Dry clothes.
• Winnow harvested crops.
• Keep us cool.
• Move boats or ships.
Exercise
1. Give any two ways how people use wind energy.
2. Make a simple research on how wind power is used to produce electricity.
8.3.6. Importance of energy got from chemicals
Activity 3.f
a. Look at the following pictures 1, 2 and 3.
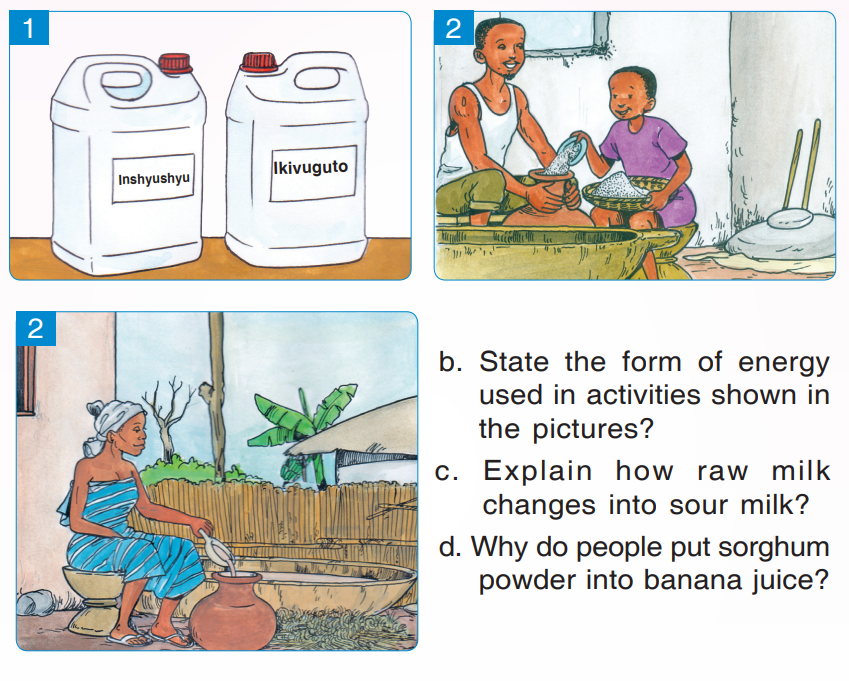
I have discovered that:
Chemical energy is produced through changes of chemicals.
Examples:
√ Souring of raw milk.
√ Fermentation of banana juice (change of banana juice into banana beer)
√ Change of porridge into sorghum beer.
8.3.7. How Magnetic force works
Activity 3.g
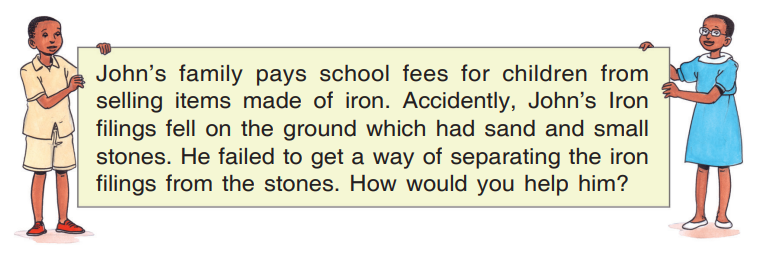
a. Look at the following pictures 1, 2 and 3
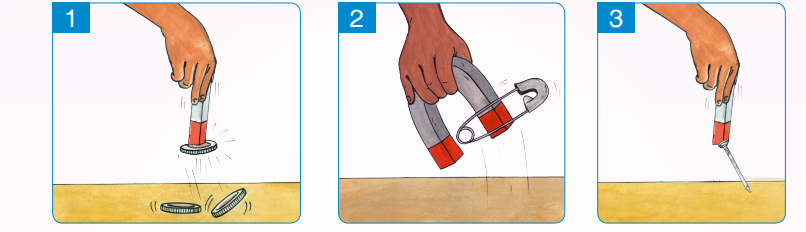
b. What kind of force that attracts the objects as seen in the pictures above?
c. Name the objects attracted by the magnet.
d. Name some objects which are not attracted by magnet.
e. Where else are magnets used in our daily life?
I have discovered that:
√ A magnet is a piece of metal which attracts other metals.
√ Magnetic force is a force that is used by magnet to attract metals.
√ Magnets cannot attract materials which are not metals.

List down at least five objects that can be attracted by magnet.
Task
Take magnet and attach it to the following materials.
- coin - needle - nail
- Safety pin. - Staple wires. - a piece of paper
Explain what happened after attaching each material to the magnet.
8.3.8. Types of energy used by different objects
Activity 3.h
a. Look at the following pictures 1, 2, 3, 4, 5, and 6.
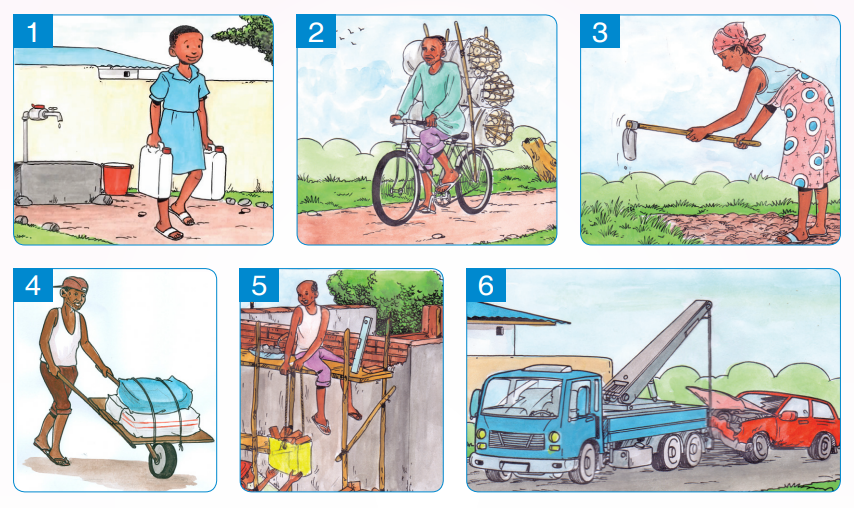
b. Identify the types of energy used in activities observed from the pictures 1, 2, 3, 4, 5 and 6.
I have discovered that:
• Materials are carried from one place to another using energy.
• The form of energy that moves materials from one place to another is called mechanical energy.
Examples:
- Lifting a jerry can.
- Pushing a wheel barrow.
- Lifting a hoe when digging.
- Riding a bicycle.
Exercise
At home, lift a 5-litre jerry can using one hand. Put it on your head and explain to your friends what it needs to perform such an activity.
End of unit assessment 8
1. What is energy?
2. Name the types of energy you know?
3. Give 3 examples where the following form of energy (force) work.
a. Magnet e. Sound
b. Chemicals f. Heat
c. Wind g. Sun light.
d. Electricity
4. What form of energy is used in the following activities?
a. Drying wet clothes. d. Cooking
b. Ironing. e. Riding a bicycle.
c. Winnowing sorghum or beans. f. Beating a drum.
5. List any two materials you see at school that provide energy.
6. Identify any two sources of energy at home.
7. State the importance of energy. 8. Give any two ways how people use wind energy.
UNIT 9: ELECTRICITY
9.0. Introduction
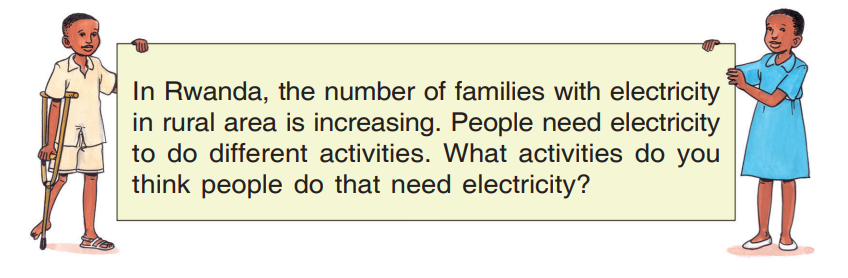
9.1. Meaning of electricity
Activity 1
a. Look at the pictures 1,2,3,4, and 5.
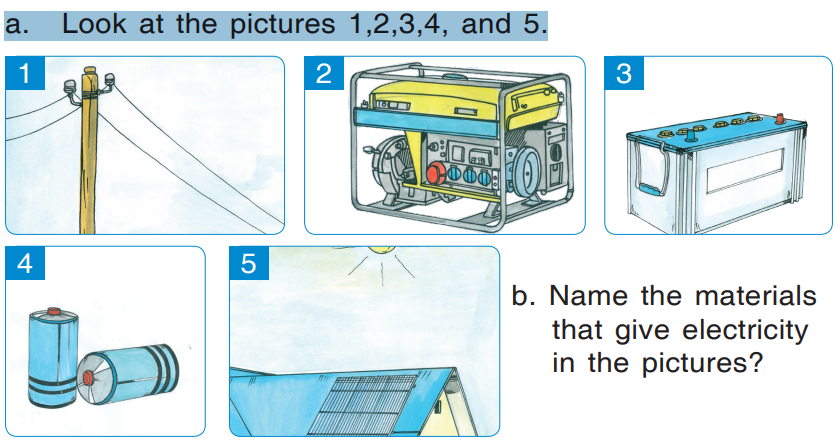
I have discovered that:
• Electricity is a form of energy that flows in wires.
• Sources of electricity include: hydro power, solar energy, generators, batteries and wind power.
9.2. Uses of electricity
Activity 2
a. Look at the pictures 1,2,3,4,5,6,7 and 8.
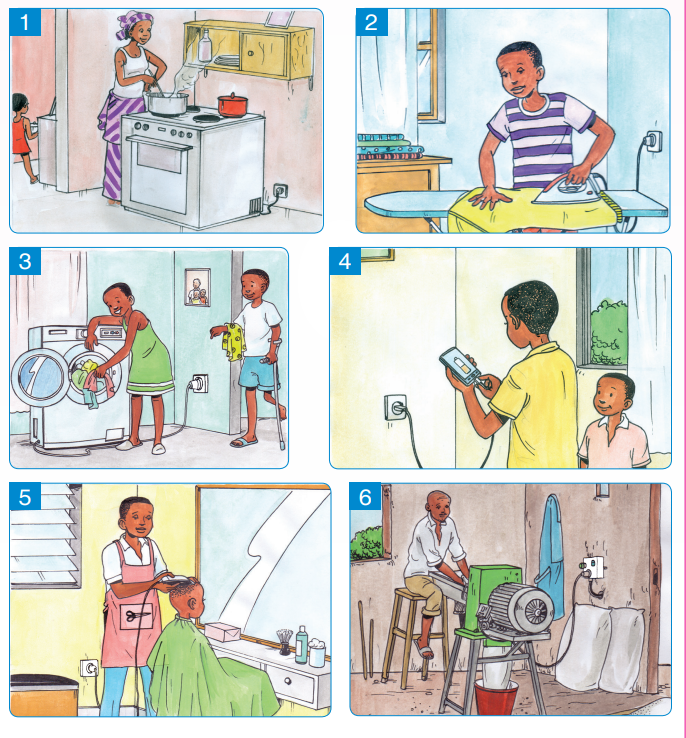
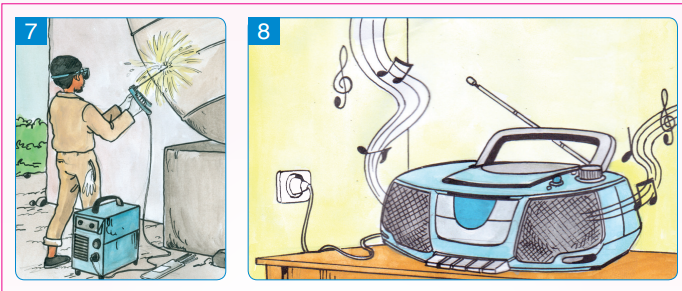
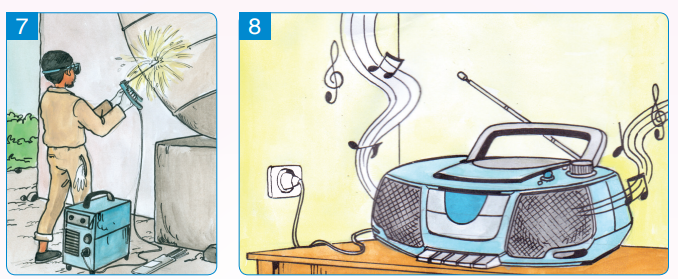
b. What do these pictures show?
c. Identify the uses of electricity shown in the pictures.
d. Apart from those shown in pictures, state other uses of electricity.
I have discovered that:
Electricity is used in doing various activities:
a. Cooking food by using cooker.
b. Ironing clothes.
c. Dry cleaning clothes.
d. Charging mobile phones, computers, torches etc.
e. Shaving hair.
f. Grinding grains.
g. Welding metals.
h. Electricity is also used to power television, radios, musical instruments etc.
i. Electricity helps in lighting our homes and other important places.
Exercise
1. What are the uses of electricity?
2. Give four things that need electricity in order to work.

a. List the uses of electricity at your home?
b. State the uses of electricity at your school?
9.3. Electronic devices
Activity 3
a. Look at the pictures: 1, 2, 3, 4, 5, 6, 7, and 8.
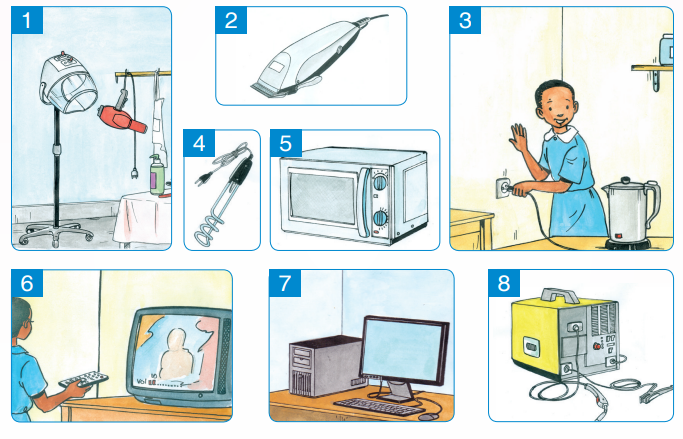
b. Name the materials shown in the pictures that use electricity.
c. Apart from those in the pictures, list other materials that use electricity.
I have discovered that:
Materials which use electricity include the following:
a. Shaving machine.
b. Microwave
c. Water heater
d. Television
e. Computer
f. Welding machine
g. Baking machine
h. Grinding machine.
Exercise
List the materials at your home that use electricity.

1. As a P3 pupil, what electric devices can you use?
2. Name any three devices that use electricity at school.
3. Why is a flat iron connected to electricity while ironing?
4. What will happen if the electricity goes off while you are listening to the radio which uses electricity as source of power? Explain why.
9.4. Dangers of electricity
Activity 4
a. Look at the pictures 1and 2
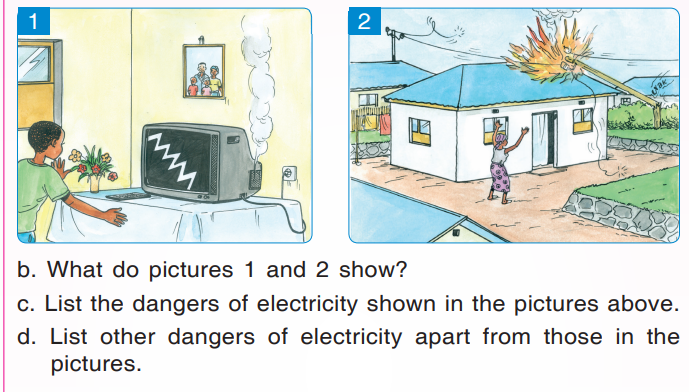
I have discovered that:
Dangers caused by electricity include the following:
• Burning/ damaging materials that use electricity.
• Burning house with its materials.
• Shocks.
• Death.
Exercise
List the advantages and disadvantages (dangers) of electricity.
9.5. Ways of preventing dangers of electricity
Activity 5
a. Look at the following pictures 1, 2, 3 and 4
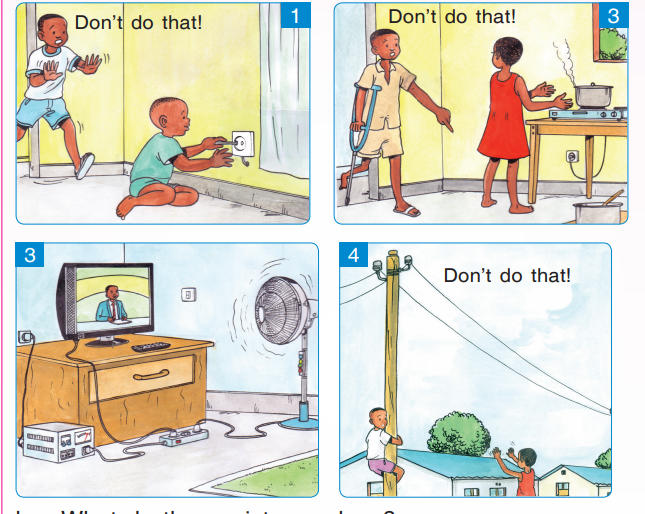
b. What do these pictures show?
c. Which ways of preventing the dangers of electricity are shown in the pictures?
d. What activities in the pictures can cause the dangers of electricity?
I have discovered that:
1. The following bad practices cause the dangers of electricity:
• Putting metals into electrical socket
• Climbing up the utility poles.
• To touch cookers without wearing gloves.
End of unit assessment 9
1. Explain the term electricity?
2. Put a tick
on the materials that use electricity and cross (x) on the materials that do not use electricity.
a. Stove f. Refrigerator
b. Electrical iron g. Grass cutter machine.
c. Wheelbarrow h. Computer
d. Mobile phone i. Electrical counter.
e. Welding machine
3. State two ways of preventing dangers of electricity.
4. Give the importance of electricity.
5. State any 4 materials that can work using electricity.
6. List 2 dangers caused by electricity.
UNIT 10: MAGNETS
10.0. Introduction
10.1. Meaning of a magnet
Activity 1
a. Look at the following pictures 1, 2, and 3.
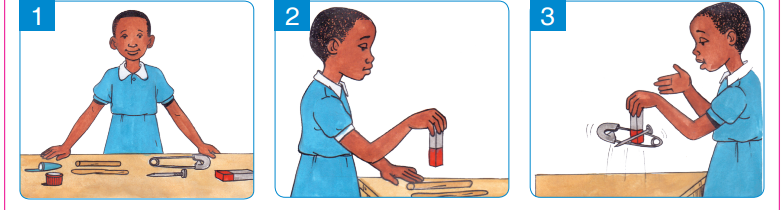
b. Name the objects you can see in the pictures.
c. What material is holding the safety pin in picture 3?
I have discovered that:
A magnet is a piece of metal that can attract (pull) other metals.
10.2. Characteristics of magnetic forces
Activity 2
a. Look at the pictures 1, 2, 3 and 4.
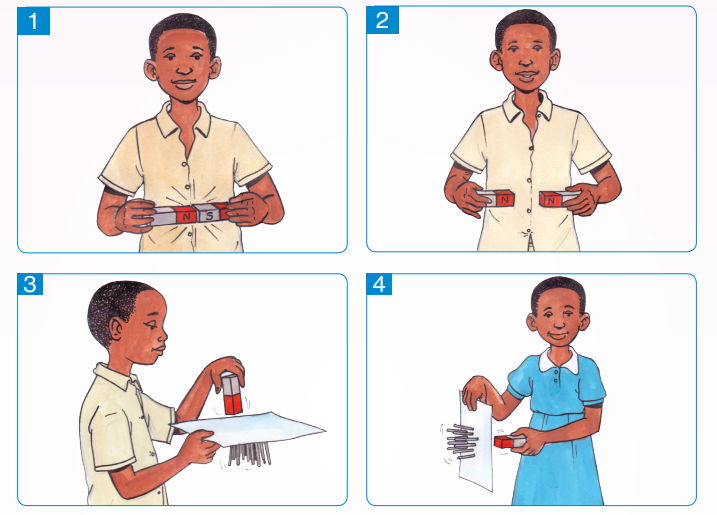
b. What do you see in the pictures 1, 2, 3 and 4?
c. In which picture do you see attraction or repulsion of magnets? Explain why.
d. Do you think magnetic force can pass through paper? Explain why.
I have discovered that:
1. A magnet has two poles (North pole and South pole)
2. Unlike poles of a magnet attract each other.
3. Like poles of a magnet repel each other.
4. Magnetic force cannot pass through materials made in paper, glass, wood and plastic
Task
a. Take a magnet. Put it over a metallic coin or near of other small metallic materials. What happens?
b. Take two magnets, and connect their like poles. What happens?
c. Take two magnets, and connect their opposite poles. What happens?
d. Take a magnet, cover it with a piece of paper and put it over small nails, coins, or other materials. What happens?
10.3. Magnetic objects
Activity 3
a. Look at pictures 1, 2, 3, 4, 5 and
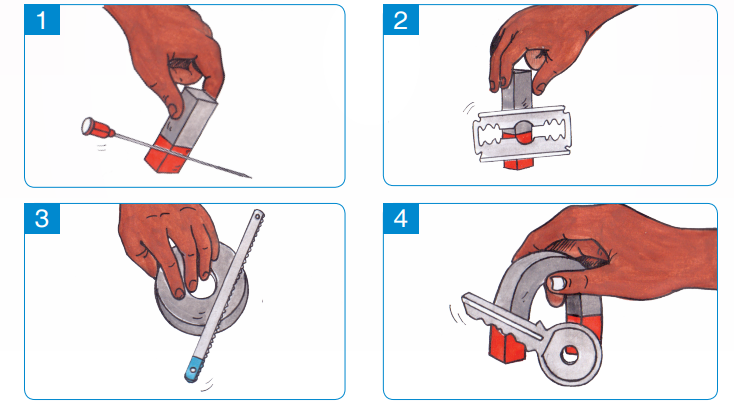
b. Name the materials attracted by the magnet shown in the pictures.
c. What is the similarity among the materials shown in the pictures?
I have discovered that:
A magnet attracts all materials made of iron.
Examples: needle, safety pin, razor blade.
Exercise
Take coins, small nails, staples, paper clip, keys, needles, safety pin, razor blades and put them in contact with magnet. Explain what happens.

In what material are objects attracted by a magnet made?
10.4. Non-magnetic objects
a. Look at the pictures 1, 2, 3, and 4.
b. List down materials shown in the pictures that cannot be attracted by magnet.
I have discovered that:
A magnet does not attract materials which are not made of iron or those which do not contain iron.
Materials which are not attracted by magnet include: Plastic materials, wood, paper, glass and other metals which do not contain iron.
Task
a. Take a wooden ruler and other small piece of wood. Put them in contact with magnet. Explain what happens.
b. Take pen covers, plastic covers and put them near a magnet. What happens?
c. Take pens, a piece of glass and put them near a magnet. What happens?
10.5. Dangers of magnet force
Activity 5
Read the following story and answer the questions.
Bahenda and Mariza are professional musicians. One day, Bahenda went to a family party in the village. Reaching there, Bahenda placed a CD, DVD, and flash disk on a loudspeaker and then switched the generator on. After, he inserted the CD into the computer and tried to search for songs stored on that CD but found out that it was empty. He continued to search on flash disk but he never found any song. He asked Mariza what had happened and Mariza told him that if CD and flash had been placed on a loudspeaker, all stored songs would have been damaged by the magnet which is in the loud speaker.
Questions about the story
1. What is the story about?
2. State materials that were damaged by magnet in this story?
3. What other materials can be damaged by a magnet apart from those mentioned in the story?
I have discovered that:
A magnet damages electronic devices like CDs, DVDs, flash disk, ATM cards, etc.
Strong magnets can cause bone fractures. We need to read safety tips when buying a magnet.

Make a list of materials at home or at school that can be damaged by magnet?
10.6. Materials which act as a magnet
Activity 6
a. Look at the pictures
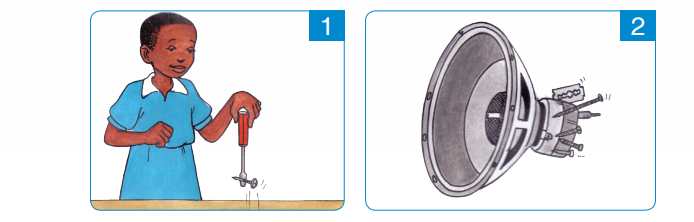
b. Explain what you see in picture 1?
c. What do you see in picture 2?
d. Name the small materials that are attached on the speaker in picture 2. Explain why?
I have discovered that:
The materials that work like magnet are:
• Screwdriver
• Radio speakers
• Loud speakers etc.
End of unit assessment 10
1. Explain the term “magnet”
2. Complete the table using the following materials. Pens, paper clip, matches box, nail, pencil, keys, safety pin, razor blade, wood, paper, cloth, materials made in clay, needle, materials made in plastic, materials made in glass, beans, staples.

3. Give 4 examples for each type of the following materials:
a. Materials that are attracted by magnet.
b. Materials that are not attracted by magnet.
4. ……………. is a material that can attract iron or other materials containing iron.
5. Give 2 examples of materials which can act like a magnet.
6. Give examples of 2 materials that can be damaged by a magnet.
7. Give examples of other materials which have magnetic properties.
End of Year Assessment
1. Using needle, a piece of cloth and thread. Make a chalkboard duster.
2. Knit a 10 cm long scarf in single or multiple loops.
3. Knit a small mat with sides measuring 10 cm by 10 cm using grass or banana fibers.
4. Make a small bag using banana fibers.
5. Briefly explain how you can make a square shape using a piece of paper or cardboard.
6. Make a rectangle and triangle using a piece of paper or cardboards and then hang them in your bedroom.
7. Using clay, mould a small pot.
8. Make a car using wires and play with it during break time.
9. Using a telephone, invite your friends to your birthday party by sending them a short message.
10. Check into your phone and save the unknown number in received calls.
11. Use microphone to call your friends who are playing to come to class.
12. Using a mobile phone, record a video of your friends telling a poem.
13. Send money to support your school using MTN mobile money or Airtel money.
14. Buy electricity of 1000 frw using MTN mobile money or Airtel money.
15. State the importance of the following keys: ctrl alt backspace shift Enter

16. Write the following sentence in italic, bold, underlined and in blue fonts. “All children have equal rights”
17. Using a computer, record your friends singing the National Anthem.
18. Give 2 examples of waterborne diseases.
19. Name the three types of soil.
20. Give 4 ways of avoiding soil erosion.
21. State the main characteristics of the following animals:
a. Vertebrate animals
b. Invertebrate animals.
22. Explain what you can do in order to take care of your muscles, joints and bones?
23. State the types of energy produced by:
a. Sun
b. Wind
c. Charcoal
24. Explain the importance of energy to our life.
25. Give any three uses of electricity in our daily life.
26. Briefly, explain how magnet works.
27. State how the following processes are done.
a. Typing words in balloons into your xo computer.
b. Opening program of typing turtle 28. State the main parts of “write activity” program
29. Give any two processes that use chemical energy.
GLOSSARY
Coccyx: A small triangular bone at the base of the spinal column in humans and some apes, formed of fused vestigial vertebrae.
Hips: projection of the pelvis and upper thigh bone on each side of the body in human beings.
Drops: A small mass of liquid.
Carpal and metacarpal: Is a part of the hand, which is between wrist and fingers
Upper arm: Part of hand between shoulder and elbow. Weaving leather: Weaving with the structure of leather.
Linear weaving: Is a type of weaving that is done in continuous line.
Muscles: Is soft kind of tissues covering bones.
Bunds: Holes traced in farms in order to prevent soil erosion.
Movement of materials: The ways materials move from one way to another. Banana fiber bag: Is a bag made in banana fiber.
Balanced diet: A meal that contains all food nutrients.
Joints: A place where two or more bones meet.
Vertebrae: Small bones that make up the backbone.
Power: Is ability of doing work. Land slide: Is a place where soil is broken down by erosion.
Erosion: Washing away of top soil by rain water or wind.
Square: Geometric figure which has four equal sides and four right angles.
Keyboard: Is a part of computer which is used during writing or typing
Filtration: Is a process of separating undissolved particles (solids) from liquid using filter.
Triangle: Geometric figure with three sides and three angles.
Computer: An electronic device that is used for writing and recording.
Temporal bone: Part of the head which is between eye and ear. Magnet: A piece of metal that attracts other metals.
Femur (thighbone): The bone that extends from the pelvis to the knee. Wrist: A joint that joins the arm and hand. Chemicals: Materials that can give energy and which can kill living things some time.
Heat energy: Is a type of energy/power that is given by heat.
Clay soil: A type of soil with very fine particles. This soil is used for making pottery and construction products such as bricks, wall and floor tiles.
Sandy soil: A type of soil which is dry, low in nutrients and drains quickly.
Loam soil: A mixture of clay, silt, and sand. It is the ideal soil for plants growing.
Rectangle: Geometric shape with four sides in which each two sides are parallel and equal with four right angles.
Light: The form of energy that enables us to see.
Backbone: The series of vertebrae extending from the skull to the pelvis. It protects the spinal cord.
References
1. MINEDUC (1997). Integanyanyigisho y’Ubumenyi n’Ikoranabuhanga Riciriritse mu mashuri abanza. Ikigo cy’Igihugu gishinzwe Integanyanyigisho, Kigali.
2. MINEDUC (2009). Social Studies Curriculum for Rwanda’s Basic Education Programme, Year 1 to 6. National Curriculum Development Centre, Kigali.
3. MINEDUC (2015). Competence – Based Curriculum Framework, Pre-primary to Upper Secondary. Rwanda Education Board, Kigali.
4. MINEDUC (2015). Integanyanyigisho y’Ubumenyi n’Ikoranabuhanga Riciriritse, Ikiciro Cya Mbere cy’Amashuri Abanza. Rwanda Education Board.